
Tamiya 1/20 Tyrrell P.34
| KIT #: | 200058 |
| PRICE: | £23.00 |
| DECALS: | Two options |
| REVIEWER: | Peter Chiu |
| NOTES: | 1976 Japan GP |
| HISTORY |
The Tyrrell P34 caused a sensation within the F1 world when it was unveiled in 1975. Derek Gardner sought to enhance braking and cornering performance by reducing the size of the drag-inducing front tires while preserving contact patch area through the use of 4 tires, thereby creating the only 6-wheeled machine in F1 history.
 It took
part in actual races beginning with the Spanish GP in 1976, and drivers J.
Scheckter and P. Depailler went on to drive their cars to a 1-2 finish at the
Swedish GP to prove the incredible potential of the P34. At the final race of
the season, the P34 appeared before Japanese fans at the inaugural Japanese GP
held at Fuji Speedway. F1 race cars often have race-specific modifications, and
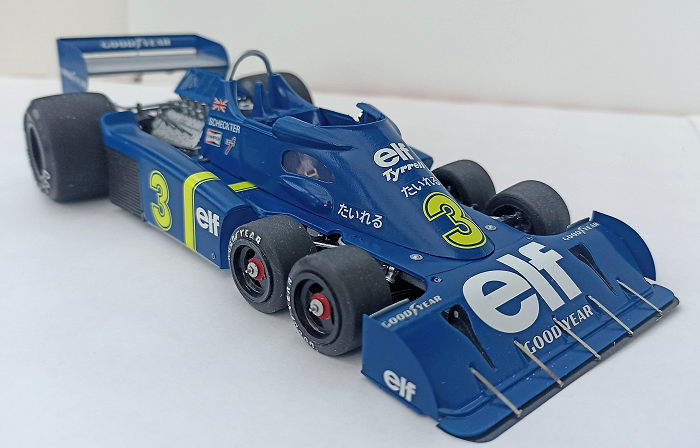
the No.3 Tyrrell P34 driven by J. Scheckter at the Japanese GP was distinguished
by a triangular net guard fitted on the air funnel and large wingtip panels on
the rear wing. The race was a battle for the championship between Ferrari's N.
Lauda and McLaren's J. Hunt and drew a great deal of attention both within Japan
and around the world.
It took
part in actual races beginning with the Spanish GP in 1976, and drivers J.
Scheckter and P. Depailler went on to drive their cars to a 1-2 finish at the
Swedish GP to prove the incredible potential of the P34. At the final race of
the season, the P34 appeared before Japanese fans at the inaugural Japanese GP
held at Fuji Speedway. F1 race cars often have race-specific modifications, and
the No.3 Tyrrell P34 driven by J. Scheckter at the Japanese GP was distinguished
by a triangular net guard fitted on the air funnel and large wingtip panels on
the rear wing. The race was a battle for the championship between Ferrari's N.
Lauda and McLaren's J. Hunt and drew a great deal of attention both within Japan
and around the world.
The weather was fair on Friday and Saturday, but conditions were worsened by rain on Sunday. Although the race finally began at 3PM after a long delay, championship contender N. Lauda quickly retired. The lost excitement was brought back by the performances of the Japanese drivers and P. Depailler's Tyrrell P34. From his 13th place qualifying position, Depailler overtook the field to briefly lead before a tire puncture dropped him back to finish the race in second place behind M. Andretti's Lotus.
| THE KIT |
According to Scalemates the original tooling of tis kit was from 1977. New parts were added in 2003 depicting the car at the 1977 Monaco GP. It was then released in 2010 with additional photo etch parts to add more realistic detail. My kit was purchased in 2022 and was similar to the 2010 release. The photo etch parts mostly replaced the rear wings as the 2 drivers (Sheckter and Depaillier) had different wings for their cars. Along with parts for the brake discs, seat harness and some minor details along the body.
| CONSTRUCTION |
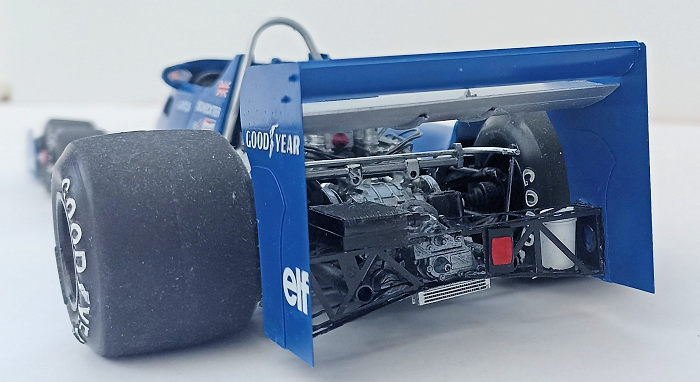
Following the instructions the build started with the engine. As the engine is clearly visible it is quite a detailed build. Build went together without issue, the engine block I painted in Mig Ammo Metal acrylic Aluminium, the exhaust pipes were painted with Vallejo Metal black. The trickiest part was getting the ignition wiring right, had to watch a you tube video of the build before I how the wiring cables were supposed to go together. The rear discs and gearbox was then built, the gearbox assembly was painted in gunmetal / black and chrome.
 The gearbox
subassembly was then attached to the engine. The base chassis was started with
bulkhead, mostly painted in Aluminium. The engine / gearbox was ten attached to
the chassis using a screw with the screwdriver also provided in the kit.
The gearbox
subassembly was then attached to the engine. The base chassis was started with
bulkhead, mostly painted in Aluminium. The engine / gearbox was ten attached to
the chassis using a screw with the screwdriver also provided in the kit.
At this point I had started priming the main body shell with grey primer and sanding to ensure a smooth finish. I also built the cockpit cowling and seat as they were all to be painted with Franch Blue which I thought was the best match to the cars colour. The cockpit cowling was in 2 parts so it took some effort in sanding to get a smooth finish with no joint showing. The front steering assemblies and radiators were then put together. I found the dual front wheel assemblies difficult to get fitted and it took several attempts to get them seated correctly. Paints used were primarily Vallejo Model Air with some Ammo Mig Metal acrylic. (As a note, Tamiya produces the exact shades needed for their car kits in their rattle can line, so if you are comfortable using this medium, that might be the way to go. Ed)
Masking off the front steering I sprayed the body, cockpit and seat Franch blue. I used AK airbrush purification cup which had fine mesh to make sure the blue paint was a smooth as possible when it was sprayed. I then masked off the body leaving the seat well which was sprayed aluminium. The interior part so the cockpit was then added, and the shell was then attached to the chassis. This took a bit of time to get the parts to line up correctly.
I then gloss coated the body with HR Hobby Aqua gloss clear, this was done in several thin layers. Small pieces of photo etch were attached to the body using pva glue, there included additional parts for the front wing some of which were also painted in Franch blue and given a gloss coat.
 While
waiting for the paint to dry, I started on the wheels, they were straight
forward to build and were painted in matt black with some detailing in red and
silver for the wheel hubs. The tyres had some rubber flash where they were mated
together, I wet sanded the tyres to remove the flash and this also helped given
them a slightly worn look. I carefully painted in the Goodyear logos around the
tyres with some white paint, I used a sharpened cocktail stick to paint the
smaller front tyres as the moulded words were so small.
While
waiting for the paint to dry, I started on the wheels, they were straight
forward to build and were painted in matt black with some detailing in red and
silver for the wheel hubs. The tyres had some rubber flash where they were mated
together, I wet sanded the tyres to remove the flash and this also helped given
them a slightly worn look. I carefully painted in the Goodyear logos around the
tyres with some white paint, I used a sharpened cocktail stick to paint the
smaller front tyres as the moulded words were so small.
The trickiest part of the build was the rear wing, I had decided I was going to use the wing for Jody Scheckter whose car had the larger rear wing. It was almost entirely made up of PE parts, luckily, I had not long before purchase a PE bending tool when I attended the nationals at Telford.
The hardest part was attaching the rear wing to the rear of the car. The wing would split from the framework every time I attempted to attach it. Eventually I attached the framework to the rear of the car before attaching the wing assembly to the frame.
I finally added the clear plastic sheeting for the 2 small windows in the front canopy. They were cut to size and attached with PVA glue.
I sprayed a coat of HR Hobby Aqua gloss before applying the decals from the kit. I chose the decals for Jody Scheckter’s no. 3 car. The decals went on without any real problems using Micro Sol / Set. I’ve read online that Tamiya decals are on the thicker side but so far, I’ve had no problems with applying them to the model. I finished off the kit with another application of Aqua gloss.
| CONCLUSIONS |
I used to follow F1 in the 1970’s and was always fascinated by the Tyrell P34. Although this kit is an older tooling from Tamiya the addition of the photo etch parts does add a greater degree of detail to the kit. Fir was generally very good with only a few parts showing their tooling age.
I thoroughly enjoyed building this kit and it sits pride of place in one of my display cabinets. Thoroughly recommend to those of you who enjoy building F1 cars.
25 March 2021
Copyright ModelingMadness.com. All rights reserved. No reproduction in part or in whole without express permission.
If you would like your product reviewed fairly and fairly quickly, please contact the editor or see other details in the Note to Contributors.