Tamiya 1/48 Swordfish I
|
KIT # |
61068 |
|
PRICE: |
$68.00 (MSRP) |
|
DECALS: |
See review |
|
REVIEW : |
|
|
NOTES: |
Photo etched rigging ($13.00 MSRP) |
|
HISTORY |
May 28, 1941: the German battleship "Bismarck" is loose in the Atlantic after sinking the famous battlecruiser "Hood" and damaging the new battleship "Prince of Wales." After a running battle involving aircraft from the carrier "Victorious" as well as cruisers and destroyers, British cruisers shadowing the German battleship have lost her.
Aboard "Bismarck," the crew remember the Swordfish attack out of the gloomy midnight twilight of these high latitudes, how the aircraft bored in despite the massive anti-aircraft fire. The two torpedo bombers shot down of the nine attacking aircraft still made their torpedo drops despite fatal damage. The Germans know the British will throw everything at them possible, and are thankful for the heavy seas and lowering cloud cover. And then, out of the clouds, a RAF Catalina appears almost directly overhead. It dodges the anti-aircraft barrage, and the Germans pick up its radio message. "Bismarck" has been found again. Now it is a race to the east, to gain the protection of the Luftwaffe tomorrow morning.
Aboard the aircraft carrier "Ark Royal," sent from Gibraltar on an emergency run to provide air support in the hunt for "Bismarck," an air of gloom reigns. The hour is late, even though it will not become completely dark; a Force 4 gale is turning a difficult ocean into a dangerous one. The sighting report from the Catalina changes everything - if the position is right, "Bismarck" is only 50 nautical miles distant. Is there time to launch a strike? Can any aircraft get off a deck whose bow is pitching through a 30-foot arc?
Within the hour, in deteriorating weather, fifteen Fairey Swordfish biplanes - half from 810 Squadron, the other half from 818 Squadron, launch from the Ark Royal's heaving deck. The first eight carry only a torpedo due to deck length. They are sent on their way as the bow reaches the limit of downward travel, the angle providing extra speed to throw the antique biplanes into the air on the upswing; those that remain, with a longer deck run possible, carry bombs as well as a torpedo. Their mission is simple: slow the "Bismarck" so that the battleships of the Home Fleet can catch her before she comes in range of land-based Luftwaffe air support, estimated to be possible by the next dawn.
Within the hour, the Swordfish find their target in the last light of North Atlantic gloom. Contending with turbulence and sea spray, in an attack lasting 30 minutes, the Swordfish make their attack one by one, running in toward the battleship mere feet above the waves. The frail biplanes are met with a barrage of murderous gunfire, Bismarck bringing all possible armament to bear, and the ship is able to dodge the torpedoes - most of which are launched too far out in the uncertain light. The 42,000 ton battleship is in a high-speed turn dodging a previous torpedo when a Number 2 subflight Swordfish of 818 Squadron bores in; the Germans don't spot the attacking Swordfish in the gloom until the final moment. The airplane turns away as its torpedo heads toward the target. "bismarck" comes 'round to dodge the torpedo arrowing toward the stern, just moments too late. The torpedo explodes against the steering gear, irreparably jamming her rudder 20 degrees right, sealing her fate.
Unable to steer, all "Bismarck" could do was await the dawn and the arrival of the British Home Fleet. The Royal Navy would avenge the loss of "Hood" by sending the "Bismarck" to the bottom on May 29, 1941.
No other carrier-based strike aircraft of any navy in the world could have gotten off the deck of "Ark Royal" in the sea conditions of that strike; at least as important was the fact that all aircraft were recovered safely in the gloomy twilight with the ship's stern rising and falling through 40 feet.
When the Swordfish entered service with the Royal Navy's Fleet Air Arm in 1936, it already looked like a refugee from another age, a fabric-covered biplane in the dawning age of metal monoplanes. By the time war broke out in 1939, the Swordfish was considered obsolete. Yet it would be one of five aircraft in first line service of all combatants in 1939 that would still be in first line service in 1945, the others being the German Bf-109 and He-111, and the British Spitfire and Hurricane.
Amazing as it may seem to look at the ungainly Swordfish, it is the most successful naval strike aircraft in history. Its exploits are the stuff of legend.
The Model: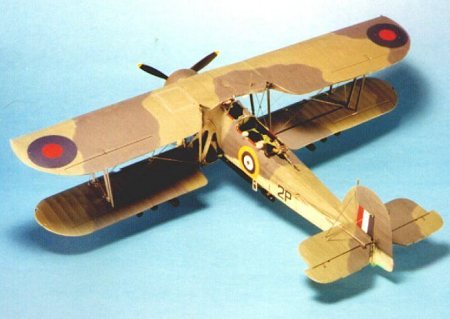
Modelers have been asking the mainstream kit manufacturers to create a 1/48 Swordfish for years. Many replied it would never happen because the airplane was a rigged biplane - a certified "no-no" among many modelers, and that it would never see the light of day because it would not sell enough units to recover the costs of production. And then, after several years of unconfirmed rumors that were many times more hope, Tamiya announced last Spring that they were indeed bringing out a 1/48 Swordfish.
When it was announced at the Chicago Hobby Show in October 1999 that the MSRP of the Swordfish in North America would be US$68.00, there was a great wail from those modelers connected to the internet about the dastardliness of "greedy model companies," and campaigns announced to "take the pledge" and boycott the overpriced model. Overseas, the kit sells for a price considerably closer to its domestic Japanese price of 4200 Yen (Approximately US$45.00), and many modelers have taken advantage of the internet to make international mail orders from the cheapest sources, and many U.S. domestic distributors have found supply sources that allow them to bring the price down to an average of US$55.00. Interestingly enough, even at the undiscounted price, the kit appears to sell well in local shops this reviewer is aware of, and the kit is now considered the fastest-selling new release in Tamiya history, even ahead of that Luftwaffe star, the Heinkel He-219. So much for the argument that "ugly British biplanes" won't find a market.
|
THE KIT |
What does a modeler get for this most-expensive price ever for a model of a 1/48 single-engine aircraft? It's a big box, full of over 200 crisply-molded parts in traditional Tamiya dark grey plastic, with the typical Tamiya flash-free production. I decided to build this one out of the box and let you decide whether it's worth it or not.
|
CONSTRUCTION |
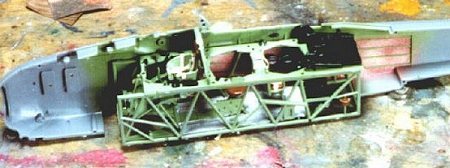
 This is definitely a model that starts with the cockpit. The instructions
here are clear, the parts work, and there are no difficulties encountered in
putting together the sub-assemblies and fitting them into a well-detailed
interior.
This is definitely a model that starts with the cockpit. The instructions
here are clear, the parts work, and there are no difficulties encountered in
putting together the sub-assemblies and fitting them into a well-detailed
interior.
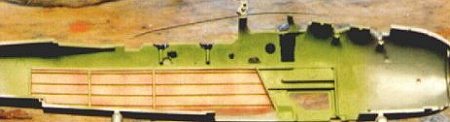
One note: in painting the Swordfish interior, the modeler who hasn't built
British biplanes before needs to be aware that the fabric exterior was covered
in red primer. Depending on how well the primer was worked into the fabric, it
would be seen in the interior as blotchy red through the doped fabric, which is
generally a light tan. I accomplished this by air brushing Gunze-Sanyo H-414
"RLM Rot23," a light brick-red color, then "blotching" that
with Gunze-Sanyo H-85 "Sail Color," which the picky-picky modelers at
the World War One List have determined is a good representation of doped fabric.
The fabric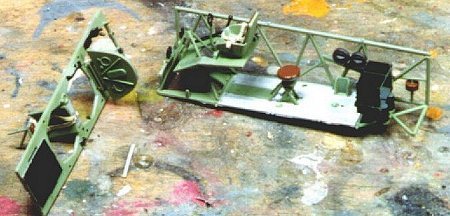 area was masked off when dry and the rest of the interior was painted
Gunze-Sanyo H-312 light green, which is a good approximation of British Interior
Green. Other modelers have mentioned that Aeromaster Acrylics have all these
colors, but inasmuch as my local shop carries Gunze-Sanyo and I don't like using
a paint that requires its own special (read: over-priced) thinner in order to be
used effectively, I'm sticking with Gunze. The other color used in the Swordfish
interior is semi-glass black on all metal items. The painting instructions are
clear and should be followed.
area was masked off when dry and the rest of the interior was painted
Gunze-Sanyo H-312 light green, which is a good approximation of British Interior
Green. Other modelers have mentioned that Aeromaster Acrylics have all these
colors, but inasmuch as my local shop carries Gunze-Sanyo and I don't like using
a paint that requires its own special (read: over-priced) thinner in order to be
used effectively, I'm sticking with Gunze. The other color used in the Swordfish
interior is semi-glass black on all metal items. The painting instructions are
clear and should be followed.
I used the seat belt decals, putting them on a piece of lead foil from a wine bottle. Once they were dry, I cut them out and had a nice flexible seat belt assembly that could be placed on the seats with a much more realistic look than otherwise.
The One Real Hard Part:
 Once the interior has been painted and assembled, it is fitted into the right
fuselage half. This is the one part of the entire construction that is the
slightest bit "fiddly," and it is very important to get it exactly
right. Failure to do so will make much grief down the line and turn the air over
the workbench many shades of purple.
Once the interior has been painted and assembled, it is fitted into the right
fuselage half. This is the one part of the entire construction that is the
slightest bit "fiddly," and it is very important to get it exactly
right. Failure to do so will make much grief down the line and turn the air over
the workbench many shades of purple.
The problem here is, there are two pins on the interior assembly, that have to fit into two holes on the fuselage half, exactly. They don't really want to. I ended up using Cyanoacrylate on each, and hitting it with accelerator, to get the assembly properly positioned. Thank goodness I had spoken with Scott Spencer the day before taking this step, since he had not accomplished that exact fit, and the fuselage of his Swordfish was now covered with putty as he dealt with the problem.
If you get this fit right, the rest of the fuselage will come together easily without use of any putty. I started gluing along the upper fuselage aft of the cockpit, and ended up using four rubber bands to hold the fuselage together for about an hour (I use Ambroid Pro-Weld)until it set up.
Finishing Construction:
The wings go together easily. You must decide at the point you assemble the upper center section which way you are going to display the model - wings folded back or wings deployed. A main spar in the upper center section becomes the main support of the wings when deployed. I assembled the upper wing completely, since I would be painting a camouflage pattern that went across the three sections, but elected not to assemble the lower wings further, with only the lower center section attached to the fuselage, prior to painting. I also left off the large bracing struts between the fuselage and lower center stubs, since it makes painting the camouflage there problematic. I also left the landing gear as sub-assemblies not yet attached to the fuselage.
|
PAINT & DECALS |
Painting:
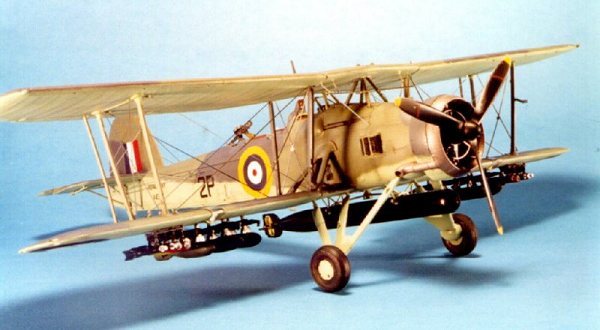
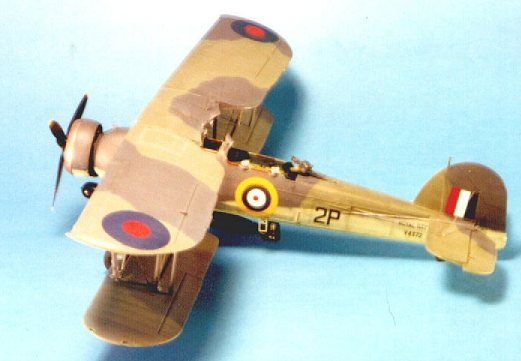
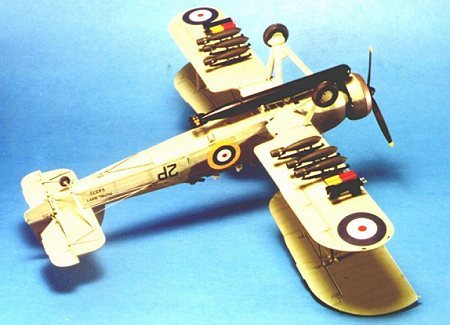
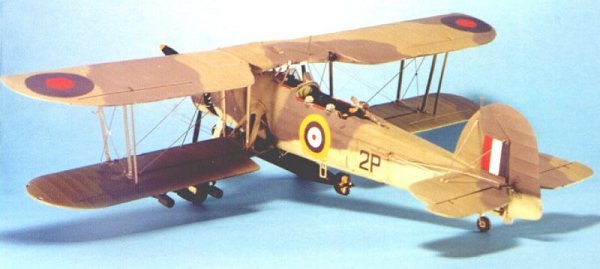
Tamiya provides markings for three airplanes: a pre-war silver-and-grey Swordfish operating off HMS "Glorious," a Swordfish of the second flight of 818 Squadron aboard "Ark Royal" for the "Bismarck" strikes described in the opening of this article, and the Swordfish flown by LCDR Eugene Esmonde, OC 825 Squadron for the attacks on "Scharnhorst" and "Gneisenau" during The Channel Dash in February 1942. (There was controversy at first as to whether or not this was a Mk.II Swordfish, but Ray Sturtivant's "Warpaint" book clearly identifies it by serial number as a "Blackfish," a Blackburn-built Swordfish Mk.I.) I decided to do the 818 Squadron aircraft, inasmuch as these aircraft were launched with a full underwing ordnance load, which meant I wouldn't have to modify the bomb racks to show them empty.
The Swordfish at this period was camouflaged in a disruptive pattern of Dark Sea Grey and Slate Grey on the upper surfaces, and Sky lower surfaces. The lower wing was camouflaged in Sea Grey and Light Slate Grey for shadow effect. I elected to use Tamiya XF-24 "Dark Grey" for Dark Sea Grey, XF-22 "RLM Grey" for Slate Grey, XF-53 "Neutral Grey" for Sea Grey, and XF-25 "Light Sea Grey" for Light Slate Grey on the upper surface camouflage. I used Tamiya XF-21 "Sky" on the lower surfaces.
One thing to note when painting this scheme is that most authorities agree that the Swordfish scheme had "soft" edges, i.e., it was not done with masking mats, as were used on many other British aircraft camouflage patterns.
Once the scheme was painted, I used Tamiya "Smoke", thinned with alcohol, to accentuate panel lines and fabric effect ever so subtly. When this was dry I gave the entire model a coat of Future and let it dry overnight.
Decals:
I used the Tamiya decals for the particular airplane I was creating. Yes, they're thick, but useable. Here's what I do: I position them, then cover them with a copious amount of Micro-Sol. I do that several times until they have settled as much as they're going to with this. Then I hit them with Super-Sol. Even settled down as much as they are, they will still wrinkle under this strong chemical, but all ends well with the decals melted down into the paint for the "painted-on" look.
Final Assembly:
 I test-fitted the photo-etch rigging to the outer interplane struts and
discovered that with these attached the strut assembly would not fit into the
very tight slot in the underside of the upper wing without damaging the
photo-etch. I removed the rigging and proceeded to assemble the wings per the
instructions, without placing the rigging. The lower wings fit well to the
stubwing center sections, and the entire assembly was set aside to firmly set
up. The airplane was looking good at this point. I attached the bombs, flares
and torpedo to their racks on the underside.
I test-fitted the photo-etch rigging to the outer interplane struts and
discovered that with these attached the strut assembly would not fit into the
very tight slot in the underside of the upper wing without damaging the
photo-etch. I removed the rigging and proceeded to assemble the wings per the
instructions, without placing the rigging. The lower wings fit well to the
stubwing center sections, and the entire assembly was set aside to firmly set
up. The airplane was looking good at this point. I attached the bombs, flares
and torpedo to their racks on the underside.
Rigging:
Rigging a biplane is the job that most sets modelers on edge when it comes to doing one of these kinds of model. It is something that gives even those of us who build biplane models regularly have a certain amount of dread. I was interested to see if the photo-etch rigging really would solve the problems associated with this step of construction. They make things easier, but they are definitely not "the second coming."
During construction, the modeler is supposed to drill open holes in the wings
for the rigging to attach to. Most of us are not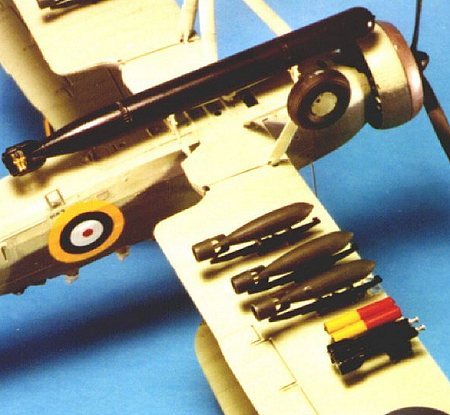 perfect, and unless these holes
were done perfectly, the slight misalignments will result in the delicate
rigging bowing very noticeably.
perfect, and unless these holes
were done perfectly, the slight misalignments will result in the delicate
rigging bowing very noticeably.
I solved this by cutting off the tabs for the rigging that would attach to the lower wing surfaces. I made sure to anchor the individual wire in the upper mounting hole (it's going to be fighting gravity once finished, so give it the help it needs here), then allowed it to find its "natural" attachment point on the lower wing, which I fixed in position with cyanoacrylate on the tip of a toothpick. Once done, the rigging wires look like a very convincing 1/48 representation of "RAF wires," which have an airfoil section.
Tamiya does not include photoetch for the wire needed for the rear control surface cables. I generally use a high-E guitar string for this; I attach a weight to one end and tape it to the wall to straighten it - voila! - .008 stainless steel wire. Be certain to study photographs when attaching these wires, as they have an idiosyncratic fit from most control wires.
Once the rigging was done, I sprayed it overall with flat varnish to get rid of the unnatural shininess of the photo-etch.
|
CONCLUSIONS |
I thought that the Accurate Miniatures F3F-1 was the easiest-assembling biplane model I had ever run across. Wrong. The Tamiya kit is so easy it makes the F3F-1 seem difficult in comparison. Tamiya is renowned for the quality of their engineering in creating a kit that wants to go together, and the Swordfish sets a new standard on that point.
Outside of the rigging - which is easy if you do it the way I told you to here - this model is simple enough that anyone who has done the Tamiya Corsair successfully will have no difficulty taking this kit and making a great-looking model.
My next one is going to be modified to a Mark II rocket-armed anti-submarine Swordfish. All the parts needed other than the radar set and the yagi antennas is already in the kit now.
Many thanks to HobbyLink Japan (www.hlj.com) for providing this review copy. HLJ offers what is probably the best price on this kit of any distributor.
Copyright ModelilngMadness.com
Back to Reviews Page 2017