
Ventura 1/72 Hawker Tempest I
| KIT #: | ? |
| PRICE: | AUD $5 via evil-bay |
| DECALS: | None |
| REVIEWER: | Peter Hobbins |
| NOTES: | Conversion for Heller Tempest V |
| HISTORY |
Compared with some of the aesthetic monstrosities produced
after the war (Westland Wyvern, Short Sperrin, Fairey Gannet to name three),
many British aircraft of WWII are quite attractive. One that has long caught my
ey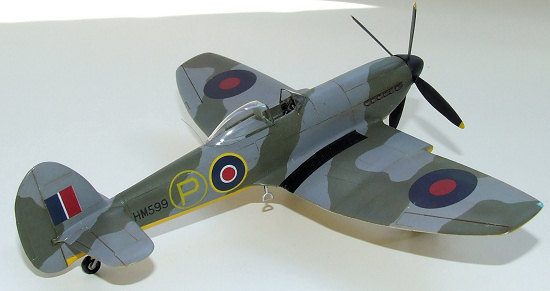 e was the Hawker
Tempest Mk I, which had streamlined wing-root radiators rather than the clunky
chin fitting that characterised the preceding Typhoon. This prototype first flew
in February 1943 and although its performance was satisfactory, ultimately the
Tempest V went into production with a chin radiator. The Tempest I prototype
(HM599) nevertheless underwent several iterations, including its original format
with a car-door canopy, four 20 mm Hispano cannon and the prominent external
bracing of the tail section seen on many Typhoons. Later, the new bubble-type
canopy was adopted, at which stage the armament and fuselage bracing were both
removed. There were other detail differences too, such as a repositioned oil
cooler and a change in the shape of the tail, but I’m not aware of the ultimate
fate of this very attractive prototype.
e was the Hawker
Tempest Mk I, which had streamlined wing-root radiators rather than the clunky
chin fitting that characterised the preceding Typhoon. This prototype first flew
in February 1943 and although its performance was satisfactory, ultimately the
Tempest V went into production with a chin radiator. The Tempest I prototype
(HM599) nevertheless underwent several iterations, including its original format
with a car-door canopy, four 20 mm Hispano cannon and the prominent external
bracing of the tail section seen on many Typhoons. Later, the new bubble-type
canopy was adopted, at which stage the armament and fuselage bracing were both
removed. There were other detail differences too, such as a repositioned oil
cooler and a change in the shape of the tail, but I’m not aware of the ultimate
fate of this very attractive prototype.
| THE KIT |
There have been numerous Tempest kits in 1:72 including 1960s offerings from Frog and the rivets-aplenty Revell kit (shamefully reboxed by Revell Germany in the late 1990s), the Matchbox technicolour treat from the late 1970s, Heller’s early 1980s release (which has been reboxed by Smer, Intech and Zvezda) and finally, Academy’s new mould from the 1990s. All of these were Mark V kits, although the Matchbox model came with an alternative nose for the radial-engined Mark II. Special Hobby also released a dedicated (albeit limited-run) Mk II in the mid 2000s which is very nice. Unfortunately – if not unpredictably – none of these kits allowed one to build the Mk I prototype.
 However, New Zealand’s Ventura Hobby Products came to the
rescue some time ago with a conversion set based around the Heller/Smer kit,
which the modeller has to purchase separately. I’ll leave it to others to review
the Heller offering, which provides the mainplanes, tailplanes, propeller and
undercarriage for this build; suffice to say that all of these pieces go
together well but feature raised panel lines. I haven’t seen the Academy kit in
the plastic so I can’t be sure if it would work with the Ventura parts.
However, New Zealand’s Ventura Hobby Products came to the
rescue some time ago with a conversion set based around the Heller/Smer kit,
which the modeller has to purchase separately. I’ll leave it to others to review
the Heller offering, which provides the mainplanes, tailplanes, propeller and
undercarriage for this build; suffice to say that all of these pieces go
together well but feature raised panel lines. I haven’t seen the Academy kit in
the plastic so I can’t be sure if it would work with the Ventura parts.
The conversion kit includes a pair of new fuselage halves, tailwheel doors, leading-edge radiator fairings and a vacform canopy. The injection-moulded pieces are formed in dark grey plastic on extremely heavy sprues (I snapped one fuselage half cutting it off the runner with my sprue clippers!). While there are some rough patches on the surface of the plastic, the panel lines are nicely scribed and the vacform canopy is lovely, being formed by Ventura’s kiwi colleagues at Falcon. While this vacform includes separate ‘car doors’ in case you want to show off the cockpit, there is strangely no bubble canopy option included in the kit. This is unfortunate as, according to my references, the tail shape of the Ventura model matches the later style for the Tempest I prototype, meaning in effect that the kit represents neither version correctly straight from the bag (I purchased a separate Falcon vacform bubble canopy for the Typhoon/Tempest in order to make the later version of the prototype). The conversion kit comes with no decals or cockpit, and inadequate written instructions with a basic plan view and profile.
| CONSTRUCTION |
I started this kit by sanding down the flying surfaces of the
Heller Tempest and rescribing them according to plans. This isn’t a big chore
given that they are largely flat surfaces and the original raised panel lines
were readily removed. I also filled the cannon
 breech bulges from the inside and
the ejector chutes from the outside so that I could remove the armament. Sanding
these items smooth was much more hassle and took repeated attempts before I was
finally happy that all of the original detail was gone. It is worth noting that
if you build the car-door option offered by Ventura you don’t need to go through
this hassle, as the original prototype was armed – the cannon were only removed
later.
breech bulges from the inside and
the ejector chutes from the outside so that I could remove the armament. Sanding
these items smooth was much more hassle and took repeated attempts before I was
finally happy that all of the original detail was gone. It is worth noting that
if you build the car-door option offered by Ventura you don’t need to go through
this hassle, as the original prototype was armed – the cannon were only removed
later.
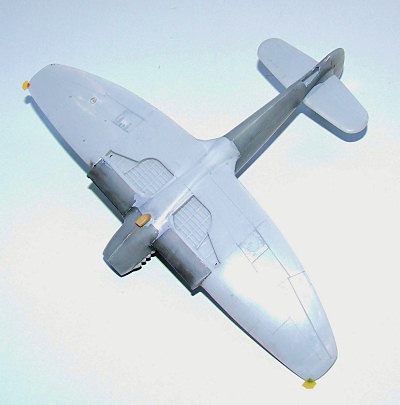
The trickiest aspect of the conversion came next, namely the wing radiators. These are vaguely labelled on their inner surfaces with code letters to help with placement (e.g. UR = upper right). However, I must have had a brain block as I decided to cut off the back sections of these, thinking that they were just moulding remnants. Actually, they are there to ensure that your radiator halves can be glued together to the correct thickness! This is where somewhat more detailed instructions would have been helpful. Anyways, having these parts prepared allowed me to slice out the relevant sections from the Heller wings. I then assembled the wings and added the radiators, fairing them in to the mainplanes with some filler and much sanding. As I only have a few reference photos of the Tempest I, I still can’t work out whether there were any obvious flaps or exhaust ducts from the radiators above or below the wings. Logically they should be there but they aren’t immediately visible, so I sanded the radiator pieces flush with the wing surfaces and rescribed the detail. Again, the instructions might have offered some guidance here.
Turning to the fuselage, I created the cockpit with a few
parts from the Heller Tempest and some spare resin cockpit details left over
from the Special Hobby Sea Fury T.61 kit (which allows you to build a single-seater
and score two spare cockpit tubs, seats
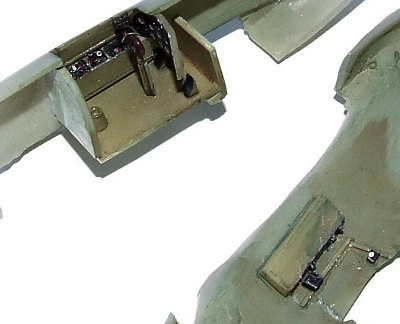 and sidewalls). Not a great deal can be
seen inside the Tempest cockpit, even with the canopy open, so I didn’t go to
town here. This area was painted in Aeromaster British cockpit grey-green and
various details picked out in relevant colours. The fuselage was then closed up;
the only problem here being that removing the join line also deletes some of the
external bracing tabs that join the fuselage to the tail section. As the
aircraft I was modelling didn’t include these I ended up sanding them all off,
but replacing the missing braces would be tricky if you were to build the early
aircraft as kitted. Sensibly, the vertical tail is moulded on one fuselage half,
with the join line at the base of the fin – this does require more filler and
sanding but avoids an overly-thick fin given the low-pressure moulding of the
conversion kit.
and sidewalls). Not a great deal can be
seen inside the Tempest cockpit, even with the canopy open, so I didn’t go to
town here. This area was painted in Aeromaster British cockpit grey-green and
various details picked out in relevant colours. The fuselage was then closed up;
the only problem here being that removing the join line also deletes some of the
external bracing tabs that join the fuselage to the tail section. As the
aircraft I was modelling didn’t include these I ended up sanding them all off,
but replacing the missing braces would be tricky if you were to build the early
aircraft as kitted. Sensibly, the vertical tail is moulded on one fuselage half,
with the join line at the base of the fin – this does require more filler and
sanding but avoids an overly-thick fin given the low-pressure moulding of the
conversion kit.
Mating the Heller tailplanes to the Ventura fuselage was easy, and there were no real problems adding the fuselage to the mainplane. Nevertheless, filler was required both on the upper wing roots and at the under fuselage join. Once this area was sanded and the missing detail rescribed, I added a small oil cooler from the spares box (strangely none is included with the conversion set). I realised after painting that the position of the oil cooler changed between the early and late iterations of HM599, so I had to clip it off, re-fair it in, and repaint the affected areas. Sometimes it pays to look carefully!
| COLORS & MARKINGS |
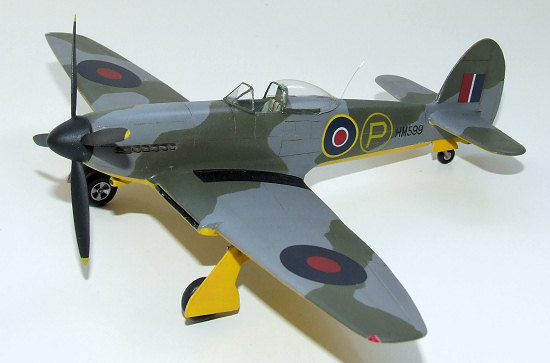
HM599 only wore one colour scheme throughout its career,
although it started to look a little tatty toward the end of 1943. Be warned
that the scheme drawn on the Ventura instructions does not match photos of the
aircraft. In fact, it seems that the aircraft wore a pretty standard Tempest V
camouflage pattern, which made it easy to cut out masking stencils based on
existing drawings 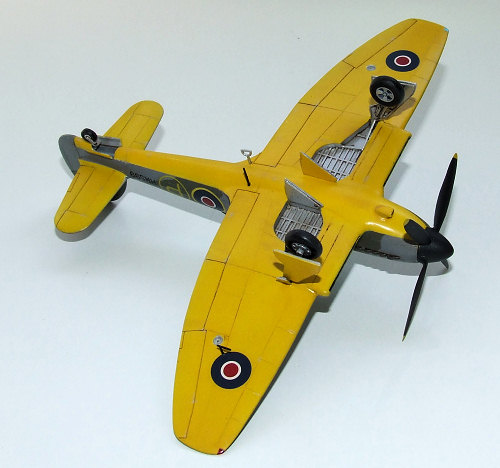 and photos. Because the scheme wraps around the fuselage under
the canopy, I left off the sliding section of the hood until after painting.
and photos. Because the scheme wraps around the fuselage under
the canopy, I left off the sliding section of the hood until after painting.
Although my first job was to spray the undercarriage bays in Humbrol silver, the rest of my painting used Gunze acrylics. The undersides were first sprayed white and then followed up with US Navy Blue Angels yellow, which is a close match for British trainer yellow. I also sprayed the propeller tips in yellow and then masked them before spraying the rest of the Heller propeller and spinner in tyre black. The upper surfaces were sprayed with dark green over extra dark sea grey, using paper masks held just off the surface with Blu-Tac. I followed both colours with subtle post-fading of major panels; this adds a little extra character without looking like the airframe has been left in the desert sun for a decade! A coat of Future prepared the airframe for decals and weathering.
Decals came from the spares box, including black walkways created from C-47 invasion stripes. The prototype ‘P’ in circle hailed from an Almark sheet which behaved perfectly despite being about 30 years old. I think most of the RAF markings were leftovers from the Revell P-51C. After sealing the decals with Future, I ran a thin wash of raw umber oil paint into the panel lines, then sprayed the airframe with Gunze flat clear. A small number of paint chips were added with a silver artist’s pencil, particularly on the walkways which clearly showed a lot of scuffing in photos. Finally, Tamiya weathering pastels were used to create a subtle exhaust stain. I attached the propeller and canopy and – ta-da! – my Tempest was ready.
| CONCLUSIONS |
While this conversion does require a little elbow grease and
some hunting around for suitable references, it would be a good model for
someone’s first attempt at branching out into conversions. My main gripe is that
the instructions really could have
 offered more assistance and a more accurate
camouflage scheme. The omission of the oil cooler and the inclusion of only one
canopy style also limit the kit, especially given that the tail shape seems to
be appropriate for the later appearance of HM599. Still, I think Ventura should
be lauded for bringing out this otherwise accurate and straightforward
conversion for the Tempest; certainly the supplied pieces are all of good
quality for a limited-run model. The Heller kit is still fairly easily found (I
picked mine up cheap second hand), while the Ventura conversion is still in
production and available from various specialty stores, plus Ventura’s own site
(www.venturapublications.com).
offered more assistance and a more accurate
camouflage scheme. The omission of the oil cooler and the inclusion of only one
canopy style also limit the kit, especially given that the tail shape seems to
be appropriate for the later appearance of HM599. Still, I think Ventura should
be lauded for bringing out this otherwise accurate and straightforward
conversion for the Tempest; certainly the supplied pieces are all of good
quality for a limited-run model. The Heller kit is still fairly easily found (I
picked mine up cheap second hand), while the Ventura conversion is still in
production and available from various specialty stores, plus Ventura’s own site
(www.venturapublications.com).
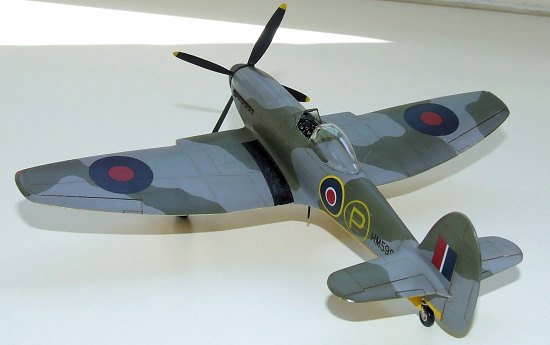
This is one of those aircraft that really should be made with the wheels up to show off its elegant lines: the chunky Tempest undercarriage makes the finished model look rather bottom heavy. However, it’s otherwise a nice-looking model and certainly gives some scope to any what-iffers who would like an RAF opponent for Luft 46 types.
| REFERENCES |
The Hawker Tempest Page (www.hawkertempest.se).
Tony Buttler. British Secret Projects: Fighters & Bombers 1935–1950. Hinckley: Midland Publishing, 2004.
Paul Lucas. RAF post-war Tempest colours. Model Aircraft Monthly, Vol 3, No 5 (March 2004), 22–39.
Mark Schynert. Ventura’s Hawker Tempest I conversion. The Styrene Sheet (Silicon Valley Scale Modelers newsletter), Vol 39, No. 10 (January 2006), 1, 6–8.
December 2007
Copyright ModelingMadness.com
If you would like your product reviewed fairly and fairly quickly, please contact the editor or see other details in the Note to Contributors.