Eduard 1/48 Tempest V
| KIT #: | ? |
| PRICE: | $? |
| DECALS: | ? |
| REVIEWER: | Fernando Rolandelli |
| NOTES: | Short Run |
| HISTORY |
The Tempest was basically a Typhoon gone
good: faster, with a more reliable engine and a crisper handling, together to
being a better gun platform without any of the vibration problems of the earlier
machine. Typhoon pilots usually transitioned to Tempests without inconvenience,
this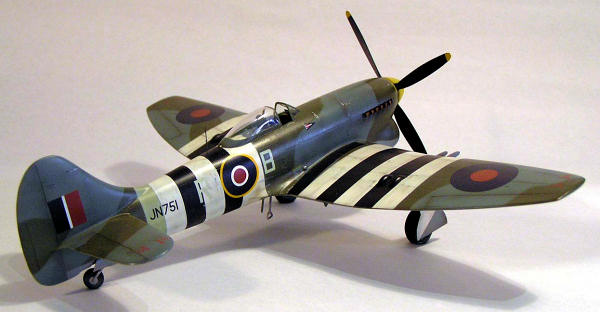 was
the intended policy, while Spitfire IX pilots went on to Spit XIVs.
was
the intended policy, while Spitfire IX pilots went on to Spit XIVs.
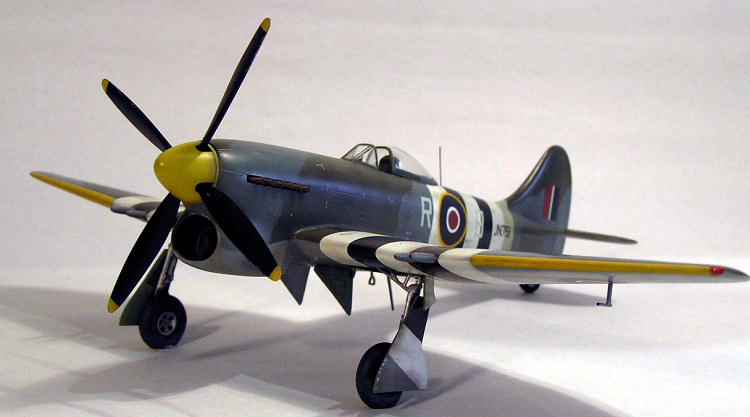
JN751 was among the first 50 Tempests
built. It was also the first to score, W/C R.P. Beamont flying it to claim the
first Tempest kill, a 109G claimed on “D+2-Day”. Previous to the invasion, he
flew it from Castle Camps, Cambridgeshire (adorned with the Typhoon-like ID
bands) within the ADGB (Air Defense Great Britain) in anti-diver missions. In
the last days of September, 1944, 150th Wing (274th, 56th and 80th Sqns) was
allocated to the 2nd TAF, Beamont leading it to B.60 aerodrome, located at
Grimberger, near
| THE KIT |
There were two boxings of the Eduard Tempest, a ProfiPack which can be built into a late machine, and a standard one, with two early series machines. The latter is devoid of any resin or PE, but the pieces included in the Profipack are not really worth the expense. The kit has been criticized as being too short and having a too thick fin, and both may be true! In addition to that, it is a typical “short run” product, so expect some cleaning and a pin-free assembly. There are a lot of aftermarket items for the Hasegawa Typhoon, but very few for the Tempest. I added an Eduard PE set (48204), True Details wheels (48036) and in the end Eagle Decal roundels and Carpena code letters decals.
| CONSTRUCTION |
 After
pondering several ways of furnishing the cockpit, among them using the tube cage
structure from a Hasegawa Typhoon or the even the Cutting Edge resin for such a
kit, I decided to go with the Eduard PE piece, gluing tube to the flat
structure. After much fiddling, it finally went in, with false sidewalls to hide
the wingroots and a false floor to hide the tops of the wheel wells. Some
scratchbuilt pieces completed both floor and sidewalls. The fit of the
windscreen was exemplary. Exhausts came from the Quickboost range.
After
pondering several ways of furnishing the cockpit, among them using the tube cage
structure from a Hasegawa Typhoon or the even the Cutting Edge resin for such a
kit, I decided to go with the Eduard PE piece, gluing tube to the flat
structure. After much fiddling, it finally went in, with false sidewalls to hide
the wingroots and a false floor to hide the tops of the wheel wells. Some
scratchbuilt pieces completed both floor and sidewalls. The fit of the
windscreen was exemplary. Exhausts came from the Quickboost range.
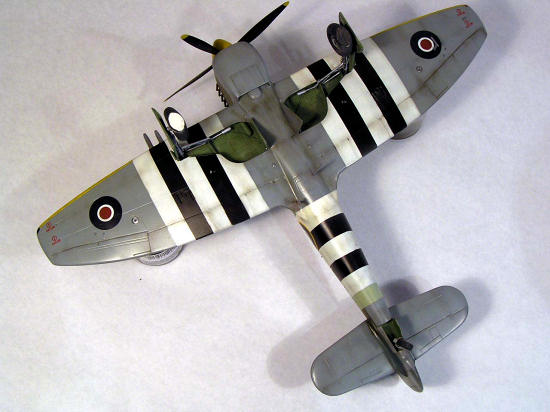
The wheel wells are well thought as
inserts, avoiding the shape issues of the Hasegawa Typhoon. They were also
furnished with PE and scratchbuilt pieces, following references and the Cutting
Edge set for the Typhoon. I added some bulges in the wing roots which are
characteristic of early machines.
I resisted the temptation of depicting
the flaps down; with all the add ons, the fit of the wings had been crazed
enough. It took several attempts to get the correct diedhral: the central under
surface should be perfectly flat, and the model insisted in adopting a slight
inverted gull shape. I also dropped the idea of replacing the stabilizers for
the Airwaves resin pieces, the ones in the kit (though a cumbersome two piece
design) fitted well enough.
The crazy idea of the wing inserts for
the protruding cannon barrels I dropped very quickly; instead, I cut the
barrels, shaped a concave base to them, inserted some rod as a guide and glued
them to the muzzle holes trying to keep the alignment. It worked, though the
soft nature of the plastic made the leading edge joints pop out under the
slightest pressure.
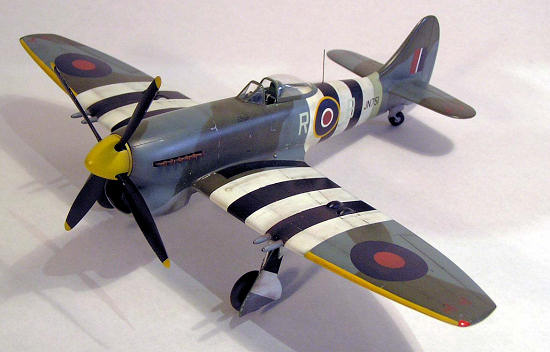
| COLORS & MARKINGS |

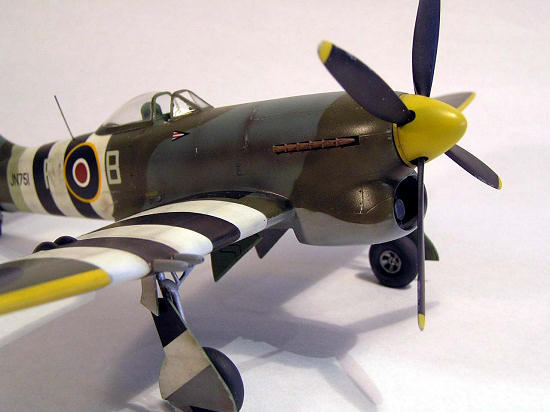
Built for a theme presentation (“From
D-Day to Bodenplatte”) this model had to have D-Day ID stripes on it. I chose to
paint them first, together with the remnants of the Sky band, and save camo
paint and time. I calculated the stripes by establishing the outer limits,
painting the surface White and then I measured the stripes, masked and painted
the Black ones. There were some inevitable issues, compounded by the slightly
too short fuselage, which came out at the time of decalling. The stripes in the
real machine were very tidy, applied for the W/C at the Hawker workshop at
Decals
 Well, here
some problems presented. The Eduard decals are good enough for a normal build,
but this I wanted to be a bit over the top, so I started replacing roundels and
flashes for Eagle Strike decals. The Eduard ones had a too bright Red centres,
something very common. Then, the code letters are in some shade of Grey, when
they should be Sky (another difficult one); moreover, they are the standard
measure of 36 in, while Beamont used a smaller size. I resorted to some Decal
Carpena 1/72nd codes, but the Xtradecals 1/72nd sheet would have been just
perfect. I had to adjust the fuselage bands by extending a bit the most forward
Black and White stripes, to allow the decals fall exactly where the photo of the
original machine showed (the fuselage is a tad too short, and the White band
advanced a bit too much on the trailing edge wing root fairing, though to be
fair it seems a bit wider than the rest in the picture). Then I realized that
the insignia was centered exactly on a Black/White division, and the White ring
was translucent. I tore the roundels away and painted some “dent” in White into
the Black band, so that the whole inner part of the roundel fell on a White
zone. Geez. The upper roundel is shown as a type C, but in the sheet the correct
Type B is included (the order to paint the narrow White ring dated from January
1945) The serials were from the original Eduard sheet and performed flawlessly.
Well, here
some problems presented. The Eduard decals are good enough for a normal build,
but this I wanted to be a bit over the top, so I started replacing roundels and
flashes for Eagle Strike decals. The Eduard ones had a too bright Red centres,
something very common. Then, the code letters are in some shade of Grey, when
they should be Sky (another difficult one); moreover, they are the standard
measure of 36 in, while Beamont used a smaller size. I resorted to some Decal
Carpena 1/72nd codes, but the Xtradecals 1/72nd sheet would have been just
perfect. I had to adjust the fuselage bands by extending a bit the most forward
Black and White stripes, to allow the decals fall exactly where the photo of the
original machine showed (the fuselage is a tad too short, and the White band
advanced a bit too much on the trailing edge wing root fairing, though to be
fair it seems a bit wider than the rest in the picture). Then I realized that
the insignia was centered exactly on a Black/White division, and the White ring
was translucent. I tore the roundels away and painted some “dent” in White into
the Black band, so that the whole inner part of the roundel fell on a White
zone. Geez. The upper roundel is shown as a type C, but in the sheet the correct
Type B is included (the order to paint the narrow White ring dated from January
1945) The serials were from the original Eduard sheet and performed flawlessly.
| FINAL CONSTRUCTION |
Weathering was very light; this aircraft belonged to the Old Man and clean is the way he liked it. Nevertheless I applied some Burnt Umber washes to the underside, that radiator bath should have exuded oil in quantities, W/C or not. I glued the undercarriage, suitably detailed with some oleo pipelines, then the exhausts and canopy and that was it.
| CONCLUSIONS |
It was a quite involved build. It must be
remembered that those early Eduard kits are nothing like present-day P-39s and
Bf 110s, they are true short run kits. I wanted to get it right, and that made
the build a bit tense, but I am quite pleased with the results. Ah, the theme
contest was won by a good friend of mine with a Tamiya Mustang
| REFERENCES |
 -
“Hawker Tornado, Typhoon and Tempest. RAF
Northern
-
“Hawker Tornado, Typhoon and Tempest. RAF
Northern
-
“The Hawker Tempest Mk.!-V”, Francis
Mason, Profile Publications no. 197,
-
“Typhoon and Tempest Aces of WW2”, Chris
Thomas, Aircraft of the Aces no. 27, Osprey Publications.
-
“Hawker Tempest”, Michail Ovcacik, 4+
Publications,
-
“2nd TAF vol 1, 2 y 3”, Chris Thomas y
Christopher Shores, Classic Publications.
-
Plans drawn by Ian Bentley in SAMI
magazine.
If you would like your product reviewed fairly and quickly, please contact me or see other details in the Note to Contributors.