
Matchbox 1/72 Lancaster II
| KIT #: | PK-602 (1979) |
| PRICE: | Out of Production but can be found for under $15.00 |
| DECALS: | Three options |
| REVIEWER: | Victor Scheuerman |
| NOTES: |
Converted to |
| HISTORY |
While the 7,076
Rolls Royce Merlin-engined Lancasters are very well known, the 301 examples of
the Bristol Hercules engined variant are not. The Hercules powered Lancaster II
was created in case there was a shortage of the Merlin that was in such high
demand for a wide variety of aircraft. As things turned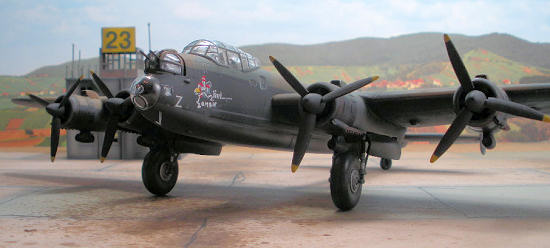 out, this shortage did not materialize (largely thanks to American license
production of the Merlin by Packard) and the Lancaster II was only used by six
operational squadrons. Of the six, three were RCAF units with one of these being
408 (Goose) Squadron that currently flies the Griffon tactical helicopter and is
based in Edmonton. More to the point, they have their historical artifacts
displayed within two display cases (WW II and post-war) in the Alberta Aviation
Museum. Sorely missing from the 408
Squadron World War II case is a Lancaster II to go with their Hampton and
Halifax.
out, this shortage did not materialize (largely thanks to American license
production of the Merlin by Packard) and the Lancaster II was only used by six
operational squadrons. Of the six, three were RCAF units with one of these being
408 (Goose) Squadron that currently flies the Griffon tactical helicopter and is
based in Edmonton. More to the point, they have their historical artifacts
displayed within two display cases (WW II and post-war) in the Alberta Aviation
Museum. Sorely missing from the 408
Squadron World War II case is a Lancaster II to go with their Hampton and
Halifax.
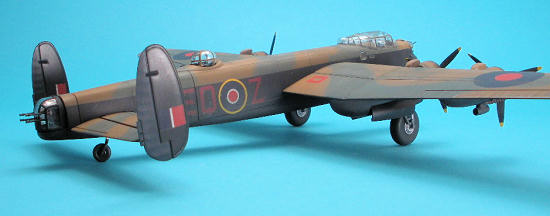
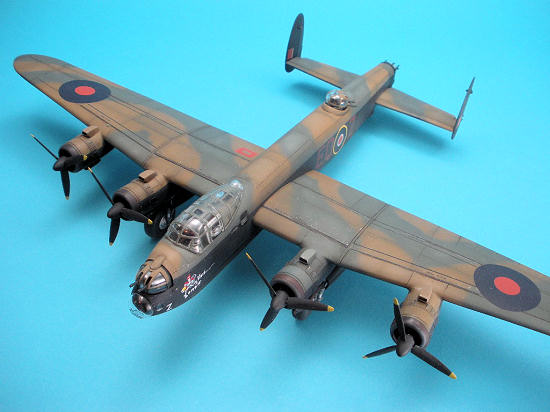
One of the more widely photographed 408 Lancaster IIs is Z for Zombie. This aircraft features a large painting on the forward port nose section that consists of a caped skeleton with a machine gun under one arm and a large ‘cookie’ bomb under the other. The name Zombie is below the figure and aft of this are a number of mission markings. These photographs also show that EQ-Z (LL725) did not have the bulged bomb bay doors.
| THE KIT |
Please
read the preview.
| CONSTRUCTION |
Paragon’s resin
conversion set is a gem. The
 One of the
great things about the museum models is that as long as the version and markings
are correct, they can be built out of the box with not too much attention
required for the lower surfaces. Great for modellers who enjoy the painting and
weathering stage.
One of the
great things about the museum models is that as long as the version and markings
are correct, they can be built out of the box with not too much attention
required for the lower surfaces. Great for modellers who enjoy the painting and
weathering stage.
Construction
started with removing the cockpit parts and gluing both the pilots and
navigators seat to the floor along with the control column. Next step was
spraying a black base coat using Testors Model Master (M/M) Aircraft Interior
Black enamel (unless stated otherwise all paint used was MM enamels) on all the
cockpit parts and the forward fuselage. When this had dried, the instrument
panel location forward was masked and left black. MM RAF Interior Green was then
misted on the remainder, leaving this green a little darker then normal to help
hide the lack of detail. Black paint was then brushed on the instrument panel,
the two radios on the separate partial wall for the navigator’s position and the
control column. This was followed by a dry brushing of a light grey to highlight
the edges and last step was dry brushing white on the instrument panel to show
the molded details.
The cockpit parts
were assembled and the fuselage halves joined using Tamiya Extra Thin liquid
cement and this worked great with the kit plastic. After taping the fuselage to
ensure a tight bond, the two piece nose was glued together and attached,
followed by the separate lower aft fuselage section (33) and the non-bulged bomb
bay doors (26,27,28,29). Super glue was used on all of the seams to both fill
and seal them. The join of the nose section required three light applications of
super glue and wet sanding to get a seamless fit, while the bomb bay doors
require some card on the port side to fill a gap a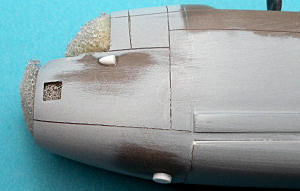 nd
some Squadron filler was used on both the fore and aft join line.
nd
some Squadron filler was used on both the fore and aft join line.
Missing from the
Matchbox Lancaster are the two outlets located below the nose turret. Two pieces
of rod were filed in half and then sanded into a tapered point at one end and
then these were glued onto location. Zombie was fitted with a camera in the
lower forward port fuselage so a punched disc was used to represent the aperture
as seen in photographs. After the aft fuselage turret shroud (18) was attached,
the openings were plugged with foam or masked with tape and then the fuselage
received a wet sanding to remove the raised panel lines.
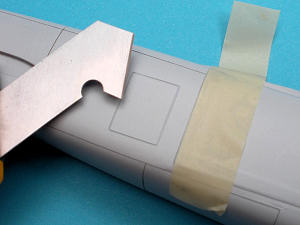 Once the
panel lines were sanded off, the fuselage was primed with Tamiya rattle can FINE
primer (lacquer). When this had cured, the panel lines were added using an OLPHA
P-Cutter along with TESTORS tape as the straight edge. This is a great
combination as the cutter actually removes the plastic and the tape is thick
enough to guide the blade but flexible enough to be used on gentile curves.
Once the
panel lines were sanded off, the fuselage was primed with Tamiya rattle can FINE
primer (lacquer). When this had cured, the panel lines were added using an OLPHA
P-Cutter along with TESTORS tape as the straight edge. This is a great
combination as the cutter actually removes the plastic and the tape is thick
enough to guide the blade but flexible enough to be used on gentile curves.
 Before the
wing halves were glued together, a dry fit of the engine nacelle inserts
(65,66,67,68) showed this was not a real tight fit. To ensure a robust
attachment that could take the future sanding, these locations received a card
backing and then the inserts were attached, followed by joining the wing halves.
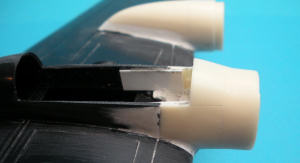
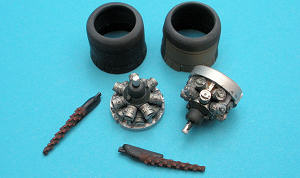
A dry fit of the resin Paragon nacelles that are made for the newer Airfix and
Hasegawa Lanc showed that some serious persuasion and filler was coming.
Before the
wing halves were glued together, a dry fit of the engine nacelle inserts
(65,66,67,68) showed this was not a real tight fit. To ensure a robust
attachment that could take the future sanding, these locations received a card
backing and then the inserts were attached, followed by joining the wing halves.
A dry fit of the resin Paragon nacelles that are made for the newer Airfix and
Hasegawa Lanc showed that some serious persuasion and filler was coming.
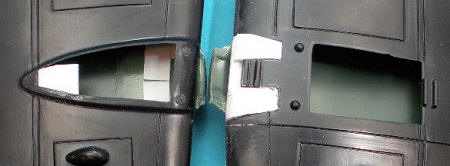
 First step
was filling in the lower wing opening that would have received Merlin cowlings.
This was done with thick card that was then carved and filed to final shape that
did match the abutting wing leading edge. This was followed by gluing the inner
nacelles that hold the landing gear together, cutting off the engine cowling and
gluing these onto location and left to cure. Next, the excellent Paragon resin
nacelles were filed until it would fit both the kit nacelle extension of the
upper wing and at least be level from the side. This did show a serious gap were
the new nacelle met the wing.
First step
was filling in the lower wing opening that would have received Merlin cowlings.
This was done with thick card that was then carved and filed to final shape that
did match the abutting wing leading edge. This was followed by gluing the inner
nacelles that hold the landing gear together, cutting off the engine cowling and
gluing these onto location and left to cure. Next, the excellent Paragon resin
nacelles were filed until it would fit both the kit nacelle extension of the
upper wing and at least be level from the side. This did show a serious gap were
the new nacelle met the wing.
 Tamiya
Spruce cutters did a great job of getting the inner housing and resin nacelles
extensions to meet and when this was accomplished, card tangs were glued inside
of the gear bay. It was then a matter of ‘sliding’ the resin nacelle onto these
and the upper tang and keeping them level. A rather generous amount of super gel
was then applied to the inside of the resin nacelle where ever it met a kit
surface. Likewise, a similar format
was followed for the outer nacelles but the raised molding on the lower wings
are larger then the base of this addition. This is when Milliput is your friend!
Tamiya
Spruce cutters did a great job of getting the inner housing and resin nacelles
extensions to meet and when this was accomplished, card tangs were glued inside
of the gear bay. It was then a matter of ‘sliding’ the resin nacelle onto these
and the upper tang and keeping them level. A rather generous amount of super gel
was then applied to the inside of the resin nacelle where ever it met a kit
surface. Likewise, a similar format
was followed for the outer nacelles but the raised molding on the lower wings
are larger then the base of this addition. This is when Milliput is your friend!
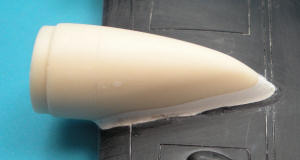 A ‘gob’ of
Milliput Super Fine (white) was mixed and applied with enthusiasm to all the new
joins. The truly excessive was removed with a No 11 blade and wet Q-tip and
after letting it set up for about four hours, it was cut back with more finesse
this time by carving with a No 11 blade. After fully curing, the Milliput was
then filed and sanded to final form.
Some more filler was required in some areas and Squadron White was used
for this. The final step was brushing on a very thin coat of super glue that was
then gently wet sanded – a beverage had be earned and was enjoyed…
A ‘gob’ of
Milliput Super Fine (white) was mixed and applied with enthusiasm to all the new
joins. The truly excessive was removed with a No 11 blade and wet Q-tip and
after letting it set up for about four hours, it was cut back with more finesse
this time by carving with a No 11 blade. After fully curing, the Milliput was
then filed and sanded to final form.
Some more filler was required in some areas and Squadron White was used
for this. The final step was brushing on a very thin coat of super glue that was
then gently wet sanded – a beverage had be earned and was enjoyed…
To see how well the
new addition looked, the wings were given a coat of primer. This did show some
tweaking was required and this was done. With the wings fully primed and all the
seams looking good, some panel lines were added back to the resin additions and
some new ones were added to the top wing. The tail planes were dealt in the same
manner.
Remaining parts of
the kit were prepared for painting. This only involved gluing the tire halves
together as was the rear quad machine guns. Because the turrets would be added
after painting, the circular extensions o n
the bottom that fit into a receiving hole were sawn off so they could slide in.
One of the real chores with the multi framed glazing on this aircraft is
masking.
n
the bottom that fit into a receiving hole were sawn off so they could slide in.
One of the real chores with the multi framed glazing on this aircraft is
masking.
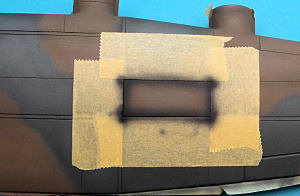
As there is not any
precut masking set available that I am aware of, it was old school masking. Out
came the Tamiya tape and new No 11 and 12 blades. A number of thin strips were
cut and applied to the frames sides. When the framing was masked, where the tape
overlapped, it was cut away by gently rocking the No 12 blade back and forth. To
finish the masking off, the interiors were covered with more of the Tamiya tape.
The Lancaster has an observation bubble on the front of the fuselage and this
has a circular pane within it. Fortunately, a wheel mask was found that was the
correct size for this circular pane, and then a circle template guide was used
to cut the outside mask.
Final detail at
this stage of the project was filling the interiors of the turrets with Blu Tac
before painting
| COLORS & MARKINGS |
Due to the good fit
of the wings to the fuselage, these would all be painted separately and attached
after painting.
First application
was to spray RAF Dark Green on the fuselage area that is covered by the large
cockpit glazing as well as this glazing. When this initial application had
cured, the masked canopy was attached first with a couple of drops of super gel.
Once the canopy was properly seated (fit rather well), the edges were
permanently sealed with five minute epoxy. Some soft foam was used to plug the
open nose while the nose turret was held together thanks to the Blu Tac and this
was pushed into location.
 White glue
was used to temporary fill the small windows aft of the cockpit and on the nose.
White glue
was used to temporary fill the small windows aft of the cockpit and on the nose.
For the base black,
Aircraft Interior Black was used as this is slightly lighter then Matt Black.
This was applied to all the lower surfaces, vertical fins and to all the panel
lines on the upper surfaces as preshading. To add some variety to the black
finish, Matt Black was used on the propellers, spinners, engine cowlings, gear
doors and gear legs. In addition, some fuselage panels were masked and sprayed
this black to break up the fuselage finish somewhat. To give the fabric covered
rudders a slightly different look, these were masked and sprayed with a
lightened Aircraft Interior Black.
 The lower
surfaces were masked, and then RAF Dark Earth was applied, followed by RAF Dark
Green and this was done free hand using the kit instructions as a pattern guide.
To give the upper surfaces a little more character, both the Earth and Green
were lightened and sprayed to the center of some panels on the spine of the
Lancaster, engine cowlings and the inner wing. In addition, some random panels
were masked and then these had the inside edges sprayed in black and then the
base colour was misted back on. This made these panels look a
The lower
surfaces were masked, and then RAF Dark Earth was applied, followed by RAF Dark
Green and this was done free hand using the kit instructions as a pattern guide.
To give the upper surfaces a little more character, both the Earth and Green
were lightened and sprayed to the center of some panels on the spine of the
Lancaster, engine cowlings and the inner wing. In addition, some random panels
were masked and then these had the inside edges sprayed in black and then the
base colour was misted back on. This made these panels look a
 little
darker then the surrounding surface.
little
darker then the surrounding surface.
Both the exhausts
and the exhaust collector rings on the cowlings were misted with Rust over the
black and then the inner ring on the cowlings were masked and sprayed grey. Some
black was thinned and misted back on to tone down the colours and Matt Black was
brush painted on the cowling attachment shroud of the exhausts.
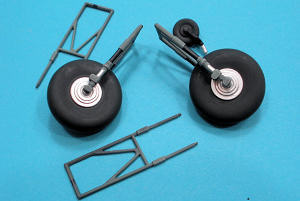 Initially
the undercarriage parts were sprayed Matt Black, but numerous photographs of the
Lancaster II show the legs and retractions arms are not painted black but a
lighter colour. Though not sure of the colour, in tone value it would be close
to Interior Gray Green so these parts were redone in this colour. The same
photographs show a section on the main legs in black so this was brushed painted
on as was the acrylic silver to the main wheels, and the exposed oleo section on
the main arms. To simulate tire black, Tamiya NATO Black acrylic was brushed on.
Initially
the undercarriage parts were sprayed Matt Black, but numerous photographs of the
Lancaster II show the legs and retractions arms are not painted black but a
lighter colour. Though not sure of the colour, in tone value it would be close
to Interior Gray Green so these parts were redone in this colour. The same
photographs show a section on the main legs in black so this was brushed painted
on as was the acrylic silver to the main wheels, and the exposed oleo section on
the main arms. To simulate tire black, Tamiya NATO Black acrylic was brushed on.
| FINAL CONSTRUCTION |
As the exterior
painting completed, it was time to assemble the main parts. First step was
scraping the paint off the joining surfaces to provide a good bond for the glue.
While the wings all fit into location very well, I found the joins to be
somewhat weak perhaps do to the receiving slot not being that deep. To ensure a
stronger join, the main wings were reattached using super gel and glue.
Next day, the
Paragon resin cowlings complete with engines were fitted. This proved to be a
little more challenging then thought because of me not ensuring that all the
nacelles were perfectly lined up. They were all attached, but one cowling had my
name on it and after three tries of attaching and removing it won! The cowlings
were followed by the upper intakes and these required some sanding on the
outboard locations to get a better fit to the Matchbox wing. Before adding the
exhaust and lower resin parts, the landing gear was glued into location.
 While the
two receiving slots for each main landing gear were not touched during the
conversion process, the retraction arms would not reach their aft placement
slot. These were simply glued to the wing roof were it met and then they were
firmly anchored with blocks of card stock. Once the gear doors are on, the
increase in the angle for these aft members are not that noticeable anyway.
While the
two receiving slots for each main landing gear were not touched during the
conversion process, the retraction arms would not reach their aft placement
slot. These were simply glued to the wing roof were it met and then they were
firmly anchored with blocks of card stock. Once the gear doors are on, the
increase in the angle for these aft members are not that noticeable anyway.
Final steps were
adding the beautiful resin exhausts, lower intakes and the kit vertical tails to
the tail planes
The model was given
a high gloss coat using Future and left for five days. The kit decals were used
for both the national insignia and stencils. Though the sheet looked not too bad
considering it’s age, just in case it was given a sprayed coat of Future at the
same time the model was glossed.
The kit decals were cut from the sheet and closely trimmed due to the solid
Future covering. These were
immersed in warm water and ‘eventually’ could be removed from their backing.
They were applied onto a puddle of Micro Set and initial impressions were not
entirely positive. However, with additional brushings of Micro Sol, the curled
edges did to go flat and they actually sunk into the trenches. That is the good
news. The down side was that they had a somewhat pebbly finish. Micro Scale
supplied the Dull Red fuselage codes while the Zombie character and name along
with the mission score had to be hand painted.
Reference could not
get much better then the colour profile in RAF & RCAF Aircraft Nose Art in World
War II by local artist Clarence Simonsen (Hikoki Publications). A section of
clear decal film was cut and tape beside the book art work and then the copying
began. It has been quite awhile since the last painted aircraft art
 and for
this effort, acrylic paints were tried for the first time. While they dry did
nice and fast as anticipated, I was leery to thin them too much with water as
they were being applied to a sheet of clear decal film. The end result is a
shape that looks like the Zombie character but it does lack some finesse. This
was given a brushed coat of Microscale Liquid Decal Film and then this character
was cut from the clear sheet and applied like the rest of the decals.
and for
this effort, acrylic paints were tried for the first time. While they dry did
nice and fast as anticipated, I was leery to thin them too much with water as
they were being applied to a sheet of clear decal film. The end result is a
shape that looks like the Zombie character but it does lack some finesse. This
was given a brushed coat of Microscale Liquid Decal Film and then this character
was cut from the clear sheet and applied like the rest of the decals.
Once the decals
were cured, a wash using Raw Umber oil was applied to the recessed panel lines
and after partially setting up, the excess was removed with a lint free cloth.
The exterior was matted using Testors Model Master Flat Clear Lacquer Finish.
Using this clear, a drop or two of Tamiya NATO Black acrylic was added along
with some Testors thinner and this was then used to add some random streaks to
the upper surfaces and to enhance some panel lines. In addition, it was used to
tone down the white in the insignia. With the weathering completed, it was into
the home stretch.
The masking was
removed from the clears parts and then the turrets were assembled and glued into
location. The small fuselage windows that had been sealed with white glue had
this removed and new windows were made using Micro Krystal Klear. The ‘almost’
final additions were the two pitot tubes on the lower nose that were made from
card and stretch sprue. The model
was then photographed and it was while viewing these photos that I realized that
I had forgotten the belly remote gun turret. Some layered card cut into a circle
and then two lengths of stiff wire for attached to represent the machine gun
barrels. A rectangular block was added as the viewing port and then the entire
assembly was painted black and then attached. Finally, the Lanc was fully armed
and ready for it’s next mission over occupied
| CONCLUSIONS |
Building Matchbox’s Lancaster was another enjoyable experience, even with the challenge of getting a resin conversion set for different model to fit. In fact, at completion of this project, the only thing I do not like about this kit is the side blister window inserts. The thick clear edges are far too noticeable when close to the model. Another reward of this project was the Paragon resin set. The engines, cowlings, exhaust and in some cases even the propellers are all gems that can be used on the other aircraft that were similarly equipped.
January 2009
Copyright ModelingMadness.com. All rights reserved. No reproduction in part or in whole without express permission from the editor.
If you would like your product reviewed fairly and quickly, please contact the editor or see other details in the Note to Contributors.
Back to the Review Index Page 2016