Eduard 1/48 Tempest TT Mk V
|
KIT # |
8022 |
|
PRICE: |
@$23 in Germany |
|
DECALS: |
4 aircraft |
|
REVIEW : |
|
|
NOTES: |
` |
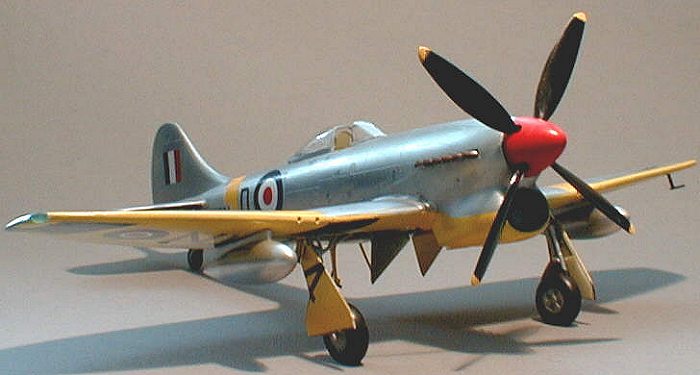
Do it in colour – Hawker Tempest TT Mk. V
|
HISTORY |
The Hawker Tempest was derived from the earlier Typhoon; in an effort to boost the Typhoon´s performance at higher altitudes, it featured a thinner, smaller wing, an elongated forward fuselage and an enlarged vertical stabilizer. The improvements on the Typhoon, such as the bubble canopy and the flush-mounted Hispano Mk.V cannons, were also integrated. Basically, there were two versions: The Tempest Mk. V powered by a Napier Sabre in-line engine, and the Tempest Mk. II, powered by a Bristol Centaurus radial engine. Both took their time until declared ready for mass production. Especially the Mk. II only really got on the way after studies on a captured Focke-Wulf Fw 190 revealed a solution for the massive problems experienced in cooling a radial engine within a close-fitting forward fuselage..
Eventually, the Tempest Mk. V saw combat from April 1944 on, fighting V-1 buzz-bombs from English bases and then accompanying the advancing allied armies right into Germany. The Tempest Mk. II had been planned for use in the British Tiger Force in the far east, but hostilities ended before that force was deployed. With the general reduction in numbers, many Tempests were retired soon after the war; the RAF used it in limited numbers until 1951 with the advent of the jet fighters. Despite its comparatively short career, the Tempest earns distinction for having been the predecessor of the plane many claim to be the ultimate piston-engined fighter, the Hawker Fury and Sea Fury.
|
THE KIT |
 Eduard
has long been a major name in photo-etched accessories; during the last years,
the company has also produced „whole" kits, offering the modeler some very
interesting subjects, namely from WW I. Their injected kits are marketed as
either the „bare" kit or as a beefed-up version labeled „Profipack" that
features a photo-etch fret, some resin and canopy masks. Considering what you
usually pay for the aftermarket stuff, 23$ for this kit is sound value for
money, since you really don´t have to invest in aftermarket stuff save the
decals if you´re into having a unique model. The injected plastic itself is
short-run, implying that you can´t expect Tamigawa standard concerning the level
of detail and the crispness of molding, that you´ll have to do without locator
pins, that the trailing edges are on the thicker side and that the sprue
attachment points are larger than usual. A number of the parts that are below
par are addressed by the brass and resin parts, but some, especially the
tailwheel, should be addressed personally – if desired. Compared with Eduard´s
Yak-3 Profipack I built last year, this kit is of lesser level of detail and
fit, yet on the whole convincing.
Eduard
has long been a major name in photo-etched accessories; during the last years,
the company has also produced „whole" kits, offering the modeler some very
interesting subjects, namely from WW I. Their injected kits are marketed as
either the „bare" kit or as a beefed-up version labeled „Profipack" that
features a photo-etch fret, some resin and canopy masks. Considering what you
usually pay for the aftermarket stuff, 23$ for this kit is sound value for
money, since you really don´t have to invest in aftermarket stuff save the
decals if you´re into having a unique model. The injected plastic itself is
short-run, implying that you can´t expect Tamigawa standard concerning the level
of detail and the crispness of molding, that you´ll have to do without locator
pins, that the trailing edges are on the thicker side and that the sprue
attachment points are larger than usual. A number of the parts that are below
par are addressed by the brass and resin parts, but some, especially the
tailwheel, should be addressed personally – if desired. Compared with Eduard´s
Yak-3 Profipack I built last year, this kit is of lesser level of detail and
fit, yet on the whole convincing.
The modeler gets 66 plastic parts, 8 resin parts and 22 brass parts, a film for the instrument panel plus cockpit masks. The cockpit is a one-piece-affair only, yet beautifully transparent. The decal sheet features full stencils and markings for four planes, two in camouflage and two in NMF. Instructions are clearly printed in a sort of japanese style, colors are given for Tamiya, Humbrol, Revell, Testors and Aeromaster. They lack clarity in several places, so you´re on your own devices and should dryfit frequently!
Preliminaries
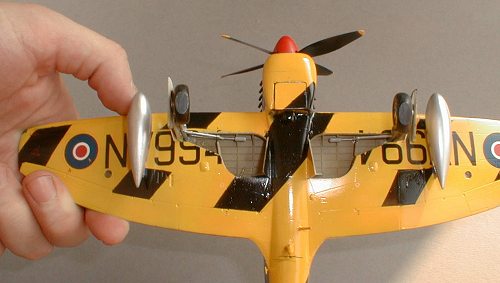
 I
decided to build my Tempest as a TT Mk.V target tug, one of the four versions
covered by the kit decals. That gave me an opportunity to build a really gaudy
plane, with lots of natural metal and yellow, plus a red spinner, and that was
that what I was looking forward to at this point of my life -after the zillions
of shades of greys used during the last years. I couldn´t find much info on the
target-towing Tempests, so I decided to follow on the kit instructions, which
meant simply to glue a little wind-driven prop below the fuselage and paint the
whole aircraft as described. Hmmm. Well, there MUST be more to it, don´t you all
think? After all, there´s a pic in the Squadron/Signal booklet (p.47) that shows
the TT Mk. V prototype with a wind driven winch mounted in lieu of the
left drop tank plus wire cable guards under the tail. Of particular interest to
me was that this plane seems to have retained its armament, since you can see
the bulges of the ammo drums on the wings, yet I couldn´t make out the gunsight
on that pic. So I was left on my own, always thinking about having that
colourful bird and the easiest way towards this goal (I CONFESS!) So I reckoned:
Weeell, the Squadron booklet says that the whole underwing fairing construction
wasn´t used on the TT´s, so I can leave it as Eduard says and trust their
research (although in the same Squadron booklet, the plane in question is
depicted in a painting without armament – sigh), and concerning that point,
weeeell, let´s follow the pic and leave it as is, minus the gunsight.
Saved me the trouble of grinding away the bulges plus filling, sanding and
rescribing the area, a very conspicuous area by the way, especially when using
an NMF...
I
decided to build my Tempest as a TT Mk.V target tug, one of the four versions
covered by the kit decals. That gave me an opportunity to build a really gaudy
plane, with lots of natural metal and yellow, plus a red spinner, and that was
that what I was looking forward to at this point of my life -after the zillions
of shades of greys used during the last years. I couldn´t find much info on the
target-towing Tempests, so I decided to follow on the kit instructions, which
meant simply to glue a little wind-driven prop below the fuselage and paint the
whole aircraft as described. Hmmm. Well, there MUST be more to it, don´t you all
think? After all, there´s a pic in the Squadron/Signal booklet (p.47) that shows
the TT Mk. V prototype with a wind driven winch mounted in lieu of the
left drop tank plus wire cable guards under the tail. Of particular interest to
me was that this plane seems to have retained its armament, since you can see
the bulges of the ammo drums on the wings, yet I couldn´t make out the gunsight
on that pic. So I was left on my own, always thinking about having that
colourful bird and the easiest way towards this goal (I CONFESS!) So I reckoned:
Weeell, the Squadron booklet says that the whole underwing fairing construction
wasn´t used on the TT´s, so I can leave it as Eduard says and trust their
research (although in the same Squadron booklet, the plane in question is
depicted in a painting without armament – sigh), and concerning that point,
weeeell, let´s follow the pic and leave it as is, minus the gunsight.
Saved me the trouble of grinding away the bulges plus filling, sanding and
rescribing the area, a very conspicuous area by the way, especially when using
an NMF...
So I tried to soothe my conscience and leave myself in a state of blissful ignorance, washed my plastic (and my hands in innocence) and set upon construction.
|
CONSTRUCTION |
That started with – the cockpit, and this being an Eduard kit, you can be sure the area is represented well. Most of the brass and the resin goes into it, and with some patience, you´ll get a convincing-looking pilot´s office. I had my usual troubles with the minuscule PE parts and some bad language was used while gluing the footrests to their mount; moreover, I had difficulties in finding out where the cockpit floor and walls had to be joined, a nasty thing when you´ve already attached the PE to those subassemblies. OK: Dry fit everything before anything else, especially the whole cockpit assembly when it comes to mating it to the fuselage! The cockpit was painted mostly sky, drybrushed with aluminum; I used pastel chalks for some weathering.
 Before
mating the fuselage halves, you have to assemble the cockpit, the chin air
intake and the exhausts. Being preoccupied with the paint finish, I used the kit
exhausts, I just drilled them out a bit and painted them with Testor´s burnt
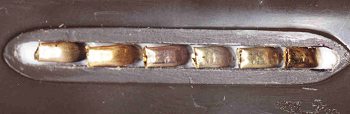
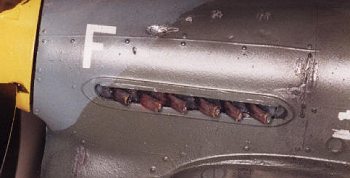
metal, drybrushed with burnt sienna artist´s oil paint. I had built homemade
exhausts for an earlier Typhoon (see pic) and find them more convincing, yet
simply didn´t care enough about it at that moment. Fitting the mentioned stuff
inside the fuselage wasn´t that easy since no positive location is supplied, so
Before
mating the fuselage halves, you have to assemble the cockpit, the chin air
intake and the exhausts. Being preoccupied with the paint finish, I used the kit
exhausts, I just drilled them out a bit and painted them with Testor´s burnt
metal, drybrushed with burnt sienna artist´s oil paint. I had built homemade
exhausts for an earlier Typhoon (see pic) and find them more convincing, yet
simply didn´t care enough about it at that moment. Fitting the mentioned stuff
inside the fuselage wasn´t that easy since no positive location is supplied, so
 that was a bit more work
than in a shake-and-bake kit, yet after all, we´re modelers, aren´t we?
that was a bit more work
than in a shake-and-bake kit, yet after all, we´re modelers, aren´t we?
Next came the wings, and I used the occasion for a quite amusing blunder. Two pieces of plastic have to be glued into each wheel well, they´re #´s 41,42,48 and 51. I managed to confuse two of them with the outer landing gear covers, #´s 43 and 44. Short run kits don´t have part numbers on the sprues ... But that wasn´t a problem when I came to the landing gear covers, since they could be easily replaced by Evergreen sheet. It just illustrates my ability in picking a wrong choice blindfolded ...
I used some wire on the wheel wells after having seen a walk-around of a Tempest, painted the wheel wells sky and weathered them liberally.
Wings and stabilizers went together well, just as the mating with the fuselage. There was some amount of filling and sanding required, a process that took some time until I was satisfied. I attached the landing gear covers with Maskol next in order to get the striping done right without too much fuzz and to protect the wheel wells from the paint. It was just at that time that I read Scott´s article on navigation lights, so I mercilessly cut pieces out of a green toothbrush and a red screwdriver and was able to make nice-looking navigation lights out of them in about 30 minutes. COOL TIP!
|
PAINT & DECALS |
Next came priming the aircraft with a matte light grey. After that, I coated all areas that were to be painted yellow with several coats of white, followed by some coats of yellow. Next thing was applying the underwing decals. I did that in order to assure proper placement of the recognition stripes, and it gave me a shock. The decals were virtually unusable: They tore into pieces whenever I tried to touch them, they literally crumbled into dust. I wrote to Eduard, and they sent me replacements pretty soon. Colin Adair of Eduard wrote me very friendly:
It is possible that you got some bad decals so I have mailed out some more for you and you can test them. I always soak "our" decals in quite warm water and then slide them right off the paper on to the model. Another method I have heard about but not tried is "spitting" on the model where you want to position the decal and then put the decal on, move if needed and them blot the excess water like normal.
We do use very thin decals, and they are harder to work with, but the
results are excellent and the majority of our customers like them so we have
not changed the style. I wish you luck and if you need anything or more
help, just ask.
 I had
absolutely no trouble using the replacement decals; they worked on par with the
best of Italeri. Yet while working on them I realized that Eduard had done
something about the decals since the kit was issued: The replacement set was
copyrighted in 1999 versus the kit decals in 1997, and the individual decal
numbers were done in a different font. So I can only with my limited experience
advise you to watch out for the ´99 vintage...
I had
absolutely no trouble using the replacement decals; they worked on par with the
best of Italeri. Yet while working on them I realized that Eduard had done
something about the decals since the kit was issued: The replacement set was
copyrighted in 1999 versus the kit decals in 1997, and the individual decal
numbers were done in a different font. So I can only with my limited experience
advise you to watch out for the ´99 vintage...
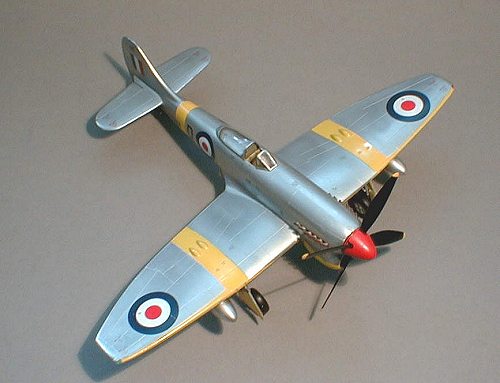
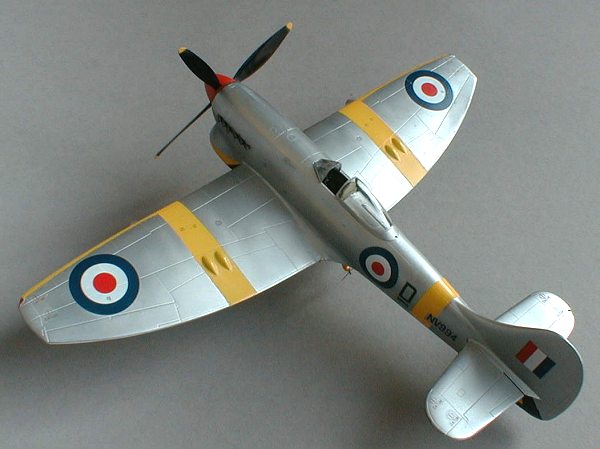
Then came a long and slightly confusing phase of masking, until I got cross-eyed and couldn´t make head nor tail of the direction of those diagonal black stripes. Masking was done with Model Master Parafilm M and masking tape from a shop specialized in automobile paint. Having sprayed (and masked and re-masked) everything, I could use considerable amounts of Testor´s aluminum metalizer on the model. I omitted any weathering of the paintjob itself since I had the idea of an older plane that had been refurbished by a military establishment slowly accommodating to peacetime ideas in 1947, and that meant spit-and-polish to me and not dust and grime on the fresh paint.
I buffed the metalizer using a softened paper towel, and when satisfied with the result, off came the masking tape. After my usual amount of corrections, I was able to apply the rest of the decals, using rubber gloves not to mar the metalizer. I used MicroSol on the decals with god success, although with the even surfaces of this kit, that could have been omitted.
In the meantime, I had painted the big prop and the landing gear (plus resin wheels) in the usual fashion. In the final steps, I installed those parts and the remaining bits and pieces such as the pilot´s stirrup, the drop tanks (patiently filled, sanded, metalized and buffed) and the antenna, until I could remove the masking from the canopy and take the pics. The landing gear is a rather flimsy affair, and on second thoughts I should have asked my dental technician to cast it in metal, but I´m sure I´ll do that on my next, say, 109 or 190, and I´ll tell you if that was a good idea or not.
|
CONCLUSIONS |
That plane looks cool with so much color on it, the kit is good value for money and you´ll get quite some hours of modeling out of it – I recommend it.
Happy modeling,
Copyright ModelingMadness.com
If you would like your product reviewed fairly and fairly quickly, please contact the editor or see other details in the Note to Contributors.
Back to Reviews Page 2017