|
KIT # |
48002 |
|
PRICE: |
$29.95 MSRP |
|
DECALS: |
Two aircraft |
|
REVIEWER: |
|
|
NOTES: |
|
HISTORY |
The FM-2 was designed as a follow up to the F4F Wildcat, and was produced by General Motors Eastern Division beginning in 1943. It was lighter than the F4F and carried a more powerful engine. The wings of the FM-2 carried only two guns each, but were reinforced to carry up a 250lb bomb or rockets on stub mountings. The lighter and more powerful FM-2 made it a perfect fit for use on the short decked escort carriers that were then being built in great numbers for both the Pacific and Atlantic theaters. Scott Van Aken's preview is here
|
THE KIT |
 This is a multi-media kit, including 41
gray injection molded pieces, three urethane castings and two vacuum
formed canopies. There was very little flash to be found on the
injected parts and their detail is engraved. The urethane castings are
for the seat, and for the cockpit's inside wall detail. Details were
crisp and included lots of fine detail. The seat has nicely molded
belts. Although the kit's instructions show a closed canopy, the
vacuformed pieces are easy to cut free. (plus there is a spare, just in
case!) The box art shows the plane with drop tanks, but they are NOT
included in the kit. The instruction booklet is 12 pages long, dividing
the assembly and painting into thirteen steps. Paint colors are called
out as you go, although only color names are referenced, not FS or
brand numbers.
This is a multi-media kit, including 41
gray injection molded pieces, three urethane castings and two vacuum
formed canopies. There was very little flash to be found on the
injected parts and their detail is engraved. The urethane castings are
for the seat, and for the cockpit's inside wall detail. Details were
crisp and included lots of fine detail. The seat has nicely molded
belts. Although the kit's instructions show a closed canopy, the
vacuformed pieces are easy to cut free. (plus there is a spare, just in
case!) The box art shows the plane with drop tanks, but they are NOT
included in the kit. The instruction booklet is 12 pages long, dividing
the assembly and painting into thirteen steps. Paint colors are called
out as you go, although only color names are referenced, not FS or
brand numbers.
|
CONSTRUCTION |
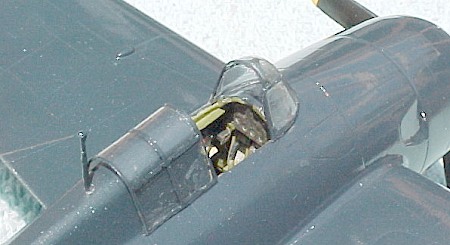
This was my introduction to limited
production models, and it was an interesting change from the few
cheaper, mass produced kits I have built so far. I built the FM-2 OTB
with the addition of True Detail wheels, Aeromaster decals, Black Magic
canopy mask and some Invisible thread and brass wire for the antennas.
The cockpit details are sharply cast, so most of the work there went to
trimming off the urethane castings and painting. This time I tried
doing all the painting was with Model Master Acrylics. After painting
the panels flat black and associated areas Interior Green, I picked out
the details using a silver and a white colored pencil, with a few
touches of Red paint as appropriate by following Kinsey's F4F Wildcat
in detail 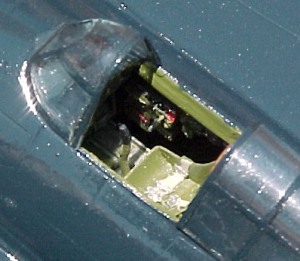 photos. I added a dab of Future to the instrument faces which
helped set them off. Before assembling the floor and seat, I cut away
the floor on either side of the rudder pedal troughs. (FM-2's did not
have the windows in the bottom of the fuselage like the F4F's but still
retained the holes in the floor). When you assemble the rudder pedals,
you need to supply a bit of rod to connect them to the center post.
photos. I added a dab of Future to the instrument faces which
helped set them off. Before assembling the floor and seat, I cut away
the floor on either side of the rudder pedal troughs. (FM-2's did not
have the windows in the bottom of the fuselage like the F4F's but still
retained the holes in the floor). When you assemble the rudder pedals,
you need to supply a bit of rod to connect them to the center post.
After sub assembling the cockpit I painted and assembled the engine. It
is pretty cleanly molded with good looking cylinder heads. I didn't
bother to go the extra mile and add harness or rod details, though
there is room in the cowl if you want to add it.
The detail of the Wildcat's unique landing gear is very good. I
followed the kit's directions and prepainted the wheel well parts flat
white, In his review, Scott mentioned doubts about the white, but it
does show off the chain detail and interior mechanism well through the
large openings on the sides of the fuselage. I picked out the molded-on
chain drive detail with black. The lower gear struts were painted Dark
Sea Blue (the exterior color for the plane I was following). By the
time you have finished these sub assemblies, there isn't much left on
the sprues!
Up to this point, I had been using Model Master Liquid cement... but
when I glued everything together in between the fuselage halves I ran
into a serious fit problem and had to resort to gluing it up bit by bit
with Zap-A-Gap, accelerator and a lot of pressure!
 Although I did dry fit the sidewall detail and the assembled cockpit
and wheelwell parts to the fuselage halves several times, I still
managed to have some fit problems. Maybe a misalignment of the firewall
or landing gear bulkhead? Part of the learning curve I guess. With
enough "urging" I got it down to a 1/16" gap on the bottom, just aft of
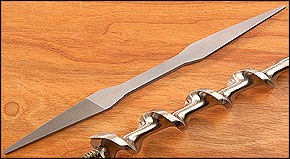
the landing gear, which the zap-a-gap filled up nicely! BTW: I used an
Auger Bit file, it is a small, fine file for sharpening drill bits that
has teeth on the flat faces at one end and on the edges on the other.
It is tapered at both ends too. VERY useful. (See Lee Valley Tools
below)
Although I did dry fit the sidewall detail and the assembled cockpit
and wheelwell parts to the fuselage halves several times, I still
managed to have some fit problems. Maybe a misalignment of the firewall
or landing gear bulkhead? Part of the learning curve I guess. With
enough "urging" I got it down to a 1/16" gap on the bottom, just aft of
the landing gear, which the zap-a-gap filled up nicely! BTW: I used an
Auger Bit file, it is a small, fine file for sharpening drill bits that
has teeth on the flat faces at one end and on the edges on the other.
It is tapered at both ends too. VERY useful. (See Lee Valley Tools
below)
|
CAMOUFLAGE & MARKINGS |
 After masking the gear and engine cowling,
and filling the cockpit opening with Elmer's Tack (Orange "Bluetak") I
airbrushed (Badger Anthem #155) the exterior with Model Master Acrylic
Dark Sea Blue. I was able to get away shooting it without thinning.
(cleaned it out with ammonia).
After masking the gear and engine cowling,
and filling the cockpit opening with Elmer's Tack (Orange "Bluetak") I
airbrushed (Badger Anthem #155) the exterior with Model Master Acrylic
Dark Sea Blue. I was able to get away shooting it without thinning.
(cleaned it out with ammonia).
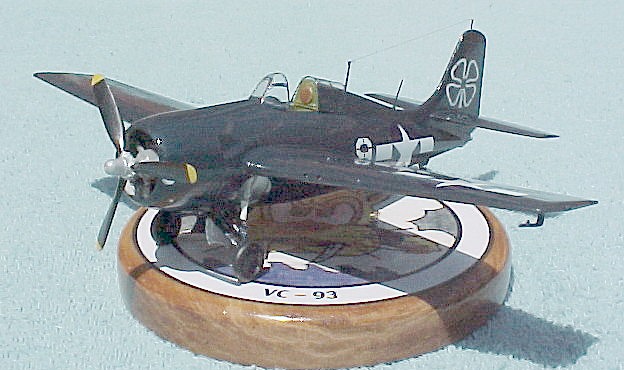
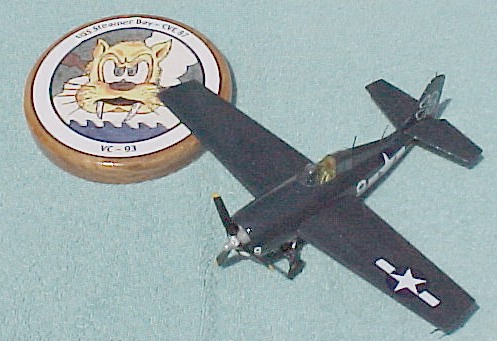
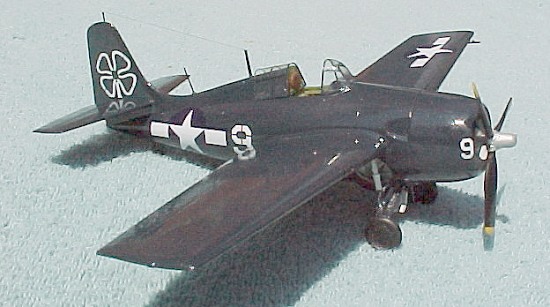
I wanted to model a plane that flew off of my father's ship, the USS
Steamer Bay CVE-87, a World War II Escort Carrier on which he was
Catapult Officer. They had two squadrons onboard during the war, VC-90
and VC-93. By chance, Aeromaster's Hot Rod Wildcats, Pt. 2 includes
decals for VC-93! They incorrectly note that VC-93 flew from the USS
Petrof Bay in June of 1945. I discovered from the squadron's website
that they moved f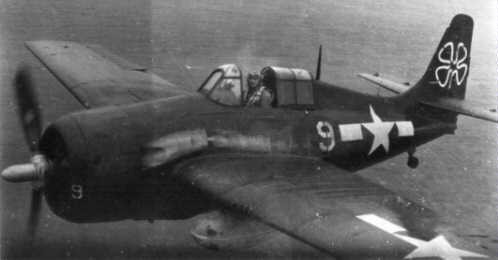 rom the Petrof Bay to the Steamer Bay at the end of
May 1945! I found a picture on their website of FM-2 #9 flown by Oliver
Dennett, so that's the one I used (turned the set's #6 upside down!) I
found several photos of their planes on the website that do not show a
cloverleaf on the wing (as shown in Aeromaster's drawing) so I left it
off. I put Future down under the decals, then brushed it across the
top. At first they wrinkled up, but they flattened right out and
snugged down. A final coat of Future helped smooth out some of the dust
on the paint.
rom the Petrof Bay to the Steamer Bay at the end of
May 1945! I found a picture on their website of FM-2 #9 flown by Oliver
Dennett, so that's the one I used (turned the set's #6 upside down!) I
found several photos of their planes on the website that do not show a
cloverleaf on the wing (as shown in Aeromaster's drawing) so I left it
off. I put Future down under the decals, then brushed it across the
top. At first they wrinkled up, but they flattened right out and
snugged down. A final coat of Future helped smooth out some of the dust
on the paint.
|
FINAL CONSTRUCTION |
Last but not least was the installation of the canopy, prop and bits
(pitot tube, antennas, wheels and arresting hook) I cut the canopy to
rough size with scissors, then cautiously carved it to size and shape
with an Xacto knife and lots of trial fits. Not
 nearly as bad an
experience as I had expected and the material looks a lot more realistic
than the normal thicker clear injected ones. I tried using the Black
Magic vinyl mask for the canopy frames. Great! It was lots easier than
using tape, but next time I will spray the paint rather than brush it
on... neater. The canopy was glued down with white glue which later
dried clear. I drilled for the antennas and used brass wire for the
rear masts. I used invisible thread for the antenna wire. The kit's
wheels are in two pieces and not great, so I used the True Details
wheels instead.
nearly as bad an
experience as I had expected and the material looks a lot more realistic
than the normal thicker clear injected ones. I tried using the Black
Magic vinyl mask for the canopy frames. Great! It was lots easier than
using tape, but next time I will spray the paint rather than brush it
on... neater. The canopy was glued down with white glue which later
dried clear. I drilled for the antennas and used brass wire for the
rear masts. I used invisible thread for the antenna wire. The kit's
wheels are in two pieces and not great, so I used the True Details
wheels instead.
For a stand, I milled disk out of Birch, stain and lacquered it, then
took a jpeg of the squadron's logo off the website and cleaned it up in
Illustrator. That got printed out onto decal film and then applied to
the wood. I then gave it a coat of Future. It came out fine until I set
it outside to photograph. Within minutes it was bubbling up! At least
the neighbors weren't home to hear my reaction! Guess I will try again,
printing onto cardstock instead!
|
CONCLUSIONS |
This kit was definitely enjoyable! It also gave me a chance to try several new materials and techniques. I think it came out pretty well, although I really need to move my airbrush away from the table saw! Building to a specific theme, ie: my dad's carrier, seems to help keep up the interest and get the kit finished!
|
REFERENCES |
F4F Wildcat, in detail, Bert Kinsey, Carrollton, Texas, Squadron
/Signal Publications
USS Steamer Bay, CVE 87,
http://home.comcast.net/~ivorjeffreys/steamer.htm
USS Petrof Bay, CVE 80,
http://home.comcast.net/~ivorjeffreys/petrof.html
Composite Squadron 93,
http://home.Comcast.net/~ivorjeffreys/vc-93.html
Auger Bit file, Lee Valley tools:
http://www.leevalley.com/wood/page.asp?SID=&ccurrency=2&page=32954&category=1,43072,43089
June 2002
Copyright ModelingMadness.com. All rights reserved. No reproduction in part or in whole without express permission. If you would like your product reviewed fairly and fairly quickly, please contact the editor or see other details in the Note to
Contributors.