
Hobbycraft 1/48 Piper L-4 Grasshopper
|
KIT # |
HC 1580 |
|
PRICE: |
CDN$8.99 |
|
DECALS: |
Five options |
|
REVIEWER: |
Olivier Lacombe |
|
NOTES: |
|
BACKGROUND |
For historical notes and a look in the box, check my preview .
|
CONSTRUCTION |
As stepping aside of the beaten
path is often dangerous, construction started with the cockpit, or more
appropriately with the lack of. As it is hopelessly barren, consisting
only of a blank instrument panel and two sticks and seats, it’s best left
dark. I decided to mask the inside of the windows (fuselage is clear
plastic), and for that I put some Tamiya masking tape on the outer ones
on the opposite fuselage side. I cut the masks, and stick them inside
the corresponding half. It worked flawlessly. A few pass with Flat
Black and the interior was done. A dark paint also helps attaining a
good opacity when you 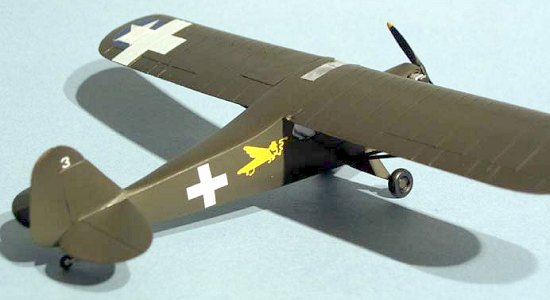 paint the kit later on. The seats were painted
Aluminium like the sticks, but the rod connecting the two was done in
Model Master Zinc Chromate to spice up the interior. The V-brace was
done with black paint.
paint the kit later on. The seats were painted
Aluminium like the sticks, but the rod connecting the two was done in
Model Master Zinc Chromate to spice up the interior. The V-brace was
done with black paint.
Once that was done, it was time to assemble the rest of the airframe. The firewall is trapped between the two fuselages halves, which being clear plastic are a bear to glue solidly. The fun really starts with the engine. It won’t fit inside the cowling, so hack away the engine and the cowling! Anyways, the point is the make the parts fit so they are straight. Once that is done, glue the assy to the fuselage and dispatch all the seams with putty. Mine had an evil seam of doom on top, so I had to revert to guerrilla tactics to make it disappear. I used two-part epoxy glue, but it barely made the cut. A little square piece of Bare-Metal foil saved the day. The tail feathers go on next, they fit without too much trouble, although the horizontal surfaces can be tricky to align. I elected to glue on the transparencies before painting, which I did after they were masked with Tamiya masking tape. Now that the plane was ready to paint, I chose to detail it a little further out. Using Bare-Metal foil, I made the wing root fairings and lead foil from a wine bottle allowed me to do the metal cover on top of the left wing’s fuel tank. Study your references, for J-3s had either one or two fuel tanks.
The fun does on with the struts and the landing gears. The struts can be glued on the wings without too much trouble, but do make sure you check the alignment often! The landing gear is the worst part of the kit. The fairings are actually too long and too pointy. Glue the part on, then take the axle and trim the fairing so that the axle rests on the fairing. Make sure you get a normal looking angle on the whole thing and glue everything on. As it lacks alignment pins, glue is what will hold it together.
|
COLORS & MARKINGS |
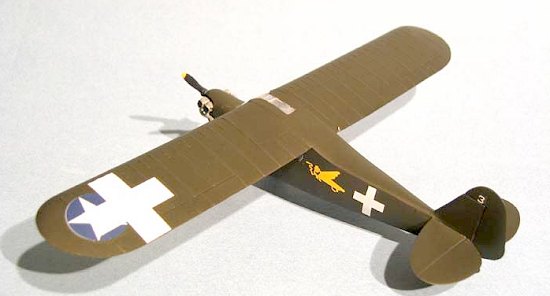
A simple paint scheme on this one: overall Olive Drab! I used the Tamiya shade for it.
 Once out of the paint shop, the
tail wheel can be glued in place and the axles can be trimmed so the
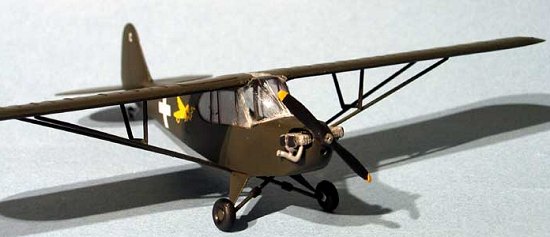
wheels fit on them (they are much too long). The propeller was painted
Flat Black with Insignia Yellow tips and an Aluminium hub. The engine
was detailed with Model Master Jet Exhausts for the, well, exhausts and
Aluminium and Black for the block.
Once out of the paint shop, the
tail wheel can be glued in place and the axles can be trimmed so the
wheels fit on them (they are much too long). The propeller was painted
Flat Black with Insignia Yellow tips and an Aluminium hub. The engine
was detailed with Model Master Jet Exhausts for the, well, exhausts and
Aluminium and Black for the block.
After the usual Future coat was applied, I proceeded to put the decals. I usually have nothing to say against Hobbycraft decals, but these were totally inadequate. The white is translucent and the other colours are slightly out of register and they mostly refuse to cooperate with Micro Sol. I however managed to obtain a passable result from them.
Poly Scale was used to attain the desired flat finish and upon unmasking the windows, I was horrified to find that the windshield was badly cracked. D’oh! It’s going to stay that way!!
|
CONCLUSIONS |
 Well, that was quite an
adventure! It took more than two years to get this simple kit from the
box to the shelf. I blame that on the bad fit, especially the landing
gears. It is not a L-4, more a J-3 labelled as a L-4. The L-4 had more
extensive glazing, as can be seen by Scott’s preview of the Heller L-4.
However, this kit is a good introduction to short runs, as it is
inexpensive, and suffers from the same problem as many short run kits!!
Well, that was quite an
adventure! It took more than two years to get this simple kit from the
box to the shelf. I blame that on the bad fit, especially the landing
gears. It is not a L-4, more a J-3 labelled as a L-4. The L-4 had more
extensive glazing, as can be seen by Scott’s preview of the Heller L-4.
However, this kit is a good introduction to short runs, as it is
inexpensive, and suffers from the same problem as many short run kits!!
July 2004
Copyright ModelingMadness.com. All rights reserved. No reproduction in part or in whole without express permission from the editor.
If you would like your product reviewed fairly and fairly quickly, please contact the editor or see other details in the Note to Contributors.
2024