|
KIT: |
Eduard 1/48 Yak-3 |
|
KIT # |
8027 |
|
PRICE: |
$22.50 |
|
DECALS: |
2 Aircraft: See review |
|
REVIEW & |
|
|
NOTES: |
|
|
HISTORY |
 Being born
and raised in the United States, the history lessons that we learned in school
about WW2 are understandably more focused on US involvement in the war with
relatively little attention paid to the contributions of our other allies, such
as the former Soviet Union. Modeling has opened up a whole new chapter of my
knowledge (which is very limited) of the Soviet contributions on the
"Eastern Front". I know little about the aircraft of this phase of the
war, but am amazed at the numbers and sizes of battles fought in this theatre.
Most US citizens know of D-Day, the famous landing on the beaches on Normandy,
but would be hard pressed to tell you about the assault on Moscow or Stalingrad,
or the massive land battle at Kursk. These battles (and their casualties) are of
a size and scope that is unfathomable to myself.
Being born
and raised in the United States, the history lessons that we learned in school
about WW2 are understandably more focused on US involvement in the war with
relatively little attention paid to the contributions of our other allies, such
as the former Soviet Union. Modeling has opened up a whole new chapter of my
knowledge (which is very limited) of the Soviet contributions on the
"Eastern Front". I know little about the aircraft of this phase of the
war, but am amazed at the numbers and sizes of battles fought in this theatre.
Most US citizens know of D-Day, the famous landing on the beaches on Normandy,
but would be hard pressed to tell you about the assault on Moscow or Stalingrad,
or the massive land battle at Kursk. These battles (and their casualties) are of
a size and scope that is unfathomable to myself.
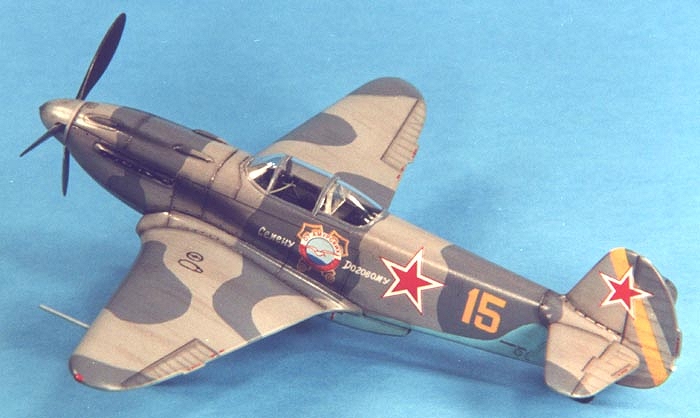
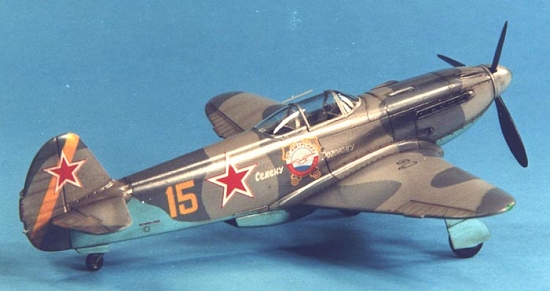
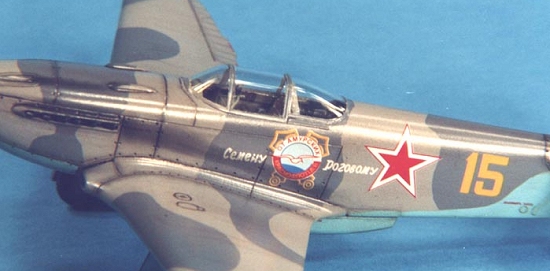
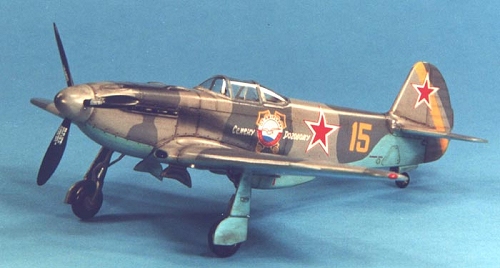
The kit modeled is Yellow 15, an aircraft flown by Semion Rogow 1st Guards Fighter Division in 1945.
|
THE KIT |
With Eduard’s new injection molding technology, the YAK-3 series of kits represent a quantum leap forward in quality over previous offerings and matches the Japanese kits in quality. The kit contains 51 injected plastic pieces (including 6 clear pieces) and a set of "Express Masks". Decal options are provided for two aircraft, Rogow’s aircraft, and LTCOL Boris Yeremin of the 6th Guard Fighter Aviation Division. Simplicity is the word which best describes this kit especially in comparison to the Accurate Miniatures YAK. It is very simple to construct, and is quite simple in detail (although it is on par with offerings from Hasegawa/Tamiya).
|
CONSTRUCTION |
After washing the parts in mild dishwater soap and letting them dry, I then pre-painted all the parts as indicated in the instructions. For interior parts, I used Polly Scale RLM02 Gray. Starting with the interior, I built up the kit as per the instructions. I had no major difficulties in assembling the fuselage components.
 I then glued the
fuselage halves together with liquid cement. Make sure you dry fit the engine
cowling before installation. I had to sand off just a hair from each side to
make a perfect panel line join without any sanding (which could destroy adjacent
detail). I also drilled out the openings in the gun troughs to accept hypo
tubing later in the installation process. The wing is a two piece affair that
includes the cockpit tub that also makes building very simple.
I then glued the
fuselage halves together with liquid cement. Make sure you dry fit the engine
cowling before installation. I had to sand off just a hair from each side to
make a perfect panel line join without any sanding (which could destroy adjacent
detail). I also drilled out the openings in the gun troughs to accept hypo
tubing later in the installation process. The wing is a two piece affair that
includes the cockpit tub that also makes building very simple.
After installing the stabilizers with liquid cement, I glued the wings in place. Simplicity is the word again; the assemblies slid right into place without any gaps and made a perfect join. I then used the "Express Masks" for the canopy framing and installed it in place with jeweler cement. After a final washing with Pollys Plastic Prep it was off to the paint shop.
|
PAINT & DECALS |
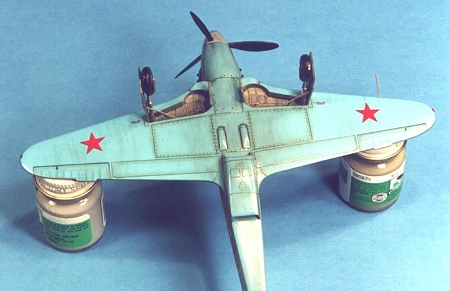 The model was painted in
a typical YAK-3 scheme of dark gray and light gray, with a bright blue
underside. I used Polly Scale USSR Underside Blue, Dark Topside Gray, and Light
Topside Gray. I first airbrushed the underside blue, and then the light gray on
the top portions. I enlarged on my scanner the painting pattern provided on the
instruction sheet to the correct size to make paper masks. I then used Tombo
Mono Multi Liquid Glue to coat the backside of the cutout masks. This is really
a great product for paper masks. The adhesive (when dry) will not pull up paint
but is fairly tacky so you can use paper masks around curves. I then carefully
lifted the edges with a toothpick to provide a slight amount of overspray and
airbrushed the dark gray. After letting the paint dry overnight I shot a light
coat of Future to prepare for decaling.
The model was painted in
a typical YAK-3 scheme of dark gray and light gray, with a bright blue
underside. I used Polly Scale USSR Underside Blue, Dark Topside Gray, and Light
Topside Gray. I first airbrushed the underside blue, and then the light gray on
the top portions. I enlarged on my scanner the painting pattern provided on the
instruction sheet to the correct size to make paper masks. I then used Tombo
Mono Multi Liquid Glue to coat the backside of the cutout masks. This is really
a great product for paper masks. The adhesive (when dry) will not pull up paint
but is fairly tacky so you can use paper masks around curves. I then carefully
lifted the edges with a toothpick to provide a slight amount of overspray and
airbrushed the dark gray. After letting the paint dry overnight I shot a light
coat of Future to prepare for decaling.
The kit decals are fairly good, nice and thin but prone to tearing. I added a few drops of liquid dish soap to the decal water and it helped a great deal. After a short drying period, I applied MicroSol setting solution to get the decals to melt into the surface. They responded very well to the setting solution with no permanent wrinkling. After drying overnight, I wiped the decals off with a moist cloth with a bit of Pollys Plastic Prep to remove any residue and after drying I shot a light coat of Future over the decals to seal them.
For weathering, I chose to accentuate the engraved panel lines and surface detail with a light burnt umber oil wash. I then sealed everything with a light coat of PS Flat Finish to provide a surface for pastel application. I then used a pastel pencil to lightly highlight the panel detail on the wings/tail surfaces. I use Derwent pastel pencils and they are quite easy to use, just lightly draw on the surface to be highlighted and blend with artists blending stump. A very nice, subtle effect can be achieved with these pencils that is much easier for me than dry brushing. I then randomly applied some ground up burnt umber pastels with a soft brush to simulate dirt staining on the lower surfaces and also the exhaust/gun streaks. Lastly, I applied a heavy burnt umber oil wash to the wheels and control surface joins.
|
CONSTRUCTION CONTINUES |
 final assembly I
installed all the exhaust stacks, pitot, landing gear, radiator assembly, and
propeller. In addition, I added 22-gauge hypo tubing to represent the machine
gun barrels (for some reason these are missing from the kit!). All pieces
"fit like a glove". Lastly, I airbrushed a coat of Pollys Satin Finish
to provide a semi-gloss sheen since the aircraft was made primarily of wood that
had a heavy varnish applied.
final assembly I
installed all the exhaust stacks, pitot, landing gear, radiator assembly, and
propeller. In addition, I added 22-gauge hypo tubing to represent the machine
gun barrels (for some reason these are missing from the kit!). All pieces
"fit like a glove". Lastly, I airbrushed a coat of Pollys Satin Finish
to provide a semi-gloss sheen since the aircraft was made primarily of wood that
had a heavy varnish applied.
|
CONCLUSIONS |
This was undoubtedly the easiest kit I have ever attempted! Not a spot of putty was used and the engineering of the kit serves as a model that I wish other manufacturers would copy. I highly recommend this kit as the first attempt for beginners. For advanced modelers who like to superdetail, you can purchase the "Profipack" version that adds more photo-etch details. Eduard deserves praise for this outstanding kit.
|
REFERENCES |
Schiffer Publishing, Stalin’s Eagles, $59.95
Ivy Books, Fighting In Hell, $6.99
Avery Publishing, West Point Military History Series: The Second World War (sold as set)
Modeling The Aircraft Of The Soviet VVS, http://www.geocities.com/~ipmsfortcrook/vvs
If you would like your product reviewed fairly and quickly by a site that has over 1,000 visits a day, please contact me or see other details in the Note to Contributors.