Eduard 1/48 Yak-3
|
KIT # |
|
|
PRICE: |
$40.00 |
|
DECALS: |
See review |
|
REVIEW : |
Frank Spahr |
|
NOTES: |
Profipack version |
The Ultimate in Construction Diaries!
Brutally open – uncensored - reveals all!
Kit: Eduard 1/48 Yak-3 Profi Pack
Day 1 Wednesday 5 April
 Cleared modeling desk; found reuse for old Hasegawa 1/72 Fw 190 A-5
box. Note: Don´t buy any more Testor´s enamels, or box will break.
Cleared modeling desk; found reuse for old Hasegawa 1/72 Fw 190 A-5
box. Note: Don´t buy any more Testor´s enamels, or box will break.
Cleaned kit with lukewarm soap water, rinsed, set out to dry on favorite old green shirt wife just sorted out.
Mused on which scheme to build.
Time: 5 minutes (musing time hard to calculate)
Excuse: My ice hockey team is on the brink of dropping out of the semifinals, and I don´t have the appropriate Pay-TV channel to watch.
Day 2 Thursday 6 April
My team has lost.
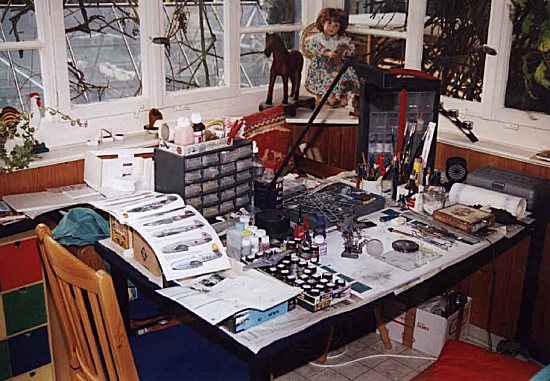
Anyway: Sat down at modeling table in the morning sun and tried to determine the appropriate shade of grey for the insides. Don´t have indicated shades of either RV, HU or TS in stock, small wonder in spite of owning 40+ shades of grey. Chose a grey I like.
Sprayed insides of cockpit, radiator and wheel wells grey.
Time: 20 minutes (spraying 5 minutes)
Same day, noon:
 Installed various cockpit odds-and-ends, mounted cowling to
starboard fuselage half. Interesting discovery: Eduard has preferred to omit
part numbers on sprues as well as positioning pins. Fit so far great. We´ll
see...
Installed various cockpit odds-and-ends, mounted cowling to
starboard fuselage half. Interesting discovery: Eduard has preferred to omit
part numbers on sprues as well as positioning pins. Fit so far great. We´ll
see...
Time: 35 minutes
Same day, later at noon:
Painted various cockpit items black, white and brown as instruction demands.
Time: 20 minutes
Same day, early evening:
Continued painting cockpit-related bits and pieces. Summoned all my guts and cemented upper and lower wing halves together.
Time: 15 minutes
Same day, later still:
Fiddled around microscopic cockpit knobs and levers until temper rose markedly. Decided on bringing along glasses with built-in magnifying lenses plus extra-fine tweezers. Still unsure how to apply levers securely into very shallow slots.
Time: 30 minutes
 Day 3 Friday, 7 April
Unexpectedly: A day off. And yet – had visit from insightful modeling pal today. Showed him levers of terror. He balked at them on account of their flatness and proposed scratchbuilding them from stretched sprue, producing the knobs by gently heating the plastic rod with a lighter until it forms a knob of its own account. So this project won´t be really straight OOB anyway – as originally intended. Still unsure which scheme to use.
Time: 30 minutes (but just decided they won´t go into account)
Day 4 Saturday, 8 April
Started early in the morning, eager to leave work on those &(/&$§&% levers behind. Realized after considerable length of sprue curling up in ridiculous forms that I´m currently not up to this, so used the PE parts anyway. Installed control column and foot pedals (both embellished with PE parts). Took break to let everything dry.
Time: 1 hour
Painted cockpit bits and pieces before lunch; started on pilot´s seat.
Time: 20 minutes
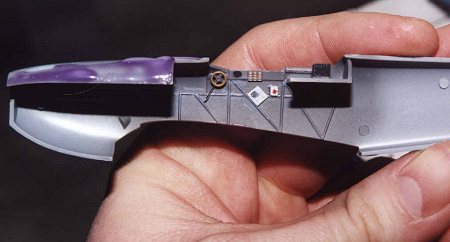
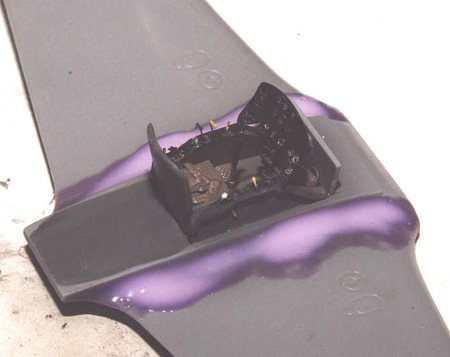
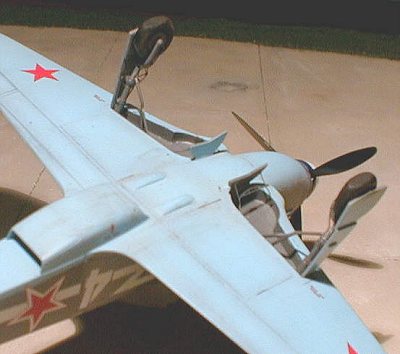
Completed painting cockpit, installed seat, weathered same. Test-fitted fuselage halves. Became very amazed at intelligent design of kit – parts are joined at actual panel lines. Fit simply great. Wonder HOW I´m going to bugger it this time. Realized it´s time for taking pictures.
Time: 45 minutes
 Completed cockpit, reattached obnoxious PE lever. Wondered what
big handle right under instrument panel is for. If it were a car, it might be
the hood release handle or perhaps the choke. But with a plane? Must consult
references. That I only have the Squadron booklet doesn´t make things easier.
Mused about paint scheme. I like those Russian schemes with text in epic length
in them („Hail to the glorious third party convention and thanks to the heroic
tractorists of brigade #5436 in Tcheljabinsk!") But the all grey scheme
with the red nose looks cool, too.
Completed cockpit, reattached obnoxious PE lever. Wondered what
big handle right under instrument panel is for. If it were a car, it might be
the hood release handle or perhaps the choke. But with a plane? Must consult
references. That I only have the Squadron booklet doesn´t make things easier.
Mused about paint scheme. I like those Russian schemes with text in epic length
in them („Hail to the glorious third party convention and thanks to the heroic
tractorists of brigade #5436 in Tcheljabinsk!") But the all grey scheme
with the red nose looks cool, too.
Time: 30 minutes
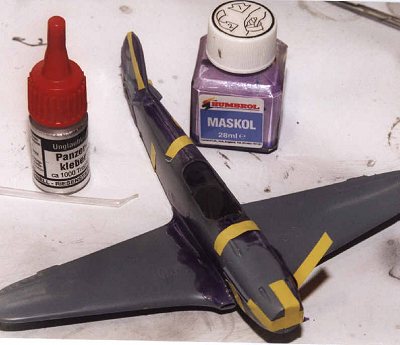
Woke at night and thought about how to prevent major blunders when mating fuselage halves and wing. I always manage to spill glue into the beautiful kit detail. Decided to give Maskol a try. More musings on paint scheme.
Time: hard to count in the wee hours, out of account anyway.
 Day 5
Sunday 9 April
Day 5
Sunday 9 April
Covered all endangered areas next to mating lines with Maskol. Took pictures.
Time 10 minutes
Summoned all my guts and cemented with CA. After more than proper setting time removed fixating tape and Maskol to discover perfectly acceptable result. Filled remaining gaps with CA. Assembled radiator (beautiful PE grills). Realized that time for decision on paint scheme draws nearer with giant steps.
Time: 1 hour
Day 6 Monday 10 April
My pace seems to slacken a bit. Did absolutely nothing today.
Day 7 Tuesday 11 April
Started sanding, one of my most favorite tasks. Realized my heart wasn´t really in it, so I quit after
20 minutes
 Day 8 Wednesday 12 April
Continued sanding, mounted closed canopy with Maskol to prevent overspray from affecting cockpit. Fit very satisfying. Ready for priming – spotting – sanding and so on.
Time 30 minutes
Day 9 Thursday 13 April
Continued same. All in all very little sanding etc. to be done, due to excellent fit.
Time 40 minutes
Day 10 Friday 14 April
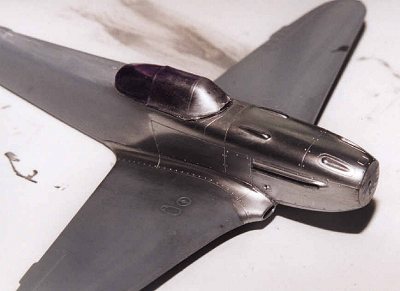
Painted all metal surfaces (those with rivets) Gunze Sangyo Mr. Metal. Buffed same with paper cloth. Resanded and painted minor glitches on upper and lower fuselage seams, especially one point right ahead from cockpit. Buffing worked very well, near-metallic surface resulted. Sprayed panel lines black.
Time 75 minutes
 Day 11
Saturday 15 April
Day 11
Saturday 15 April
Mounted radiator and stabilizers. Completed metalizer and pre-shading. Plane is ready for camo scheme to be sprayed. Now it´s my part to decide on which scheme to use. I´ll have another look into the net first.
Time: 30 minutes
Looked into VVS resource page. Paint alchemy seems to be near as mystical as with Luftwaffe (sigh). Determined on doing yellow 15, a two-tone grey camo scheme. Mixed light blue paint for undersides. Sprayed undersides. Considerable problems with airbrush. Paint clogged, mixture probably too heavy. Got it sprayed anyway. All my preshading is gone. Postshaded with RAF medium sea grey. Again applied light blue. Very satisfied with result, at least until I realized I´ll have to make some corrections, especially around the radiator. I´ll see to this tomorrow. Tonight prestigious boxing fight.
Time: 45 minutes
Day 12 Sunday 16 April
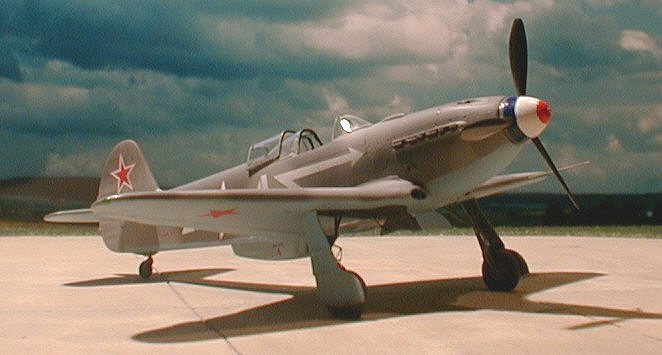
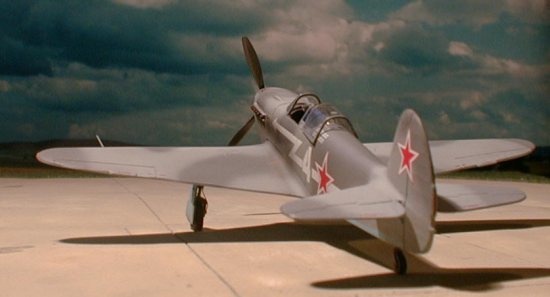
It really wasn´t such a good idea to give the undersides another shot of paint after watching the boxing fight. The several beers may have had some effect, too. Had to redo quite a lot in the way of shading and spraying light blue, but now things look quite alright for me. I´ll have to wait for the paint to dry, then polish it a bit and recoat with clear gloss paint before I can continue in earnest. Have given the question of which scheme to use yet some more thoughts and decided to do Roger Marchi´s White 4, a plane of the free french Normandie-Niemen regiment. Photographic evidence doesn´t show all that much concerning how hard or soft the borders are, but I´ll do hard demarcations between underside and camo, and soft borders between the light and dark gray of the camo. But before I do that, I´ll have to complete the cockpit and canopy.
Time: 1 hour
Masked canopy. Provided masking material is cut to size very exactly; the bulged parts are procided as „frames" only, remainder has to be filled with Maskol. Makes things easier! Adhesion of material is inferior to that of EZ-Masks, strips tend to come off at junctions. Masked area around wheel wells.
Time: 20 minutes
Sprayed wheel wells, primed canopy framing with metalizer and dark grey. Went to bed to prevent further BS.
Time: 15 minutes
Day 13 Monday 17 April
Mounted frame for gunsight and armored screen behind pilot´s head. Glued rear part of canopy to fuselage with white glue. Fit leaves nothing to be desired.
Time: 20 minutes
Mounted gunsight, glued front part of canopy with white glue, placed middle part of canopy with Maskol. Polished and masked undersides.
Time: 20 minutes
 Day 14 Tuesday 18 April
I finally did it. I must admit I neglected each and all references and advice. I´m liable to severe colour police punishment. I chose my shades of grey for the camo as: Neutral grey and RLM (!) 75. Both seemed OK for me, and both was available in gloss. So I sprayed the kit in a totally uneventful manner.
Time: 25 minutes
Read very insightful editorial by Scott today. The man´s right. We´ve all experienced these and worse mishaps before. It´s just that his output both in quality and numbers stands markedly/vastly above mine, so it´s from quite a different angle when he terms himself a Klutz. My problem is that I frequently don´t have the heart for correcting certain mistakes. I´ve too often experienced that my attempts at correction made everything worse, so I had to dump the kit. I´m not that far yet that I can easily live with that.
Day 15 Wednesday 19 April
Polished model with Ivoclar high gloss paste early in the morning. Managed grade A+ entry for Klutz-of-the-month-contest. Paint came off in various places. Redo from start.
Well, I´m always in for the thinnest of paint coats, but this one was too thin.
Time: 10 minutes I had better spent drinking tea.
Day 16 Thursday 20 April
Redid paint job. Left model to dry and drove off into holidays.
Time: 30 minutes
Day 17 Friday 28 April
Ruthlessly applied decals of Normandie-Niemen version without so much as spending a single thought on alternative schemes. Started with the biggies, then left to dry. Decals react very fast to watering, seems reasonably thin. Used Micro Sol.
Time: 10 minutes
Day 18 Saturday 29 April
Decals look fine. Continued with stencilling. Wondered briefly what all these Cyrillic words mean. They might print just about anything without most of us to find out. I´m just applying 2 or 3 decals at a time to prevent me from touching and dislocating or destroying unset ones.
Time: 40 minutes
Day 19 Sunday 30 April
Coated model first with Revell gloss coat, then with several flat coats.
Time: 40 minutes
 Day 20 Tueday 2 May
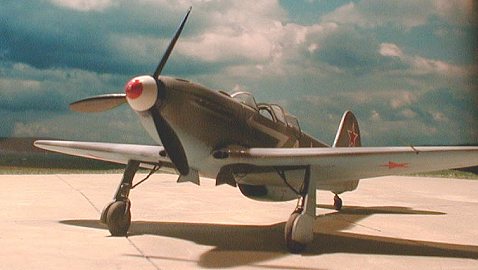
Off we go towards the finish line: Mounted prop, fought a while with painting, finally brush-painted the red and blue parts. Blades were brush-painted Humbrol gun metal, then polished. Exhausts were carefully drilled open, painted gun metal and drybushed with burnt siena. Maskol was finally removed from canopy, borders cleaned up with toothpick. Flattened resin wheels were used, brush-painted.
Brake cables were installed at landing gear, using brass wire that comes with the more mature spanish wines, mounted with single strands of model railroad copper wire, secured with superglue.
Time: 2 ½ hours
Day 21 Monday 22 May
Finished model in one determined effort, completed landing gears with flimsy etch parts, replaced machine gun barrels and pitot tube with sections of hypodermic syringes. Sprayed moderate exhaust stains, used pastel chalks at undersides of plane and landing gear.
Time: 2 hours
Total: 19 hours and 10 minutes.
Conclusions:
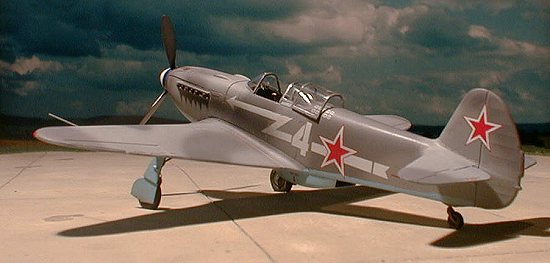 Building this kit was a real delight! It is so cleanly engineered
that it simply falls together. The extra effort spent in masking all areas
adjoining the seams paid off greatly. You hardly need any sanding or filling.
The cockpit is nicely detailed, the instructions come up to the rest (with the
exception of omission of part #s on sprues), the colour pics of preserved
examples also help, all in all this kit offers a tremendous amount of value for
money, so no aftermarket items are really needed in my opinion.
Building this kit was a real delight! It is so cleanly engineered
that it simply falls together. The extra effort spent in masking all areas
adjoining the seams paid off greatly. You hardly need any sanding or filling.
The cockpit is nicely detailed, the instructions come up to the rest (with the
exception of omission of part #s on sprues), the colour pics of preserved
examples also help, all in all this kit offers a tremendous amount of value for
money, so no aftermarket items are really needed in my opinion.
Highly recommended, I'll also build the P-40 and Tempest, I'm sure!
Copyright ModelingMadness.com
If you would like your product reviewed fairly and quickly, please contact me or see other details in the Note to Contributors.
Back to Reviews Page 2017