| KIT #: | 32007 |
| PRICE: | $64.95 MSRP |
| DECALS: | Five options |
| REVIEWER: | Tom Cleaver |
| NOTES: | Short run multimedia kit |
| HISTORY |
The Fiat G.55 was Fiat’s answer to
a 1942 requirement placed by the Regia Aeronautica
for a fighter that would be designed from the outset to take advantage of the
German Daimler-Benz engine.
The previous fighters - the Macchi C.202 and the
Reggiane Re.2001 - had been developments of earlier designs to utilize the
Daimler-Benz DB601.
Named Centauro
the G.55 was a development of the G.50 Freccia,
though it owed little more than a general layout commonality to that fighter.
Fiat was fortunate that they had already been working on
an advanced design when the Regia Aeronautica
decided to produce a “third generation” fighter.
The previous design had been planned to utilize a
domestic high-performance engine which did not come to fruition.
 Modification
of the advanced design to utilize the German DB605 engine was relatively easy,
and it put Fiat ahead of its competitors - Reggiane with their Re.2005 and
Macchi with their C.205N and their “stopgap” C.205V, with the Fiat prototype
taking flight on April 30, 1942, well before the competition.
Modification
of the advanced design to utilize the German DB605 engine was relatively easy,
and it put Fiat ahead of its competitors - Reggiane with their Re.2005 and
Macchi with their C.205N and their “stopgap” C.205V, with the Fiat prototype
taking flight on April 30, 1942, well before the competition.
The G.55 was originally designed
around an engine-mounted MG151 20mm cannon, with four Breda SAFAT 12.7mm machine
guns 9n the nose, firing through the propeller.
This became the Serie O,
12 of which were ordered as pre-production aircraft; these were the only G.55s
to see any service with the Regia Aeronautica prior to the Italian surrender in
September 1943, though their use was limited to interceptions of Allied bombers
in the vicinity of Rome prior to the declaration of Rome as an “open city.”
By May 1943, the
Serie I had flown with the central MG151, two
12.7mm machine guns in the upper forward fuselage, and an MG151 in each wing.
Italian pilots were elated when the Serie I proved
itself more maneuverable than either the Bf-109G or the Fw-190A in tests that
summer, with the Italian fighter being able to accelerate away from both German
fighters in a dive and only being inferior to the Focke-Wulf as regarded roll
rate.
By the time production began for
the Serie I in the fall of 1943, Italy had surrendered.
The pilots of the Serie O aircraft were all from
Northern Italy, an d since Fiat was based in Turin in the
Republica Sociale Italiana declared by Mussolini following
his rescue by the Germans, it was logical that the airplane would now become the
main equipment of the Aviazione Della R.S.I.,
the new Fascist Air Force, and several thousand G.55s were ordered.
Unfortunately, shortages of engines
began to develop quickly.
The license-built Italian engine of the DB605 was as
good as the license-built Italian version of the DB601 (not very), and the
Italians were forced again to depend on German production for
 their
engines, which put them at the end of the priority list after the DB605s were
produced for the Luftwaffe. In the end,
due to shortages and non-delivery of the DB 605A-1 engines, only 105 FIAT G55's
were produced.
Force majeure required that the Italian units re-equip with the
Bf-109G, though some unofficial production of the G.55 continued until the end
of the war.
their
engines, which put them at the end of the priority list after the DB605s were
produced for the Luftwaffe. In the end,
due to shortages and non-delivery of the DB 605A-1 engines, only 105 FIAT G55's
were produced.
Force majeure required that the Italian units re-equip with the
Bf-109G, though some unofficial production of the G.55 continued until the end
of the war.
Following the end of the war, production of the G.55 resumed for foreign export with G.55A single-seaters and G.55B two-seat trainers built. The G.55A was armed with either 2 12.7mm machine guns or 2 20mm canon in the wing, plus the 2 12.7mm machine guns in the cowling. The postwar Italian Aor Force purchased 10 two-seaters and 9 fighters, while 30 - 15 G.55As and 15 G.55Bs - were sold to Argentina. Argentina returned 17 G.55As that were then sold to Egypt in 1948, though they did not take part in hostilities. The final version of the G.55 was the G.59, which was redesigned to use a Merlin engine. The Italian Air Force bought 10 single-seater and 10 two seater G.59s to use as fighter trainers in 1952-52, thus making the Fiat design the last piston-engine Italian fighter in production.
| THE KIT |
This kit by Pacific Coast Models is
the first G.55 to appear in 1/32 scale, and continues the company’s
specialization of producing models of Italian aircraft.
As with the Reggianne Re.2005 and the Spitfire IX kits,
this kit is produced by Sword of the Czech Republic, with photo-etch from Eduard
and decals from Cartograph.
The G.55 has had a spotty history
as a model. Back in the early 1970s, the company that later became Italerei
produced a 1/72 kit that was acceptable for the time and can still be found.
(As mentioned in the preview, Frog did a fairly nice one that was later
reissued by Revell. MPM/Special Hobby have an excellent series of G.55s in
1/72, the results of one build can be seen
here. Ed)
Earlier in the late 1960s, Merit had produced a G.55 that was really
1/50 scale though marketed as 1/48; it did superficially
 resemble
a G.55 and was released in the 1980s by SMER, and may still be found.
This kit is only worthwhile if you are on a really tight
budget and price is your only consideration.
In the mid-1990, Classic Airframes produced a 1/48 G.55
that suffered from serious shape problems.
In 2007, Special Hobby released a G.55 with fuselages
allowing a modeler to do either the Serie O
or Serie I, and this is the best kit of
the airplane available in 1/48.
MPM/Special Hobby had announced last year that they
would produce a 1/32 kit, but they have been beaten to the starting gate by this
kit from Pacific Coast Hobbies
resemble
a G.55 and was released in the 1980s by SMER, and may still be found.
This kit is only worthwhile if you are on a really tight
budget and price is your only consideration.
In the mid-1990, Classic Airframes produced a 1/48 G.55
that suffered from serious shape problems.
In 2007, Special Hobby released a G.55 with fuselages
allowing a modeler to do either the Serie O
or Serie I, and this is the best kit of
the airplane available in 1/48.
MPM/Special Hobby had announced last year that they
would produce a 1/32 kit, but they have been beaten to the starting gate by this
kit from Pacific Coast Hobbies
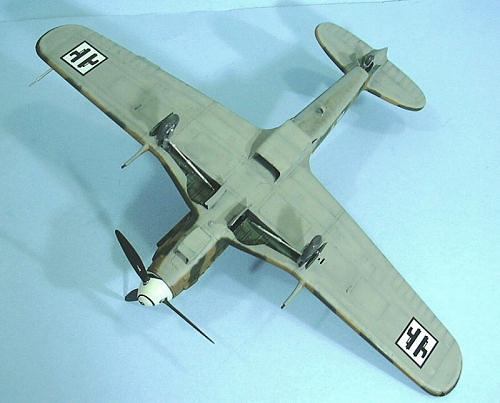
The kit is typical Sword: shiny
injection plastic, a bit thick, with panel lines that are slightly heavy but
will look OK under the proverbial coat of paint from my experience.
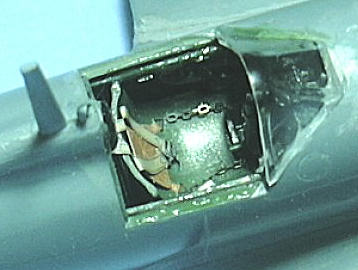
The cockpit and wheel wells and engine are done with
very crisp resin parts that are so well-done there are very few parts, yet the
result will look highly detailed.
Test-fitting the kit reveals that the fit of the plastic
parts is superior to that of the Re.2005 and somewhat better than the Spitfire
IX, both of which are very good examples of limited-run kits.
The two part canopy and windscreen are thick, but very
clear.
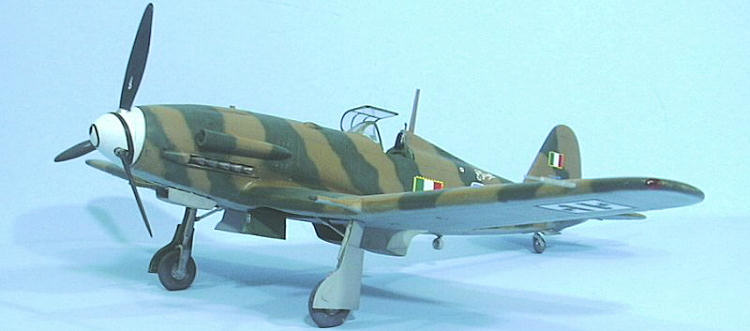
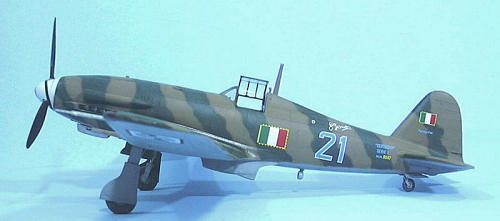
Decals are provided for five aircraft flown by the Aviazione Della R.S.I.. Two are in dark green and grey, one (the boxart airplane) is in German 74/75/76, one is in Dark Earth and Dark Green banded markings, and the last is in the tri-color “splinter camouflage.”
| CONSTRUCTION |
This is easily the best 1/32 kit
from Pacific Coast Models yet, even better than the very good Spitfire, in terms
of production design and ease of assembly.
Everything fits quite closely, which is a first for a
Sword kit in my experience.
While it is indeed a limited-run kit and therefore
requires that you test-fit twice before gluing once, the various parts did not
need much more than clean-up for everything to fit nicely.
 I built the model as two
sub-assemblies: fuselage with cockpit and tail, and wing with wheel well.
I built the model as two
sub-assemblies: fuselage with cockpit and tail, and wing with wheel well.
The first thing I did was glue the
fuselage halves together, and attach the panel for the fuselage guns, and attach
the resin exhausts in place; this last required some clean-up of the open area
in the fuselage to get good fit, but was otherwise no problem.
I then glued the upper wings to the
lower outer panels; these benefitted from sanding down the interior of the
trailing edges before assembly to get nice thin trailing edges.
I then moved on to the detail
parts.
 n
this was all dry, I airbrushed the parts with Xtracrylix Flat Varnish.
n
this was all dry, I airbrushed the parts with Xtracrylix Flat Varnish.
The only part of the details I
didn’t like was the photo-etch individual instrument faces.
It was guaranteed I would lose at least two and in fact
I lost three.
Fortunately those were the very small ones, and their lack of
presence was not really that noticeable in the end.
I think it would have been very easy to do the usual
photo-etch “sandwich,” which would have been easy to glue to the resin
instrument panel.
Once all that was done, I cut off
the parts from their molding blocks with the trusty Dremel, and assembled the
wheel wells and the cockpit tub.
The wheel well assembly was then
attached to the lower center wing.
Test-fitting showed the central part of the wheel well
with the engine detail was not going to fit without some extra effort.
I dremeled the exterior of that part till it was
paper-thin, and it still wouldn’t fit because the inner area of the exhausts was
in the way.
I ended up dremeling the exhausts until the rear area was flush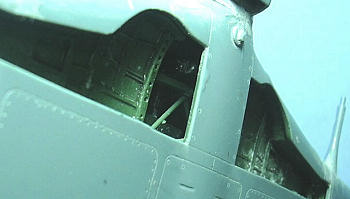 with the interior of the fuselage, at which point everything fit easily.
I then slid the wings over the
outer end of the wheel wells and discovered I needed to dremel the wheel wells
to fit; these were thinned down until I could see light through them, at which
point the wing assembly was easy.
I rubber-banded the wings to the lower center assembly
to get a good fit.
The cockpit tub slipped into
position without a problem and was pushed up into final position.
The good news here was that doing so widened the
fuselage just enough to give a good tight fit of the fuselage sub-assembly to
the wing sub-assembly.
In fact, it was so tight I had to use some big rubber
bands to hold it in position while it set up overnight.
The result of all this nice tight
fit was that I only had to sand things down a bit, apply Tamiya Surfacer (the
only available replacement for Mr. Surfacer, and a very good replacement since I
think it’s the same substance) to all the seams, then sand the joints smooth.
I rescribed where necessary, and the model was ready for
the paint shop
| COLORS & MARKINGS |
 Painting:
I first pre-shaded the model.
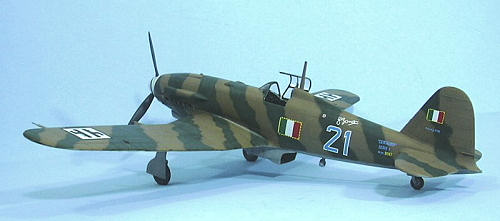
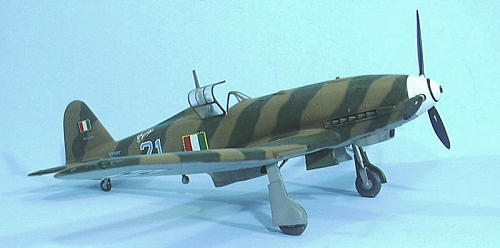
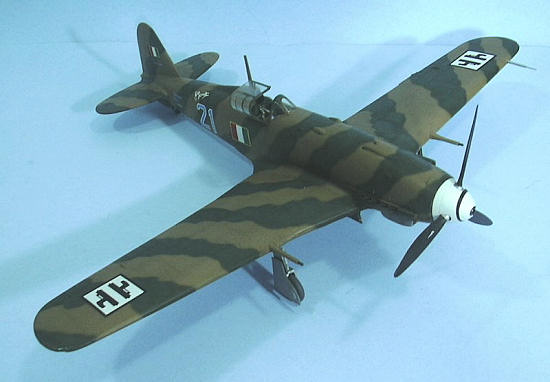
I had decided to do the airplane as the G.55 Serie I of
3rd Squadriglia, 1st
Gruppo Caccia, since the “chevron” camouflage was unlike
any other model in my collection of Italian fighters.
I painted the lower surfaces with Tamiya “Sky Grey.”
The upper surface camouflage was Tamiya “Japanese Army
Green” and a mixture of Gunze-Sangyo “Dark Earth” and Tamiya “Desert Yellow” to
match the shade in the color profile.
Everything was airbrushed freehand.
When this was dry, I gave the model a coat of Xtracrylix
Gloss Varnish.
Decals:
The Cartograf decals went on
without problem under a couple coats of Micro-Sol.
I used an old decal from a Super-Scale Luftwaffe sheet
for the black spiral on the white spinner. When the decals were dry, I washed
the model to get rid of setting solution residue and gave it a coat of
Xtracrylix Satin Varnish.
| FINAL CONSTRUCTION |
The model was given a final coat of
Xtracrylix Flat Varnish with a brushful of Tamiya “Flat Base” added in for a
flatter final finish.
I applied exhaust stains with Tamiya “Smoke.”
Since these airplanes didn’t see a lot of operational
use, I left the model clean otherwise.
The prop and spinner were assembled
and attached, and the landing gear was attached; there was nothing fiddly about
this landing gear assembly.
I unmasked the windscreen and canopy and mounted the
canopy in the open position.
| CONCLUSIONS |
 Aesthetically, Italian fighters
looked really good when their well-designed airframes were mated to Daimler-Benz
engines.
I think the G.55 may be the best-looking of the bunch.
It looks really nice sitting on the shelf next to the
Macchi C.200 and C.202 and the Re.2005.
Aesthetically, Italian fighters
looked really good when their well-designed airframes were mated to Daimler-Benz
engines.
I think the G.55 may be the best-looking of the bunch.
It looks really nice sitting on the shelf next to the
Macchi C.200 and C.202 and the Re.2005.
Overall, this kit is one of the
easiest limited-run kits I have done, with the only difficulty being the need to
grind down the resin parts to fit inside the wings and then inside the fuselage.
There was no problem in accomplishing that (your Dremel
is your friend!), after which assembly was very easy.
A modeler with a couple of limited-run kits under their
belt should have no trouble turning out a really nice-looking result.
Highly recommended.
December 2008
Thanks to Pacific Coast Models for the review kit. Get yours at http://pacmodels.com
If you would like your product reviewed fairly and qu, please contact me or see other details in the Note to Contributors.