Airfix 1/72 SM.79 Sparviero
|
KIT # |
? |
|
PRICE: |
$33.95 NZ (reissue price) |
|
DECALS: |
Two options |
|
REVIEWER: |
Mark Fordham |
|
NOTES: |
Typical, spend years looking for one THEN they re release it. |
|
HISTORY |
The SM79 was the most famous version of a line of
tri-motor Italian bombers. It was christened Sparviero (Sparrow Hawk) but
it's crewmen called it Gobbo (Hunchback). This sturdy hump-backed
aircraft dated back to 1934 and didn't look like much, but it provided
valuable service in all Italian theaters, even in the most difficult
conditions. Originally created as a
 bomber, it really came into it's own
as a torpedo-bomber. The image here is from the Spanish Civil War, hence
the colours are not those of WWII. Production ceased in 1944 after about
1370 aircraft were built. It was used by the Italians after the war as a
transport and target tug.
bomber, it really came into it's own
as a torpedo-bomber. The image here is from the Spanish Civil War, hence
the colours are not those of WWII. Production ceased in 1944 after about
1370 aircraft were built. It was used by the Italians after the war as a
transport and target tug.
The S.M.79 II had a crew of four, with three 1000 hp Piaggio P.XI RC40 radial engines. It boasted a speed of 267 mph (434km/h), a ceiling of 23,000 ft (7000m) and a range of 1,180 mi (1900km). It was armed with four or five machine guns (usually a mixture of 12.7 mm and 7.7mm guns) one facing forwards over the cockpit, one facing backwards from the "hump", one facing forwards in a ventral position and one each for side windows. It could carry 1250 kg of bombs internally, or a single torpedo externally.
History from http://www.constable.ca/sm79.htm
|
THE KIT |
 If I had a just one
beef with Airfix, me “Mr Airfix”, it would be Airfix’s annoying habit of
re-releasing a kit about 2 months after I had spent a great deal of time
and money tracking down an OOP copy, this has happened on a number of
occasions now, notably with the Boomerang and the SM79, this kit I had
been after for years and after much searching I had managed to track one
down and persuade the owner to part with it and of course less than 2
months after completing it and feeling really smug with myself Italeri
release their vastly superior 1/72nd scale offering and Airfix
respond by re-releasing their offering in a flash new box, aaarrrrrgggg
almost enough to make me go join the local Kapa-Haka.
If I had a just one
beef with Airfix, me “Mr Airfix”, it would be Airfix’s annoying habit of
re-releasing a kit about 2 months after I had spent a great deal of time
and money tracking down an OOP copy, this has happened on a number of
occasions now, notably with the Boomerang and the SM79, this kit I had
been after for years and after much searching I had managed to track one
down and persuade the owner to part with it and of course less than 2
months after completing it and feeling really smug with myself Italeri
release their vastly superior 1/72nd scale offering and Airfix
respond by re-releasing their offering in a flash new box, aaarrrrrgggg
almost enough to make me go join the local Kapa-Haka.
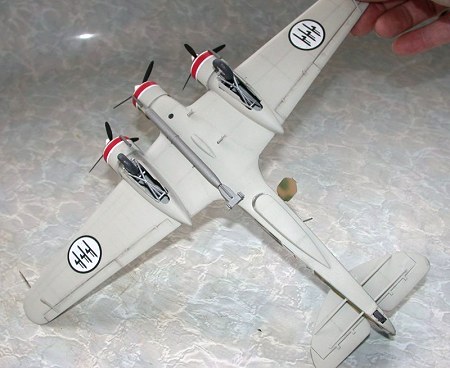
The version boxing I have is the 1970’s issue and as far as I can tell there is no difference from the 2004 re-issue apart from the Decals, compared to the Italeri offering the Airfix kit really shows it’s age with crude detailing on the undercarriage, standard Airfix rivets, raised panel lines and little in the way of interior detail, not that you can see much through the thick glass.
|
CONSTRUCTION |
Construction starts with simple cockpit which consists of seats, floor, and control columns, I added seatbelts and a few odds and ends and painted the whole lot gray as the scale 3 foot thick canopy stops you from seeing any real detail anyway.
Even though this kit
dates from the about the late 60’s, fit is pretty good and like most
Aifix kits very little filler is needed on the fuselage joins. A light
sand is all that is required. Moving onto the wings shows that my
particular kit had a little problem with heat over the years and the
starboard wing was a tad warped, I glued the wings together as far as the
warp and then plunged the wing into near boiling water and quickly bent
the offending wing to the right shape and taped it up until it had
 cooled
down. There is no undercarriage detailing what so ever but as I build
most of my Airfix offering out of the box I left the cavernous wells
alone.
cooled
down. There is no undercarriage detailing what so ever but as I build
most of my Airfix offering out of the box I left the cavernous wells
alone.
Moving onto the engines presented no problems other than the tedious clean up of components that is standard with Airfix, the engines where painted metallic Gray and dry brushed with silver to bring out the detailing. With the addition of the tail planes the major airframe was complete and just needed a quick sand over to remove the rivets and raised panel lines. Once the airframe was smooth I re-scribed the most prominent panel lines. The glassed areas were masked up and added at this stage and small amount of filler was needed to flair them in, but if you have build more and a couple of Airfix kits over the years you will know that Canopies are not one of Airfix strong points, If you can get them I would recommend a set of Squadron Vac canopies.
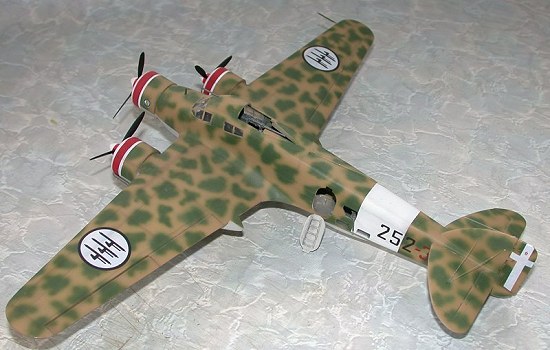
The torps that come with the SM79 are really Naff and bare no resemblance to any torpedo ever dropped, looking in the spares box produced one usable torpedo that came off a Italeri Ju 88 but research shows it was not uncommon for the SM79’s to only carry one torpedo during a mission so I made up some mounting shackles out of plastic card and stretched sprue and mounted the one torp.
|
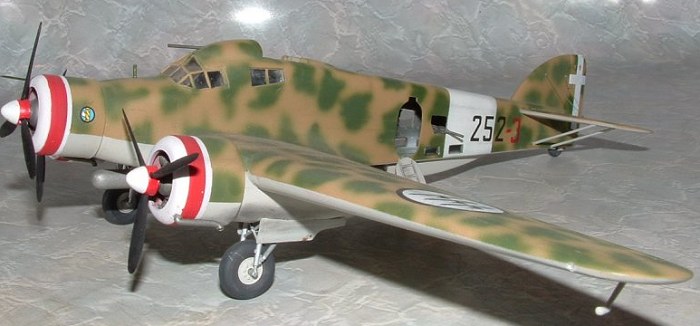
COLORS & MARKINGS |
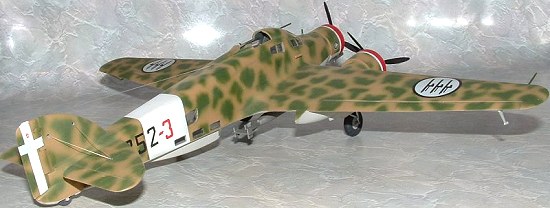
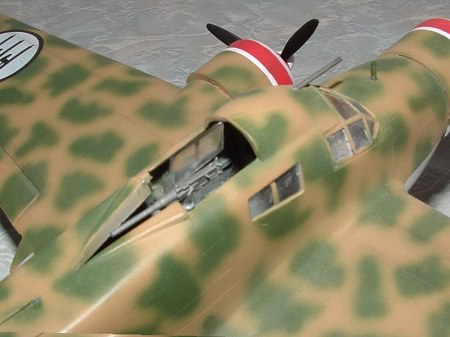
One of the things that
attract me to aircraft modeling is models like the SM79, the green over
sand mottle is the sort of cool camouflage that I like. The entire
airframe was given a couple of heavy coats of Tamiya light Gray to act as
an undercoat to show up the many flaws that I always seem to end up with,
after going back over the plane and filling the worst of the sink
 marks
and re-spraying it was time to mask off the underside which being light
Gray didn’t need any additional paint, Tamiya Desert sand was then
applied to the top surfaces using my trusty old Paasche H and left to
dry. The Green mottle was done freehand using my Paasche VSL-90 spraying
at about 18 psi.
marks
and re-spraying it was time to mask off the underside which being light
Gray didn’t need any additional paint, Tamiya Desert sand was then
applied to the top surfaces using my trusty old Paasche H and left to
dry. The Green mottle was done freehand using my Paasche VSL-90 spraying
at about 18 psi.
Once all the masking tape was removed the red stripes were masked off and sprayed using Tamiya matt red. The white theatre stripes were done in the same session and did you ever notice that spraying white after spraying red is an exercise in frustration, it doesn’t matter how many times I strip the airbrush and clean it, how many liters of thinner I try to blast through the tip and the fact that it can look as clean as a whistle the second I fill up the cup with white and try to spray it I end up with a hot pink stripe!
The decals went on well with no silvering even though they had been rattling around in the bottom of a damp box for 30 odd years. The decal paper had mould growing on it and I first thought that the decals would be toast but after a 40 second soak in hotter than average water they were finally persuaded to part from the backing paper, my homemade decal softener soon made short work of the brittle decal and melted it down onto the paintwork.
|
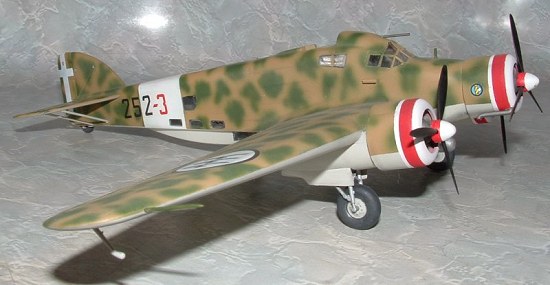
CONCLUSIONS |
 As far as Airfix kits
go the SM79 was typical 60’s/70’s Airfix, simple in parts, chunky
detailing and no real vices when putting it together, I’ve seem pictures
of Airfix SM79’s that have been “fully worked” and they are true
masterpieces, but built straight out of the box a decent looking model
can result, it just that Italeri’s 2004 issue is better and so it should
be as there must be 35+ years in difference in the age of the molds.
As far as Airfix kits
go the SM79 was typical 60’s/70’s Airfix, simple in parts, chunky
detailing and no real vices when putting it together, I’ve seem pictures
of Airfix SM79’s that have been “fully worked” and they are true
masterpieces, but built straight out of the box a decent looking model
can result, it just that Italeri’s 2004 issue is better and so it should
be as there must be 35+ years in difference in the age of the molds.
Airfix obviously tried to cash in on the new Italeri issue and re-release their old Dinosaur in a fancy new box and as much as it grieves me to say this as an Airfix nut skip the Airfix offering and go straight for the Italeri one, as price-wise in New Zealand at least there is like $3.00 difference.
As a footnote I had the opportunity to have a good look at the Italeri version today and the moldings are very nice but the fabric effect on the fuselage and tail planes is heavily overdone and distracts from being an excellent model.
|
REFERENCES |
Google SM79
TC’s reviews of the 1/48th scale offering right here on MM
http://www.constable.ca/sm79.htm for history
August 2004
If you would like your product reviewed fairly and fairly quickly, please contact the editor or see other details in the Note to Contributors.