| KIT: | Eduard 1/48 FW-190A-8 |
| KIT #: | 8173 |
| PRICE: | $39.95 MSRP |
| DECALS: | Four options |
| REVIEWER: | Dan Lee |
| NOTES: | Kit built out of the box |
| HISTORY |
Kurt Tank designed one of the most effective and versatile fighters of WW2 which did almost everything asked of it from low level attack to high altitude interceptor.
The FW190A-8 version was equipped with an uprated BMW801 radial engine and designed to be a bomber interceptor—the most numerous version of the FW190 ever built. It was heavily armed with 4 20mm cannon in the wings and a pair of 13mm machine guns in the fuselage which was powerful enough to shoot down a B-17 or B-24 (assuming it could survive the defensive fire of their guns and avoid the P-38, P-47 and P-51 escorts.)
Please see other FW190 reviews for more detailed information and cover it better than I can.
Hans Dortenmann
 Hans Dortenmann was originally an
infantryman, but transferred to the Luftwaffe and underwent flight training in
1941. After he graduated, he was assigned to II/JG54, the Grunharts in 1943.
JG54 was assigned to the Eastern Front and one of the most famous Luftwaffe
fighter groups due to its distinctive Green Heart emblem and colorful markings.
By the time Hans and the II/JG54 were transferred to the Western Front in June
1944, Hans had shot down 14 Soviet planes.
Hans Dortenmann was originally an
infantryman, but transferred to the Luftwaffe and underwent flight training in
1941. After he graduated, he was assigned to II/JG54, the Grunharts in 1943.
JG54 was assigned to the Eastern Front and one of the most famous Luftwaffe
fighter groups due to its distinctive Green Heart emblem and colorful markings.
By the time Hans and the II/JG54 were transferred to the Western Front in June
1944, Hans had shot down 14 Soviet planes.
II/JG54 arrived in just in time to get involved in the wild fight of the Normandy Campaign. Dortenmann shot down a P-47 and a P-51 before he was shot down over Paris on June 26, 1944 while flying a FW190A-8.
In total Hans shot down 38 aircraft, 22 on the Western Front and 16 on the Eastern Front, but what makes him notable is that he was the FW190D9 aces of aces. He shot down 18 allied aircraft in the Dora. Hans survived the war to live in West Germany, became an architect and died in 1973.
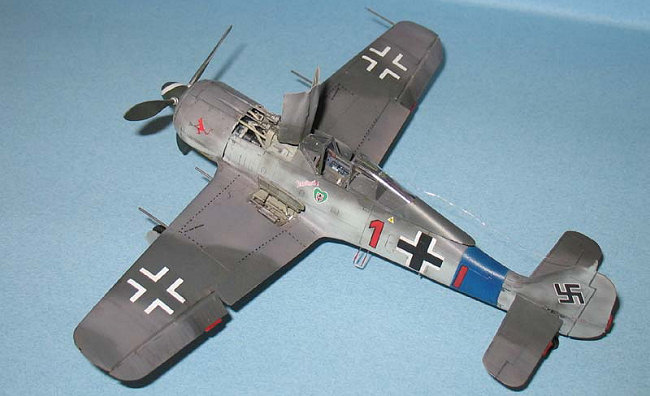
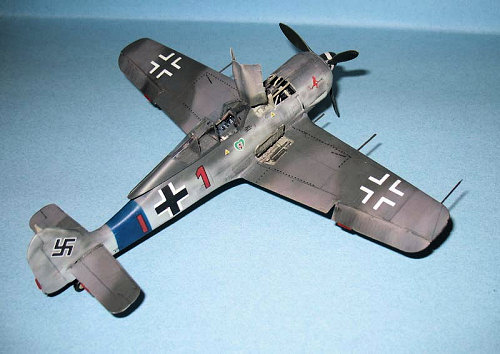
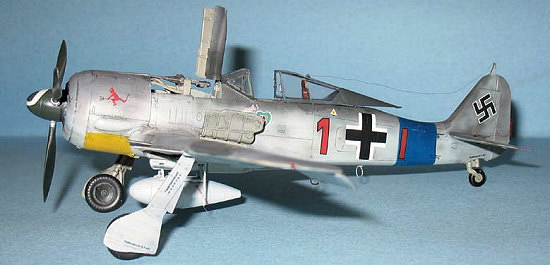
The markings used for this model are of Hans’ plane that was shot down over Paris on June 26, 1944.
Most of the information is from http://www.luftwaffe.cz/ and other sources on the web.
| THE KIT |
No information provided.
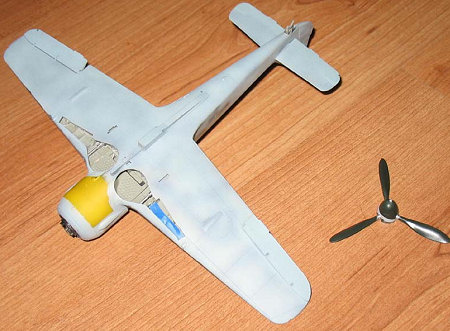
| CONSTRUCTION |
As with most airplanes, it begins with the cockpit. The interior color styrene was airbrushed in typical late war Luftwaffe RLM66 before I started on the PE.
However, the cockpit took a while due to my use of the kit’s PE. I must compliment Eduard as they redesigned their photoetch so that it is easier to install levers into panels (etched holes) and added extra levers as they tend to disappear. Eduard provides a lot of extra parts (as is their MO) to do other mods as well as for those who are really uncomfortable using PE so you can save the PE fret for another Wurger. I figured that I’ll use the kit PE for this review as I’m not an uber Wurger fan with several kits in the model stash.
 Each side panel is a separate piece
so it was easy to concentrate on one thing at a time. I managed to get
everything together without much swearing (as is my tendency when working with
PE.)
Each side panel is a separate piece
so it was easy to concentrate on one thing at a time. I managed to get
everything together without much swearing (as is my tendency when working with
PE.)
The rudder pedals on the other hand weren’t so easy. The attachment point is almost useless and it took a lot of fiddling to get the damn things to stick in place. I am thankful that I am somewhat comfortable with PE or I would have had no rudder pedals (the kicker is that they can be barely seen when the cockpit is fully completed.)
Seatbelts and instrument panels were easier to do. No real problems.
I followed the instructions and worked on the interior firewall and cowling gun bays. I think this is where my alignment problems began. The firewall goes together okay, but I strongly recommend that you test fit and sand down parts before gluing everything together. Also, I recommend that you leave the cowling guns off till the end which I did.
The fuselage bits go together, but I really did not like how I had to jam the firewall with ammo bins into the front part of the fuselage. If I had been a little less blinded by enthusiastic then I might have been shaved down a few things before gluing. It certainly would have saved me a lot more headaches later on (that wonderful 20/20 hindsight.)
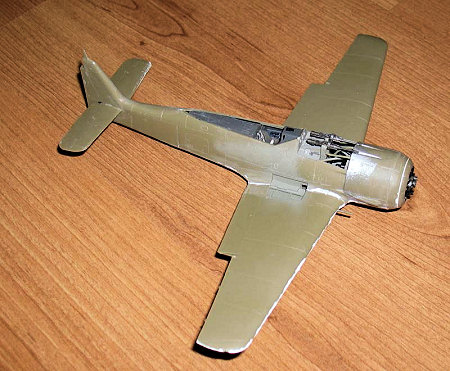
The lower wing assembly went together without much hassle. The hassle began when I glued the lower wing assembly to the fuselage. First thing I discovered was that the cowling gun ammo chutes were too thick for the openings in the wheel wells so I had to sand them down. I was not happy about the fit and mentally thumped myself for not seeing this problem considering the issues with the firewall.
It got worse when I glued the wings to the fuselage. I had to tear the fuselage and the wings apart and re assemble them till I got something close to alignment which looking back wasn’t damned close enough. Only thing I didn’t mess with was the firewall section (again with the 20/20 hindsight I should have messed with.) To make matters worse I discovered that I had a very noticeable gap on the left side of the firewall to fuselage join. I filled it using a shim of 10 thou plastic card and had to repaint the area.
 I’ve read on the only internet
review of the kit (at the time of the writing) that everything went together
beautifully with little or no filler. I would really like to know what he did
because nothing went right for me (alignment wise.)
I’ve read on the only internet
review of the kit (at the time of the writing) that everything went together
beautifully with little or no filler. I would really like to know what he did
because nothing went right for me (alignment wise.)
I skipped the final assembly of the wings and worked on the engine. I’m really glad that I did a sloppy paint job on the engine parts because you can’t see anything with the cowling closed up. The one thing that the instructions do not make clear is where certain exhaust pipes go, but you can figure it out just be examining the pin locations and how the pipes bend. The alignment piece is a very useful and I can’t imagine building the engine without it. I glued some fine solder to the engine to represent various lines. It is not accurate and is only intended to flesh out the engine more.
Mounting the engine could have used another jig because it was a major posterior pain. Again, don’t do what the instructions tell you to do. I recommend that you install the engine mount before you install the wing or you will end up swearing and yelling for a couple of hours. Why? Picture yourself working in a confined space with flimsy pieces with only a pair of tweezers. Trust me, it sucks.
I let the model sit for a week due to work and the wonky engine mount. The engine was installed without too much hassle (the guide pins for the engine are a lot more useful than those used to attach the firewall to the engine mount.)
The cowling goes together well, but unfortunately I discovered a couple of things. The engine is sized for the PE and/or open hatches which means that you will need to do some sanding down of the engine peripheral bits for the engine to fit. Also the engine cooling blades attached to the prop hub need to sanding a little or it will not easily fit thru the cowling with the aluminum painted interior. Had I know this then I would not have jammed the cowling over the engine (mostly due to frustration.) Anyway, this is probably why the cowling did not attach to the wing part all that well (the wing includes the lower cowling.)
By this point, I was feeling like the Eduard FW190A-8 was the styrene equivalent of a former boss who was well meaning but had the temperament of a hyper sensitive cat. I put the kit aside and didn’t touch it for a few weeks (I was happier working on my lawn and painting the windows at this point.)
 Thanks to the time away, I stopped
being pissed with the kit (and myself) and started to work on the interior bits
of the wing. The wing bits were painted with RLM02 and they fit as without
issues. One of the complaints regarding the Tamiya FW190A-8 is the simplified
wheel wells. The Eduard wheel wells are sooooo much better than the Tamiya
wheel wells as they provide depth and detail that can not be matched by the
Tamiya without the addition of aftermarket resin parts. I prepainted the cannon
parts before gluing them in.
Thanks to the time away, I stopped
being pissed with the kit (and myself) and started to work on the interior bits
of the wing. The wing bits were painted with RLM02 and they fit as without
issues. One of the complaints regarding the Tamiya FW190A-8 is the simplified
wheel wells. The Eduard wheel wells are sooooo much better than the Tamiya
wheel wells as they provide depth and detail that can not be matched by the
Tamiya without the addition of aftermarket resin parts. I prepainted the cannon
parts before gluing them in.
I glued the wing halves together and discovered the exact same problem I had with my Tamiya FW190A-8. First of all the wing roots had a nasty overbite (again alignment problems came back to haunt me.) This meant sanding and filling, but the wing root cannon barrels get in the way. My solution? Cut them off and replace them with MiniMeca tubing later. The last pieces added were the flaps which I put in the down position.
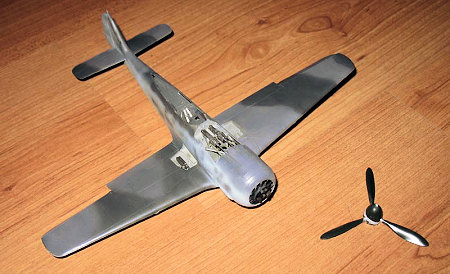
At this point, I used Mr Surfacer to fill all the gaps in my construction. I had to fill the fuselage wing join, the underside of the fuselage, the wing roots, the wing leading edges, the cowling to wing join and the wing tips which was all caused by my own stupidity. Using a combination of sanding and lacquer thinner to remove the excess Mr Surfacer, I was fortunate that I did not destroy much detail which was redone the best I could. After the model was cleaned, dryed and various openings stuffed with wet toilet paper, it was ready for painting.
The fuel tank was straight forward in construction, but needed some filling and sanding.
| COLORS & MARKINGS |
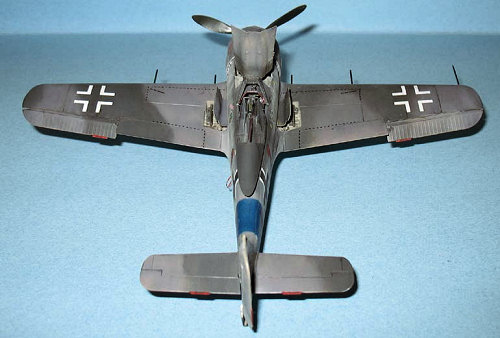
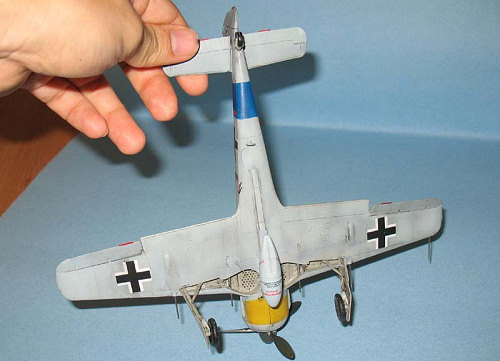
I chose the markings of Hans Dortenmann which had the standard RLM 74, 75 and 76 camo pattern with a touch of RLM04 (all Poly Scale Acrylics.) The model was pre shaded flat black along the panel lines while the underside cowling was sprayed with a thin coat of flat white (for the RLM04 Gelb/Yellow panels.)
 When the flat white was dry, the
underside cowling panel was painted with a couple of thin coats of RLM04. After
it dried, it was masked off while the wheel wells were masked using cut strips
of 3M Blue tape.
When the flat white was dry, the
underside cowling panel was painted with a couple of thin coats of RLM04. After
it dried, it was masked off while the wheel wells were masked using cut strips
of 3M Blue tape.
I sprayed the undersides and all the areas that had been sanded with RLM76. Well, something went right because I didn’t need to fill and sand again.
Eduard supplies the canopy masks for the FW190A-8 as well as four canopies (the basic two types for both open and closed configurations!) These are not vinyl masks, but the Tamiya tape like ones which are easier to use in my opinion. The interior color was a sprayed MM Acryl Engine Grey and then the exterior color of RLM74 was added when I did the exterior of the FW190A-8. It was only after I installed the canopy that I realized the RLM74 was slightly darker than the paint on the plane.
The RLM pattern went on freehand before I attempted to do the mottling. Thanks to my wonky trigger finger, it took some two hours and two sessions before I got the mottling to the look I wanted it. One thing I should remind folks, low air pressure and extra thinned paint are your friends when doing Luftwaffe mottled camo.
I posted photos of the build up on the forum and Tom Cleaver noted that my overspray was out of scale. He’s right, it is, but by the time it was mentioned I had already decaled it so it was too late to correct it.
Once the paint was dry, I sprayed a 50/50 mix of rubbing alcohol and Future to prepare the FW190A-8 for decaling.
The various small bits were painted according to instructions and I glued some cut aluminum foil to the landing gear struts to get that chrome look.
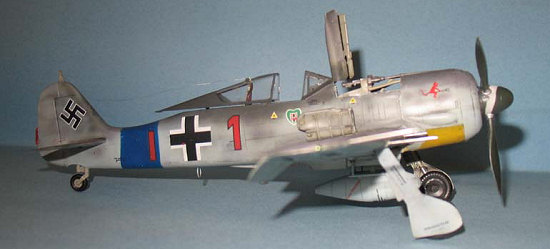
At this point I worked on the prop. I don’t like using decals for Luftwaffe spinner markings because they don’t sit right on tight curves and a general pain to install. Instead I sprayed the spinner flat white and then let it dry. I cut up some Tamiya tape into thin bits and gently curved it around the spinner. I then sprayed RLM70 over it and then removed the tape. It is a little more work than decal, but it looks so much better (and somewhat more realistic as on real planes, the spinner markings were not crisp well defined curves—the Luftwaffe equivalent of D-Day stripes.)
 I selected Hans Dortenmann’s
markings for the FW190A-8 because they were interesting to me and the fact that
Walter Dahl’s plane will probably be more common.
I selected Hans Dortenmann’s
markings for the FW190A-8 because they were interesting to me and the fact that
Walter Dahl’s plane will probably be more common.
I must say that Eduard decals look really nice, but they stick to a gloss coat too damned easy which makes adjustment a chore. I had to keep the surface wet at all times or the decals would stick (which didn’t always work.) I had problems with one of the stencils (anyone with sharp eyes will notice which one I’m talking about.)
Anyway, I used all the decals (with MicroSol and MicroSet) except the Reich Defense Band as I don’t like using fuselage band decals and the stickum nature of Eduard decals (in my experience, fuselage band decals need a lot of adjustments.) I masked the fuselage and sprayed on Tamiya gloss blue instead.
The decal solution was washed off and then I applied my standard watercolor wash of black/burn sienna and raw umber. Despite the intense bomber campaign, the Luftwaffe didn’t fly every day due to the weather so the ground crews had time to clean the plane up. In my simple mind, I decided to just highlight the panel lines and dirty the plane just a little which meant no gunfire residue and exhaust stains.
When the excess wash was removed, I sprayed on a couple thin coats of Gunze Flat.
| FINAL CONSTRUCTION |
I wanted an OOB build, but as mentioned earlier I opted to go with Minimeca tubes for the gun barrels. These were primed, painted with Gunze Steel, cut and glued in place with CA glue.
 One of the biggest complaints about
the Tamiya kit is the incorrect sit and angle of the landing gear. Eduard
solves this problem by using the correct length and an angled groove which makes
it almost impossible to get it wrong. I do recommend that you keep an eye
on the landing gear to ensure that it is aligned and also that you glue on the
wheel doors to the struts before installation (it is a tight fit.)
One of the biggest complaints about
the Tamiya kit is the incorrect sit and angle of the landing gear. Eduard
solves this problem by using the correct length and an angled groove which makes
it almost impossible to get it wrong. I do recommend that you keep an eye
on the landing gear to ensure that it is aligned and also that you glue on the
wheel doors to the struts before installation (it is a tight fit.)
The last instrument console and cover with gunsight was added to the cockpit.
The prop, spinner, wheels, guns, cockpit detail bits (including PE), antenna (the PE versions) and various other bits were added. I drilled a hole in the canopy and inserted a thin aluminum wire (the radio aerial wire) which was held in place with a drop of white glue. One of the things I’m still awful at is radio aerial wire, but the radio aerial wire on the Wurger with the canopy open is loose and sloppy which is the typical condition of my craptacular aerials.
The Eduard plastic is somewhat brittle for small bits as I broke the foothold and the pitot tube. I made replacements for the foothold with a piece of wire bent into shape and the pitot tube with a wire inserted into a Minimecha tube (glued in place with CA glue.)
I added some fine wire glued on with CA into the wing gun bays to make them look busy not accurate. The gun covers were then glued in open position. If you do build this plane with closed gun bays then do NOT install the guns as the gun cover will not fit in closed position due to the thickness of the plastic bit.
| CONCLUSIONS |
Despite all my (self inflicted) frustrations with the kit, I am happy with the final result.
In terms of simplicity and
buildability, the Eduard kit is no replacement for the Tamiya kits as it has a
lot of fiddly issues (all caused if you don’t get the alignment correct.)
However, when you throw in the corrected detail, the color PE and no need for
replacement resin parts (wheel wells, cannon bays, and engine), the Eduard is a
great kit for an experienced modeler. One thing of note is that
 the inner
detail like the engine and cannon bays are simplified compared to the real thing
and probably need the Eduard external PE set, but that kind of detail is only
recognized by Wurger fans/experts and in the case of the engine only seen if the
cowling is opened up.
the inner
detail like the engine and cannon bays are simplified compared to the real thing
and probably need the Eduard external PE set, but that kind of detail is only
recognized by Wurger fans/experts and in the case of the engine only seen if the
cowling is opened up.
I like this kit, but I think the one flaw with this kit has is that Eduard designed it to be everything for everyone who likes the FW190A-8. I generally do not open up my planes to expose the engines and or weapons while I know others who love doing that, but the kit disappoints both of types of modelers as it does not have enough detail to satisfy the “guts open” folks and while the exposed sections increase the headaches for a middling modeler like myself.
To sum up: If you are a beginner and like the FW190As then you’d be better off to buy the Tamiya kit. If you are an experienced builder then this is the FW190A-8 kit for you as the level of detail is much superior to the Tamiya and it provides a nice base for those who are into exposing the guts of a plane.
July 2007
If you would like your product reviewed fairly and quickly by a site that has over 350,000 visitors a month, please contact me or see other details in the Note to Contributors.