|
KIT # |
5517 |
|
PRICE: |
$40.00 |
|
DECALS: |
Two Aircraft |
|
REVIEW : |
|
|
NOTES: |
Aries and Eduard sets/ Third Group decals used |
|
HISTORY |
The Racher, or Avenger, began its evolution during 1936. It exemplified the problems that beset the Third Reich’s Luftwaffe, resulting from the dual control exerted upon its development by Hitler and Goering. The RLM suffered from poor decisions and this led to the late development of the Ju 88, which was one of the most diversified and successful aircraft of the Luftwaffe. This in turn led to the large delay in the development of the Ju 188, so much so that it entered production during 1943, almost two years after it was anticipated, and even then in limited numbers. Eventually over one thousand of this aircraft were built, including the variants. It was a testament to this aircraft’s abilities when countries like France used it after the war, in much the same manner as the Fokker D VII was distributed as the spoils of WWI.
Work on the Ju 188 began with modifying existing Ju 88s given the designation Ju 88B. Initial work was on the construction of a cockpit mock-up during 1939, with the efforts running parallel to general development of the Ju 88. This mock-up was completed at the end of 1939 and held a crew of three. The sleek “egg” shaped cockpit, along with other modernizations proved attractive to the RLM who increased the prototype number from three to six, to be delivered by October 1940. The improved aerodynamics of the cockpit, coupled with the more powerful BMW801 engines gave rise to expectations of speeds up to 500 km/h, making it a worthwhile venture.
 The first
prototype of the Ju 88B program, Ju 88 V23 flew on 19 June 1940 and, despite
having Jumo 211B standard engines was found to have good performance and flight
characteristics. Three subsequent machines were available by December 1940.
The first
prototype of the Ju 88B program, Ju 88 V23 flew on 19 June 1940 and, despite
having Jumo 211B standard engines was found to have good performance and flight
characteristics. Three subsequent machines were available by December 1940.
The big problem with all of the prototypes at the time was that there was no major leap in performance over the existing Ju 88 A-5, nor was the cockpit that much larger than the Anton, in fact it was unsatisfactory to all but the pilot, despite it being quite attractive. In the case of the Anton, bulging the rear part of the cockpit allowed two rear gunners to be accommodated, something that was not feasible in the Berta (Ju 88B) prototype. It was also obvious that the prototype was going to need the BMW801, which was in heavy demand by a fierce fighter in the form of the Fw 190! It was apparent that a BMW powered Ju 88B would be capable of speeds up to 539 km/h under favourable conditions, almost 50 km/h faster than the equivalent Jumo powered prototype!
Work began on stretching the Berta’s cockpit to allow for a third gun position at the end of the autumn of 1940. The first aircraft in the second generation of the Berta was Ju 88 V27, which had the enlarged cockpit housing a rotating turret armed with a MG131 gun. It flew during December 1940 and by the end of that month another aircraft; Ju 88B V28 had flown, with the third on 21 January 1941. Work on the Ju 88B programme finally came to a halt at the end of the winter 1941.
At the beginning of May 1941 the RLM renewed the programme but this time with a fully combat-ready Ju 88E bomber. Only one of the prototypes from the Berta programme was allocated for test work, this being Ju 88 V27. During May this aircraft received the new BMW 801-ML engine along with many other small modifications. The front gun was replaced with the MG151/20 cannon. The aircraft was also given a new designation, V27/1. Development work progressed very slowly and during spring of 1942 Ju 88 V30 was included, being largely modified to the V27/1 standard.
Three more prototypes were added to the programme at the end of the summer of 1942. The first two (V61 and V62) were fitted with the BMW 801-ML and ML-2 engines, the last (V63) was initially fitted with Jumo 211J and B motors. This aircraft was later upgraded to the Jumo 213 engine and equipped with the upper turret, which was armed with the MG151/20 cannon. Shortly thereafter it was renamed V63/1 and treated as a prototype bomber, eventually becoming known as the Ju 188A. It is likely that these three aircraft had the standard wings and tail of the Ju 88 A-4.
During the development of the Ju 88B programme work continued on modifying the Ju 88A with the aim of improving the aircraft’s capabilities. A serious shortcoming of the Ju 88B and E was in the aircraft’s horizontal stability and required some hard work on the part of the pilot simply to maintain a smooth flight. In an effort to iron out these problems three aircraft were built (V41, V43 and V44), which had extended wing tips and an enlarged tail. These modifications increased the wingspan from 20.08 m to 22 m and the wing area from 54 sq. m to 56 sq. m. All three aircraft were flown during the second half of 1941. They were not assigned to the Ju 88E programme but rather regarded as a separate experimental branch.
 The flying
characteristics of these three aircraft were that much more attractive than the
Ju 88E, so much so that they became the version chosen to go onto become the Ju
188. This decision took place at the end of the summer of 1942 with the failure
of the “Bomber B” programme. The RLM decided very quickly to instigate the new
programme and, in August 1942, they switched to the new version designated as
the Ju 188. In October of that year Ju 88 V44 was re-allocated from an
experimental aircraft to become the prototype for the new series bomber
designated Ju 188E.
The flying
characteristics of these three aircraft were that much more attractive than the
Ju 88E, so much so that they became the version chosen to go onto become the Ju
188. This decision took place at the end of the summer of 1942 with the failure
of the “Bomber B” programme. The RLM decided very quickly to instigate the new
programme and, in August 1942, they switched to the new version designated as
the Ju 188. In October of that year Ju 88 V44 was re-allocated from an
experimental aircraft to become the prototype for the new series bomber
designated Ju 188E.
The Ju 188A did not see production until the beginning of 1944 with the advent of the Jumo 213A, in-line engines. This powerplant was used in the Antons and the Doras. In both cases the production started with the numbers “-2” in which all the modifications initiated in the late series Ju 188E and F versions were utilised. The development of the Ju 188 A-3 and A-3/U was carried out as a parallel assembly and these two variants became the torpedo aircraft without and with radar respectively.
By the end of 1943 all Ju 188 aircraft had the FuG 101 radio altimeter installed and, in the first half of 1944 all reconnaissance Ju 188 aircraft had the FuG 217 as standard equipment. Production of the Ju 188 totalled 793 examples during 1944. At the end of the war over one thousand of these sleek looking aircraft had been produced, some becoming the spoils of war for the victors.
|
THE KIT |
This kit is full of the standard Dragon mouldings in pale grey with the fuselage split just behind the cockpit to allow for the various marques of this aircraft to be built. There are eight sprues in light grey with two clear sprues and two stainless steel photo-etched sprues. Quite a box!
The wing tips are separate from the main wings as are the ailerons, rudders, and elevators. The clear parts are very crisp and extremely clear. In my kit there were a few minor scratches.
The instruction sheet is clear with the breakdown of the construction easy to follow, although I was a little amused to find that a 9 gm weight was to be installed in the tail section of the aircraft. Perhaps this is one of those infamous nose sitters? I’ve seen many photographs attesting to such aircraft although most seem to have come about as a result of unfortunate landing “incidents”! Paint colours are given for three different styles, Gunze Sangyo Mr. Colour, Gunze Sangyo Aqueous Hobby Colour and Italeri paint numbers.
|
CONSTRUCTION |
The Cockpit
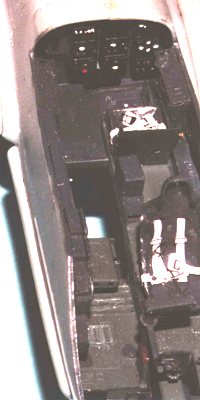
I like to upgrade most kit cockpits and this was to be no exception using the Eduard photo-etch kit for the Ju 188E. Most of the internals were going to be similar and, as there appeared to be no kit available for the model being built, I decided to use this one.
 The
instructions are very clear and I set about cutting and scraping to prepare
areas for the Eduard upgrades. By far the most challenging in this area
was the bomb aimer’s seat, which is presented as part of the starboard side
panel requiring the original unit to be cut so that the photo-etched seat could
be attached. I finally decided to try the method of using nylon thread to cut
along existing panel lines. This is a very easy method whereby a hole is drilled
in the part to be removed and then gentle pressure is exerted to move the thread
back and forth, or up and down depending on your perspective, along the panel
line. Take care that the thread stays in the line and it really does cut like a
hot knife through butter, WITHOUT the usual buckling of the plastic when using
said hot knife!
The
instructions are very clear and I set about cutting and scraping to prepare
areas for the Eduard upgrades. By far the most challenging in this area
was the bomb aimer’s seat, which is presented as part of the starboard side
panel requiring the original unit to be cut so that the photo-etched seat could
be attached. I finally decided to try the method of using nylon thread to cut
along existing panel lines. This is a very easy method whereby a hole is drilled
in the part to be removed and then gentle pressure is exerted to move the thread
back and forth, or up and down depending on your perspective, along the panel
line. Take care that the thread stays in the line and it really does cut like a
hot knife through butter, WITHOUT the usual buckling of the plastic when using
said hot knife!
Controls and dials were added at appropriate stages and the whole internal assembly was painted with Gunze Sangyo RLM66, Grau. I used my references where the internal colours are shown as a mixture of RLM02 and RLM66, whether this is poetic licence or not is of no major concern as there is very little RLM02 used, but it does tend to break up a rather bland interior. Once the colour had dried it was dry brushed with Flat Aluminium to show areas of wear.
I used the photo-etched harness and painted them off-white with silver buckles. The parts were subjected to heat to make them more malleable prior to removing them from the sprue and before painting.
The rear of the cockpit and on both cockpit sidewalls held the ammunition cans for the rear top and lower machine guns. All were made from photo-etch and the side ones had little handles painted brown to simulate leather. The Eduard etch comes with a belt of ammunition, which was attached to the machine gun. I salvaged some extra belts from the spares box and attached these to the two rear ammo cans and placed these down on to the lower rear MG81Z machine guns.
All the guns were from the Aries resin range and included kit No. 4024, German 7.92mm gun MG15 and kit No. 4021 German 20mm gun MG151.
The Fuselage and Wings
Initial work begins by checking the fit of the two fuselage halves and, having read the review of Nicholas Wigman (SAMI, Vol. 6, Issue 11 – November 2000) confirmed that there was going to be a gap at the forward top section of the join with the cockpit section. The interior area of the rear wheel well was painted with Aeromaster acrylic RLM02, Grau prior to joining the two halves, which were joined with a sliver of plastic card inserted at the forward joining surface. The whole assembly was allowed to set and then the sanding takes place, carefully! The engraved panel lines are very delicate and require caution not to see them ground into oblivion. The best method to preserve the panel lines, at least partially, is to cover the area with Tamiya masking tape. (This is great stuff and worth every South Pacific peso (Aussie dollars) spent on its acquisition.)
 The next
step in this delicate process is to join the forward and rearward fuselage
subassemblies. The first step was to dry fit and test the join. Once I was happy
with the join gap-filling superglue was used for a fast and strong bond. The
join was carefully sanded smooth and checked for continuity. Panel lines were
rescribed and it was on to the wings.
The next
step in this delicate process is to join the forward and rearward fuselage
subassemblies. The first step was to dry fit and test the join. Once I was happy
with the join gap-filling superglue was used for a fast and strong bond. The
join was carefully sanded smooth and checked for continuity. Panel lines were
rescribed and it was on to the wings.
I had decided to join the wings to their respective tips prior to joining the assembly to the fuselage. This required overnight drying and then some filler and sanding down. No major hassles here just care needing to be taken and the various assemblies went together quite well. This kit has the majority of the flight surfaces as separate and alleviates the need for major surgery both to the model and, if you’ve had unfortunate slips, to the modeller! Sharp things these knives!
 The main
wings were first connected to the fuselage and then, after they had set, the
flight surfaces were connected to the wings. Tamiya masking tape came to
the rescue again to allow the wings to set with the correct dihedral angle. The
control activators for each aileron were also attached and positioned to match
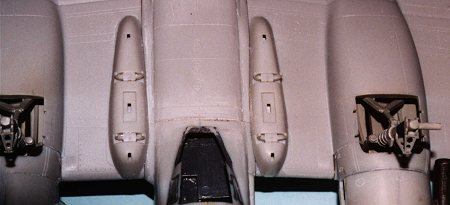
the control column offset. The pylons for the torpedoes were connected at this
time, with a small amount of gap-filling superglue needed to even the contact
surface. This join was then wiped clean before the glue had gone off. The
leading edge of this pylon is quite delicate and required pressure to help bond
it to the wing leading edge.
The main
wings were first connected to the fuselage and then, after they had set, the
flight surfaces were connected to the wings. Tamiya masking tape came to
the rescue again to allow the wings to set with the correct dihedral angle. The
control activators for each aileron were also attached and positioned to match
the control column offset. The pylons for the torpedoes were connected at this
time, with a small amount of gap-filling superglue needed to even the contact
surface. This join was then wiped clean before the glue had gone off. The
leading edge of this pylon is quite delicate and required pressure to help bond
it to the wing leading edge.
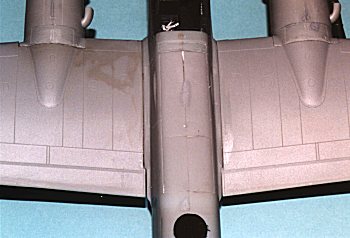
The tailfin
and tailplanes were attached, again with appropriately positioned flight
surfaces to coincide with the cockpit controls. I
 used minimal filler in all
these areas and let everything dry before sanding and rescribing. Filler was
also used on the main wing root to ensure a smooth join along the fillet. In
this case however it was quite a lot of filler, as I need to fix some poor
joins, as the accompanying photos show. It took quite some hours to sand the
joins to a point where I was satisfied to move onto the painting.
used minimal filler in all
these areas and let everything dry before sanding and rescribing. Filler was
also used on the main wing root to ensure a smooth join along the fillet. In
this case however it was quite a lot of filler, as I need to fix some poor
joins, as the accompanying photos show. It took quite some hours to sand the
joins to a point where I was satisfied to move onto the painting.
The bomb bay is a separate item and is fairly straightforward to attach. At this stage the small bits and pieces (without the accompanying antennae) were also attached to make the painting phase easier. This included the clear bits on top of the fuselage aft of the life raft compartment. It meant that they would need to be masked.
The only thing that you do need to be aware of with this part of the construction is to ensure the main wings have the correct dihedral in relation to the tailplane. Comparing my photo references shows the tailplane as horizontal and, when viewed from the front of the model, intersects the main wing just outboard of the engine nacelles. The cockpit glazing was attached once all the airframe painting had been completed (see below).
Undercarriage
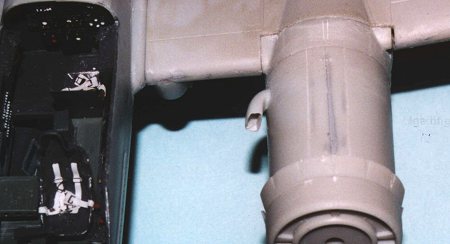
The kit
undercarriage is quite well presented and needed little detailing other than
some extra piping in the wheel bay. I took one look at my reference book and
decided that less was best, including some main hydraulic lines back from the
firewall to the rear of the wheel bay. They are not that visible once the gear
doors are in place. The main wheel bays and struts are
 painted
Gunze
Sangyo RLM 02, Grau, with the oleo boots painted Tamiya X18, Semi
Gloss Black. A single hydraulic line was added down the side of the main struts
and a brake line added to the wheel hubs. The line was painted in Gunze
Sangyo RLM02, Grau, except where the hose continues past the upper strut and
reconnects onto the lower part. This was painted Flat Black.
painted
Gunze
Sangyo RLM 02, Grau, with the oleo boots painted Tamiya X18, Semi
Gloss Black. A single hydraulic line was added down the side of the main struts
and a brake line added to the wheel hubs. The line was painted in Gunze
Sangyo RLM02, Grau, except where the hose continues past the upper strut and
reconnects onto the lower part. This was painted Flat Black.
The main wheels were weighted using an old clothes iron at low heat and gently applying pressure to the wheel. The trick is not to have too much heat otherwise you end up with a globberiginous mass that used to be a wheel. Once the wheel has been thus treated it is sometimes necessary to attach some Milliput to each sidewall to simulate the bulge. Each tyre was painted with Gunze Sangyo Tire Black and the hubs painted with Tamiya Semi Gloss Black. They were then subjected to a little weathering and dirtied up to simulate an aircraft that operated from unprepared airfields. Raw sienna was washed into the hubs and each was dry brushed with the “steel” mix described below. A slight brownish hue was also added to the sidewalls to give the effect of a dirty tyre that had been washed by the ground crew.
The tail wheel was made up of kit parts, which included some photo-etch. The entire assembly, with the exception of the struts and wheel were painted in RLM02. The wheel centre was painted Tamiya Semi Gloss Black and the tyre painted in Gunze Sangyo Tire Black. Once everything was dry, and following the fuselage painting, the sub assembly was attached and the wheel aligned with the displaced rudder. A little artists oil Raw Sienna was dry brushed across the sidewalls and over the tail wheel to simulate muddy conditions under which the aircraft would have operated.
As indicated above the weapons on this aircraft are primarily semi fixed machine guns of differing calibres, including one rotating upper turret. All the kit gins were replaced with Aries resin kits to some degree, and were painted in Gunze Sangyo Gun Metal and dry brushed with a “steel” mix. This mixture is made up from enamel chrome and artists oil raw sienna, which imparts a kind of subdued brassy look to the surface. This mixture works quite well as the two different media combine to give the best of both worlds – a wetter paint that stays on the brush longer and dries faster than the normal artist’s oil (Courtesy of Dave Roach of the Queensland IPMS). Gunstocks were painted in black or brown, depending in the whim of the artist. These were mounted after the fuselage was painted, and prior to final attachment of the canopy.
 The spares box was raided for some
ammo belts and these were used on the MG81Z installed in the lower gondola. This
kit part was slightly modified by cutting off both barrels and replacing them
with the Aires gun barrels from the MG15 set, giving the barrels a much
better look than the basic kit offering. The front machine gun, the MG151 20mm
cannon, and the rear machine gun, a MG15 7.92mm, were augmented with sights from
the photo etch supplied with the kit.
The spares box was raided for some
ammo belts and these were used on the MG81Z installed in the lower gondola. This
kit part was slightly modified by cutting off both barrels and replacing them
with the Aires gun barrels from the MG15 set, giving the barrels a much
better look than the basic kit offering. The front machine gun, the MG151 20mm
cannon, and the rear machine gun, a MG15 7.92mm, were augmented with sights from
the photo etch supplied with the kit.
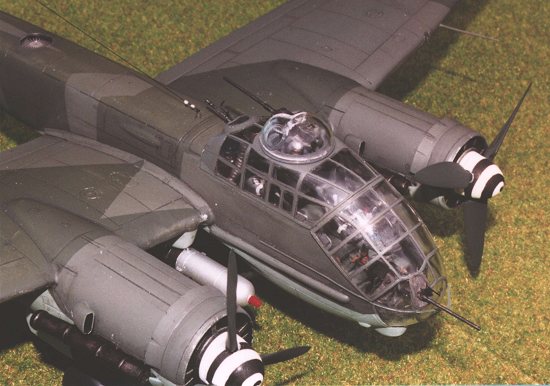
The upper turret was given quite a bit of treatment with the gun barrel being replaced by resin and the lower part of the turret being replaced by photo etch. A seat and backrest were added using aluminium foil, painted Gunze Sangyo RLM66, Schwarzgrau, and the shell-casing bag, which is mounted below the turret floor, made from Milliput and painted brown. The spent casing chutes were all painted in Gunze Sangyo, Khaki Drab and given a slight dry brush with the mixture mentioned above.
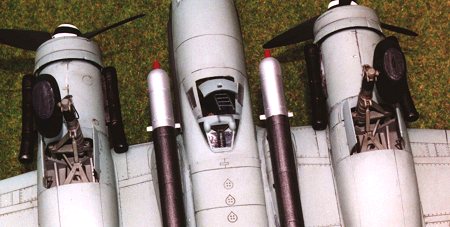
The kit is also comes with two torpedoes and these were painted in four colours; the main body of the torpedo was painted with Gunze Sangyo Steel, the forward portion was painted in Aluminium, the detonating piston was painted Tamiya Red and the counter rotating spinners were painted in Humbrol No. 55 Bronze.
Some time was spent here to thin the spinner blades, as they are way too thick for the scale. The blades were also bent to match the angle that would be required to drive them through the water, rather than the flat position in which they were moulded. Both torpedoes were attached to the under wing pylons after the airframe was painted, decaled and weathered.
|
CAMOUFLAGE & DECALS |
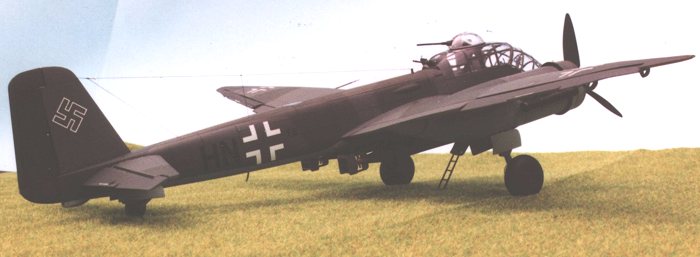
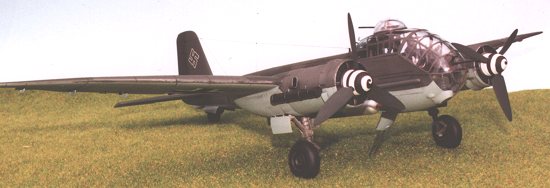
Once all the sanding had been completed, and checks done to ensure the seams were invisible, the model was painted. I commenced with Aeromaster RLM65, Hellblau (acrylic) on the lower surfaces of the wings, tailplane, engine nacelles, undercarriage doors and gondola. This was relatively trouble free except where I had hand painted the Gunze Sangyo RLM66, Schwarzgrau on the clear glazing of the bombsight on the nose of the aircraft. This crinkled the topcoat and needed it to be sanded back and done again. Different makes of paint being the probable cause of the crinkle finish or perhaps the thinned
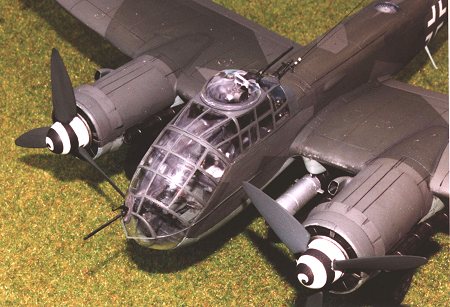
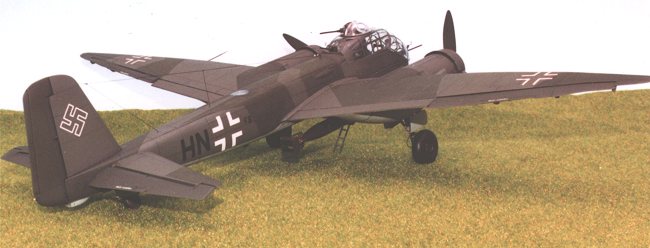
The upper surfaces were painted in a splinter pattern using Aeromaster acrylics. RLM70 Schwarzgrun and RLM71 Dunkelgrun were used here. The canopy glazing, which is very clear (although mine had an imperfection on the upper part) was masked with Tamiya tape, burnished to prevent paint seepage (Wow, it actually worked this time!) and then painted. Firstly the interior colour, RLM66 Schwarzgrau, was hand painted and then the RLM71 Dunkelgrun over that. Using a burnishing tool to ensure the masking tape sat snugly was very rewarding and the lines are very clear.
 Once the
main colours had been applied the entire aircraft was sprayed with Gunze Sangyo
Clear in preparation for the decals and the weathering. The weathering process
is one that I have used quite a bit over the past year and is simply a case of
using detergent with paint and water mixed into slurry. This is then painted
onto the panel lines, allowed to dry and then carefully wiped off with a Q-tip
or tissue paper (for the larger surface areas). The result is quite convincing
providing you use a colour that is not a drastic contrast to the paintwork. I
tend to use browns and greys in preference to black, although in some instances
this also works well. It is usually a “suck it and see” exercise and if it looks
bad, simply wipe it off and do it again! The process is almost fool proof!
Once the
main colours had been applied the entire aircraft was sprayed with Gunze Sangyo
Clear in preparation for the decals and the weathering. The weathering process
is one that I have used quite a bit over the past year and is simply a case of
using detergent with paint and water mixed into slurry. This is then painted
onto the panel lines, allowed to dry and then carefully wiped off with a Q-tip
or tissue paper (for the larger surface areas). The result is quite convincing
providing you use a colour that is not a drastic contrast to the paintwork. I
tend to use browns and greys in preference to black, although in some instances
this also works well. It is usually a “suck it and see” exercise and if it looks
bad, simply wipe it off and do it again! The process is almost fool proof!
The decals were from Third Group (Set No. 48-058) although only the crosses and swastika were used as I intended on modelling an aircraft from KG40, based in France during 1944, an Anton-3. This particular aircraft had the fuselage codes F8 + HN. Now nothing in any of my spare decal sheets came close to the correct size or letters and a member of our local IPMS club, David Roach, came to the rescue with a sheet of 13mm codes in every colour except black. (Isn’t it always the way?) The suggestion was made that I would scan the alphanumeric codes into the computer, change the colour to black and print them out on decal sheet. It worked quite well and I made enough for both Dave and myself. The only problem encountered was that the density of the colour was a little light, requiring the required codes to be cut out and sprayed flat black before putting them on the sides. I think perhaps that the system administrator should replace the colour cartridge in the work printer! Dave kindly donated the ‘F’, which is a much-reduced size, and I scrounged up the ‘8’ from another sheet. Once the decals were dry and the weathering completed the entire airframe was sprayed with Gunze Sangyo Flat Clear.
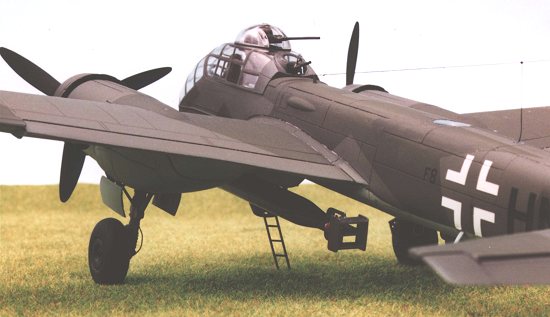
It is at this point that the canopy was attached. The canopy comes in two parts; the front that has a distinct angle, along with photo-etch handles and wire cutters, and the rear part that is flat. A small opening is found at the front of the forward canopy that allows the MG151/20 cannon to pass through. In flight, this was covered with fabric (?) to prevent the cockpit being blown away by the 500 Km/h gales. This was simulated with tissue paper, which was attached with fog-free superglue, painted Khaki Drab and slit open with the sharp bladed knife. The canopy was then attached with said fog-free superglue, after using a cut-down cocktail stick to slightly push out the cockpit walls to merge the canopy to the cockpit frame. This worked very well and left the rear canopy to be attached using PVA glue. The cocktail stick was simply removed after the forward canopy had set. The slit tissue paper was moved back around the MG151/20 cannon and a little dab of Khaki Drab sealed the slit.
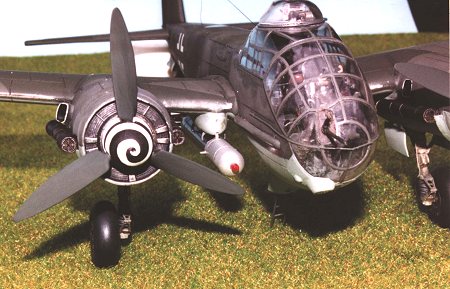 Now a
little licence has been taken with this particular aircraft. It is a
torpedo-carrying plane and has the standard splinter camouflage on the upper
surfaces. But I had decided that the model would look better if the spinners
were white with a black swirl. To do this it was necessary to use some of the
kit decals, as I had for the “Keep yer cotton pickin hands off the trim tabs”
decals. Microsol was used to get them to sit correctly and some hand
painting of flat black was necessary where my overzealous nature had managed to
split them. They look OK and give the model a little more colour than the bland
Schwarzgrau spinners may have done.
Now a
little licence has been taken with this particular aircraft. It is a
torpedo-carrying plane and has the standard splinter camouflage on the upper
surfaces. But I had decided that the model would look better if the spinners
were white with a black swirl. To do this it was necessary to use some of the
kit decals, as I had for the “Keep yer cotton pickin hands off the trim tabs”
decals. Microsol was used to get them to sit correctly and some hand
painting of flat black was necessary where my overzealous nature had managed to
split them. They look OK and give the model a little more colour than the bland
Schwarzgrau spinners may have done.
The other “little” bit of artistic licence is the attachment of the upper turret as the picture reference shows it to be absent. Although aware that some variants of the Anton had this modification I wanted the upper turret as it looks very nice and seems to finish the cockpit off. Besides, it may have been a field modification prior to the photograph being taken!
|
CONCLUSIONS |
This is a very important German aircraft that came too late in the war and in insufficient numbers to make a difference. It was supposed to be the logical progression of the immensely successful Ju 88, one of the most versatile of all the medium range German bombers, whose production had been delayed. It was also the victim of politics suffering the inconsistencies of the tandem control exerted by Hitler and Goering, which resulted in the RLM making poor decisions. Nevertheless this elegant aircraft did manage to get into production and become a useful tool for the Axis air forces.
This kit has been a very enjoyable build, although it does suffer from the standard Dragon problems of poor fit, necessitating the use of filler and the drudgery of sanding, whilst trying to keep the fine panel lines. It presents the flying surfaces as separate items, making it easier to pose the aircraft with some dynamics. There is little flash and only a small amount of sink and ejector pin marks, although the latter occur in some horrible places that require some very careful sanding to remove them.
Whilst the instruction sheet is fairly clear, portions of the build require a little thought and the inevitable dry fitting to ensure that the parts are going to fit correctly. Dragon at least include more than one paint manufacturer to choose from, albeit Gunze Sangyo (two versions) and Italeri, a little better than some of the larger companies.
Overall the kit is quite suitable for the novice looking to move into a slightly bigger challenge. In the hands of an advanced builder this kit can be an absolute gem and give rise to a model worthy of any contest, or to simply sit and be admired for ages to come. I strongly suggest that if you have the chance of one of these kits grab it with both hands and have a go.
|
REFERENCES |
Ju-188/Ju-388 part 1 and
2, Michulec, Robert, A-J Press, 1998
"Racher": Detailing Dragon's Ju-188A-1, Wigman, Nicholas, SAMI Vol 6/11,
November 2000
Copyright ModelingMadness.com. All rights reserved. No reproduction in part or in whole without express permission from the editor.
If you would like your product reviewed fairly and fairly quickly, please contact the editor or see other details in the Note to Contributors.