ProModeler 1/48 Ju-88A-4
|
KIT |
ProModeler 1/48 Ju-88A-4 |
|
KIT # |
5948 |
|
PRICE |
$50.00 (AUD) |
|
DECAL OPTIONS |
Three versions |
|
REVIEW BY |
Grenville Davies |
|
NOTES: |
Accuracy: Yes – OK I’m not into precise measurements, give or take a thou! Credits: Thanks to Scott for his review of the Ju88A-14 |
It was seeing the review of Scott’s Ju88 that convinced me to build a twin engined German bomber/fighter. Fickle thing modelling, I liked the look of the Skeletal Hand and decided I’d have a go at doing something similar.
This project has been on the boil for a few months and I purchased the Aeromaster decal kit plus the Eduard photo etch for the Monogram kit, 48 – 246 and, of course the reference book by Squadron "Ju88 In Action, Volume 1.
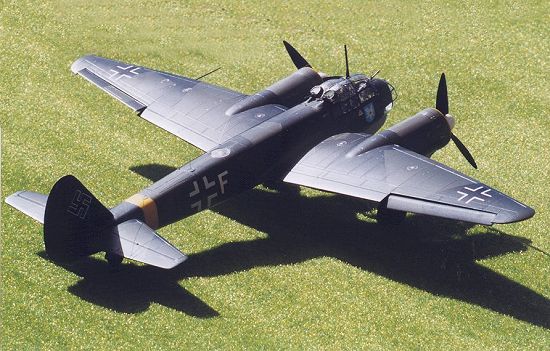
Figure 1 Ju 88A-4 9K + FR of 7.Staffel from III/KG 51 Edelweiss Geschwader
Thus armed I set about securing which aircraft I would build from the array of decals at my disposal and, as I wished to produce an aircraft with a bit of yellow, opted for one of the two aircraft displayed on the front cover of the reference book. As I had enough decals for the KG 51 Eastern front squadron I decided to build 9K + FR of 7.Staffel, of III/KG 51 Edelweiss Geschwader, which featured yellow around the engine cowls, yellow on the wingtip undersides and a yellow fuselage band. More of that later.
THE COCKPIT
As with most aircraft kits I begin with the cockpit. It is time consuming and it’s where all the fiddly bits are concentrated. I like to get it out of the way early and thus leave myself time to enjoy painting and doing the relatively easy task of putting the whole thing together. This kit was a little bit of an exception as the cockpit glazing and guns were to prove.
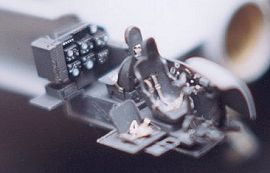
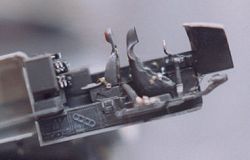
Photo etch was used to great advantage throughout the cockpit, adding seat belts, new consoles, levers, instrument panel, navigator’s seat, rudder peddles, armour plate and ammunition boxes. The whole cockpit was painted with Model Master RLM 66 Schwartzgrau and dry brushed with silver for highlights. Where necessary the various dials, switches and tubes were painted as called out in the quite detailed kit instructions.
The The brass parts allow for quite exceptional detailing around the cockpit, as not only are the seatbelts, throttles, instrument panel and cockpit switches available, there is ammunition boxes, navigator’s seat, bulkhead frames, cockpit handles and enough ‘goodies’ to satisfy even the most fastidious of modellers.
Forward fuselage halves were glued to their respective rear fuselage parts before installing the cockpit sub-assemblies. The main wings were attached to the completed halves, as was the left and right tailplanes. It was necessary to use a small amount of filler at the joins, with both Milliput and liquid paper being used to effect a reasonable join. Both halves of the fuselage were then dry fitted to test for fit prior to gluing the whole thing together.
UNDERCARRIAGE
The main oleos and the rear wheel are quite detailed and I used the Eduard brass bits to full effect
on the main undercarriage and added a thin copper wire to simulate the brake hoses. Eduard supplied the brake hose on the wheel itself. The main assembly is painted in RLM 02 – enamel Model Master, and the wheels were painted flat black (Tamiya XF 1) with the tyres painted in Gunze Sankyo Tire Black. A faint wash of silver was applied to highlight the hubs and the tyres were dirtied up using artist acrylics. Remember these aircraft operated out of grassy fields.
Both the internal bays of the main and rear undercarriage were also painted in RLM 02. I used a light wash of Gunze Sankyo Oil, as the undercarriages were known to ‘bleed’.
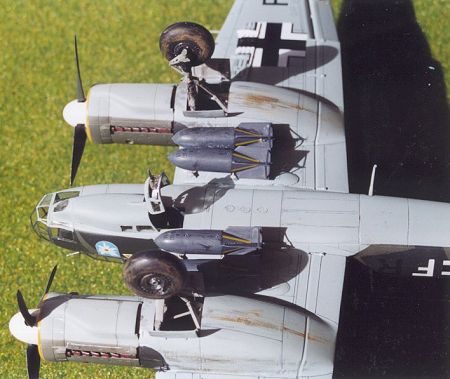
Figure 5 Gondola wheels and bombs with weathering
The main undercarriage was attached prior to joining the fuselage halves with the rear wheel set in place at the same time. The wheel well doors were left off until the aircraft had been painted, the holes filled with tissue paper for masking.
PAINTING
After waiting for the fuselage to dry I then used filler along the top and bottom seams and, after sanding, attached the tail fin. I then ran a bead of polystyrene glue around the base to fill the obvious gap. This worked very well and there was no shrinkage after the glue had dried.
Before I commenced painting the colour I highlighted each panel line with semi gloss black. Once the topcoat dried the panel line was highlighted and gives the appearance of a weathered paint, darker around the panel edges. I then used a panel-cutting tool to remove the surface colour and reveal the black undercoat.
I sprayed the under surfaces RLM 65 using Aeromaster Warbird enamel colours and hand-painted the clear gondola and forward glazing, prior to attaching them to the fuselage undersides. The bomb sight was installed in the front part of the gondola and the join was done using PVA glue, which was then painted RLM 65.The twin MG81Z machine guns were painted and installed on their mount and installed in the rear of the gondola.
The undercarriage doors were sprayed RLM 65 on the sprue, whereas the interior of the doors was hand-painted RLM 02, prior to attachment.
Figure 6 Lower surfaces of the aircraft showing airbrakes, bombs and undercarriage
The aircraft was then masked in preparation for the top surface colours. The camouflage scheme for this variant called for RLM 70, and RLM 71 in the splinter pattern. I opted to spray the RLM 70 first and then mask off to spray the RLM 71. Both colours were from the Aeromaster Warbird enamel range. The panel lines had already been pre-coated with the semi-gloss black and the resulting effect gives a weathered look without being overpowering, although spraying the matte finish over the decals does detract from the initial effect.
Once the camouflage had been completed the ridge at the mask edge was removed and the area to be covered by the decals was then painted in gloss clear. This will help reduce the tendency for silvering under the decal.
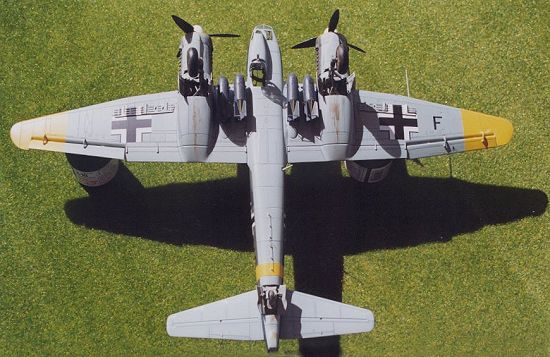
Figure 7 The splinter camouflage of the Ju 88a-4
DECALS
Having already decided to build the 7.Staffel aircraft it became necessary to cannabalise both the kit and the Aeromaster decal sets to create the required version. I needed two white "F" decals for each fuselage side, plus a black "F" for the underside of the port wing. All other decals were a mixture of the kit and Aeromaster decals.
It was here that I noticed a marked difference between the two sets of decals. The decals supplied by ProModeller have all the numbers with sharp edges, e.g. the number ‘5’ was displayed as ‘5’ instead of the Aeromaster decal equivalent ‘5’.
I decided that Aeromaster probably research their decals a little more thoroughly than ProModeller, so Aeromaster was used. Also, whilst both kits offered the Edelweiss Geschwader KG 51, the colours were much better placed on the Aeromaster decals.
Both sets were subjected to decal setting solution and silvering was kept to an absolute minimum.
FINISHING
Once all the markings had been placed the aircraft then had some mild weathering, with the prop leading edges, wing leading edges and panels on the wing surfaces receiving some treatment. Oil streaks were applied to the upper and lower surfaces aft of the engines and a little artist acrylic senna applied to simulate wheel-sprayed mud. The engine exhausts were painted Gunze Sankyo Burnt Iron and then dabbed with rust, from the same company. Engine exhaust was then brushed on both nacelles.
The cockpit framing is quite complex and I abandoned my original idea of painting Bare Metal Foil,
cutting it into strips and then attaching to the clear glazed parts. I opted to do it by hand – very carefully. My major problem here was the two halves of the rear blisters. I eventually decided to glue them in position one at a time. The reason for the problems was due to the amount of brass sitting inside the cockpit – especially the ammo boxes, which I had inadvertently glued too far forward when I had assembled the cockpit. Oh Hum! The resultant gap at the base, rear of the glazing was then filled and painted. It still doesn’t look 100% but that’s OK.
The aerials were made from invisible thread and attached to small holes drilled in appropriate places at the cockpit sides, aerial mast, aerial points along the fuselage spine (FuG 10, front and FuG 16, rear) and the tailfin. They were then painted with flat Aluminium (Tamiya).
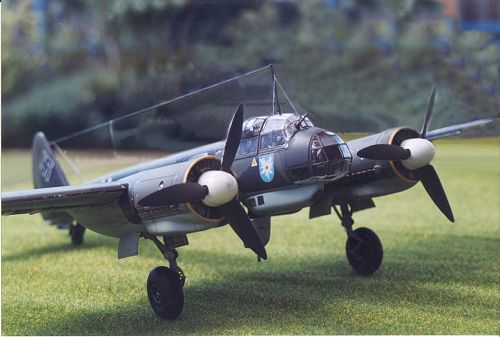
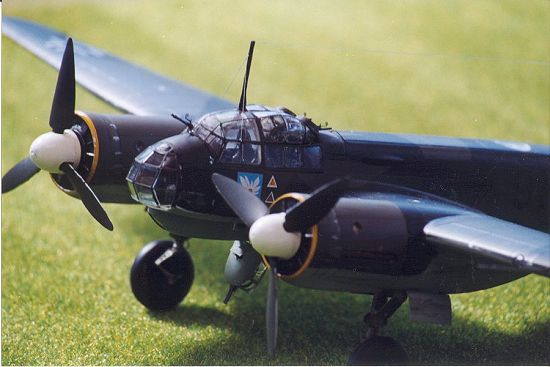
Figure 8 Left front view of cockpit, gondola and engine nacelles
The rear entry to the gondola was attached using brass etch and each machine gun was given a sight, which was then painted black. The ladder was installed and the wheels were weighted using an old warm iron. The final touch was to install a small length of black thread to simulate the tether line for the rear stowed life raft.
One of the war’s most versatile aircraft, the Ju 88a-4 is a pleasing addition to my collection. A bit of effort was required to produce the model, but it was well worth the money. The kit went together very well and it was only the builder’s enthusiasm that saw some fit problems occur. But after all, the more we do the better we get, right?
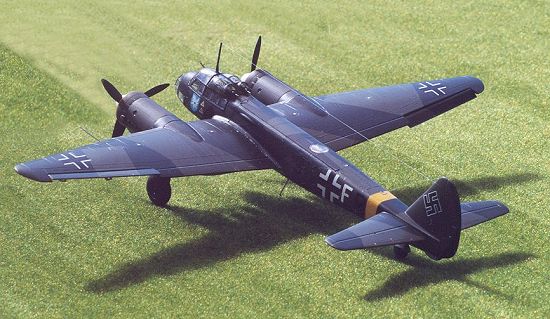
Figure 9 The finished product – note the raft tether line on top left of fuselage