|
KIT: |
Tamiya 1/48 Me-262A-1a |
|
KIT # |
61087 |
|
PRICE: |
$37.00 MSRP |
|
DECALS: |
Three aircraft |
|
REVIEWER: |
|
|
NOTES: |
Aires Jumo 004 engine used |
|
HISTORY |
|
THE KIT |
When Tamiya announced that it was releasing a new tool Me262 in 48th scale last year I was very excited. However, when it hit the shelves at nearly $50 I was not! It has been a favorite aircraft of mine for years but I just couldn’t bring myself to pay that much just because it came with a little tow tractor. So I waited until the 2002 IPMS Nationals and was able to pick one up significantly cheaper. At that point I still wasn’t satisfied. I wanted to do a four gun nose fighter version, so I waited a little more and now I finally have it.
There have been many debates over
whether or not the Tamiya offering is a better kit than the Monogram or
Dragon versions from years ago. Well I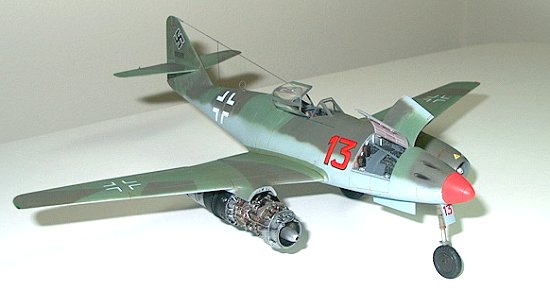 S there even any comparison?
I’ve built the Monogram kit several times and still have several more
that I plan to build. The main problem with it is the lack of recessed
panel lines. Many will argue however, that the raised lines are more
accurate. As for the Dragon kit, I’ve only built one and I thought it was
fiddly going together, but resulted in an excellent looking Schwalbe. So
I would have to say that the Dragon Version is more in tune with modern
building standards and will suffice to build a very nice model OOB. The
Monogram version also builds into a nice model if you don’t have a
problem with the panel lines being raised. However, after spending
significant time studying the NASM Me262 in person I would have to say
you could sand the Monogram kit smooth and have the most accurate version
of them all since the panels are very tight and even filled in some
cases.
S there even any comparison?
I’ve built the Monogram kit several times and still have several more
that I plan to build. The main problem with it is the lack of recessed
panel lines. Many will argue however, that the raised lines are more
accurate. As for the Dragon kit, I’ve only built one and I thought it was
fiddly going together, but resulted in an excellent looking Schwalbe. So
I would have to say that the Dragon Version is more in tune with modern
building standards and will suffice to build a very nice model OOB. The
Monogram version also builds into a nice model if you don’t have a
problem with the panel lines being raised. However, after spending
significant time studying the NASM Me262 in person I would have to say
you could sand the Monogram kit smooth and have the most accurate version
of them all since the panels are very tight and even filled in some
cases.
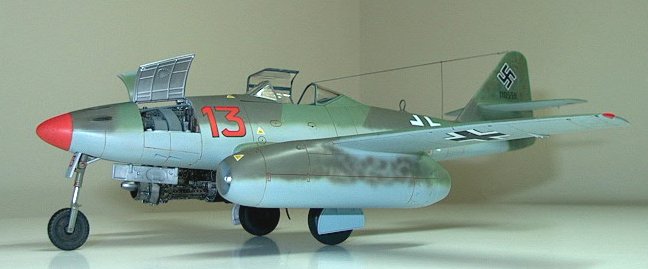
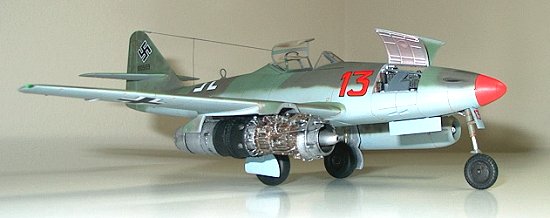
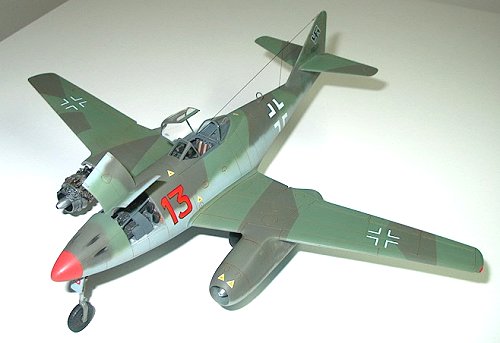
The Tamiya kit is molded in the standard gray plastic with crisp even panel lines and no flash. There’s not much difference between this version and their first release of the bomber version except the addition of a four gun nose, rudder, and a nose gear strut. The decals are printed thinner than some of the older ones and provide options to do several noteworthy aircraft. I was especially excited to see Heinz Bar’s Red 13included since I had been wanting to do it for quite awhile. I was very impressed with what I had purchased and couldn’t wait to begin.
There are several manufactures offering replacement items for this kit and I did some investigating to see what they where all about. Cutting edge makes a cockpit set that includes a nice film instrument panel but I felt it didn’t offer much over the kit parts so I passed on it. They also make a wheel set and dropped leading edge slats and flaps. I Decided to purchase the slats and flaps but passed on the wheels (more on that later). I also checked out Verlinden’s complete update set which offers an engine, slats, wheels and under wing rockets. After looking at the Verlinden set I was glad I bought the CE slats and flaps. The Verlinden slats are simply a single strip that attaches to the leading edge, very simplistic looking in my opinion. I did however like the idea of displaying the engine with the panels removed. I did some more searching to see if I was going to have to buy the Verlinden set just for the engine when I found the Aires offering. This is quite a piece of work, I was astonished at the level of detail they managed to produce. I knew I had to have it, so I quickly picked one up. Last but not least I grabbed a set of the old reliable Eduard photo-etch seat belts to spice up the office. So, at the end of my research the score was Cutting Edge 1-3, Verlinden 0-1, Eduard 1-1, and Aires 1-1.
|
CONSTRUCTION |
As usual construction started with
the cockpit. I built the entire assembly except for the instrument panel
and painted it RLM66. I then gave it a wash of black acrylic paint
followed by a light dry brushing of RLM66 to accent some of the prominent
areas. The seat is molded very accurately and with the addition of the
Eduard belts is a dead ringer for the real thing. I added two pieces of
wire to the back of the seat to represent the attachment points for the
seat belts but the 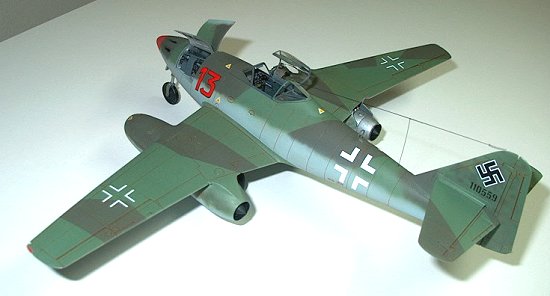 backing plate would later hide them. I also painted
the bottom of the cockpit tub which would form the inside of the wheel
wells at this time. I first painted it RLM66 and followed it with a coat
of Alclad aluminum to represent the unfinished metal. Some tiny details
and the seat cushion where also picked out with a brush before the
assembly was to be mounted in the fuselage.
backing plate would later hide them. I also painted
the bottom of the cockpit tub which would form the inside of the wheel
wells at this time. I first painted it RLM66 and followed it with a coat
of Alclad aluminum to represent the unfinished metal. Some tiny details
and the seat cushion where also picked out with a brush before the
assembly was to be mounted in the fuselage.
I wanted to make sure the instrument panel looked as accurate as possible so I painted it RLM66 and gave it a thick coat of Future in preparation for using the kit decals. The kit supplied decals are extremely accurate and had detail that I could never have paint on, so I cut them out individually and applied them to the panel. While this is very tedious, the result is worth it. Once I had them in their respective places I snugged them down with a generous application of Solv-A-Set which proceeded to turn the entire panel white. This wasn’t a problem though, another coat of Future restored it to its desired condition. For whatever reason Solv-A-set always reacts with a white film once applied to Future. The Revi gun sight was also added at this point. After reviewing my references I couldn’t determine which side the sight folded to when not in use so I posted for some help on Hyper-scale and quickly got some responses that pointed me in the right direction. On the real plane the gun sight was folded down when ever it wasn’t being used to enhance the pilot’s view. I wanted to depict this since my model would be shown having engine maintenance done to it.
The gun bay and front wheel well was added next. I ignored the kit instructions and glued the metal wheel well into the fuselage with out the gear strut, as I didn’t want to take the chance of breaking it off during the rest of the construction. The detail is very nice in the gun bay area and is quite acceptable straight from the box. Neither of these sub assemblies were painted at this time.
Fit was pretty good between the two
fuselage halves. I did however manage to use some Tamiya putty on the
upper and lower spine. I had a slight vertical misalignment on the two
halves. I’m sure this is my fault as it’s a SOP for me to use putty on
every 262 that I’ve built! The rudder and four gun nose where also added
at this time. The fit of the nose was not
 very snug, but that could have
resulted from my fuselage trouble. A liberal application of Pro-Weld
followed by a pass with the sanding stick quickly filled the gap and it
was then off to the wings.
very snug, but that could have
resulted from my fuselage trouble. A liberal application of Pro-Weld
followed by a pass with the sanding stick quickly filled the gap and it
was then off to the wings.
As mentioned earlier I had purchased the Cutting edge slat and flap set and intended to use it on this kit. Well as luck would have it I damaged the wing leading edge (not the slat) while removing it from the pour stub, so I had to stick with what the kit had to offer OOB. I have to say the Cutting Edge set is very well molded, I just get al little carried away with the No. 11 sometimes! The wings minus the engines where assembled per the instructions and the lower wheel well parts where also installed and painted Alclad Aluminum. I tested a new technique for weathering aluminum on the wheel wells this time around also. I decided to take a little brownish red pastel and grind it up and mix it in with some Future. I could barely tell it was in there while looking at it in the jar but once applied to the wheel wells it gave a very subtle realistic dirty wash. I wanted to make sure that it didn’t appear to be rust as aluminum obviously doesn’t rust. I was very impressed with the results and will continue to use it, unfortunately it is so subtle that my camera wouldn’t pick up on it.
Next I mated the fuselage and wings
together. The fit here was perfect and required no filling or sanding at
all. Now on to the engines. I built the left engine straight from the box
and mounted it to the wing. The right wing however wasn’t going to be so
easy. I couldn’t find any pictures or diagrams of how the engine panels
where removed. Most pictures show either all of them off with the front
intake cover on or just the front top cover off. I even took a bunch of
pictures of the NASM’s yellow 7 to try and figure it out, but ended up
just guessing and sticking with the story that the engine had just been
reinstalled after a major overhaul on mine. I carefully cut the kit parts
back until I had the desired sections, which essentially just
 involved
following the panel lines. Once I had the upper edge of the housing I
needed, I glued it to the bottom of the wing. This really is an easy
operation to perform, and I didn’t need to add any Evergreen to replicate
the front structure. Once the upper housing is mated to the wing the
correct airframe shape is formed from the kit parts, I simply sanded it
smooth and drilled the structural holes in it and I was done!
involved
following the panel lines. Once I had the upper edge of the housing I
needed, I glued it to the bottom of the wing. This really is an easy
operation to perform, and I didn’t need to add any Evergreen to replicate
the front structure. Once the upper housing is mated to the wing the
correct airframe shape is formed from the kit parts, I simply sanded it
smooth and drilled the structural holes in it and I was done!
At this time I assembled Aires fine JUMO engine. Aires kit is molded in 6 large pieces of resin, 5 smaller pieces and a tiny photo etch fret. Assembly took about 10 minutes once the pour stubs were CAREFULLY removed. Small bits of wire for various lines were also included but I decided to leave them off until I had mounted it to the wing. I painted it flat black followed by a liberal dry brushing of silver highlighted by a selective was of Burnt Umber artist oil. I really don’t know much about Aires and haven’t used their products before but on a scale of 1 to 10 I’d have to give this set a 10.
The last major construction that I did involved the gear and tires. I carefully cleaned up all of the gear struts and clipped the attachment leg off of the front gear brace to allow it to fit in the well since I had glued it in place earlier. I decided to sand down the kit tires instead of the after market offerings since I wanted to use the smooth style. I also couldn’t see spending nearly 10 dollars for a resin set. I had used an old True Details smooth set that looked great on my Monogram 262 years ago so I decided to try and replicate them. Removing the existing kit tread only took a couple of minutes with a course sanding stick. The kit supplied tires actually have a lot of detail including valve stems.
|
CAMOUFLAGE & MARKINGS |
I wanted to do Heinz Bar’s Red 13 since I read Akira Banzai’s article in an older issue of Scale Aviation. I used his paint scheme as a guide instead of the instructions. I painted the upper surfaces RLM81 & 83 while the lower was finished in the standard RLM76. The canopy, gear, and gear doors where also painted at this time. I decided to paint the rear horizontal stabilizers separately before they were attached to ease painting. These items all received a heavy coat of Future in preparation for the decals.
The kit supplied decals went on with no trouble and settled right down with a little Solv-A-Set. Once they had dried I applied another coat of Future followed by a wash of Burnt Umber artist oil over the entire plane.
|
FINAL CONSTRUCTION |
The gear, canopy, and engine were all mounted next. I attached the engine by drilling out the top mounting bolt and inserting a piece of wire that was attached to the inside of the wing. It’s nearly a perfect fit and a dead match with the kit part except the turbine cone is slightly different. Not to worry though! The kit comes with two FOD covers, one of which will hide the slight difference! The handed navigation lights and an Antenna and tensioner made from stretched sprue and light bulb filament where then added for the finishing touches.
|
CONCLUSIONS |
I am very pleased with the Tamiya 262 and the Aires engine. It looks great next to my other Luftwaffe fighters and bombers and represents a very important step in aviation. I would recommend this kit to anyone with a little modeling skill and a passion for the first operational jet fighter. Thanks to Hampton Roads Hobbies for the review kits.
|
REFERENCES |
Scale Aviation Magazine, Volume 8, July 99
German Jet Aces of World War 2, Osprey Aerospace, Hugh Morgan & John Weal
German Aircraft Interiors, Vol.1 1935-1945, Monogram Aviation Publications, Kenneth A. Merrick
If you would like your product reviewed fairly and quickly by a site that has over 200,000 visitors a month, please contact me or see other details in the Note to Contributors.