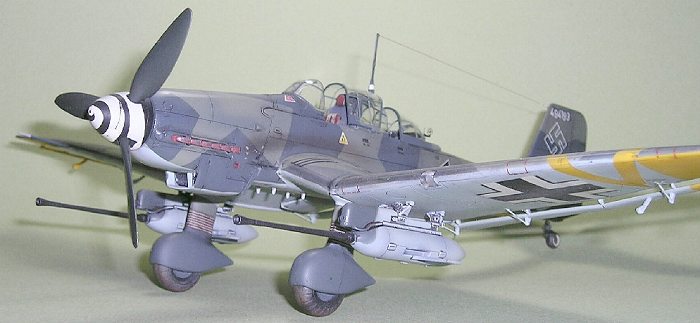
Hasegawa 1/48 Ju-87G-2 Stuka
|
KIT # |
9054 (JT 54) |
|
PRICE: |
SGD $39.00 |
|
DECALS: |
One option |
|
REVIEWER: |
Ewart Yong |
|
NOTES: |
True Details ring and bead sights used. |
|
HISTORY |
The history of this aircraft has been adequately covered in this website (and many others), so I shall not bore you readers with another repeat.
|
THE KIT |
I believe this kit was released by Hasegawa around 1998 and is one of the numerous versions of the Stuka released by this company. Molding is basically quite good with minimal flash and details are quite crisp. The only complaint I have about this kit is the very noticeable ridge on the ailerons and the outer wingtip, which is probably caused by a mis-aligned mold insert used to convert the B-variant to this variant using the same mold.
 Cockpit detail is passable; requiring
only the addition of seat belts and careful painting and dry brushing to
bring out the details. For some strange reason, no rudder pedals were
supplied although locating holes were present behind the instrument panel
for these. I believe rudder pedals were included for earlier variants of
the Stuka by this manufacturer. Also, I notice that the pilot’s head
armour was not included while my references clearly showed this present for
the aircraft in question.
Cockpit detail is passable; requiring
only the addition of seat belts and careful painting and dry brushing to
bring out the details. For some strange reason, no rudder pedals were
supplied although locating holes were present behind the instrument panel
for these. I believe rudder pedals were included for earlier variants of
the Stuka by this manufacturer. Also, I notice that the pilot’s head
armour was not included while my references clearly showed this present for
the aircraft in question.
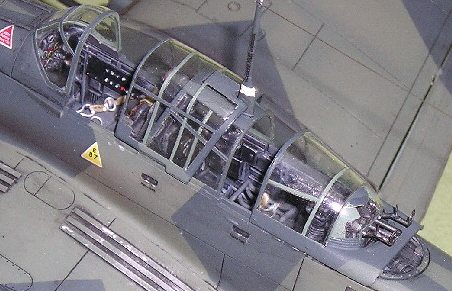
Clear parts are reasonably thin and clear and can be further enhanced by a good dip in Future floor polish. The canopy comes in four sections and may be posed open if desired.
Instruction sheet is in the usual Hasegawa style with a brief history, logical construction steps and clour call-outs referencing Gunze paints.
There is only one decal option, this Ju-87G-2 kit includes only decals for Rudel's final Stuka. The decals seem quite thick and the white somewhat yellowish but I found them reasonably usable and reacted well with Aeromaster Set and Sol decal solutions.
|
CONSTRUCTION |
 As usual I began construction with the
cockpit. This was basically assembled according to the instructions. I
added the pilot’s head armour and rudder pedals with plastic sheet. Seat
belts and buckles were fashioned from lead foil and fuse wire
respectively. The entire assembly was airbrushed with Testors RLM 66.
Once the paint had dried, I accentuated the recesses with black water
colour and drybrushed with light grey to bring out the details. Other
details were picked out before the entire assembly was ‘dirtied ‘ with
ground up light brown pastel chalk powder to simulate dirt and grime. A
coat of Testors Dullcote lacquer from a spray can sealed everything in.
As usual I began construction with the
cockpit. This was basically assembled according to the instructions. I
added the pilot’s head armour and rudder pedals with plastic sheet. Seat
belts and buckles were fashioned from lead foil and fuse wire
respectively. The entire assembly was airbrushed with Testors RLM 66.
Once the paint had dried, I accentuated the recesses with black water
colour and drybrushed with light grey to bring out the details. Other
details were picked out before the entire assembly was ‘dirtied ‘ with
ground up light brown pastel chalk powder to simulate dirt and grime. A
coat of Testors Dullcote lacquer from a spray can sealed everything in.
I next proceeded with the wings. The offending step at the wingtips and ailerons was sanded down and the panel lines restored with my trusty scriber. The control horns and actuator links on the flaps and ailerons were represented by thick, triangular slabs since these were molded integrally with the lower wing halves. I removed these with a motor tool and rebuilt them using plastic sheet for the control horns and 10 thou steel guitar strings for the push rod actuators.
 The construction of the main airframe
proceeded without much incident. I did however add the non slip walkways
at the wing roots with plastic strips as I found the decals supplied for
this rather unconvincing. Almost no filler was required; I only needed to
fill the wing joint at the bottom of the fuselage with Mr Surfacer.
The construction of the main airframe
proceeded without much incident. I did however add the non slip walkways
at the wing roots with plastic strips as I found the decals supplied for
this rather unconvincing. Almost no filler was required; I only needed to
fill the wing joint at the bottom of the fuselage with Mr Surfacer.
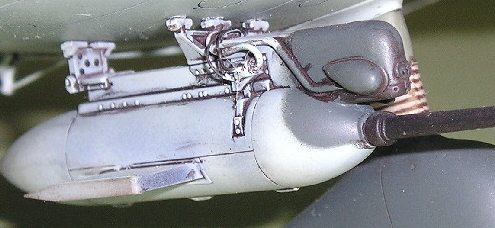
I proceeded to assemble the anti-tank cannons next. With my references in hand, I added the various tubing, piping work and wiring with plastic rod and fuse wire. These were then set aside as separate sub-assemblies for painting.
The subassemblies were washed thoroughly with dishwashing detergent and allowed to air-dry for a week in preparation for painting.
|
CAMOUFLAGE & MARKINGS |
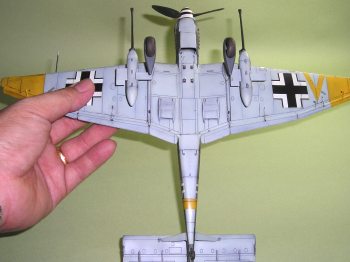
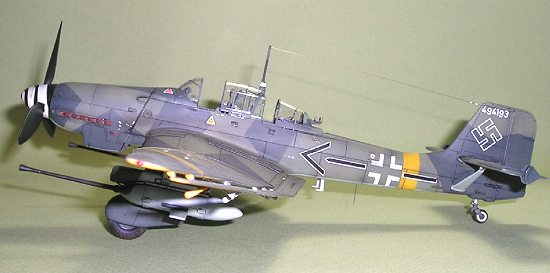 Panel lines were pre-shaded with black
paint. After this was done, I sprayed yellow for the theatre band and wing
markings. I elected not to use the decals supplied for this purpose as I
doubted their opacity. Once done, I masked off the yellow portions and
sprayed the RLM 65 undersides on the airframe and cannon. After allowing
the paint to dry overnight, I masked off the light blue portions and
sprayed the RLM 70 upper surfaces. I used only two light coats to allow
the pre shading to show through. Once this was dry, I masked off the
splinter camouflage pattern and sprayed RLM 71.
Panel lines were pre-shaded with black
paint. After this was done, I sprayed yellow for the theatre band and wing
markings. I elected not to use the decals supplied for this purpose as I
doubted their opacity. Once done, I masked off the yellow portions and
sprayed the RLM 65 undersides on the airframe and cannon. After allowing
the paint to dry overnight, I masked off the light blue portions and
sprayed the RLM 70 upper surfaces. I used only two light coats to allow
the pre shading to show through. Once this was dry, I masked off the
splinter camouflage pattern and sprayed RLM 71.
The canopy was given a dip in Future.
Following this, the armoured shield for the rear gunner was masked from
the inside according to my references and sprayed with RLM 02. My
references clearly indicate that some of the framing was inside the
canopy. This was simulated with decal strips painted RLM 02. Once the
internal painting and decaling were completed, the canopies were given
another dip in Future and allowed to set. The external framing was masked
off and sprayed with RLM 66. Once the paint had dried, I sprayed the
appropriate camouflage colours. The tires were painted along
 with the canvas portion of
the wheel spats in dark grey and canvas respectively.
with the canvas portion of
the wheel spats in dark grey and canvas respectively.
The airframe was given a coat of Testors Glosscote using my Aztec airbrush in preparation for decaling. The decals, though thick went on satisfactorily and snuggled down with generous applications of Aermoaster Set and Sol. The only problem I had was with the white spiral around the spinner. This did not fit easily and broke in several places when I tried to adjust it. As a result, I had to do some touching up with white paint.
With the decals applied and set, I washed the model with a mild detergent to remove any decal residue. The model was then given a coat of Testors Dullcote. Paint chipping was simulated with a 00 brush and aluminium paint. Fading and exhaust staining were simulated with pastel chalk. With this done, I sealed everything in with another coat of Testors Dullcote.
|
FINAL CONSTRUCTION |
I added the cannon and canopies and added True Details photo-etched ring and bead gunsights to the rear defensive guns. Monofilament sewing thread for the antenna wire finished off the model.
|
CONCLUSIONS |
Apart from the molding deficiencies, this kit is quite straightforward to assemble. It is much better detailed than the old Monogram offering and is a must to any Stuka collection.
November 2003
Kit courtesy of my wife, as a birthday gift.
Main reference used: Squadron& Signal’s “Stuka in Action”
If you would like your product reviewed fairly and quickly, please contact me or see other details in the Note to Contributors.