| KIT #: | 090337 |
| PRICE: | $ |
| DECALS: | Two options |
| REVIEWER: | Greg Hansel |
| NOTES: | New mold kit |
| HISTORY & THE KIT |
| CONSTRUCTION |
This is not going to be your normal
construction review. I’m in the Air
Force and Scott was kind enough to indulge me with this build while I was on
temporary duty for 10 months in 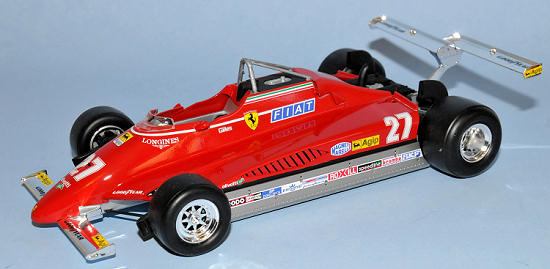 the
suspension, the plastic used for the parts in the Fujimi kit is the same as the
rest of the kit. This means the
suspension is a little weaker then a similar Tamiya model, but once it’s all
together it holds up just fine and seems sturdy enough.
After I built up the engine and suspension I sprayed them with aluminum
and flat black respectively. The
monocoque was also painted aluminum at this time.
the
suspension, the plastic used for the parts in the Fujimi kit is the same as the
rest of the kit. This means the
suspension is a little weaker then a similar Tamiya model, but once it’s all
together it holds up just fine and seems sturdy enough.
After I built up the engine and suspension I sprayed them with aluminum
and flat black respectively. The
monocoque was also painted aluminum at this time.
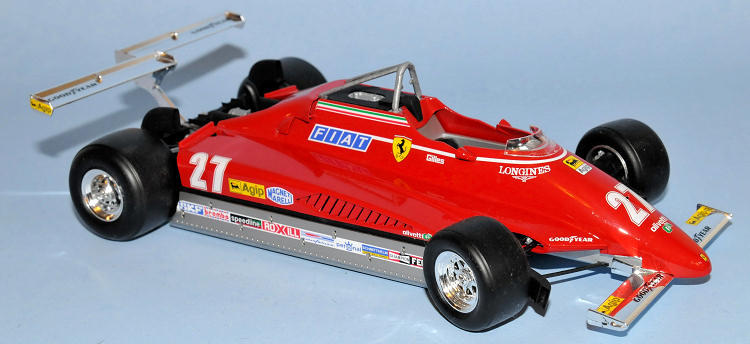
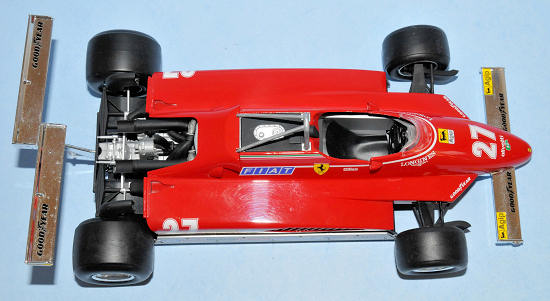
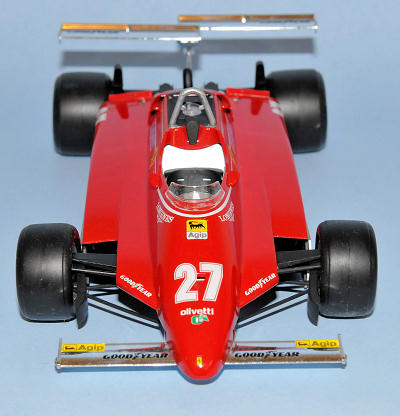
The engine and monocoque fit neatly into the lower tray and almost didn’t need cement. The top of the engine is well detailed with the exhaust and turbos and everything fit neatly with no drama. The body shell is designed to be removable, but it did not fit very well when it was put in position without cement. I adjusted the body as much as I could while trying to adjust the fit, but no matter what I tried, there was always at least a 2mm gap on one side or the other. I feel that with my full range of tools and more patience I may have been able to get a better fit, but I decided to cement the body shell on instead. There was a bit of tension on the body shell when it was fully in place so I felt standard model cement would not have been strong enough. I used 5 minute epoxy for the body to guarantee strength in the bond and because it would not fog the clear coat like CA glues tend to do. The rear wing looked like it would be difficult to assemble, but in reality went together with ease; I used CA cement to ensure strength. I was happy to find out that the wing could be fitted to the car without cement so that I could dismount it for transport.
| COLORS & MARKINGS |
I got lucky for this portion of
the build! I had to return home for
12 days to burn off some “use or lose” leave.
When I flew home I packed up the body parts and side skirts so I could
paint them properly. The side
skirts required a mix of aluminum and gold which I mixed with Alclad colors.
The body was prepared and painted House of Kolor Euro Red with PPG
urethane clear to top it
 off.
The body has a few imperfections and four sink marks. I filled the
imperfections with putty before priming. I
wish I had not been rushed for this part because I ended up having the sink
marks reappear under the paint. I
actually discovered a new method of using CA glue with accelerator for filling
small areas and that probably would have worked better for me.
Once I had the paint and clear done for the body parts, I bundled
everything back up and went back to DC for my last four months.
I spent 4 evenings laying the decals, and they went on extremely well!
I was a bit concerned that the white striping would be difficult, but the
decals were the correct length and there was no need to worry.
off.
The body has a few imperfections and four sink marks. I filled the
imperfections with putty before priming. I
wish I had not been rushed for this part because I ended up having the sink
marks reappear under the paint. I
actually discovered a new method of using CA glue with accelerator for filling
small areas and that probably would have worked better for me.
Once I had the paint and clear done for the body parts, I bundled
everything back up and went back to DC for my last four months.
I spent 4 evenings laying the decals, and they went on extremely well!
I was a bit concerned that the white striping would be difficult, but the
decals were the correct length and there was no need to worry.
My luck ran out on the tires.
This kit, like Tamiya F1 kits, uses a transfer for the Good Year markings
instead of decals. I used the
transfers as the instructions indicated only to have them curl up a couple of
days later. I ended up stripping the remainder of the tire markings off.
I would have preferred decals that I could have applied and shot a matt
clear over.
| CONCLUSIONS |
| REFERENCES |
To be honest, the only references I really used were googled images due to my temporary living conditions. When I was home for two weeks I did reference the book Grand Prix; Fascination Formula 1, Konemann publishing 1993, for some photo references.
April 2009
Thanks to www.dragonmodelsusa.com for the review kit. Get this and many other fine Fujimi kits at your local hobby shop.
If you would like your product reviewed fairly and quickly, please contact me or see other details in the Note to Contributors.