Airfix 1/72 Fairey Rotodyne
|
KIT # |
? |
|
PRICE: |
AU $18.95 |
|
DECALS: |
The prototype |
|
REVIEWER: |
|
|
NOTES: |
Very frustrating build - good end result |
|
HISTORY |
A development of the earlier Fairey Gyrodyne prototypes, which had established a number of British helicopter records, the Rotodyne featured a large rotor powered by air bled from two wingtip mounted Napier Eland turboprops, using the rotor for vertical take-offs, landings and hovering, while full power was applied to the tractor propellers of the turbo props for forward flight.
 The first flight using the tractor propellers was
on 10 April 1958, while on January 5th 1959, the Rotodyne established a
helicopter speed record over a closed circuit of 307 km/h. The prototype
Rotodyne was a three-crew, forty-passenger machine, itself a remarkable
achievement for it's day but on the acquisition of Fairey, Westland
Aircraft proposed to develop the Rotodyne into a production aircraft
capable of carrying between 57 and 75 passengers and using two of the new
5,250 shp Rolls-Royce Tyne turboprops to give a cruising speed of 370
km/h, and the ability to carry up to 6.700 Kgs of freight including
standard-width British Army vehicles.
The first flight using the tractor propellers was
on 10 April 1958, while on January 5th 1959, the Rotodyne established a
helicopter speed record over a closed circuit of 307 km/h. The prototype
Rotodyne was a three-crew, forty-passenger machine, itself a remarkable
achievement for it's day but on the acquisition of Fairey, Westland
Aircraft proposed to develop the Rotodyne into a production aircraft
capable of carrying between 57 and 75 passengers and using two of the new
5,250 shp Rolls-Royce Tyne turboprops to give a cruising speed of 370
km/h, and the ability to carry up to 6.700 Kgs of freight including
standard-width British Army vehicles.
However, an initial order for twelve production Rotodynes for the Royal Air Force did not materialize, and after initial interest from British European Airways, the state owned domestic service and European international airline, did not develop into a firm order, the project was abandoned in February 1962
Preamble
I had never even heard of the Fairey Rotodyne prior to a big box arriving from the United States for me last year. My US friend Mike, armed with the knowledge I was semi-interested in unusual, esoteric aircraft, included the Airfix 1:72 scale Fairey Rotodyne amongst the more conventional kits in the box.
What was a Rotodyne?
Keen to learn more and impressed by the box art I went to the modeller’s friend, the internet and did some research. I rang Mike the next day to thank him for the box and told him that construction on the Rotodyne would begin promptly.
|
THE KIT |
 The kit was originally issued in 1959, back when
Airfix produced several new kits a year for the keen modelling fraternity
of the day. There are over 100 parts in the kit, including 21 transparent
parts. The kit parts are moulded in light grey and are festooned with all
that lovely oversize rivet detail that Airfix is renowned for . Dry
fitting indicated filler would be required in several areas…More on that
later!
The kit was originally issued in 1959, back when
Airfix produced several new kits a year for the keen modelling fraternity
of the day. There are over 100 parts in the kit, including 21 transparent
parts. The kit parts are moulded in light grey and are festooned with all
that lovely oversize rivet detail that Airfix is renowned for . Dry
fitting indicated filler would be required in several areas…More on that
later!
One decal option is provided, along with an instruction sheet. Painting instructions using Humbrol paints are also provided, so a conversion chart is a must.
|
CONSTRUCTION |
Assembly started with the cockpit. Airfix provides a simplistic instrument panel and centre console with instrument panel decals giving the required details. I painted the instrument panel and console flat black with the cockpit floor, rear bulkhead and seats dark grey. Not much can be seen of the cockpit interior so I opted not to add seatbelts or detail the instrument panels further.
The completed cockpit assembly can be inserted into the fuselage after they are joined together. This proved to be a excellent way to go as joining the two fuselage halves were a problem. I could line up the top surface but not the lower and visa versa. There was going to be no way of getting both upper and lower to work at the same time. I decided to get the upper surface even and fill the lower to remove the seam. My theory was that the lower surface was not able to be seen without lifting the model!! I added weights behind the cockpit rear bulkhead as this bird was going to be a tail sitter in a big way if not added!
 Before the fuselage halves were joined together I
added the rotor hub, cementing that into place as I wanted to be able to
remove the rotor assembly whilst transporting the finished model. I
sprayed the interior with flat black and added the 20 oval windows, The
windows were carefully reinforced with superglue to prevent them falling
inside once the cockpit halves were joined. Yeah, right!!!
Before the fuselage halves were joined together I
added the rotor hub, cementing that into place as I wanted to be able to
remove the rotor assembly whilst transporting the finished model. I
sprayed the interior with flat black and added the 20 oval windows, The
windows were carefully reinforced with superglue to prevent them falling
inside once the cockpit halves were joined. Yeah, right!!!
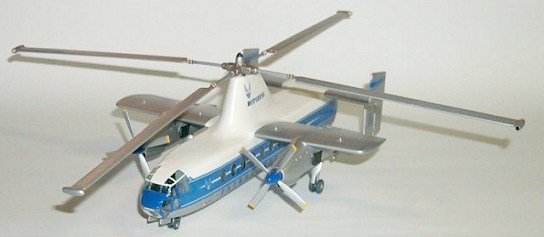
The clam shell rear doors were cemented shut. Gaps caused by the non-installation of the provided door mechanism. This mechanism allowed the doors to open and close “toy style”. The door halves also were different sizes and needed careful filling and sanding to achieve a good fit.
The remainder of assembly proceeded smoothly and rather quickly, with only small amounts of filler required to smooth out ill fitting joints. As the lower half was going to be natural metal, seam line removal and silky smooth plastic are mandatory. At this point I cleaned up, polished and masked the canopy. The cockpit was cemented into place and the front wheel well painted in flat black then the canopy was offered up to the fuselage and cemented into place with clear parts cement, reinforced with a careful application of liquid cement. A small amount of reshaping and sanding had to be done to smooth out the join of the canopy windshield to the fuselage.
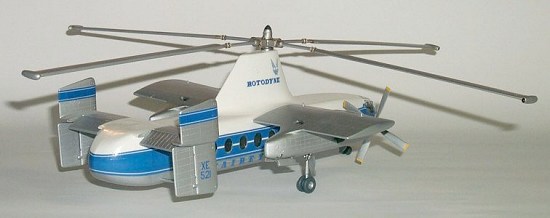
The wings and tail assembly attached to the fuselage with only a small amount of filler needed to fair over seams. However a lot more work was required to clean up each wing engine assembly before an acceptable result could be readied for Tamiya AS12 Natural Metal.
All the minor parts such as the undercarriage legs and bay doors needed cleaning up to remove flash and seam lines. Perhaps Airfix could have invested some more money in cleaning up the mouldings?
|
COLORS & MARKINGS |
Now that construction was finished I could settle down to masking fun and painting. I started with a white primer, base coat overall. For white schemes generally I use Citadel “Skull White” spray cans. These cans have 3 times the amount of a Tamiya spray can and cost around $15 from Games Workshop or Games World stores. In my opinion they are the best hobby spray paint on the market, giving a fantastic even coat in minimal passes.
 When the base coat dried I masked off the wings
and tail assembly and sprayed Tamiya AS12 NM. Masking and spraying
continued until all the base colours were on. I then polished the natural
metal areas with SnJ polishing powder. Peeling away the masking revealed
the previously painted white areas and the glazing. While removing the
Humbrol Maskol on one of the side windows it FELL IN!!!! Once I had
calmed down and my wife had made me a cuppa, I decided the best thing to
do was to make a new window out of some clear acetate sheet. This was
done and after some tense moments successfully installed. Now I have a
Rotodyne with a rattle!!
When the base coat dried I masked off the wings
and tail assembly and sprayed Tamiya AS12 NM. Masking and spraying
continued until all the base colours were on. I then polished the natural
metal areas with SnJ polishing powder. Peeling away the masking revealed
the previously painted white areas and the glazing. While removing the
Humbrol Maskol on one of the side windows it FELL IN!!!! Once I had
calmed down and my wife had made me a cuppa, I decided the best thing to
do was to make a new window out of some clear acetate sheet. This was
done and after some tense moments successfully installed. Now I have a
Rotodyne with a rattle!!
I painted the cockpit framing Humbrol French Blue, which proved to be a near perfect match for the decal stripe colour.
Whilst all that paint and repair work was drying, I spent some time cleaning and then painting the four exhausts. Painting exhausts is straightforward, spray a base of flat black and dry brush Model Master metallic paints to give the exhausts a weathered, heat stressed appearance. The Model Master metallics are very thin and dry brush really nicely.
I painted the rotor assembly with Citadel metallics, washed with a raw umber oil wash to give a used look. Wheels were painted and the propeller spinner covers carefully painted Humbrol French Blue.
The flat white paint was then painted over with several thin coats of Johnsons “Future” in preparation for decaling.
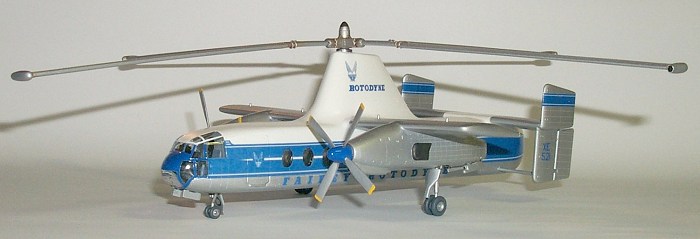
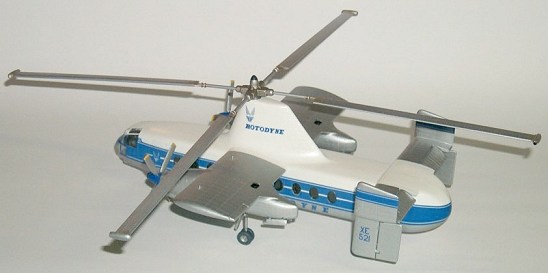
Airfix offer only one decal choice, XE 521 that
flew at the Farnborough Air Show in 1958. These colours are a simple
white/natural aluminium and French blue. I was a bit concerned with the
decals as they were slightly thick and matte in appearance. The fuselage
stripes come in 6 parts and I found it was best to work from the front on
each side and work to the rear. The decal stripes going around the clam
shell rear doors needed some careful slitting and use of decal solvent to
 make them snuggle down. All the other decals snuggled down to the surface
details fairly well with some applications of decal solvent. Colours were
in the main dense and look great against the white and natural metal. I
was most impressed at how easy they were to apply and to position.
make them snuggle down. All the other decals snuggled down to the surface
details fairly well with some applications of decal solvent. Colours were
in the main dense and look great against the white and natural metal. I
was most impressed at how easy they were to apply and to position.
Once the decals had dried, I applied another couple of thin coats of “Future” with a clean wide flat brush, kept specifically for the task, to seal in the decals and to impart a gloss finish overall.
The problem with using sealers with natural metal aircraft is that the metal look tends to disappear. Funnily enough “Future” has no effect on the appearance once applied to natural metal finishes and I have used this successfully in the past.
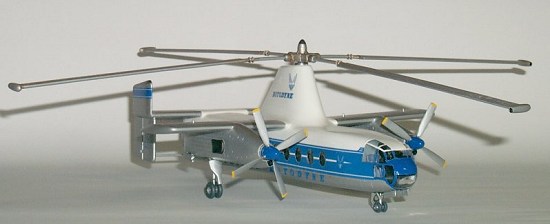
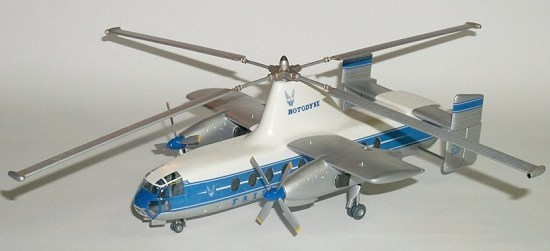
I then added the painted wheels to the undercarriage legs and the over thick undercarriage doors were cemented into place. The final task was to add finished Rotor and the two propeller assemblies and my Rotodyne was finished!
|
CONCLUSIONS |
 This kit embodies all the things that make
modelling such a fun and rewarding hobby. Not a shake and bake Tamigawa
offering certainly, but once all was done the Rotodyne gave me a great
sense of satisfaction and pride. One question remains, with a 400mm rotor
span, where am I going to put it?
This kit embodies all the things that make
modelling such a fun and rewarding hobby. Not a shake and bake Tamigawa
offering certainly, but once all was done the Rotodyne gave me a great
sense of satisfaction and pride. One question remains, with a 400mm rotor
span, where am I going to put it?
Good fun!
On impulse I entered the Rotodyne in the Civil Air category in the 2003 WASMex (Western Australian Scale Model expo), to my utter surprise it took gold.
Hmmm, maybe a “what if” QANTAS Rotodyne?
September 2003
|
REFERENCES |
World Aircraft Files
http://pauldunn.dynip.com/aircraft/rotodyne/
http://www.internetage.com.au/rotorcraft/rotodyne1.htm
http://web.ukonline.co.uk/jonathan.mock/iac/reviews/rotodyne.html
Copyright ModelingMadness.com. All rights reserved. No reproduction in any form without express permission from the editor.
If you would like your product reviewed fairly and quickly, please contact the editor or see other details in the Note to Contributors.