Airfix 1/72 Dehavilland DH.88 Comet
| KIT #: | 0013 |
| PRICE: | $5.00 |
| DECALS: | one options |
| REVIEWER: | George Oh |
| NOTES: | A basic kit |
| HISTORY |
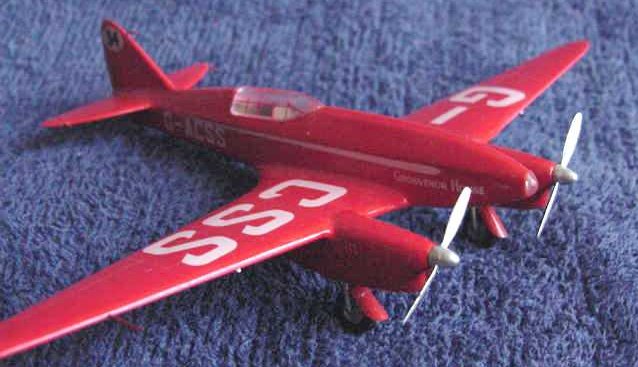
In 1934, an air-race from England to Melbourne was organised. De Havilland designed the DN88 for the race and built three. One was painted scarlet, one green and the other black & gold. The Scarlet one named Grosvenor House won the race and is preserved in the Shuttleworth Collection (see). Since it is a significant British aircraft, it is no surprise that Airfix produced a kit of it.
| THE KIT |
 This is a vintage Airfix kit that has not changed since it was first sold
in a plastic bag sealed with a paper header written entirely in English
(the good ‘ole days). It is sooooo old, it doesn’t feature the Airfix
signature gigantic rivets. It is a fairly basic kit. There is no
cockpit – only a plate with two heads, and the cockpit canopy is incredibly
thick. Only the propellers needed some carving to remove a large block
from the spinners behind each blade. On the plus side, the completed
model looks like a Comet. I dunno if it measures-out correctly – I build
models, I don’t measure them.
This is a vintage Airfix kit that has not changed since it was first sold
in a plastic bag sealed with a paper header written entirely in English
(the good ‘ole days). It is sooooo old, it doesn’t feature the Airfix
signature gigantic rivets. It is a fairly basic kit. There is no
cockpit – only a plate with two heads, and the cockpit canopy is incredibly
thick. Only the propellers needed some carving to remove a large block
from the spinners behind each blade. On the plus side, the completed
model looks like a Comet. I dunno if it measures-out correctly – I build
models, I don’t measure them.
The latest edition of the instructions has minimal text in several languages, relying for the most part in pictures. This is par for the course in today’s international market. The painting & decaling instructions, while fully comprehensive, are on the back of the box. I find this format a real pain when a competition wants your references ‘cos I have to keep the box(es).
| CONSTRUCTION |
There were three things that I targeted for attention – a cockpit, the undercarriage and several small details on the box art that I thought were doable – namely the horn-balances on the tail control surfaces, small lights outboard of the engine nacelles, a pitot tube and a small transparency on the tip of the nose.
I carefully carved away the cockpit plates from the fuselage halves to
open-up the cockpit. In order to do something about the plainness of the
inside, I slapped a few amorphous bits against the walls, painted &
drybrushed them, then glued the halves together. Sticks followed – I
cheated by drilling holes in the belly and poking the sticks through into
the cockpit. The sticks filled the holes. Two seats were scratch-built
from thin metal foil, fitted with seatbelts and super glued into the
 fuselage on pegs (to set their heights). For the 2 x instrument panels, I
cut across the fuselage with a razor saw, slotted-in pieces of thin plastic
sheet, then trimmed them to size. Again, the plastic filled the cuts.
The fuselage construction seam didn’t require much filler (nice for a
change). I sliced-off the solid nose tip because the box-art showed a
landing light there. I (eventually) built-up a clear nose from Krystal
Kleer.
fuselage on pegs (to set their heights). For the 2 x instrument panels, I
cut across the fuselage with a razor saw, slotted-in pieces of thin plastic
sheet, then trimmed them to size. Again, the plastic filled the cuts.
The fuselage construction seam didn’t require much filler (nice for a
change). I sliced-off the solid nose tip because the box-art showed a
landing light there. I (eventually) built-up a clear nose from Krystal
Kleer.
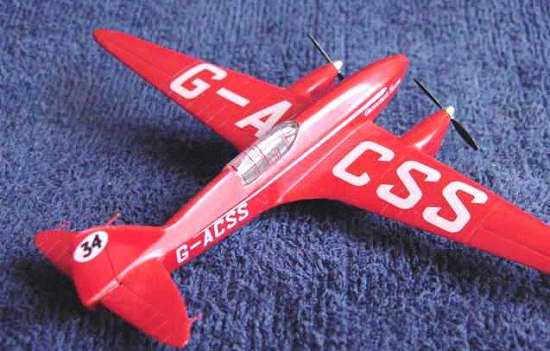
The 2 x engine nacelles went together easily, but they needed extensive putty work. The chin intakes were both misshapen, so I puttied and filed them into the shape. I don’t know if they are right, but at least they are both identical. The front of the nacelles curved in behind the propeller spinners and the propeller shafts were a loose fit. The cure was to replace the shafts with lengths of brass tube. Another larger brass tube was inserted into each nacelle (a side advantage of this was that the propellers spin nicely, and are removable). More putty corrected the shape of the nacelle fronts. And even more putty was required to blend the nacelles into the wings, and the wings to the fuselage.
The small details were easy, but required some care. I drilled small holes with a drill bit in a pin-vice, at the appropriate positions. The horn balances were replicated with pieces of fine fuse wire. I just super glued them in place, trimmed them to length, then tipped them with a superglue blob. The Pitot tube is a piece of fine piano wire. Its inside tip is anchored against the inside of the training edge inside the wing. The small lights were replicated by burying short pieces of plastic rod in the wings and eventually painting the tips white.
| COLORS & MARKINGS |
About now, I plugged the cockpit and wheel well cavities and sprayed the
model. First a high-gloss enamel silver from a Galmet brand metal paint
spraycan to cover the puttying, then several coats of Humbrol acrylic gloss
red. The propellers were also silvered. My problem was the painting of
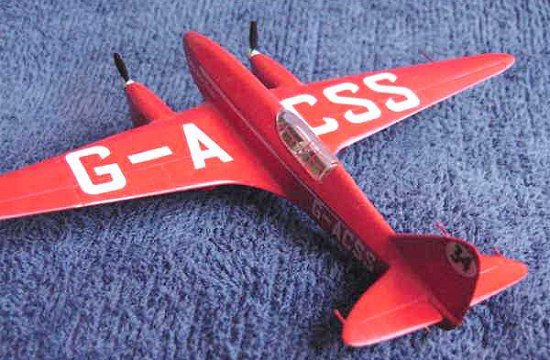
the canopy frames. They were not moulded on the canopy and the boxart
indicates that most were very fine. I solved the problem by scribing the
framing into the canopy, painting the canopy
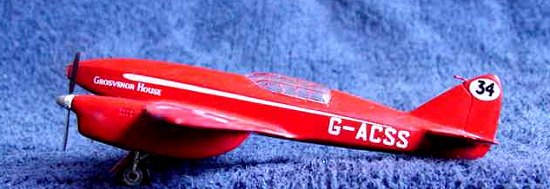 red, then wiping the paint off
(with an alcohol swab) leaving enough red paint in the scribing. There is
a noticeable dip where the rear of the canopy meets the fuselage spine. I
tried, unsuccessfully, to fill it with Krystal Kleer. This would have
been a snap to fill with filler if the canopy had been extended to include
part of the fuselage spine.
red, then wiping the paint off
(with an alcohol swab) leaving enough red paint in the scribing. There is
a noticeable dip where the rear of the canopy meets the fuselage spine. I
tried, unsuccessfully, to fill it with Krystal Kleer. This would have
been a snap to fill with filler if the canopy had been extended to include
part of the fuselage spine.
I wasn’t happy with the apparent lack of strength in the undercarriage legs & retraction struts, so I replaced them all with lengths of paperclips – and I didn’t have to paint them. The tailskid was a small piece of plastic. I replaced it with a copper staple. All of the metal bits were superglued in place.
Since the whole model was painted gloss red, the decals went on without fuss or solutions. They received the mandatory pressing-down and clear gloss overcoat. They are a little too translucent for my liking. The stripes along the sides have to be constantly checked during application to ensure that they go on straight. I look along them from the front of the model.
| CONCLUSIONS |
If I have to build another Comet, I’d do a better job on the nose transparency/light by carving one from a piece of clear sprue. I could then drill a ‘light bulb’ in the back if it. I might also convert the markings into masks that I’d put on a white model, then remove them after painting the red. I wonder if anyone does a sheet of markings for the other two Comets?
The Comet is the only civilian aircraft I have ever built. It captivated me by its bright red livery and its sleek lines, and that’s why I built it. As it is a basic kit, I can recommend it to all levels of builders, including those (like me) who want to push it a little further.
October 2004
Copyright ModelingMadness.com
If you would like your product reviewed fairly and fairly quickly, please contact the editor or see other details in the Note to Contributors.