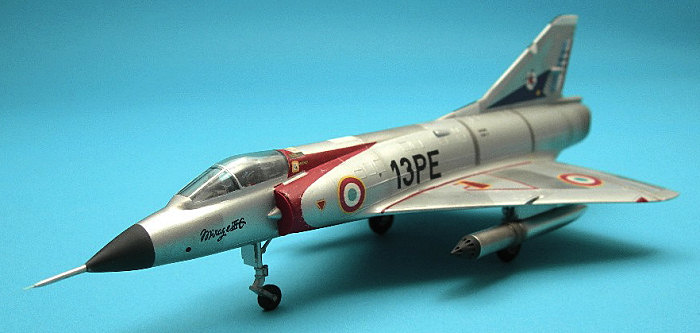
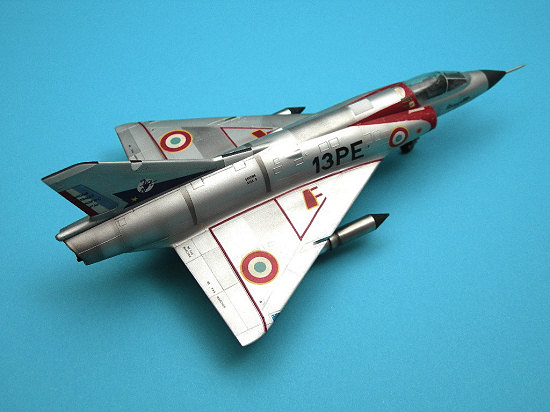
Airfix 1/72 Mirage IIIC
| KIT #: | 292 (1964) |
| PRICE: | Currently out of production |
| DECALS: | One option |
| REVIEWER: | Victor Scheuerman |
| NOTES: | Surprisingly nice for a 1964 mold |
| HISTORY |
An all weather interceptor and ground attack aircraft, the Mirage III C is the initial production model of the extremely successful series of Dassault multi-purpose deltas. Some 200 of this particular version have been produced and are in service with the French Armee de L’Air and the Israeli Air Force.
Development of the Mirage stems from a French competition for a light weight day fighter held in 1954. Although nothing came of the competition the Dassault entry showed such promise that a higher powered version, known as the Mirage III was produced and flew in November 1956. In the following January a speed of Mach 1.5 was achieved with the Atar engine and when an auxiliary rocket, the SEPR.66 was fitted this speed was increased to M 1.9. Ten pre-production Mirage IIIA’s were built, the first flying in 1958, and development flying was carried out with these, a speed of Mach 2 being exceeded in October 1958.
 The IIIC Mirage is an extremely
versatile aircraft, it is fitted with low pressure tyres enabling it to operate
from grass air-strips, has a highly efficient Cyrano radar for gun or missile
control and navigation, can be fitted with a booster rocket for high altitude
missions and is capable of carrying a wide range of underwing stores. External
loads can include long range fuel tanks with combined rocket launchers, Matra,
Falcon, Sidewinder or Nord guided missiles, conventional or nuclear bombs and a
variety of rockets or napalm tanks. Internal armament is a pair of 30 mm. DEFA
guns, each with 125 rounds.
The IIIC Mirage is an extremely
versatile aircraft, it is fitted with low pressure tyres enabling it to operate
from grass air-strips, has a highly efficient Cyrano radar for gun or missile
control and navigation, can be fitted with a booster rocket for high altitude
missions and is capable of carrying a wide range of underwing stores. External
loads can include long range fuel tanks with combined rocket launchers, Matra,
Falcon, Sidewinder or Nord guided missiles, conventional or nuclear bombs and a
variety of rockets or napalm tanks. Internal armament is a pair of 30 mm. DEFA
guns, each with 125 rounds.
Other Mirage versions in service or being introduced include the IIIB a tandem seat trainer; the IIIE long-range strike aircraft; the IIIO which is a variant of the IIIE to be manufactured in Australia for the R.A.A.F.; the IIICZ for the South African Air Force; the IIIR a reconnaissance version and the IIIS for Switzerland.
With over 600 Mirages already ordered or delivered, many of them for export it seems certain that the Mirage III will be a common sight throughout the world for many years to come.
The Mirage IIIC is powered by an Atar turbo jet of 9,600 Ib.s.t (14,110 Ibs s.t. with after burner) giving a maximum speed of approximately Mach. 2.05. Normal armament consists of two 30 mm. DEFA cannon, two JL100 rocket/fuel pods and one Matra guided missile. Wing span is 27 ft. and length 43 ft. 10 ins.
| THE KIT |
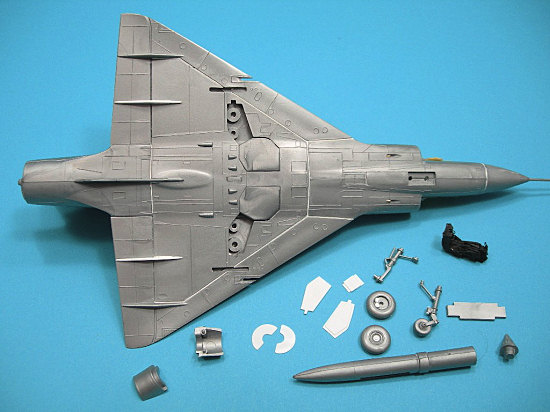
Airfix’s ancient Mirage IIIC consists of 43 individual silver parts with petit raised panel lines and a one-piece clear canopy. The cockpit detail is limited to a pilot, Martin-Baker seat and some minor detail on the instrument coaming. Separate intake bullets are glued from the inside (becomes part of the cockpit sidewall) and the other fuselage additions are the radome, separate nose probe, lower aft fuselage strake, fuselage pylon and a two-piece Atar engine afterburner assembly.
While the nose landing gear bay is
framed in (too shallow), the main gear wells are not. The landing gear legs
themselves are actually rather nice with petit retraction arms and the nose
wheel is molded as part of the nose leg. Common for the era are that all the
gear doors are too thick. 
External stores are limited, though somewhat exotic. Airfix supplies a single air-to-air Matra R.511 missile for the fuselage station. Unfortunately, all the flying surfaces are way too thick (to be expected for a 1964 mold), lower fin is missing and the fuselage shape is not correct. The other stores are the air-to-ground Dassault JL-100 combination rocket pod/fuel tanks for each wing and these look good. All of these stores are firmly held in place with some rather thick pylons. These pylons and the separate inner control surface actuators all fit into large receiving slots. One of the nice things about the wing is that Airfix actually captured the downward curvature at the wing tips.
Airfix was not generous with the decal sheet with only one French subject in natural metal finish being offered. This is limited to a black 18 fuselage number and none of those great French unit insignia but with a full-colour rudder. Rather moot points as these are well pass their due date and there are several after market sheets to be had. The decal positions and brief colour notes are included on the one-page, two-step assembly sheet.
| CONSTRUCTION |
 With only 43 parts to deal with
(well less then that as this eBay kit was missing the pilot, seat and both wing
flap actuators) the seam lines were minor and easily removed by side-scraping
with a No 11 blade; except the nice landing gear legs. The main gear legs have
rather petit side retraction arms that must be handled with care while removing
the seam line; more care than I exercised on one!
With only 43 parts to deal with
(well less then that as this eBay kit was missing the pilot, seat and both wing
flap actuators) the seam lines were minor and easily removed by side-scraping
with a No 11 blade; except the nice landing gear legs. The main gear legs have
rather petit side retraction arms that must be handled with care while removing
the seam line; more care than I exercised on one!
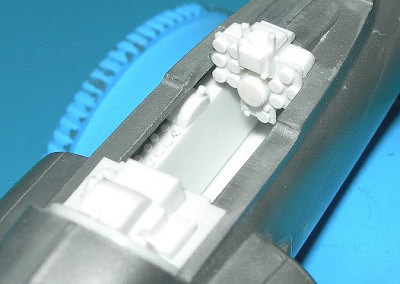
After gluing the combination intake bullet/side walls in place, the minor wall gap in the cockpit area was filled with Milliput Superfine (white) and wiped smooth with a dampened cloth. Some card and strut was then used to build a basic cockpit that included; floor, aft bulkhead, side consoles, instrument coaming and instrument panel shape. As the excellent resin Pavla MB Mk.4 seat (72004) would be used, it was inserted during construction to ensure a nice tight fit, just like the real Mirage. Waldron’s Miniature Punch & Die Set was then used to punch discs of various diameters to add details to the side consoles and instrument panel.
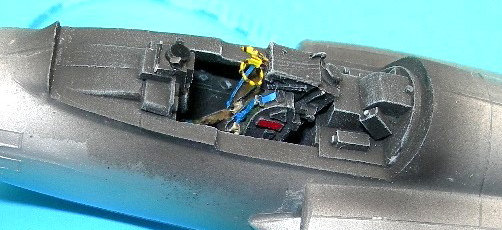 Dassault painted their cockpits
black which is also the main colour of the Martin Baker seat. The entire cockpit
was sprayed black, followed by a dry brushing of medium grey to high light the
details. Detailed painting was done with acrylic paint followed by a final dry
brushing. To add a little variation between the instrument faces and the same
coloured panel face, the former were painted with gloss black. Final additions
were punching out two discs from left over film negative and they were used on
the radar scope and gunsight.
Dassault painted their cockpits
black which is also the main colour of the Martin Baker seat. The entire cockpit
was sprayed black, followed by a dry brushing of medium grey to high light the
details. Detailed painting was done with acrylic paint followed by a final dry
brushing. To add a little variation between the instrument faces and the same
coloured panel face, the former were painted with gloss black. Final additions
were punching out two discs from left over film negative and they were used on
the radar scope and gunsight.
The wings were assembled and then
the main inner gear doors were glued closed. Do not use Part 12; the retaining
plate, as this will force these doors proud of the fuselage. This assembled wing
was then glued to the fuselage followed by the nose radome and aft nose gear
door (both this and the inner gear
 doors bleed down). As the Matra
R.511 was not used, the receiving slot was for it’s pylon was filled. Next, the
missing flap actuators housings were made from strut and added. It really was in
general an impressive fit that only required some Milliput Superfine (White)
two-part epoxy on the wing/fuselage seams that was then wiped smooth with a
moistened Q-Tip.
doors bleed down). As the Matra
R.511 was not used, the receiving slot was for it’s pylon was filled. Next, the
missing flap actuators housings were made from strut and added. It really was in
general an impressive fit that only required some Milliput Superfine (White)
two-part epoxy on the wing/fuselage seams that was then wiped smooth with a
moistened Q-Tip.
This kit, like most kits from that time feature gear doors that are way too thick. All the remaining doors were replaced with much thinner ones made from card and some card discs were added to the main tires and nose well strut. Having decided to use the JL 100s, the body halves were glued together and sanded smooth.
Next, the one-piece canopy was polished and attached with white glue and after curing, permanently fixed in place with super glue. This showed that the aft framing was well above the joining fuselage surface as was the lower front windscreen. These areas were filed, and then the entire canopy was wet sanded until all the framing was removed. To restore the canopy, it was wet sanded with fine grit emery cloth and then polished. Masking was done with Tamiya tape.
| COLORS & MARKINGS |
Black was sprayed on the cockpit area and then the model was primed using the excellent Tamiya rattle can. This showed some trouble areas with the seams on the lower surfaces requiring some super glue to correct. This of course removed some of those fine raised panel lines. A combination of the OLPHA P-Cutter blade and Testors tape were used to restore them. An additional coat of primer and wet sanding with 1200 grit emery cloth had the surface ready for the Tamiya AS-12 Bare-Metal Silver rattle can finish. This can was warmed in water first and then the finish was applied in several light coats.
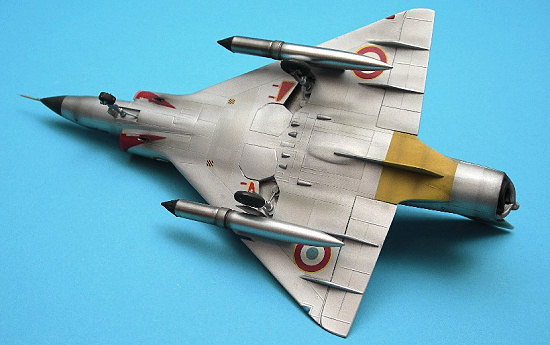 This provided a tuff metal base
that can be safely masked, so random panels were masked and sprayed various
shades of ALCLAD II. The exception was the gear doors and JL-100 pods that were
first sprayed with Krylon Gloss Black 41601 lacquer from the rattle can,
followed by Polished Aluminum. To complete the ‘metal’ part of painting, the
inner gear doors and landing gear were brush painted with Games Workshop Mithril
Silver. Specific areas were then masked and then sprayed black (nose radome),
yellow (lower aft fuselage), and white (fuselage dielectric panels).
This provided a tuff metal base
that can be safely masked, so random panels were masked and sprayed various
shades of ALCLAD II. The exception was the gear doors and JL-100 pods that were
first sprayed with Krylon Gloss Black 41601 lacquer from the rattle can,
followed by Polished Aluminum. To complete the ‘metal’ part of painting, the
inner gear doors and landing gear were brush painted with Games Workshop Mithril
Silver. Specific areas were then masked and then sprayed black (nose radome),
yellow (lower aft fuselage), and white (fuselage dielectric panels).
After the paint had cured over night, masking was removed from the canopy and the landing gear with doors were attached.
Decaling would prove to be an ‘interesting’ process. The original plan had the excellent looking and printed decals from the Decals Carpena Sheet 72/24 Mirage III/5 (Portugal production) being used. Though they looked great, apparently no adhesive was used in production as they simply ‘fell off’ over night. To complete the model, various Model Decals sheets provided; cocardes ( Sheet 62), large fuselage codes ( Sheet 63), some stencils, speed brake covers and large unit insignia came from sheet No 88. Matchbox supplied the coloured rudder and fuselage Mirage IIIC lettering while the 1976 Revell Mirage kit supplied the red scallops on the intakes and aft of the canopy. An old Scale Master sheet supplied the red walkway stripes that really add that something extra to the finished model. Eventually they all did work, with a cloth soaked with hot water working wonders on the Model Decal items.
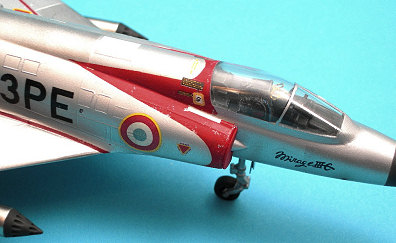 One of the areas that required
some further attention was the old red Revell scallops. Humbrol Gloss Red 19 was
carefully brushed onto the cracked sections and along any gaps. While this
corrected the problems, there were now high gloss sections of red that really
did not look correct. To tone done the gloss here and on some of the other decal
surfaces, Testors Flat Clear Lacquer Finish diluted with thinner was misted on.
This mix then had a drop of Tamiya NATO Black acrylic added and then this was
very carefully misted on aft of hinge lines, wheel wells, gun troughs, random
streaks, and over some of the decals to slightly weather the finish. Further
weathering was done using some MiG Productions Black pigment on the cannon ports
and landing gear and the final weathering step was some paint chipping added
with a silver pencil.
One of the areas that required
some further attention was the old red Revell scallops. Humbrol Gloss Red 19 was
carefully brushed onto the cracked sections and along any gaps. While this
corrected the problems, there were now high gloss sections of red that really
did not look correct. To tone done the gloss here and on some of the other decal
surfaces, Testors Flat Clear Lacquer Finish diluted with thinner was misted on.
This mix then had a drop of Tamiya NATO Black acrylic added and then this was
very carefully misted on aft of hinge lines, wheel wells, gun troughs, random
streaks, and over some of the decals to slightly weather the finish. Further
weathering was done using some MiG Productions Black pigment on the cannon ports
and landing gear and the final weathering step was some paint chipping added
with a silver pencil.
Final steps were giving the canopy a final polish, gluing the under wing stores in location, adding the new nose probe tip made from brass and adding the afterburner.
| CONCLUSIONS |
This was a most enjoyable build of an Airfix ‘classic’ that most modelers probably would not even consider doing; their loss. While it was a little tuff for me to leave the gear bay as is, I did managed to do it. Now I can look forward to building some other gems like the original Airfix Hunter and Lightning, FROG’s Canberra, Hunter and as this is being written, the FROG Meteor F Mk IV is on the bench.
November 2007
Copyright ModelingMadness.com. All rights reserved. No reproduction in part or in whole without express permission from the editor.
If you would like your product reviewed fairly and fairly quickly, please contact the editor or see other details in the Note to Contributors.