Matchbox 1/72 Gnat T.1 Trainer
| KIT #: | PK-16 |
| PRICE: | Long out of production |
| DECALS: | Two options |
| REVIEWER: | Victor Scheuerman |
| NOTES: |
| HISTORY |
Folland’s diminutive trainer started out as a proof of concept lightweight fighter in the form of the Midge of 1954. The RAF did not take any interest in this or the improved fighter version, the Gnat. However, the RAF was looking for an unarmed two-seat advanced trainer to replace the Vampire T.Mk11. Folland then looked into adding a second seat and ways to lower the landing speed. Major changes in addition to the seat and new canopy were; enlarged wing surfaces, lengthened forward fuselage and a more powerful Orpheus 100 engine.
As soon as Folland became part of Hawker Siddeley Aviation in February 1960, it was awarded a contract for 30 aircraft. Additional orders increased the production run for the Gnat T. Mk 1 to 91 aircraft with the last delivery in April, 1965. During its service career it would go about its task adequately but it would become an internationally recognized airframe thanks to its long association with the famous Red Arrows of the RAF.
| THE KIT |
Matchbox first released this kit in 1973 and this boxing was a combination of red and white plastic for the kits 35 parts. Once again the Matchbox trencher has paid a visit but nothing that some rattle can primer and sanding can’t cure. The canopy is one-piece (my preference for 1/72 scale) and is quite clear which will really highlight the basic cockpit. Matchbox supplies two seats that look somewhat similar to the unique Folland designed items in the Gnat. These are attached to a rectangular floor that has a separate large console separating the cockpit positions.
 One of the nice things about
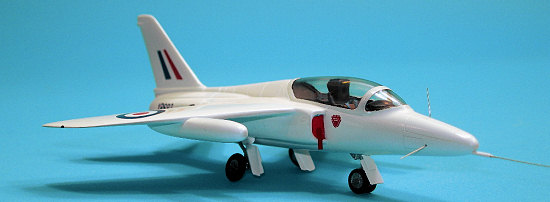
the kit is that the long ‘cigar’ wing tanks are included. Both the main and nose
gear wells are fully framed in as is the nose bay and are too shallow. The
landing gear themselves are OK with the doors requiring thinning or replacement
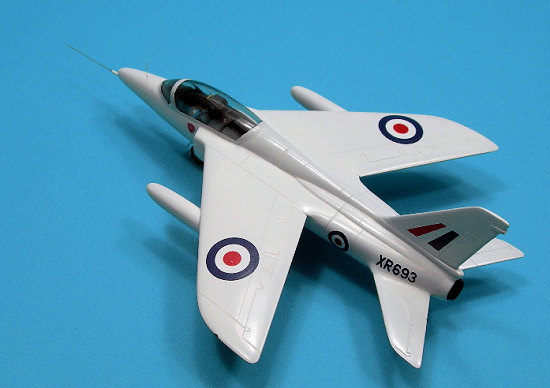
with card items. Decals are for XR993 ‘Red Arrow’ and an attractive red with
white trimmed trainer from No 4 Squadron, Central Flying School at Little
Rissington.
One of the nice things about
the kit is that the long ‘cigar’ wing tanks are included. Both the main and nose
gear wells are fully framed in as is the nose bay and are too shallow. The
landing gear themselves are OK with the doors requiring thinning or replacement
with card items. Decals are for XR993 ‘Red Arrow’ and an attractive red with
white trimmed trainer from No 4 Squadron, Central Flying School at Little
Rissington.
As fate would have it, Special Hobby just listed the Gnat T. Mk I as a future 1/72 scale release. This is becoming more common as the Czech modelling empire slowly replaces the older molded 1/72 scale kits with more state of the art efforts. The Matchbox Gnat is still a fine little kit; what to do?
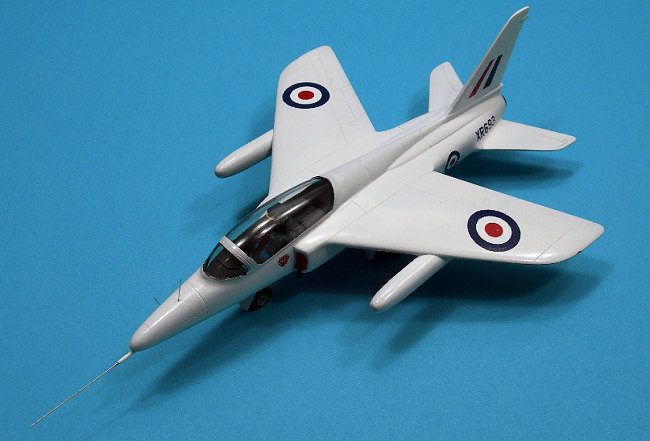
Scale Aircraft Modelling’s feature aircraft in the November 1985 issue is indeed the Hawker Siddeley (Folland) Gnat. While looking at the numerous side profiles, I noticed the preproduction Gnats featured a shorter and blunter nose and that two of them had the rear position occupied with test equipment. The Brits at one time had the interesting habit of painting their prototypes in ‘interesting’ colours. Of the pre-production batch, XM693 was the only one with a different finish. This aircraft was gloss white overall and the aft fuselage and wing serial numbers were done in blue and the fin flash was also unique in configuration. As I had the Airfix Gnat kit on the shelf that has all the serial numbers for the Red Arrows in blue, it was a done deal; or so I thought…
| CONSTRUCTION |
Normally, most folks detail the cockpit before the fuselage is assembled. However, what I normally do with 1/72 scale kits that have a nice open cockpit, is to actually assembly the main components, prime the kit and then correct the basic flaws first. Sounds a bit odd but it allows most of the pronounced exterior corrections to be done before the office is added.
Therefore, the next step was to start the actual assembly. Starting with the main gear bay covers (12/13) and intakes (9/10), these were attached after sanding for a tight fit and some super glue was used to ensure there were no seams. The assembled fuselage looks fine except that the nose gear bay was both too shallow and the seam was really quite pronounced. To correct this, the main part of the bay was first cut away and then the edges were filed smooth. Next, a new card roof was added from inside the fuselage and it looked much better.
 With the fuselage completed
for now, the main wing halves were joined and those funky looking tanks were
glued together and sanded smooth. These were then attached to the wing and a
speck of Milliput Super Fine epoxy was used to fill a small gap that was on the
outside of both tanks. A wipe with a moistened Q-tip had the problem corrected
without any sanding (works great when you need to fill a seam that has raised
detail present).
With the fuselage completed
for now, the main wing halves were joined and those funky looking tanks were
glued together and sanded smooth. These were then attached to the wing and a
speck of Milliput Super Fine epoxy was used to fill a small gap that was on the
outside of both tanks. A wipe with a moistened Q-tip had the problem corrected
without any sanding (works great when you need to fill a seam that has raised
detail present).
One of the nice things about working with a simple kit like this, you can be a little heavy handed. In this case that was used to advantage by cutting the wing location tabs smaller so that the flying surfaces could be worked back and forth with a little more liquid glue then normal. The result is a nice tight fit, but the main wings had way too much negative dihedral. With the wings set at the proper negative dihedral, a large gap was the result on the lower join. Again, Milliput was used as mentioned but two applications were required. Super glue was then used to ensure there were no seams at any of the joins and then the model was given an enthusiastic sanding with the outer main wings and all edges getting extra attention to get them somewhat thinner.
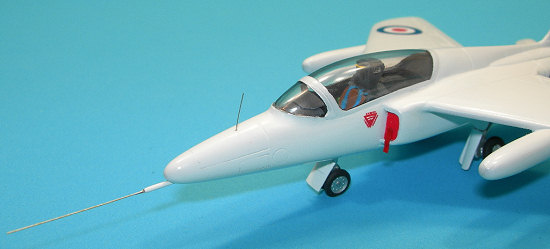
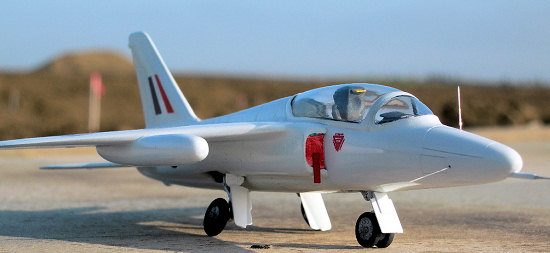
Using the 1/72 scale drawings in the SAM reference, the nose was cut shorter and Milliput was used to build up the lower fuselage. After curing, the Milliput was sanded to shape and then a hole was drilled to receive a new Pitot probe. A generous coat of primer was applied with Tamiya’s Surface Primer (L) rattle can. While I normally do not enjoy engraving, with a surface prepped with the Tamiya Primer it seems to go much better. Over a couple of sessions with Testors tape and the OLPHA-P cutter blade, the surface looked much better with some panel lines added.
Matchbox supplies a landing gear that is adequate. As the main doors have an unusual configuration that the kits (23/25) items are close to, these were sanded thinner. Matchbox supplies a one-piece nose door (29) that is inaccurate, as the actual items has a small door in front of the rectangular main one. Both of these were made from card using the kit piece as a guide. As one would expect, the landing gear legs are rather petit and because of this the attached retraction arms have the open space between the arms occupied by thin plastic. Removing all of this took some time but it did improve the final appearance. There are two parts on the red tree; 36/37 that are not shown in the plans. These were eventually identified as two very small doors that are located behind the main doors but in front of the landing gear leg. These were given a sanding and then used on this project. All the tires had a missing disc added to the center of the hub, and then the outer ring of attachment nuts on the main tires had their centers drilled to reflect this detail on the actual items.
 Improving the cockpit
interior was started by not using the kit partial floor and replacing it with a
new one from .010 card that occupied the completed length and went under the
instrument panel coaming. Next, a card base for a future instrument panel was
attached to the edge of the coaming and a card bulkhead was added to upper part
of the aft cockpit. For replicating the side consoles in 1/72 scale jets, wide
use is made of thicker strip material. In this case, a length of .040 x .156”
strip was cut and place on the new floor. This was then clamped to match the
curve of the side of the fuselage and left to cure.
Improving the cockpit
interior was started by not using the kit partial floor and replacing it with a
new one from .010 card that occupied the completed length and went under the
instrument panel coaming. Next, a card base for a future instrument panel was
attached to the edge of the coaming and a card bulkhead was added to upper part
of the aft cockpit. For replicating the side consoles in 1/72 scale jets, wide
use is made of thicker strip material. In this case, a length of .040 x .156”
strip was cut and place on the new floor. This was then clamped to match the
curve of the side of the fuselage and left to cure.
The kit seat was temporary attached so that a card bulkhead could be added behind it. Aft of this, rectangular pieces of thick strip were added to simulate the test equipment. Next, a combination of card and card discs made with the Waldron Sub Miniature Punch & Die Set were added to detail the office. A two-piece instrument panel was made and glued into location and then the coaming received a new partial cover. Even though the seat looks a tad odd with its offset configuration, this received a lead foil harness, some card, strip and rod detailing. To complete this area, a control arm was made from stiff wire with a dollop of white glue representing the handle.
Once all the parts had been fitted with the canopy in place (the kit seat required some sanding so the canopy would have a tight fit), all the parts were sprayed with a mixed very dark grey (scale black). This was followed by dry brushing the surface with a medium grey to emphasize the raised details. Future was then brushed onto the instrument panel face and on a couple of discs on the side instrument consoles. Acrylics were used for the detailed painting of the seat that was brown for the back cushion, green for the seat with the harness being done in blue. Humbrol gloss green was used on the oxygen bottle and a dash of silver covered the quick release box of the harness.
Mike Grant decals were used to add the instrument faces were required and his placards were also used on the seat. Once the decals had dried a brushing of Testors Matt Clear Lacquer was brushed were required and then some clear five-minute epoxy was mixed and applied to each instrument face to simulate the glass. All the interior was dry brushed with a medium gray and then to give most of the surface that ‘metal’ sheen, graphite was applied with a dedicated brush. The office was looking not to bad now, so the seat was glued into location and after the ‘interior’ of the canopy was polished with NOVUS 2 & 1, it was attached in place with some white glue and left to cure.
Even though the canopy had been sanded to get a better fit, it still was not good enough. After the initial application of white glue had dried, the entire circumference was then sealed with a further application. To both secure the canopy permanently in place and to produce a better join, some clear five-minute epoxy was mixed, applied and then wiped smooth using spittle on a finger tip; works great with practice. It did take two applications to build up the area below the windscreen. Before the masking was applied, the canopy was polished with NOVUS 2 only as using NOVUS 1 at this stage can compromise the adhesion of the masking tape.
 I must admit that masking
canopies is one of the requirements of building model aircraft that I do not
enjoy. It is probably because of this, that whenever I can I will use the latest
Eduard or EZ mask. As none were available for the Gnat, it would be old school.
The Gnat’s canopy framing configuration is such that all the corners are both
angled and rounded; kind of adds insult to injury. To ensure this is properly
masked, I use a combination of the excellent Waldron Punch & Die set, Tamiya
tape and .015 plastic card.
I must admit that masking
canopies is one of the requirements of building model aircraft that I do not
enjoy. It is probably because of this, that whenever I can I will use the latest
Eduard or EZ mask. As none were available for the Gnat, it would be old school.
The Gnat’s canopy framing configuration is such that all the corners are both
angled and rounded; kind of adds insult to injury. To ensure this is properly
masked, I use a combination of the excellent Waldron Punch & Die set, Tamiya
tape and .015 plastic card.
Start off by applying the tape to the card. The reason for this is that the tape will tear or fold over if it is punched alone. However, because of the card backing you will get a nice clean cut, plus you will have a disc for a future use. No doubt you are wondering why .015 in lieu of .010 card? I have found that sometimes the punch is not clean if using the latter thinner card on a larger diameter disc; thus I always used .015 to take the guess work away. Next, remove the punches and dry-fit them into the corner location and then select the one with the proper or closets to proper diameter. Simply punch the disc out with the card backing, remove from same and apply into the corner and when it is seated properly, burnish it into location. The remainders was masked with strips of Tamiya tape and because of the curve of the lower part of the windscreen, a curve section of tape using a circle guide was used to fit this part.
| COLORS & MARKINGS |
Interior Black was then sprayed on the canopy frame. This did show a couple of areas that required some super glue for filling and after sanding, some of the black was sprayed on the corrected spots. Next, the entire model was resprayed using Tamiya Surface Primer (L) rattle can that had been gently warmed in some hat water. This showed a couple of spots that were repaired. The model was given a gentle wet sanding overall with some micro grit paper and then was rinsed and left to dry. A final primer of Tamiya Fine Surface Primer (L) was applied as before and left to cure.
As most of us know, white is one of the more onerous colours to apply. Thanks to the quality fine primer by Tamiya, a smooth uniform light gray base was established so the white sequence could start. MM Flat Header White (my favorite flat white enamel) was thinned with the Testors dedicated thinner with a little more thinner then normal. The trusty old Badger 100 with fine tip was used with an air pressure of 10 PSI. This thinned white was lightly misted on over three coats. Each coat was left to cure for six hours, and then a mild abrasive pad was used to ensure that the surface was free of lint etc before the next coat was applied.
 To get the deep high-gloss
finish I wanted to replicate, the decision was made to use gloss paint in lieu
of a clear gloss finish. When I attempt a high-gloss paint finish, Humbrol
enamels are used. For this project Humbrol Gloss 22 white was paint of choice.
This tinlet was opened and then the contents were very thoroughly mixed and
misted on as the previous white. However, a full 12 hours lapsed between each
application and in lieu of using the abrasive pad between each coat; ALCAD II’s
emery cloth was utilized. This gloss enamel was then left for a couple of days
to harden.
To get the deep high-gloss
finish I wanted to replicate, the decision was made to use gloss paint in lieu
of a clear gloss finish. When I attempt a high-gloss paint finish, Humbrol
enamels are used. For this project Humbrol Gloss 22 white was paint of choice.
This tinlet was opened and then the contents were very thoroughly mixed and
misted on as the previous white. However, a full 12 hours lapsed between each
application and in lieu of using the abrasive pad between each coat; ALCAD II’s
emery cloth was utilized. This gloss enamel was then left for a couple of days
to harden.
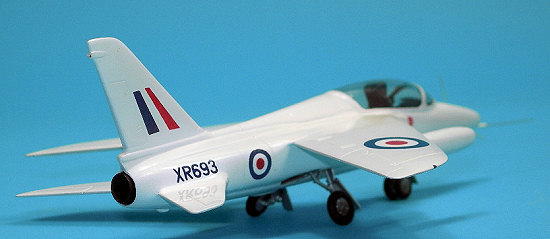
As a high gloss finish was the goal for this kit, the masking was carefully removed from the canopy and then the entire model was gently polished with NOVUS 2 and wiped clean. With the model ready for the decals, both the kit sheet and the large one from the latest Airfix Gnat boxing were taken out. Great! XM693 could not be made up as the XM was apparently used only on the preproduction batch. With both the X and the 693 available, this model would be finished as XP693 and will be never taken to Telford (or any other contest for that matter). Even though the Matchbox decals looked OK, I used the Airfix ones for all positions except the tail stripes (the red and blue were cut from the Matchbox full-colour tail flash) and the ejection warning placards. As anticipated, The Airfix went on perfect without any setting solutions while the Matchbox decals benefited from one application of Super Sol.
In order to achieved a uniform gloss finish, NOVUS 2 was applied to the decals and surrounding area and gently hand buffed. After several light applications the desired sheen had been achieved.
To finish the project, the remaining items were attached with super gel and only some MiG Production Black Pigment was light brushed on the landing gear to pick out some of the detail.
| CONCLUSIONS |
I must say that the Matchbox Gnat looks a little better then I thought it would. If I do another one, I will replace all the main gear doors with card and of course build a yellow two-seater of the Yellow Jackets aerobatic team.
| REFERENCES |
Scale Aircraft Modelling November 1985, Hawker Siddeley Gnat T.1, Malcolm Lowe
The Encyclopedia of World Aircraft, David Donald, Prospero Books
May 2007
Copyright ModelingMadness.com. All rights reserved. No reproduction in part or in whole without express permission.
If you would like your product reviewed fairly and fairly quickly, please contact the editor or see other details in the Note to Contributors.