Eduard 1/72 L-4 Cub 'Stripdown'
| KIT #: | 7009 |
| PRICE: | €10.00 on discount |
| DECALS: | None |
| REVIEWER: | Frank Spahr |
| NOTES: | 42 P.E. 24 Stryene and an instrument panel film. |
| BACKGROUND |
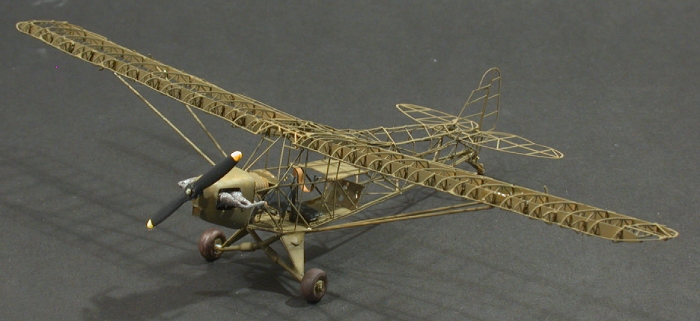
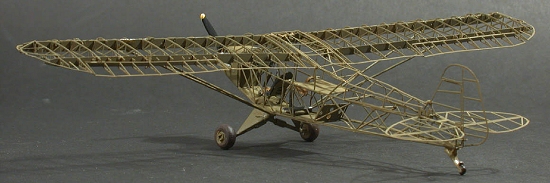
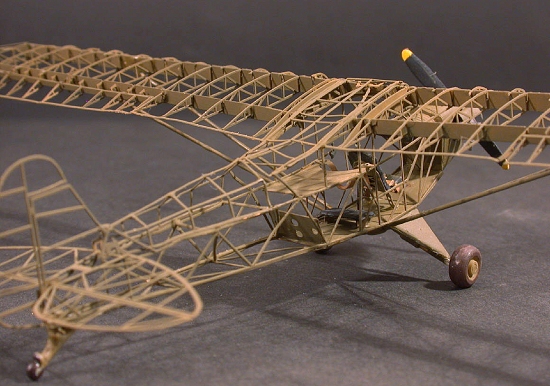
A Grasshopper that shows you (nearly) all – building Eduard´s Strip Down Piper L-4
Wow. This must have been one of my fastest builds so far. I didn´t
keep track of time but it must have been between ten and fifteen hours
building this thingie. And a small and d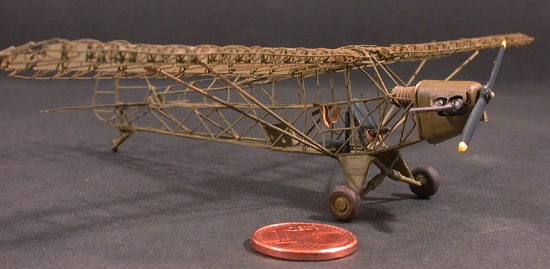 elicate
and fragile thingie it is. It is one of my smallest models and probably the
one that stands handling least.
elicate
and fragile thingie it is. It is one of my smallest models and probably the
one that stands handling least.
All the problem areas you see with imperfections, with bends and misalignments are there firstly because of my inability to do it better but ultimately because I saw no means of correcting them without compromising the entire structure. So as any other of my models it bears testimony of my current abilities.
Having worked with delicate PE of late I knew what would expect me, and I felt again that the most important thing you have to master for this endeavour is – breath control. Being able to control your moods wouldn´t be half a bad idea, too, but breath control is imperative in dealing with parts that small and light and hard to handle and easily bent. So finding a deserted mountaintop close by to do some meditating before starting a modeling session might not be the worst of ideas ;-)
| THE KIT |
Please visit the preview to see what comes in the box.
| CONSTRUCTION |
I
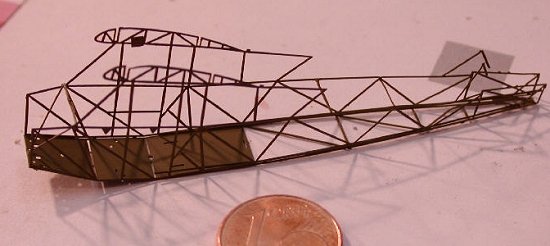
started as per instructions with the main fuselage part. I do not possess a
special PE bending tool, so did my job on a glass plate using various
tweezers, scissors and X-ACTO knives. The PE frets aren´t of the same
strength, so the necessary force
 varies. I found it especially hard to
avoid bending the PE part in cutting it off. I understand that bending
tools help you there a lot but I did not yet feel like buying one. The CA
glue used was of the less viscous sort and was applied with disposable
little tube applicators from dentistry. Apart from that, my magnifying
light was absolutely indispensable.
varies. I found it especially hard to
avoid bending the PE part in cutting it off. I understand that bending
tools help you there a lot but I did not yet feel like buying one. The CA
glue used was of the less viscous sort and was applied with disposable
little tube applicators from dentistry. Apart from that, my magnifying
light was absolutely indispensable.
The fuselage job went pretty straightforward with bending and gluing the main part and then adding the interior. The control panel is the usual Eduard job with a film, the seatbelts likewise. I did not master the teensy-tiny foot pedals provided, neither could I hold them nor could I glue them to their places. But I got along well with the seats and seatbelts and throttle quadrant. The fuel tank took some coaxing into the right shape, but when glued with the front and back closed looked the part.
| COLORS & MARKINGS |
Due to the delicate nature of the parts I only worked in the normal assembly sequence and didn´t use subassemblies – that would have been a far too bold challenge to the carpet monsters. I spraypainted the fuselage before adding the interior parts olive drab. The seats and belts were painted black and tan respectively. The instructions call out for painting the various components of the plane as to their original material (wood, aluminum, steel and so on) but I choose not to do so in my model – I „primed“ it all in olive drab to let the geometrical structure stand out even more.
| CONSTRUCTION CONTINUES |
 My
first troubles came in step 5 when trying to install oblique reinforcements
into the plane´s tail. The three PE parts bent upon releasing them from the
fret and wouldn´t return to normal, leave alone would they accept being
installed: They just kept on bending upon being navigated into place and
wouldn´t accept glue. So after some colorful language I replaced them with
steel wire (which is of course round not flat and slightly larger in
diameter) and felt I got away with it. I somehow botched the assembly
sequence of the stabilizer in regard to the reinforcements integral to the
fuselage. The instructions just look clear yet left enough room for
doubt and mistakes in my case. So this area will not look perfect. Adding
the upper part of the fuselage (part PE 45 and 25) only aggravated the
problems I had created, so there´s some misalignment now. I felt unable to
remove the tightly glued parts for a second try without bending and
generally destroying them, so I left things as they were.
My
first troubles came in step 5 when trying to install oblique reinforcements
into the plane´s tail. The three PE parts bent upon releasing them from the
fret and wouldn´t return to normal, leave alone would they accept being
installed: They just kept on bending upon being navigated into place and
wouldn´t accept glue. So after some colorful language I replaced them with
steel wire (which is of course round not flat and slightly larger in
diameter) and felt I got away with it. I somehow botched the assembly
sequence of the stabilizer in regard to the reinforcements integral to the
fuselage. The instructions just look clear yet left enough room for
doubt and mistakes in my case. So this area will not look perfect. Adding
the upper part of the fuselage (part PE 45 and 25) only aggravated the
problems I had created, so there´s some misalignment now. I felt unable to
remove the tightly glued parts for a second try without bending and
generally destroying them, so I left things as they were.
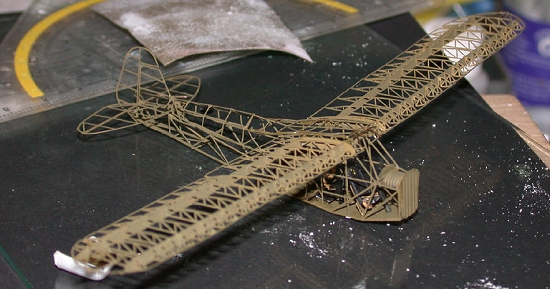
The fuselage done it became time for the wing. This looks harder than it really was. Using some patience and some time enabled me to assemble the wing pretty straightforward. In a way it was like building PE ladders and stairs for ship models – just a bit larger ;-))) The bends and misalignments left are the result of my being unable to rectify them without creating troubles elsewhere. The reinforcements for the wingtips were equally flimsy as the ones inside the fuselage so I also replaced them with thin wire.
 Next came the completion of the wing assembly with no less than 20 leading
edge profiles and two solid profiles for the wing attachment area. Nothing
but some patience needed for that. The mating of the wing with the fuselage
was trickier; the instructions are reasonably clear yet the whole affair
affords some skills. I got along through the process not 100% perfect yet
enough for me.
Next came the completion of the wing assembly with no less than 20 leading
edge profiles and two solid profiles for the wing attachment area. Nothing
but some patience needed for that. The mating of the wing with the fuselage
was trickier; the instructions are reasonably clear yet the whole affair
affords some skills. I got along through the process not 100% perfect yet
enough for me.
Now I had the bulk of the PE job completed, I started on the styrene. The cowling was cut from the styrene fuselage with a razor saw, the engine block cleaned up and painted Model Master burnt metal. It was mated to one cowling half and then both halves were glued together. The seam was cleaned up and received some Mr Surfacer 1000. A light sanding completed this part. It was only in writing this review that I realized I had completely forgotten to attach the flame dampers (PE parts 41 and 42). HA! More on that later ...
After gluing the engine assembly to the firewall I cleaned up the prop. I´m still not satisfied with it and would like to replace it. Generally speaking the styrene parts are of inferior quality, the wheels are blobs and they don´t come up to the rest of the kit – but there´s not really much styrene on this baby after all. I replaced the wing struts which looked way oversize with thin wire, but left the undercarriage assembly as it was for stability´s sake. Against the instructions I also used the styrene tailwheel as the PE assembly looked just too flimsy to stand handling to me.
 After all, my little Piper stood in front of me and I felt rather happy
for having completed it at all. I really wasn´t sure when I started the kit
if I would complete it. I wouldn´t make a habit from building these PE kits
but it was a good feeling that I got through this one. I regard modeling
(amongst all other aspects) as a training in self-control and
determination, and this model has helped me in this respect quite some bit.
But I really feel like cutting and scribing styrene now for a change –
honest.
After all, my little Piper stood in front of me and I felt rather happy
for having completed it at all. I really wasn´t sure when I started the kit
if I would complete it. I wouldn´t make a habit from building these PE kits
but it was a good feeling that I got through this one. I regard modeling
(amongst all other aspects) as a training in self-control and
determination, and this model has helped me in this respect quite some bit.
But I really feel like cutting and scribing styrene now for a change –
honest.
OK – so far, so good. Remember the case of the missing flame dampers? I completed the model on sunday and was VERY happy about it. I took my photos and still felt fine. As it so happens, it was tuesday at lunch break when I started on the article, using the instructions as a guide. And then I realized I hadn´t been through with the build yet. So I set myself to work last night, removed the flame dampers from the frets, bent them and wanted to assemble them, when:
The styrene cowling broke loose and the whole plane, having no aerodynamic properties whatsoever, dove straight to the ground. I guess my wail would have made a banshee shiver. Upon retrieving the plane from my concrete floor I found out that the pilot´s seat had come loose and was sliding inside the fuselage. I still have no idea how I coaxed it back into its position and managed to glue it there – there is very little space for tweezers and a fat chance of bending the structure. Suffice it to say that I somehow did it. Next highlight of the evening: Upon regluing the cowling it stuck slightly off-angle and with a gap, yet so strong that I would have bent the entire fuselage in removing it. I was able to fill the gaps with more CA – and that was it. I should also have mounted auxiliary wing struts, but my determination left me after a series of unsuccessful attempts. So I took it as a sign that I shouldn´t meddle more with this baby, repainted it, added a final flat coat and called it quits. Such is life. I quit a job when I gather the notion that more work will only make things worse, and this was the point of this case.
| CONCLUSIONS |
So I´m happier than before that I still have the Piper on my shelf yet I´m a bit disappointed at having done less of a job than I would have liked to. So again: Modeling is just like life. And: if you do this at home, don´t say you weren´t warned!
April 2005
Copyright ModelingMadness.com. All rights reserved. No reproduction in part or in whole without express permission.
If you would like your product reviewed fairly and fairly quickly, please contact the editor or see other details in the Note to Contributors.