Revell 1/542 USS Saratoga CV-60
|
KIT # |
5025 |
|
PRICE: |
$20 |
|
DECALS: |
See review |
|
REVIEW : |
|
|
NOTES: |
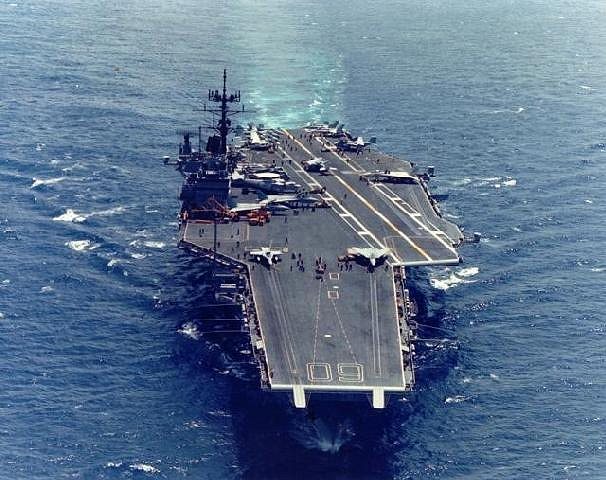
Sara photo courtesy Sal Longobardo |
|
HISTORY |
The U.S. Saratoga (CVA-60) was launched in April of 1956. She displaced more than 60,000 tons and was 1039 feet long. The carrier air wing was composed of up to 90 aircraft. Fifteen thousand combat missions were flown off her deck during the Vietnam War. In 1985 she participated in strikes against Libya and in 1990 served in support of Operation Desert Storm. She was decommissioned in August 20, 1994 and is currently sitting in a Rhode Island cove with the Forrestal and battle ship USS Iowa while a Foundation (http:www.saratigamuseum.org) tries to make a floating museum out of the ship at Quonset Point Naval Air Station.
|
THE KIT |
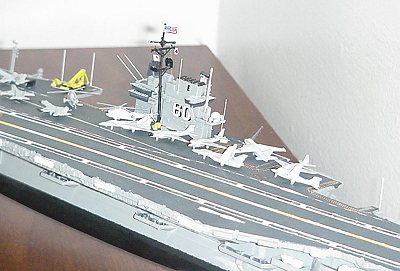
Revell's model has been around a long time. My instruction sheet is copyrighted in 1989 and it is still in the catalog, as I saw three of them arrive at my local hobby shop last week. The model represents the Sara after an overhaul probably in 1980 at the Philadelphia Naval Yard. The model comes with Sea Sparrow launchers, Phalanx close in weapons and and modern aircraft such as F-14 Tomcats, F-18 Hornets and A6E Intruders. A problem may be that the fight deck was re-configured in 1962. As you can see from the view of the real ship, the triangle area forward of the port elevator is missing and the layout of the flight deck is different. So perhaps the newer planes and
weaponry are out of place on the ship as molded by Revell.
|
CONSTRUCTION |
 I hadn't built a model in a long time and originally bought this one for my son. But when he showed little interest in it, I decided to try my hand. I had built many in my youth, In fact I remember building a model of Revell's Forrestal in the sixth grade. I remember painting the flight deck red for some reason. With the yellow decals and the flight wing molded in white plastic, it certainly stood out at the class craft show. I decided to take my time on this model and try to do a nice job on it. I was surprised how difficult this turned out to be!
There was quite a bit of flash on the small parts requiring lots of clean up and a big mold mark in the middle of the flight deck. The flight deck has molded bumps all over it. I'm not sure if they are supposed to represent rivets or not, but at this scale that would seem ridiculous. In fact at this scale probably some of the small parts (such as search lights) are best forgotten.
The first task was to paint the waterline and the bottom of the hull. I decided to add the propeller shafts and rudders prior to painting. This turned out to be a mistake because the parts kept getting bumped around and broken. I also had a tough time getting a smooth water line with masking tape. This was going to be harder than I thought.
 The instruction sheet consists of nine exploded diagrams with little text. Sometimes the positioning of the parts is a little vague and I referred to the box art on more than one occasion. I thought I would be smart and decal the numbers on the island before mounting the island on the flight deck. But I set the decal too high and didn't account for a cat walk that went right across, Oh well. I left the island off until the last step.
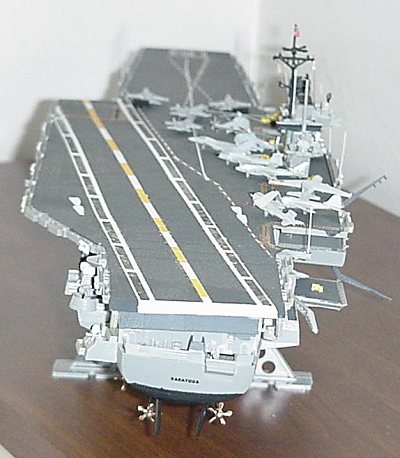
Building the superstructure sides and elevators was difficult as the parts didn't fit that well and a smooth even top is needed to eventually glue on the flight deck. There are dozens of tiny parts such as life rafts and search lights. I decided not to break up the life rafts and glued them on in groups of 4 or 5. The kit supplied whip antennae looked much too thick and prone to breakage. In searching for a substitute, I cut some bristles off a white whisk broom and super glued them in place along the flight deck and on the island. They turned out to be just right and tough enough to take most abuse.
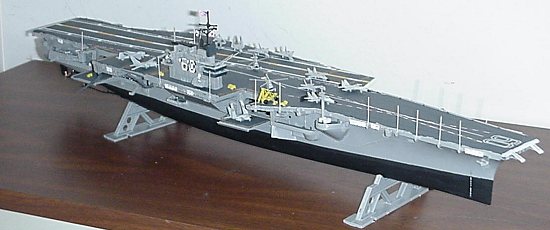
The secret to a good looking carrier is a good looking flight deck. Revell supplies an impressive decal sheet which goes a long way towards making this task easier. Painting the deck stymied me for a while. I suppose in reality the no-skid surface looks a lot like a black top road with skid marks all over it. I decided I rather have something more neat looking for now and maybe I'll weather it in the future. I mixed up a suitable dark gray lightened with a little white that was reasonably close to the pictures I've seen. The decals didn't quite fit in some areas like the warning markings around the elevators, but its easy enough to fill these in with some dots of red and yellow paint. The decals were a little milky, probably because they were so old. A coat of dull coat helped somewhat and sealed the decals. Revell even provides tiny insignia for the air wing, which is a vast improvement over the planes that came with the Forrestal. These actually look like the aircraft they are supposed to represent. I didn't scale them out but they look a little big for the scale. A down side is you get only 14 planes and two sea king helicopters, so a crowded flight deck is out of the question. A really outsized crane (I think) and tow tractors were painted a scruffy looking yellow.
 I put off adding the island for a long time. I wasn't sure what to do about the windows in the superstructure and finally painted them a shade of dark gray. The main mast was difficult and one of the small radar screens joined a number of other small parts that seemed to disappear into the cement floor.
At this point I realized I had a problem as I only had three of the four propellers I needed. A letter to Revell at the address on the instruction sheet was returned for a bad address. I checked the Web and found the Revell-Monogram site with a newer address, I was also glad to see that the Sara was still in the catalog. The company responded quickly to a letter and within a week I had the missing propeller and as luck would have it the section of sprue they sent also included the missing radar screen. I painted the propellers bronze and added some rigging from fly fishing leader and some small signal flags. I solved the problem of the sink hole in the flight deck by permanently parking a helicopter on top of it.
The kit is molded in a light gray and for now, I decided not to paint those parts which are intended to be light gray.
|
CONCLUSIONS |
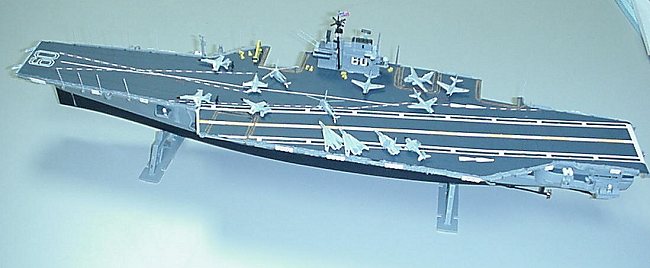
Overall the kit builds up to an impressive model, but with the myriad of small parts and and flash, its not an easy build. It also seems to be at an odd scale compared to other models where 1:700 seems to be the norm and finding ships to match it could be a problem for a diorama.
Copyright ModelingMadness.com If you would like your product reviewed fairly and fairly quickly, please contact the editor or see other details in the Note to
Contributors.
Back to Reviews Page 2018