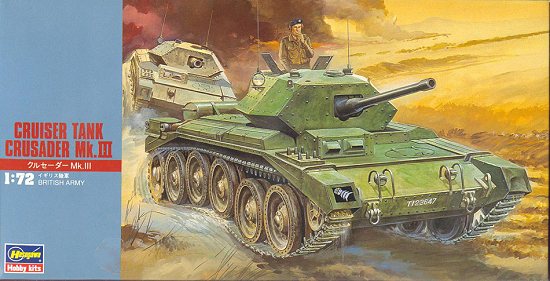
Hasegawa 1/72 Crusader MkIII
|
KIT # |
MT 26 |
|
PRICE: |
$7.98 |
|
DECALS: |
See review |
|
REVIEWER: |
Tom Roskelly |
|
NOTES: |
Gunze Sangyo Acrylic paints used |
|
HISTORY |
The Crusader, which formed the foundation of British tanks such as the Cromwell, Centurion, Chieftain and others, was the last of the prewar designs of cruiser tanks to see action. A total of about 5,300 were built. During World War II, the Royal Army used two classes of tank; the slow, heavily armored infantry tank and the cruiser for mobile operations. The cruiser tanks especially performed in anti-tank battles. They fought hard against the Pz Kpfw III and Pz Kpfw IV tanks of Rommel’s Africa Corps. The Crusader first went into action in 1941 on the western frontier of Egypt, in the abortive operation “Battleaxe” aimed at the relief of Tobruk. Thereafter, the Crusader fought magnificently until the end of the North Africa campaign. To classify it broadly, there were three types of Crusader. Mk. I mounted a 2 pdr. gun and carried a Besa machine gun in the front hull. Mk. II was a more heavily armored type with the machine gun removed. Mk. III had added armor protection with a 6 pdr. main armament.
|
THE KIT |
 I must admit, I’m an airplane geek like most of us. This
is my first armor model since 1978. Actually, it’s only my second armor model
ever and my first one was the Testors/Italeri Crusader Mk. III - history has a
way of repeating itself! With inspiration from Modeling Madness, a
couple IPMS DC members, and reading a gazillion how to books on armor, I
decided to give it a try.
I must admit, I’m an airplane geek like most of us. This
is my first armor model since 1978. Actually, it’s only my second armor model
ever and my first one was the Testors/Italeri Crusader Mk. III - history has a
way of repeating itself! With inspiration from Modeling Madness, a
couple IPMS DC members, and reading a gazillion how to books on armor, I
decided to give it a try.
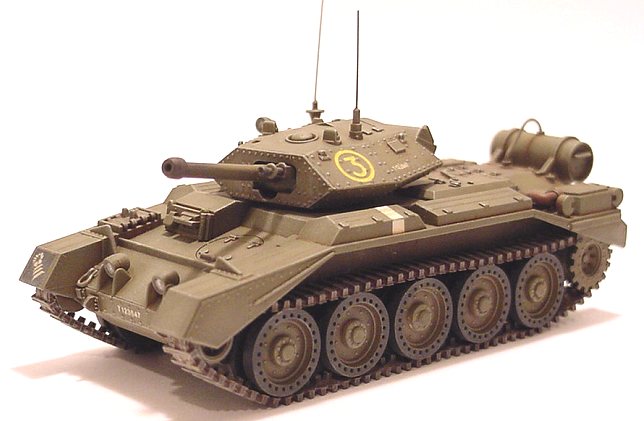
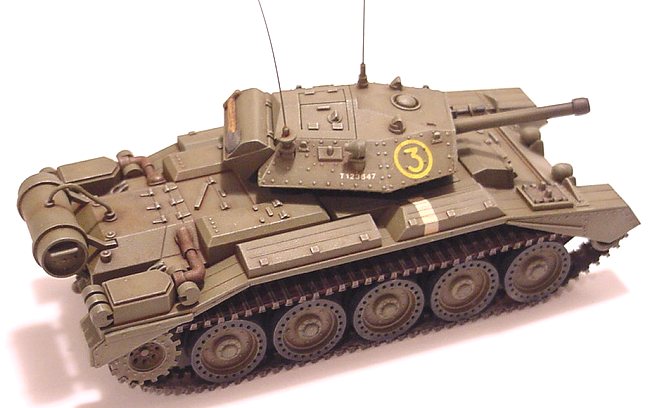
The first thing I noticed when opening the box was, “Geez…, that is one small model!” The second and more important thing was noticing the quality of the moldings and the ease (clarity) of the instructions – traits we’ve come to expect from Hasegawa and eastern imports. The kit comes in two crisply molded light gray parts trees, a small decal sheet and two rubber tracks. Unfortunately, my tracks had quite a bit of flash on them, more on that later. A commander figure is included but no cables are provided. Two decal options are provided. The kit is fairly detailed for a small model but there are a few areas that appear to be out of scale or could be detailed/modified. Since I built this out-of-the-box, I’ll omit the detailing ideas that bounced around in my head.
|
CONSTRUCTION |
After washing all the parts in warm soapy water to clean any greasy releasing agents, I began trimming all the parts and removing what very little flash there was on the parts. With careful sanding (I used Emory board-type sanding sticks) you’ll find all pieces fit together very nice and tight. Seven easy to follow steps lead to a quick and enjoyable construction: the turret, upper and lower hulls, side walls and wheels (the inner wheels are molded on the side walls), front upper hull details, attaching the turret, rear upper hull details and finally the side skirts and tracks. A word of caution, many of the detail parts are small and fragile. Take great care when cutting them from the trees so they don’t break or fly off into oblivion – destined for the vacuum cleaner!
 On step one - the turret, be careful when
positioning/aligning the machinegun (part A3) so that it’s perpendicular with
the main gun. Since there is no interior detail, I excluded the commander
figure and closed the hatches. I had a wee-bit of a gap where the front plate
of the turret attaches to the main portion of the turret. I used watered-down
Elmer’s glue to fill in the gap. Also, the top of the turret had two small
sinkholes. I simply filled these with Testors’ red putty and wet-sanded it
smooth. No other filler was needed anywhere on the model.
On step one - the turret, be careful when
positioning/aligning the machinegun (part A3) so that it’s perpendicular with
the main gun. Since there is no interior detail, I excluded the commander
figure and closed the hatches. I had a wee-bit of a gap where the front plate
of the turret attaches to the main portion of the turret. I used watered-down
Elmer’s glue to fill in the gap. Also, the top of the turret had two small
sinkholes. I simply filled these with Testors’ red putty and wet-sanded it
smooth. No other filler was needed anywhere on the model.
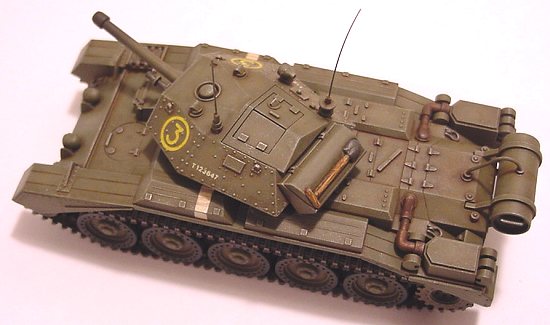
On step three - side walls and wheels, I left the wheels off for painting and attached them later. On step four - front upper hull details, take care when attaching the forward lights (parts B10) to the hull. They can easily turn from side to side before the glue sets. On step seven - side skirts and tracks, I was left with the unenviable task of having to clean up the rubber tracks. Cutting each piece of flash off every link would be a major pain. I read somewhere about hardening rubber tracks in your freezer. Supposedly this would make them easier to sand. After attempting this, and my Mrs. thinking I had placed two centipedes in the freezer, I found it didn’t work… at least in my case. So, I decided to trim only one side of each track since you wouldn’t see the inside edge except on the front and the back. I also cut each track into two measured pieces so they would be easier to attach after the wheels had been attached. I did add a couple stretched-sprue antennas. Constructing the model only took about five hours.
|
PAINTING & MARKINGS |
Simple! How nice to be able to pretty much construct an
entire model before having to paint it! I used Gunze Sangyo acrylic paints.
The instructions provide two paint schemes but only one can be used due to the
partial side skirts. So, I painted my Crusader as one from the Royal Army, the
1st Force, 6th Armored Division, in Tunisia 1943. First I
primed the entire model (less tracks) using a light gray. The tank was
airbrushed an overall H73 – Dark Green. I then did shading with lightened Dark
 Green (about 30% H11 – Flat White added) over all the panels on the entire model
in a “cloud” pattern. No decals were provided for the two white stripes on the
sides so I masked off the areas using Pactra modeling tape and airbrushed the
stripes Flat White.
Green (about 30% H11 – Flat White added) over all the panels on the entire model
in a “cloud” pattern. No decals were provided for the two white stripes on the
sides so I masked off the areas using Pactra modeling tape and airbrushed the
stripes Flat White.
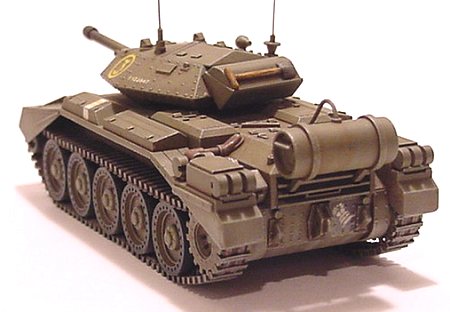
Detail painting - the machinegun, shovel, lights, exhausts, wheels and extra piece of track were all done after the main color was applied. The machinegun itself was given a wash of H12 – Flat Black then dry-brushed with H18 – Steel. The entire edge of the shovel was given a Flat Black wash to establish an outline then painted overall Flat Black. The shovel head was dry-brushed Steel and the handle was painted with Raw Umber and Burnt Sienna oil paints to get a “wood grain” look. The lights/lenses were “dabbed” for a good round spot with H8 – Silver, then a drop of MicroMark’s Krystal Kleer was added. The exhausts were painted with H76 – Burnt Iron, then multiple washes of Raw Umber and Burnt Sienna oil paints to build up the color. The wheels were given a Flat Black wash just like the shovel to establish an outline between the “rubber” section and the steel wheel. Then, I made a mixture of gray paints to paint (with successive washes) the “rubber” sections of the wheel. The extra track was simply painted Dark Green and dry-brushed Steel. The tracks were painted Flat Black, then given a heavy wash of Burnt Sienna and Raw Umber oil paints. When totally dry, I dry-brushed them Silver.
I coated the model with Future before applying the decals. The decals (seven of them) are a bit out of scale but snuggled down just fine over the rivets with a little setting solution.
|
WEATHERING |
 This was the fun part! There aren’t many times you can get
sloppy (with moderation) with a model and end up with a good finish. Simple
enough, an overall wash of Raw Umber, Burnt Umber and Black oil paints. After
dry, a couple more local washes were added, especially around the engine
compartment. I dry-brushed most of the tank with a little Silver and Steel. A
little black chalk pastel was brushed on the muzzle and some tan/sand color
pastel on various places on the tank and on the treads. I wasn’t sure if I
wanted to go all out and make it extremely dusty looking for a diorama or for
that “used, but cared for” look – if you can even say that about a tank! I
chose the latter to leave me with future options.
This was the fun part! There aren’t many times you can get
sloppy (with moderation) with a model and end up with a good finish. Simple
enough, an overall wash of Raw Umber, Burnt Umber and Black oil paints. After
dry, a couple more local washes were added, especially around the engine
compartment. I dry-brushed most of the tank with a little Silver and Steel. A
little black chalk pastel was brushed on the muzzle and some tan/sand color
pastel on various places on the tank and on the treads. I wasn’t sure if I
wanted to go all out and make it extremely dusty looking for a diorama or for
that “used, but cared for” look – if you can even say that about a tank! I
chose the latter to leave me with future options.
|
CONCLUSIONS |
Go out and buy one and put it together. This simple little model has stirred my blood to begin building armor kits. No, you don’t have to give up your beloved aircraft but it’s a fun, quick and enjoyable change of pace. The results might very well surprise you!
December 2002
|
REFERENCES |
Kit information
World War II Tanks, by Eric Grove, Longmeadow Press 1987
Tanks of WorldWar II, by Steve Crawford, Grange Books 2000
Copyright ModelingMadness.com
If you would like your product reviewed fairly and quickly, please contact the editor or see other details in the Note to Contributors.
Back to the Reviews Index Page 2018