Kombrig 1/700 HMS Royal Sovereign (1891)
| KIT #: | ? |
| PRICE: | $Probably more than 98 cents |
| DECALS: | None |
| REVIEWER: | Frank Spahr |
| NOTES: | Resin ship model |
| HISTORY |
Britain´s Royal Sovereign class of
ships of the line, authorized in 1889, set standards for capital ships that
remained valid until the commissioning of HMS Dreadnought in 1906. The eight
strong class was aimed at standardizing the line of battle after the rather
 confused
and varied construction characterizing the previous decades. Britain´s later
designs clearly show the evolution of this successful type of ship. These
vessels were the largest and heaviest of their time, well protected and
nonetheless fast. They were equipped with a formidable array of quick-firing
guns against torpedo boats, the capital ship´s nemesis of the age.
confused
and varied construction characterizing the previous decades. Britain´s later
designs clearly show the evolution of this successful type of ship. These
vessels were the largest and heaviest of their time, well protected and
nonetheless fast. They were equipped with a formidable array of quick-firing
guns against torpedo boats, the capital ship´s nemesis of the age.
The design stressed good seakeeping
and a high freeboard. To this aim, in seven ships the main artillery of four
13.5 in guns were mounted in open barbettes instead of turrets in the classical
sense. These barbettes were armed surrounds constructed integral to the hull.
They shielded the guns, their machinery and ammunition feeds, all of which
rotated inside the barbettes. Hence the armament remained stationary, contrary
to classical turrets. These were used in HMS Hood,
the eighth ship of the class, by personal order of the First Sea Lord,
Lord Hood. These rotating armored turrets were much heavier, and to achieve an
acceptable centre of gravity, the ship had to be built with one less deck
and without casemate guns. Nonetheless she was a poor seaboat, and she
was the Royal Navy´s last turret ship. All later gun turrets are principally
barbette types, with an armored „tube“ as an integral part of the ship´s
structure, inside which the gun mechanism rotates, under an armored cover which
is usually referred to as turret but isn´t one in the original sense of the
term.
Upon entering service, the Royal
Sovereigns displayed a strong tendency towards rolling, until bilge keels were
fitted. Originally serving in the Channel and Mediterranean, they rather soon
became obsolete and were relegated to home waters and secondary duties.
 Upon the
outbreak of World War One, only HMS Revenge was active, conducting shore
bombardments. She was the first vessel to receive anti-torpedo bulges. In 1919,
she also was scrapped like her sisters before.
Upon the
outbreak of World War One, only HMS Revenge was active, conducting shore
bombardments. She was the first vessel to receive anti-torpedo bulges. In 1919,
she also was scrapped like her sisters before.
Technical data
|
Dimension |
Length 410 ft 6 in / Width 75
ft / Draught 27 ft 6 in mean |
|
Displacement |
14,150 t |
|
Propulsion |
2 three cylindre triple
expansion steam engines / 8 boilers / 11,000 hp / 2 shafts |
|
Armament |
4 x 13.5 in / 10 x 6 in / 16
x 6-pdr / 12 x 3 pdr |
|
Performance |
Top speed 16,5 kn / Range @
10 kn 4.720 nm |
|
Crew |
712 |
| THE KIT |
| THE PRESENTATION |
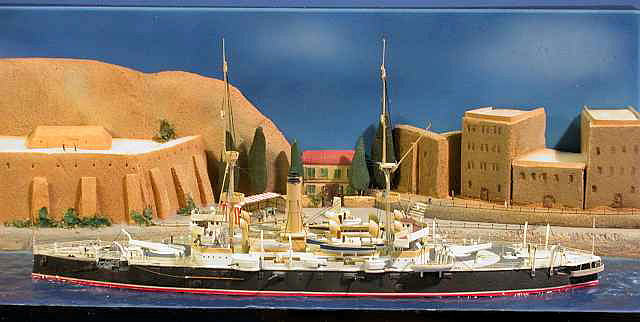
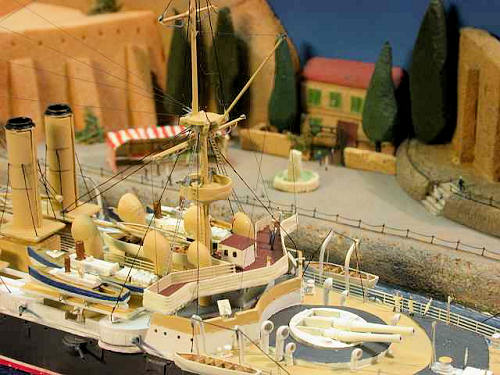
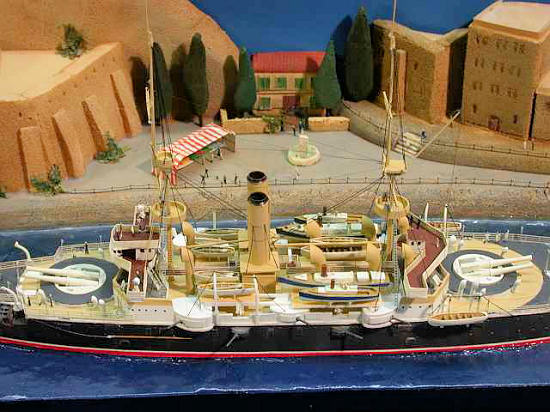
Being openly anglophile and
interested in the Royal navy a lot, I had for a long time planned to build a
pre-dreadnought from the RN´s pinnacle of power, the Victorian era. I wanted to
use the so-called Victorian Livery of black hulls, white upperworks and buff
funnels.
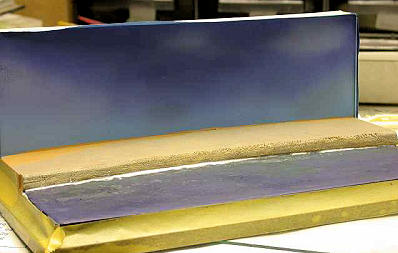
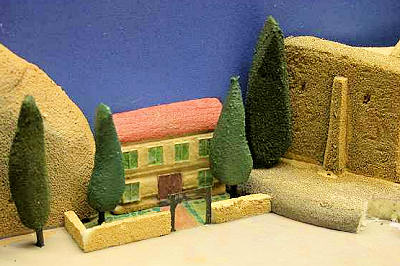 made some
sketches and cut mockups from cardboard. The display box was converted using
strip styrene, plaster, white glue and paint so that I ended up with a seascape
of about two thirds of the base, and a raised shore part for the background. The
water effect was created in my usual technique using wall paint, acrylics and a
gloss coat. The border was sculpted from fine Styrofoam and painted. The
background was sprayed in a hue suggestive of a sunny Mediterranean sky. The
buildings were also made from Styrofoam which is easily cut, sanded and painted.
Some window frames were made from photo etched railings. Acrylic paints were
used throughout. The market stall was built starting with a frame made from PE
railings, covered with cigarette paper and painted.
made some
sketches and cut mockups from cardboard. The display box was converted using
strip styrene, plaster, white glue and paint so that I ended up with a seascape
of about two thirds of the base, and a raised shore part for the background. The
water effect was created in my usual technique using wall paint, acrylics and a
gloss coat. The border was sculpted from fine Styrofoam and painted. The
background was sprayed in a hue suggestive of a sunny Mediterranean sky. The
buildings were also made from Styrofoam which is easily cut, sanded and painted.
Some window frames were made from photo etched railings. Acrylic paints were
used throughout. The market stall was built starting with a frame made from PE
railings, covered with cigarette paper and painted.
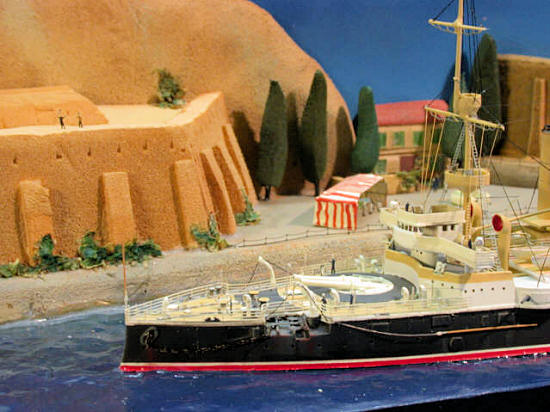
 The
shoreside rails are WEM 1:350 SMS Koenig railings, trimmed in height. Plants
were simulated using a mixture of dried marjoram and white glue, painted in
appropriate hues. The figures are from my rather large stock of Lion Roar´s
1:700 figures. I know of no horses and carriages in 1:700 scale – some of those
would have made the shore scene much livelier. The visual style I tried to
achieve was a somewhat stylized one, a bit like seamen´s souvenirs from the
period I had seen in a Danish maritime museum.
The
shoreside rails are WEM 1:350 SMS Koenig railings, trimmed in height. Plants
were simulated using a mixture of dried marjoram and white glue, painted in
appropriate hues. The figures are from my rather large stock of Lion Roar´s
1:700 figures. I know of no horses and carriages in 1:700 scale – some of those
would have made the shore scene much livelier. The visual style I tried to
achieve was a somewhat stylized one, a bit like seamen´s souvenirs from the
period I had seen in a Danish maritime museum.
| CONSTRUCTION |
Upon checking my references, I found
nothing major to alter in the kit – here may be many modelers more critical than
me in this respect, though. I concentrated on detailing the kit instead.
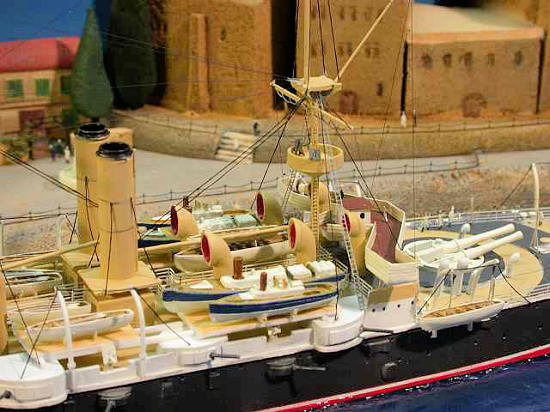
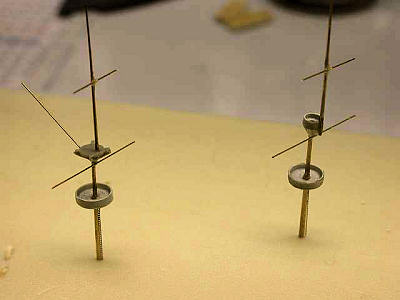 My friend
Burkhardt Masch of BMK Kleinserien helped me a lot by producing crisp brass
barrels for the very visible main guns. These go a long way in improving the
looks of the vessel. I also used BMK´s conically turned brass for the masts,
which are much straighter and sturdier than the rein items. Another crucial item
was AIZU ultrafine masking tape, a Japanese product I discovered at a model
show. It´s available in strips as narrow as .4 mm and eases applying the fine
trim of the Victorian Livery a lot. I also used various styrene stock and fine
brass wire in diameters as fine as .2 mm. To compensate for the missing PE, I
used the very handy WEM sets for HMS Tiger and the cruiser Askold.
My friend
Burkhardt Masch of BMK Kleinserien helped me a lot by producing crisp brass
barrels for the very visible main guns. These go a long way in improving the
looks of the vessel. I also used BMK´s conically turned brass for the masts,
which are much straighter and sturdier than the rein items. Another crucial item
was AIZU ultrafine masking tape, a Japanese product I discovered at a model
show. It´s available in strips as narrow as .4 mm and eases applying the fine
trim of the Victorian Livery a lot. I also used various styrene stock and fine
brass wire in diameters as fine as .2 mm. To compensate for the missing PE, I
used the very handy WEM sets for HMS Tiger and the cruiser Askold.
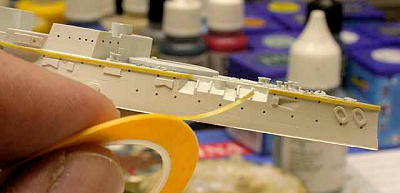 and for
security reasons another layer of white paint was added. The lower hull was then
sprayed red and masked, and the upper hull was sprayed Revell Aqua Color #9
anthracite, a very dark grey. Upon removing the masking tape, I was very
satisfied with the result, needing only minimal touchups.
and for
security reasons another layer of white paint was added. The lower hull was then
sprayed red and masked, and the upper hull was sprayed Revell Aqua Color #9
anthracite, a very dark grey. Upon removing the masking tape, I was very
satisfied with the result, needing only minimal touchups.
Further painting was done by brush
and using acrylics. I aimed at a very well-maintained vessel oozing the spirit
of spit-and-polish, so weathering was no issue apart from the inevitable signs
around the anchors. The well-kept decks were painted Vallejo Dark Sand, for the
funnels, vents and masts Vallejo Buff was used. I have no definite info re the
colours of the upper decks and flying bridges. After studying images and
discussing the issue with modeling friends, I used linoleum and dark grey paints
– even if it lacks authenticity, it looks nice.
During this time-consuming phase I
addressed further subassemblies. The funnels need minimal cleanup and were
completed soon. The upper deck levels and the flying bridges needed removing the
cast-on bulwarks. The massively cast rudder station was also removed and
replaced by a more open version, using 1:600 PE ladders for bridge windows. The
bridge railings were don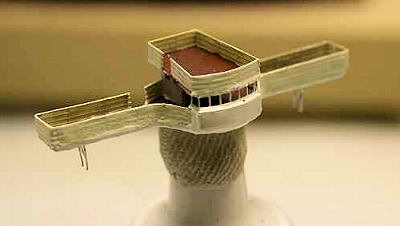
| CONCLUSIONS |
A very attractive vessel, especially in this paint scheme; a fine yet demanding kit, surely not suited for the beginner in resin kits. I do like the display box which has withstood a lot of travel already. All in all a sunny day in the Mediterranean Fleet!
July 2010
If you would like your product reviewed fairly and quickly, please contact me or see other details in the Note to Contributors.