Minicraft 1/350 Titanic
|
KIT #: |
? |
|
PRICE: |
$ |
|
DECALS: |
One option |
|
REVIEWER: |
Mark Hiott |
|
NOTES: |
Gold Medal Models photo etch used |
Everyone knows the story of the Titanic. Maiden voyage, hits
an iceberg, sinks, a lot of people die… we’ve all seen the movie. (This is
not a good example of a proper historical introduction. I'm sure Mark won't mind
me using this as a teaching aid for prospective authors. Ed)
 The
Minicraft kit has been reissued over the years, getting better each time. This
model is of the early issue, dated around 1985 or so. The early version of the
Minicraft kit has several detail mistakes that some may want to fix, I chose not
to. The later kits, as well as the 1/400 scale kit, resolve some of these
problems. The kit was first marketed by Entex, along with the companion kit, the
RMS Lusitania. They were state-of-the-art kits at the time.
The
Minicraft kit has been reissued over the years, getting better each time. This
model is of the early issue, dated around 1985 or so. The early version of the
Minicraft kit has several detail mistakes that some may want to fix, I chose not
to. The later kits, as well as the 1/400 scale kit, resolve some of these
problems. The kit was first marketed by Entex, along with the companion kit, the
RMS Lusitania. They were state-of-the-art kits at the time.
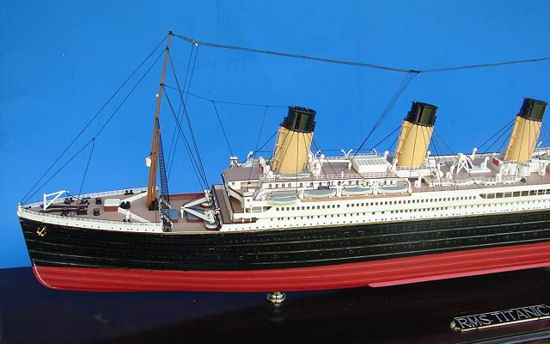
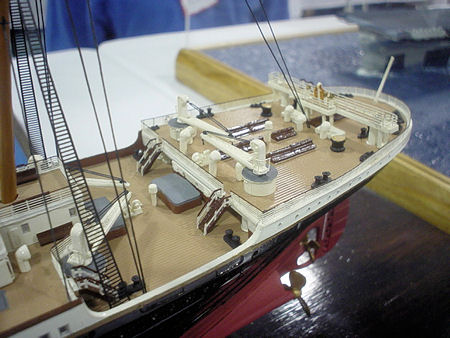
The kit is beautifully cast, with a
one-piece hull. The hull is cast in black, with the main parts in white,
including the separate rails. A nice touch is the deck cast in tan. Also
included is a tree of gold plated parts for the propellers and anchors.
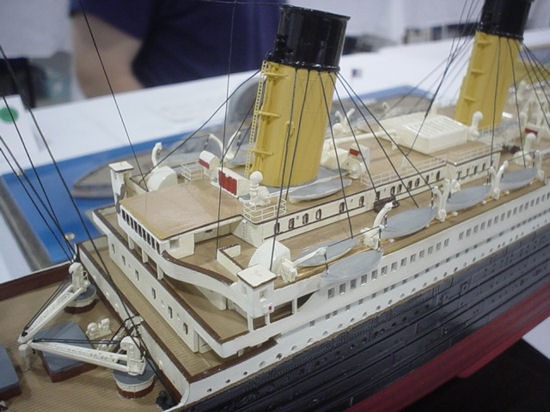
There are
ALOT
of parts in the box. The amount of detail in the kit is amazing. All railings
are separate and well cast with very little flash. Bulkheads are also separate,
but will need quite a bit of clean up around the windows.
The instructions are very well done.
The steps are well laid out and easy to follow. Riggings call outs are included
in the steps that require it.
A very fine kit can be made with the
parts in the box, although I used the Gold Medal Models detail set.
 What
can I say: This kit is a tedious build. The model is big and is very easily
broken during the process if you're not careful.
What
can I say: This kit is a tedious build. The model is big and is very easily
broken during the process if you're not careful.
Breaking the build down into
several smaller builds goes along way in easing construction. The only big
deviation I made was to build the superstructure off the hull. I found it easier
to handle as a separate part. If you try it this way, just be sure that you note
what you will have to do differently with the rigging in later steps.
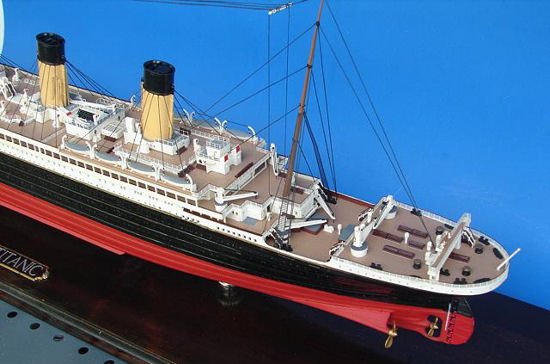
One thing that will need to be done
is add a small lip to the forward well deck sides. If you don't the gold cheat
line will pass through
the well deck as opposed to passing under it. Another spot that will require
attention is the forward hull area. The number of portholes visible in the white
area is incorrect. You will need to add the portholes with a small drill.
There are numerous improvements you
can make to this model to make it more accurate, but with just these two you can
make a wonderful display.
 THE
PHOTOETCH:
THE
PHOTOETCH:
I'm going to add a section about this all by itself because
I think the photo-etch is what sets this model apart from others.
Gold Metal Models makes some of the best ship details that
I have come across and the basic "Merchant Ship" p/e set is complete with
everything a person will need. Railings in five types (1,2,3,4 and 5 bar), stair
railings, lifeboat davits, ladders and ratlines are all included as well as many
other small items. One note on the photo-etch: it includes 4 bar railing, but
the Titanic does not use it. If you intend to build the
Lusitania
sister kit to the Titanic, save the 4 bar railings. There is not enough 4 bar in
the set to do the Lusitania. The
set is reproduced in several scales and they are all the same.
GMM now makes more complete photo-etch sets that include parts for the deck
benches as well as the compass platform.
Most of the parts are direct replacements for the kit
parts. Stairways will require a bit of modification to fit the railings
properly.
 Painting
the ship is straightforward: Black for the lower hull, white for the upper
sections. The decks (although molded in tan) were painted Model Masters
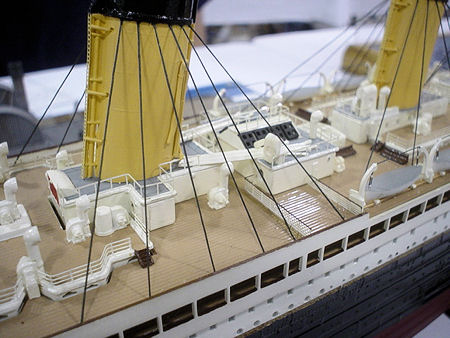
"Wood". A 1/16-inch gold cheat line was painted around the hull. One thing
of note is that some of the rails require a brown top-rail. Make sure to do
research to determine which rails require it. Most passenger areas use 5-bar
railings, while crew areas use 1, 2, or 3-bar railings.
Painting
the ship is straightforward: Black for the lower hull, white for the upper
sections. The decks (although molded in tan) were painted Model Masters
"Wood". A 1/16-inch gold cheat line was painted around the hull. One thing
of note is that some of the rails require a brown top-rail. Make sure to do
research to determine which rails require it. Most passenger areas use 5-bar
railings, while crew areas use 1, 2, or 3-bar railings.
All portholes were drilled out and filled with "Krystal
Klear". Drilling the portholes in the black area of the hull turned out to be a
waste of time, as they are very hard to see, but to each his own.
The funnels require a custom mix of paint to get the "Cunard
Buff" color correct.
The decals were used for the "Titanic" names on both sides
of the bow and at the stern. Also provided are various flags for the rigging.
Rigging was done with black sewing thread.
I chose to leave the anchors and screws in the gold
plating... I think it just looks really cool.
I mounted the model on a custom made base using Acorn shaped
lamp fennels. I also built a custom case out of 1/8 Plexiglas to cover it.
 This
is a great model in my opinion. Excellent detail, great subject matter plus a
wide range of p/e available make it a good choice. Not to mention, it looks
GREAT on display, everybody likes seeing a Titanic model!
This
is a great model in my opinion. Excellent detail, great subject matter plus a
wide range of p/e available make it a good choice. Not to mention, it looks
GREAT on display, everybody likes seeing a Titanic model!
It takes a skilled hand to build, but anyone with a bit of
ship building experience should have no trouble.
“Exploring Titanic” by Robert Ballard
Various photos off the web
http://titanicmodel.com/
Mark Hiott
February 2009
If you would like your product reviewed fairly and quickly, please
contact
me or see other details in the
Note to
Contributors.
Back to the Main Page
Back to the Review Index Page