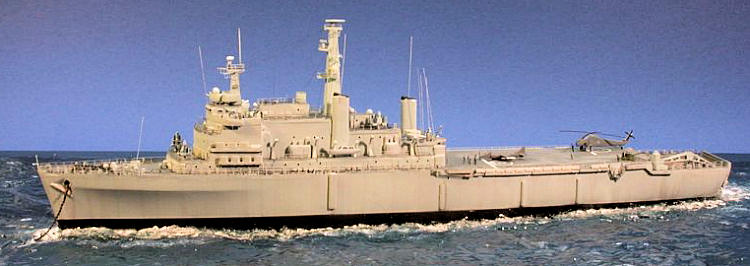
Airfix 1/600 HMS Fearless
| KIT #: | 03205 |
| PRICE: | €10.00 (about $16.00) |
| DECALS: | |
| REVIEWER: | Frank Spahr |
| NOTES: |
WEM PE # 624 / 625 @ 20 GBP and resin Seacat launchers, currently OOP |
| HISTORY |
The Royal
Navy´s seventh ship to bear this name, the LPD HMS
Fearless
was commissioned in 1963. Built at Harland&Wolff, Belfast, she and her
sister ship Intrepid
were designed to cover British interests and project military power around
the world, with the remaining British colonies in mind. Her design was
evolved from WW2 experience and the various classes of ships built then.
 Four
large LCU and four smaller LCVP landing craft could transport troops,
vehicles and material. A helicopter deck speeded up troop transport, but the
ships had no hangar. Apart from accommodation decks for embarked troops,
three vehicle decks with an elaborate ramp system provided space for all
sorts of cargo and – for a short term – more troops.
Four
large LCU and four smaller LCVP landing craft could transport troops,
vehicles and material. A helicopter deck speeded up troop transport, but the
ships had no hangar. Apart from accommodation decks for embarked troops,
three vehicle decks with an elaborate ramp system provided space for all
sorts of cargo and – for a short term – more troops.
Fearless served during the slow decline of the Royal Navy and the British retreat from the remaining colonies, being deployed all around the world from Hong Kong to the Persian Gulf, from Norway to the Caribbean. The infamous Nott cuts of 1981 had slated her for scrapping, when the outbreak of the Falklands War saved both LPD´s and made them indispensable centerpieces of the task force, as important as the two carriers. So she left Britain after an emergency boiler refit on only one engine, and returned victorious several months later, yet with one LCU and several of its gallant crew missing.
The changed strategic situation after the Falklands campaign and the increased necessity of global deployments granted both ships a prolonged service life, plus a major modernization in 1991. Fearless survived Intrepid for several years, pending the completion of the new ships of Albion and Bulwark. Upon her decommissioning in 2002, Fearless was the last remaining British warship with a steam propulsion plant. She was moored at Portsmouth for several years, whilst efforts were made to preserve her as a museum ship. As nearly always, these did not succeed, and at the time of writing (July, 2008) the ship is being broken up in Belgium.
Technical data
|
Laid down |
25 July, 1962 |
|
Launched |
19 December, 1963 |
|
Commisioned |
25 November, 1965 |
|
Decommissioned |
18 March, 2002 |
|
Fate |
Sold for scrapping in 2007 |
|
Dimensions |
Length: 520 feet (160 m) Beam: 80 feet (24 m) Draught: 21 feet (6.4 m) |
|
Displacement |
12,120 t (full load) |
|
Powerplant |
2 steam turbines @ 11,000 hp |
|
Speed |
21 kn |
|
Range |
5,000 nm @ 18 kn |
|
Armament |
4 x Sea Cat / 2 x 40 mm Bofors 1991 Sea Cat replaced with 2 x Phalanx CIWS , Bofors replaced with 20 mm BMARC Short term capacity up to 700 troops Helo deck offered space for up to 5 Sea Kings |
|
Landing craft |
4 x LCVP / 4 x LCU |
|
Complement |
580 |
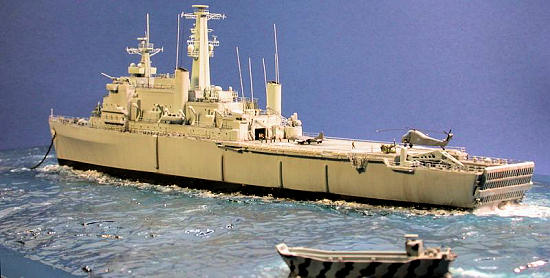
The story behind the diorama
On 13 June, 1982, soon before the end of hostilities in the South Atlantic, the only British heavy-lift helicopter made a heavy landing at San Carlos airfield, damaging the plating and temporarily disabling the airfield. Two Sea Harriers on CAP, running out of fuel fast, urgently had to find a place to land and refuel. Unable to reach the British carriers, Lt. Hargreaves and Lt. Cdr. Thomas decided to land on the helo decks of the two LPD´s Fearless and Intrepid. As soon as they had landed, a refueling rig was improvised; due to the lack of a ski jump ramp, they could not refuel to capacity. The two Harriers spent about an hour and a half in readiness aboard the LPD´s, until they were alerted and vectored towards two Argentine Skyhawks. Before the British could approach, the Argentine turned away; Hargreaves and Thomas thereupon returned to HMS Hermes. I wanted to depict this first landing of a Harrier aboard an LPD.
| THE KIT |
 I
built my first Fearless
at age 12. This kit, introduced in 1968, fascinated me with its helos,
landing craft and working stern gate, and I did play with it a lot. When I
decided which Falklands warships to build for the Laupheim modelers´
meeting, Fearless
easily made the top of my list – even though I didn´t complete her on time.
But the kit was readily available, and the molding still looked quite OK,
notwithstanding some sink marks. Detailing was cutting edge as per 1968, and
to me, it
is one of the best ship kits
produced by Airfix. With a lot of progress made since then, obviously some
modifications were necessary.
I
built my first Fearless
at age 12. This kit, introduced in 1968, fascinated me with its helos,
landing craft and working stern gate, and I did play with it a lot. When I
decided which Falklands warships to build for the Laupheim modelers´
meeting, Fearless
easily made the top of my list – even though I didn´t complete her on time.
But the kit was readily available, and the molding still looked quite OK,
notwithstanding some sink marks. Detailing was cutting edge as per 1968, and
to me, it
is one of the best ship kits
produced by Airfix. With a lot of progress made since then, obviously some
modifications were necessary.
| CONSTRUCTION |
I had procured various WEM aftermarket parts, most notably the PE sets #624 and 625, plus resin Sea Cat launchers. WEM was out of stock of resin Sea Harriers, but luckily Norbert Thiel from NNT helped me out with a 1:700 Fujimi Sea Harrier – thanks a lot, Norbert!
Rainer
Michalek helped me a long way with many images of the excellent HMS
Fearless
model in Portsmouth, plus two very
 helpful
and interesting books on the ship he had bought on his trip to Britain –
many thanks, Rainer!
helpful
and interesting books on the ship he had bought on his trip to Britain –
many thanks, Rainer!
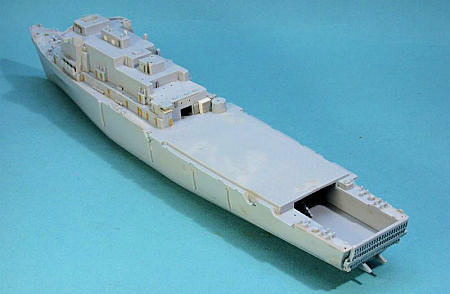
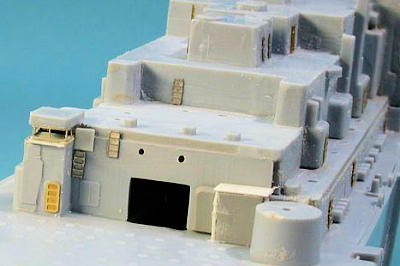
Basic construction went fast and mostly hassle-free. Portholes were drilled out, and watertight doors, vertical and inclined ladders were replaced with PE. Missing bridge and flyco windows were added using PE ladder stock. Overscale splintershields were thinned out using a power tool, what molded on detail to be replaced was removed likewise.
I started the water base already at this stage, using a picture frame as I usually do. The glass was removed, and a thin styrofoam sheet was added from the frame´s backside, leaving enough space for the hull. I was unable to remove the lower hull due to the exposed well deck; so I wrapped the ship in clear household foil and then poured plaster around the hull, still leaving the hull removable. More thinly mixed plaster was added to the area around the ship; covering it with finely crumpled aluminum foil rendered the desired wave structure. Some cleanup and corrections were needed, but in the end it was done.
 To
add some more life to the dio, I decided to add an LCU, one of the very
hard-worked craft crucial to the landings´ success, oftentimes operating
independent from the mothership. The LCU was detailed using PE bridge
windows and was painted in the trademark „tiger stripes“ of
Fearless´
LCU´s. I used a leftover Exocet canister as cargo, as a nod to this
missile´s importance in the conflict. To accept the LCU, the plaster was cut
out accordingly.
To
add some more life to the dio, I decided to add an LCU, one of the very
hard-worked craft crucial to the landings´ success, oftentimes operating
independent from the mothership. The LCU was detailed using PE bridge
windows and was painted in the trademark „tiger stripes“ of
Fearless´
LCU´s. I used a leftover Exocet canister as cargo, as a nod to this
missile´s importance in the conflict. To accept the LCU, the plaster was cut
out accordingly.
The base was painted in various shades of green, blue and white using wall paint from the hardware supermarket, leaving the area around the hull somewhat lighter than the rest. The surface was sealed with several layers of gloss lacquer from a rattle can.
In the meantime, I
continued work on t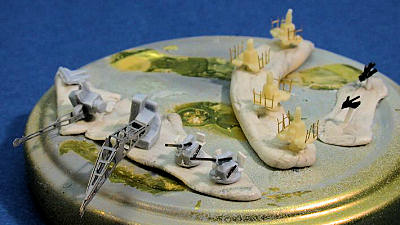 he
ship. Apart from work at the hull itself, numerous subassemblies were made,
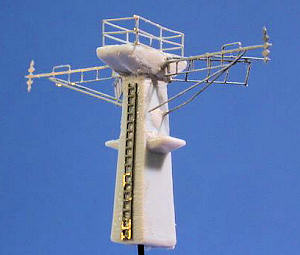
amongst them missile launchers, cranes, masts, boats, guns and aircraft.
WEM´s Sea Cat launchers were detailed with PE launcher rails and missiles
made from painted toothpick tips. Corvus chaff launchers were made from
stretched sprue and styrene stock.
he
ship. Apart from work at the hull itself, numerous subassemblies were made,
amongst them missile launchers, cranes, masts, boats, guns and aircraft.
WEM´s Sea Cat launchers were detailed with PE launcher rails and missiles
made from painted toothpick tips. Corvus chaff launchers were made from
stretched sprue and styrene stock.
Towards the end of the Falklands campaign, Fearless sported on her helo deck a Rheinmetall 20 mm twin AA gun „liberated“ from the Argentines. It was nicknamed „Y turret“. This gun was built according to reference photos using styrene stock and syringe needles. The two Bofors guns in the bridge wings were made the same way.
| COLORS & MARKINGS |
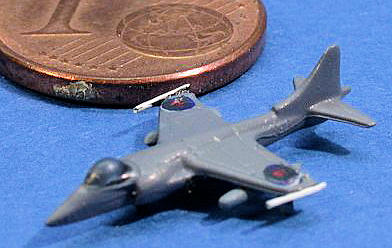 The
Fujimi Sea Harrier was modified as follows: The canopy was carefully removed
with a round bur; drop tanks and Sidewinders were made from stretched sprue.
The plane was painted in a shade of blue-grey that seemed to me to match
EDSG in this small scale. Exhaust nozzles were picked out in a dark
metalizer. After a gloss coat, Starfighter decals´ RAF roundels were applied
to the wings. A final satin coat completed painting. Finally, the canopy was
added using a dro
The
Fujimi Sea Harrier was modified as follows: The canopy was carefully removed
with a round bur; drop tanks and Sidewinders were made from stretched sprue.
The plane was painted in a shade of blue-grey that seemed to me to match
EDSG in this small scale. Exhaust nozzles were picked out in a dark
metalizer. After a gloss coat, Starfighter decals´ RAF roundels were applied
to the wings. A final satin coat completed painting. Finally, the canopy was
added using a dro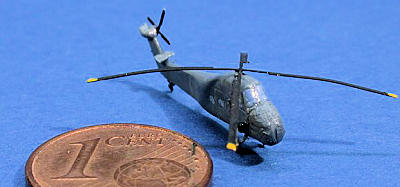 p
of white glue.
p
of white glue.
The vessel was
painted virtually entirely using acrylics, mostly from the JPS range. For
Light Admiralty Grey, I substituted a homemade mix based on RAL 7035
Lichtgrau, the darker grey was substitued using JPS IJN Maizuru Grey.
Getting the numerous demarcations between decks and weatherworks right was
time-consuming. Hull dishing was hinted at by overspraying the basic colour
with darker grey through a m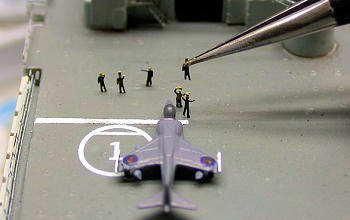 osquito
net, and then adding more of the lighter colour to soften the effect.
osquito
net, and then adding more of the lighter colour to soften the effect.
Fearless´ helo deck markings seem to have changed several times. I used the kit decals where possible, but they proved hard to work with – upon initial contact to the deck they stuck and couldn´t be coaxed to be moved any further. This is why #2 marking is misaligned. To hide this blemish, I placed a Wessex helo there, even though I assumed no helo would have been allowed to land while the Harrier was in readiness. But then again I wasn´t 100% positive and thought I might get away with it. Fearless´ flight deck recognition code was „FS“, and even though I couldn´t find it in the reference images and supposed it was overpainted at the start of hostilities, I just couldn´t keep from leaving my initials on this deck, so on it went. After all, it´s almost covered by Y turret ...
| FINAL CONSTRUCTION |
As
in each project, there came the point when things come together;
subassemblies were added, finally the railings were added, the paintjob was
touched up and the ship was we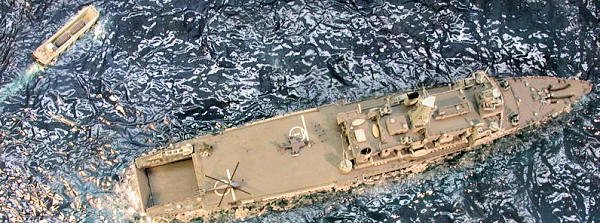 athered.
I used watercolors, mixed with distilled water, but a window cleaner will
work even better due to its content of detergents.
athered.
I used watercolors, mixed with distilled water, but a window cleaner will
work even better due to its content of detergents.
The wire railing bars were painted black using an indelible marker to enhance the contrast between them and the steel railing posts. The vessel was rigged using black stretched sprue, glued with liquid plastic glue and a pointed toothpick. The rigging was tightened using heat from a dental waxing instrument. For the crew figures, Lion Roar PE was used. A final flat coat completed work at the vessel.
To mount the ship in the diorama, I used heavy clear acrylic gel. After drying the disturbed water around the hull was drybushed using white artist´s oil paint. The brass anchor chain from Seamann Aetztechnik was glued into a pre-drilled hole using acrylic gel.
| REFERENCES |
 David
Brown: The Royal Navy and the Falklands War, London 1989
David
Brown: The Royal Navy and the Falklands War, London 1989
Ewen Southby-Tailyour: HMS Fearless,
Barnsley 2006
Neil McCart: Fearless & Intrepid 1965-2002, Cheltenham 2003
Bildunterschriften Fearless
|
Bild |
Text |
|
5135, 5137,5142 |
Der Rumpf im Rohbau mit geätzten Schotten und Brückenfenstern sowie aufgebohrten Bullaugen |
|
5152 |
Einpassen des Rumpfes in der Gipsbasis |
|
5443 |
Zustand direkt nach dem Aufsprühen dunklerer Farbe durch ein Stück Mückengitter – so ist der Kontrast noch zu stark |
|
5445 |
Nach dem Abtönen mit Rumpffarbe scheint die Gitterstruktur nur noch leicht durch und wirkt stimmiger |
|
5486/87 |
Einige der Baugruppen mit Knetkleber zum Lackieren fixiert – Düppelwerfer, Sea Cat – Starter, 40mm Bofors, Bordkräne und Anker |
|
5491/92 |
Die detaillierten Fluggeräte im Größenvergleich |
|
5495/96 |
Die Masten mit den geätzten Rahen und Antennen vor dem Lackieren |
|
5501 |
„Turm Y“ im Rohbau, die Rohre entstammen Injektionskanülen |
|
5505 |
Zum Auftragen von Sekundenkleber eignen sich Einwegpipetten aus dem Dentalhandel |
|
5514 / 16 |
Als „Biegetool“ verwende ich zwei Klingen für Cuttermesser – das reicht meist aus |
|
5519 |
Zur Alterung eignen sich normale Wasserfarben – sie lassen sich auch leicht korrigieren |
|
5521 |
Ein Glasfaserstift ist nützlich, um Lackierungen abzustumpfen und Übergänge abzumildern |
|
5523/24 |
Neugierige Besatzungsmitglieder aus meinem Vorrat werden rund um den Harrier in Position gebracht |
|
5530 |
Alles, was man zum Takeln mit gezogenen Gußästen braucht: Flüssigkleber, schwarzer Gußast, Pinzetten, eine Klinge, ein angespitzter Zahnstocher, eine Hitzequelle und ein Metallinstrument zur Abgabe der Hitze |
|
5617 – 5775 |
Fertiges Schiff – die Ladung des LCU besteht aus zwei Exocet - Containern |
July 2008
If you would like your product reviewed fairly and fairly quickly, please contact the editor or see other details in the Note to Contributors.