
Airfix 1/600 DKM 'Narvik'
| KIT #: | ? |
| PRICE: | $ |
| DECALS: | options |
| REVIEWER: | Frank Spahr |
| NOTES: |
| BACKGROUND |
A trip into tiny town, slipping further towards the „wet“ side – Airfix Narvik Class Destroyer in 1:600
During my build of the Trumpeter Harbin I bought the Airfix Set „Naval
destroyers of WW2“ from ebay. The set contains three british and one german
vessel, the british being the HMS Cossack, Hotspur and Campbeltown (ex USS
Buchanan). I had built all of those kits when a kid and was interested in
what I could make from them now. I started with the german ship, Guido Hopp
being so kind as to furnish me with PE parts from the WEM set. Thanks
Guido! In the course of the build my attitude and
 commitment changed and
things got more complicated. Please remember I´m still a rookie doing these
things, so each kit is a step on the way. And this way may be rocky now and
then as we probably all know.
commitment changed and
things got more complicated. Please remember I´m still a rookie doing these
things, so each kit is a step on the way. And this way may be rocky now and
then as we probably all know.
I had intended to go right ahead but soon my curiosity awoke and I looked for references on the net. Apart from them I found Engbertus Backer´s three-part review in the German magazine ModellFan, and I obtained the volume by Koop and Schmolke „Vom Original zum Modell“ containing some rather useful plans and pics. Ye gods, is that AMS already?
I used three PE sets by White Ensign Models: One set for cruisers and destroyers made for the Prinz Eugen, Graf Spee and the Narvik destroyer, a generic set with ladders and railings, watertight doors and the like, and a set with light AA weapons, as those kit parts were too crude and not numereous enough anyway.
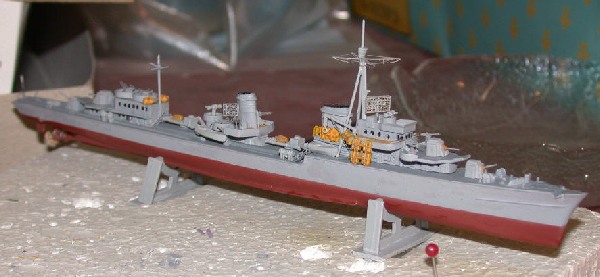
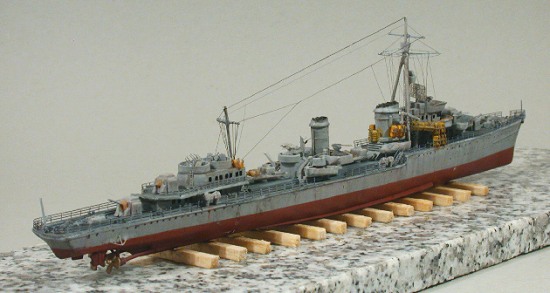
I decided to model the destroyer Z 28 in a late state, soon before its loss in March 1945. This destroyer was originally intended as a flotilla leader and had an enlarged aft superstructure housing the necessary offices. The WEM instructions point out that the Airfix model is closest to this ship. There were of course numerous greater and smaller differences between the ships, with the refits during the war making things ever more complicated. So I decided to take the plans from my book as „the gospel“ and stick to them.
| CONSTRUCTION |
At this point I had already assembled the hull which was -as the whole kit - a good fit in spite of the age of the molds. I had also decided to build the ship full hull. The superstructures were partly ssembled and now needed some reconstruction, mainly to accomodate the additional AA from the 1945 plans. (Late in the war, in November 1944, an effort was made to upgrade the destroyers´ air defence capabilities by mounting extra AA guns - or Flak in german from “Flugzeugabwehrkanone“. This was coded the „Barbara-armament“. Given the nature of the war situation, this plan was put into practice only partly and not straight by the book.)
![]() In building the superstructures I added the PE where I thought it made
sense – the instructions leave you quite some room there. I had to find out
that the PE, although of utmost delicacy, was in parts still too large. I
had to trim some of the ladders and stairs in half and the watertight doors
had to be clipped at the bottom. I regarded some other parts as inferior to
the kit part, namely the liferafts which are simply too flat in PE. I made
castings from the kit parts as the plans showed quite a number of liferafts
more than supplied in the kit and used those.
In building the superstructures I added the PE where I thought it made
sense – the instructions leave you quite some room there. I had to find out
that the PE, although of utmost delicacy, was in parts still too large. I
had to trim some of the ladders and stairs in half and the watertight doors
had to be clipped at the bottom. I regarded some other parts as inferior to
the kit part, namely the liferafts which are simply too flat in PE. I made
castings from the kit parts as the plans showed quite a number of liferafts
more than supplied in the kit and used those.
 The fore superstructure was
modified to accomodate additonal AA next to the gun turret. The gun turrets
were modified with barrels from syringes and blast bags made from wax. The
aft deckhouse was modified with walkways to the side of the upper deck and
with two circular
The fore superstructure was
modified to accomodate additonal AA next to the gun turret. The gun turrets
were modified with barrels from syringes and blast bags made from wax. The
aft deckhouse was modified with walkways to the side of the upper deck and
with two circular
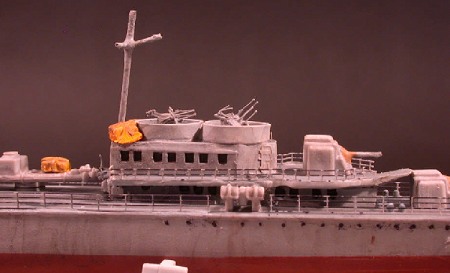 splintershields
housing quadruple flak on the uppermost deck. The splintershields were made
from .3 mm tin foil aft and from paper soaked in CA ahead of the bridge.
The PE anchor chains were used and painted in Model Master burnt metal
(hey, I´m still an aircraft modeler!) I also had to add the rear mast using
steel wire.
splintershields
housing quadruple flak on the uppermost deck. The splintershields were made
from .3 mm tin foil aft and from paper soaked in CA ahead of the bridge.
The PE anchor chains were used and painted in Model Master burnt metal
(hey, I´m still an aircraft modeler!) I also had to add the rear mast using
steel wire.
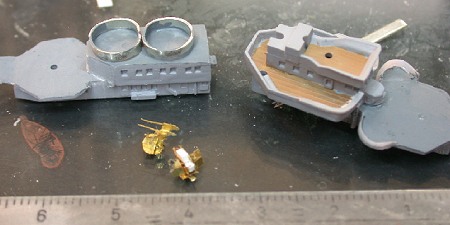
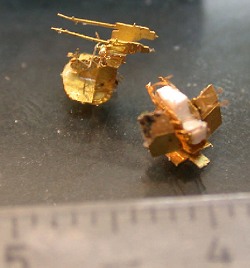
To obtain the necessary measurements for the AA embrasures I built a twin and a quadruple AA. Now that was some kind of experience! I hadn´t used PE so delicate and ethereal ever before. Even using my big magnifying light I didn´t really always see what I was doing. I gulped a bit and postponed building the rest ...
| COLORS & MARKINGS |
 The ship was painted with Humbrol and Revell enamels as I have plenty of
them and a short drive brings me to half a dozen shops stocked wth them. I
used Revell 57 for the decks and Humbrol 127 for the hull and
superstructure, although neither of the colors is „authentic“ or „correct“.
I checked them against color charts yet.
The ship was painted with Humbrol and Revell enamels as I have plenty of
them and a short drive brings me to half a dozen shops stocked wth them. I
used Revell 57 for the decks and Humbrol 127 for the hull and
superstructure, although neither of the colors is „authentic“ or „correct“.
I checked them against color charts yet.
The numerous recessed windows and bulleyes were painted black with a waterproof marker; in spite of much care taken, that necessitated some corrections. Finally I was able to glue the superstructures to the hull and fill the remaining gaps, touching up the paint here and there. I also added the radars and the screws and prop guards at that time, leaving me with a ship complete but AAA, weathering, railings and rig.
| MORE CONSTRUCTION |
It
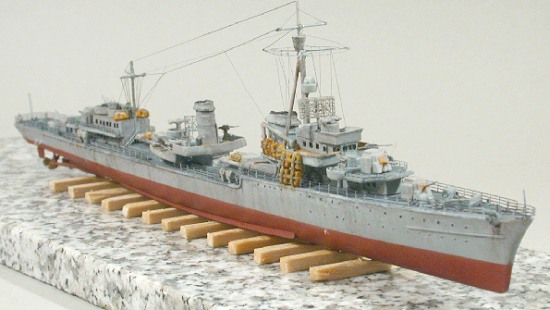
was at that time that I decided to place the ship on a stand on a row of
timbers. I found a granite tile at the DIY store and glued a row of pieces
of matches on it with CA. These were duly carved to accept the ship and the
stand set aside. Instead I
 glued
the two plastic stands on a piece of wood and added the ship with plumbers
putty. That gave me a stable base which was easy to handle and I could
remove the ship easily upon completion.
glued
the two plastic stands on a piece of wood and added the ship with plumbers
putty. That gave me a stable base which was easy to handle and I could
remove the ship easily upon completion.
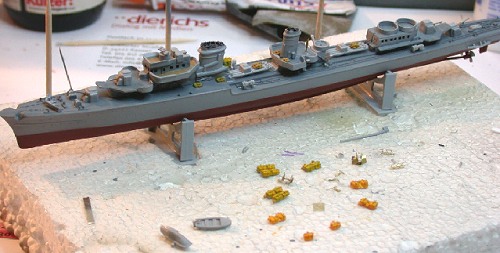
Then I waited for the right state of mind to tackle my little PE opponents. Upon some fine morning I did it and spent the rest of the day assembling AA guns. After listing how many items of each subtype I would need (according to the Koop/Schmolke book) I started the, to say the least, tedious job of cutting out and assembling the little buggers. I found out this works best in Zen-mode with good breath control. You can do all the ranting, raving, screaming, fist-clenching and stamping you want afterwards. Anyway I persevered until I had enough flak together. Sadly, they are still too large for my liking as well as too, well, flat. But they well exceeeded my abilities and I, as in my childhood days, had some parts as leftovers I couldn´t assemble for the love of Pete. Anyone who can cope with this set can be sure of my deepest reverence. I´m not that far yet, but I´m working on it.
 I
sprayed the AA guns grey and glued them in place, no mean feat by the way.
And so my destroyer sat for a while. Lacking weathering, railings and a
rig. It simply looked like a toy without decent weathering, but I didn´t
have the guts to face things using either oil paint or pastel chalk. I was
mortally afraid of ruining all I had achieved so far by the proverbial
stroke of a brush. So I asked people with more experience for advice. Guido
Hopp gave me an excellent how-to on using watercolors. I jumped at the
prospect of being able to make corrections to my efforts but still didn´t
get round into the modeling den for a while. But by coincidence I was
contacted by Jim Baumann and I even had the chance of meeting him on a trip
to the UK. Jim helped me quite a lot and gave me some very decisive tips in
the way of using PE, weathering, railings and rigging. So when I returned
from the trip (which was unforgettable in many ways, including my visit to
HMS Victory and sailing past HMS Fearless and Invicible) I was all keyed up
to get going on the last leg of the build.
I
sprayed the AA guns grey and glued them in place, no mean feat by the way.
And so my destroyer sat for a while. Lacking weathering, railings and a
rig. It simply looked like a toy without decent weathering, but I didn´t
have the guts to face things using either oil paint or pastel chalk. I was
mortally afraid of ruining all I had achieved so far by the proverbial
stroke of a brush. So I asked people with more experience for advice. Guido
Hopp gave me an excellent how-to on using watercolors. I jumped at the
prospect of being able to make corrections to my efforts but still didn´t
get round into the modeling den for a while. But by coincidence I was
contacted by Jim Baumann and I even had the chance of meeting him on a trip
to the UK. Jim helped me quite a lot and gave me some very decisive tips in
the way of using PE, weathering, railings and rigging. So when I returned
from the trip (which was unforgettable in many ways, including my visit to
HMS Victory and sailing past HMS Fearless and Invicible) I was all keyed up
to get going on the last leg of the build.
And
in the end things wrapped up really fast. I had given the model a flat coat
before the trip, so I had a good base for the watercolors. I used black
and red plus ochre, highly diluted with distilled water, applied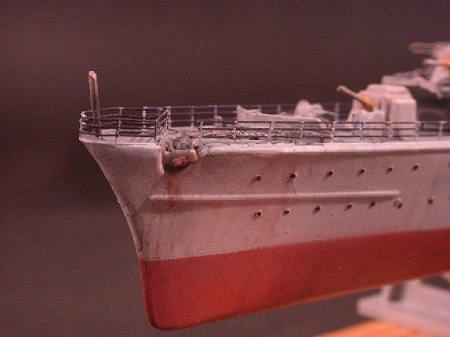 with a
brush and dabbed off with Q-tips. I tried to achieve the look of a ship
that has been in a hard and grueling service, yet not one that has been
neglected. No boatswain or first officer would reasonably accept that. But
I assumed that with the evacuations from the eastern provinces going on in
the winter of 44/45, the destroyers must have been really hard put to
without much of a chance for „spit and polish“. The effect was achieved,
but it looks more credible in looking at the model with the naked eye than
with a macro camera lens – at least to me. In the end, what we are doing is
staging an impression that is designed to be credible to a human observer
looking at the model from a normal viewing distance. And as the makeup of
an actor in a theatre is designed to look right from the audience and not
from two feet distance, the ship´s makeup had to follow similar rules for
me. Anyone with better knowledge feel free to correct me.
with a
brush and dabbed off with Q-tips. I tried to achieve the look of a ship
that has been in a hard and grueling service, yet not one that has been
neglected. No boatswain or first officer would reasonably accept that. But
I assumed that with the evacuations from the eastern provinces going on in
the winter of 44/45, the destroyers must have been really hard put to
without much of a chance for „spit and polish“. The effect was achieved,
but it looks more credible in looking at the model with the naked eye than
with a macro camera lens – at least to me. In the end, what we are doing is
staging an impression that is designed to be credible to a human observer
looking at the model from a normal viewing distance. And as the makeup of
an actor in a theatre is designed to look right from the audience and not
from two feet distance, the ship´s makeup had to follow similar rules for
me. Anyone with better knowledge feel free to correct me.
After that I attached the railings. I had sprayed them light grey as the hull and now picked the bars out with a black waterproof marker to represent the different shade of the wires from the stanchions on Jim´s advice. They were attached step by step with CA glue and consecutively bent to shape. I only used pliers and an X-ACTO blade for bending the PE in this project. After completing this step, I made the necessary corrections around the railings, both in paint and weathering. After applying another flat coat I delved into the realm of rigging.
I
clung to the rigging plan from the Koop/Schmolke book. First of all,
following Jim´s advice, I fabricated a sufficient amount o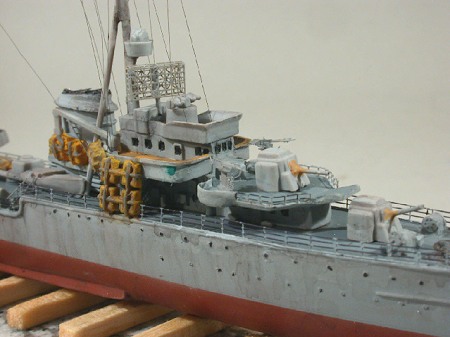 f
stretched sprue. Well, it´s not like I never did that before, but I got
some useful hints. First of all, use black sprue. Jim even went so far as
to label sprue from a vintage (!) Airfix HMS Victory kit as „the only thing
that would do“. Due to his generosity, I´m the proud owner of a piece of
that description now. I didn´t dare using that hallowed piece of styrene
right for the first attempt, so I used some of my Heller spanish galleon
instead. Maybe all my difficulties ensued from this choice ;-) I also
tended and optiomized my tweezers to insure a good grip. I´ll have to look
around the dental suppliers or other sources for a really good and fine one
these days.
f
stretched sprue. Well, it´s not like I never did that before, but I got
some useful hints. First of all, use black sprue. Jim even went so far as
to label sprue from a vintage (!) Airfix HMS Victory kit as „the only thing
that would do“. Due to his generosity, I´m the proud owner of a piece of
that description now. I didn´t dare using that hallowed piece of styrene
right for the first attempt, so I used some of my Heller spanish galleon
instead. Maybe all my difficulties ensued from this choice ;-) I also
tended and optiomized my tweezers to insure a good grip. I´ll have to look
around the dental suppliers or other sources for a really good and fine one
these days.
Anyway, the first trick was to light up the end of the sprue with a lighter and dab it on a firm surface, then pull. I had heated the middle of the sprue before and brought my hands apart. This method is far more economic on the sprue. I then chopped the long filament into handy pieces. (Those in the know skip this or read something else) I then picked up one piece, dabbed it into a drop of plastic glue and attached it appropriately on one end. That went better from time to time.
The next important hint was how to attach the other end. I had so far glued the other end to its belaying point using CA and after drying cut off the excess – not quite easy. Jim taught me how to sharpen a toothpick, dab it into plastic glue and how to use it to attach the other end and melt of the excess. Neat! It did of course take some practice.
I
preoceeded until I had enough rigging for my liking, yet still about just
one third of what the period pics showed, but enough for me at this point
of my life anyway ;-) 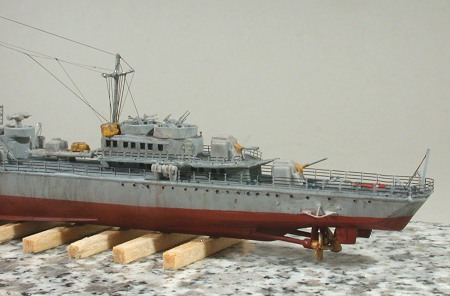
The filament streched in this way will lovingly shrink upon exposure to heat. Jim recommended incense sticks towards matches as you can read frequently. He pointed out their continuous emission of heat as their main advantage. So I gave them a try. My background as a dentist prompts me to use as much dental equipment as possible in modeling, so I´m used to a dental modeling tool, a PK Thomas #1, to be excact, for this task. This steel tool is heated in a flame (I have a handy spirits burner) and then cautiously approached to the sprue. (Normally it is used to apply wax in modeling dental structures in wax-ups and crown and bridgework.) I wasn´t used to the continuous heat of the incense stick, let alone the heat in the smoke. I soon realized that the smoke could easily cause the sprue to snap. In the end, I returned to my method with the waxing instrument just because I´m used to it. But I have to admit that the incense stick vastly improved the atmosphere over my workbench!
Finally I mounted the model to the base and took my pics using my trusty Nikon Coolpix 995. I of course discovered several glitches in the pics, glitches I can assure you I´m adamantly determined to correct – manana. At the latest ;-)
| CONCLUSIONS |
 Bottom line: I´m pretty happy I completed the project and thus found a
start working seriously with small-scale ships. 1:600 or 1:700 is just so
economic space-wise, although I´d love to work in the bigger scales.
Bottom line: I´m pretty happy I completed the project and thus found a
start working seriously with small-scale ships. 1:600 or 1:700 is just so
economic space-wise, although I´d love to work in the bigger scales.
This concludes the news from my basement. Right now I´m completing three aircraft and am planning to start a tank plus whatever else may rain down on me.
Happy modeling wishes
June 2005
| REFERENCES |
Gerhard Koop, Klaus-Peter Schmolke: Vom Original zum Modell. Die deutschen Zerstörer 1935-45, Bonn 1995
Engbertus Backer: Die deutschen Zerstörer „Z23“ bis „Z45“; Umbauten im Maßstab 1:400. In ModellFan September 2004 / November 2004 / Februar 2005
Detailsets: White Ensign Models: PE Sets Nr. 627 (Ultimate Kriegsmarine set 2), Nr. 633 (Ultimate Kriegsmarine Set 3), Nr. 623 (German Light AA Weapons).
Photography: Nikon Coolpix 995 used with tripod; custom white balance, settings to manual with aperture priority.
My sincere thanks to Jim Baumann, Guido Hopp, Frank Ilse, Martin Kohring!
If you would like your product reviewed fairly and quickly, please contact me or see other details in the Note to Contributors.