| KIT #: | 9012 |
| PRICE: | $5.00 second hand |
| DECALS: | Generic options |
| REVIEWER: | Brad Gaff |
| NOTES: |
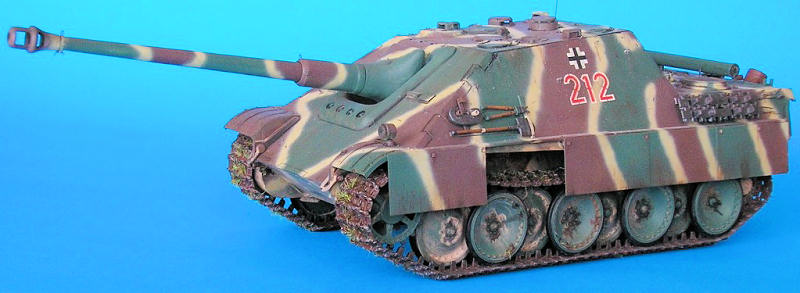
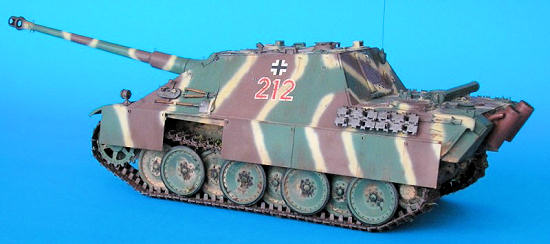
Modified to a late model Jagdpanther |
| HISTORY |
The Panther family of tank started life in 1941, when the Germans encountered
the Russian T-34 and found themselves up against a rather formidable foe. The
Jagdpanther was ordered in 1942 as a tank destroyer based on the Panther tank
chasis and 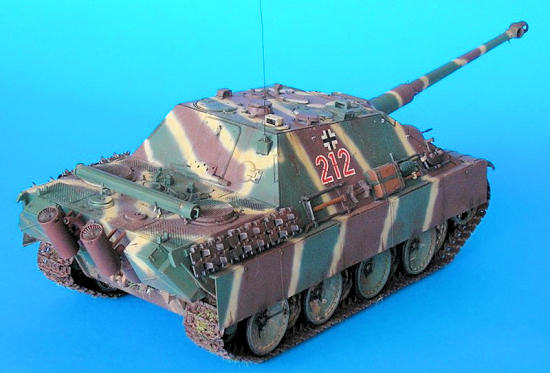 the 88mm gun, however it
was only put into production in early 1944 after a rather extended development
phase. Other than the hatches mounted on top of the extended superstructure, the
Jagdpanther differed in only a small number of parts from a standard Panther
tank. At 46 tonnes and powered by a 12 cylinder, 23.1 litre engine it could hit
a top speed of 45kph and had a range of 160kms (on road). Its performance was
good, as it suffered little of the mechanical teething problems of early
Panthers due to the incorporation of an upgraded transmission.
Armed with the excellent 88mm Pak43, an experienced crew could hit
targets 3000 meters away.
the 88mm gun, however it
was only put into production in early 1944 after a rather extended development
phase. Other than the hatches mounted on top of the extended superstructure, the
Jagdpanther differed in only a small number of parts from a standard Panther
tank. At 46 tonnes and powered by a 12 cylinder, 23.1 litre engine it could hit
a top speed of 45kph and had a range of 160kms (on road). Its performance was
good, as it suffered little of the mechanical teething problems of early
Panthers due to the incorporation of an upgraded transmission.
Armed with the excellent 88mm Pak43, an experienced crew could hit
targets 3000 meters away.
| THE KIT |
Typical of the ‘Imperial Series’ of Dragon armour there are no magic tracks, zimmerit, metal barrels or photo etched included. Although the instructions guide you towards constructing an early model Jagdpanther, the bolt on gun mantlet, alternate style drive wheels and machine gun housing are included (and were used) to make a late model tank, however the two part barrel isn’t. Most of the kit is flash and defect free, apart from the tracks. Around 20 of the track links in this kit were unusable and the rest require clean up, all 172 of them. Fortunately there are around 200 links included.
| CONSTRUCTION |
 I decided straight away that due to the total lack of interior detail I would
button up all the hatches. This simplifies construction of the upper hull as
everything apart from the tools, cleaning kit, extra track links and exhausts
were glued on. Once dry, the lower
hull was fixed to the superstructure. Careful fitting will ensure virtually no
clean up on the joints.
I decided straight away that due to the total lack of interior detail I would
button up all the hatches. This simplifies construction of the upper hull as
everything apart from the tools, cleaning kit, extra track links and exhausts
were glued on. Once dry, the lower
hull was fixed to the superstructure. Careful fitting will ensure virtually no
clean up on the joints.
With most of the tank built I turned my attention to some details. I had decided
on building a late model vehicle of Pz.Jg.Abt 654 delivered to the group in late
1944 or early 1945 which meant I had to do some kit bashing.
Steel cable tie down hooks were mounted all over this vehicle, along with
tie down hooks and clamp rings to the barrel. I scratch built these with thin
copper wire I got from an old extension cord I cut up and some copper sheet. The
barrel cleaning kit was also moved to the back engine deck. The mounts for this
were scratch built out of copper sheet and glued to the surface (minus the
cleaning kit).
 I dug through the spares box to see what I could come up with to make the 2 part
gun barrel. I found a section of tiger tank gun which was perfect. I chopped off
a large portion of the kit barrel and glued the two parts together.
I knew it would need some filler between the barrel and the cast section
of mantlet but this was nothing some Squadron white putty and wet sanding
couldn’t handle. I also pinched some flame dampeners from another panther kit I
had. Finally I added the side skirt mounts and it was onto the tracks.
I dug through the spares box to see what I could come up with to make the 2 part
gun barrel. I found a section of tiger tank gun which was perfect. I chopped off
a large portion of the kit barrel and glued the two parts together.
I knew it would need some filler between the barrel and the cast section
of mantlet but this was nothing some Squadron white putty and wet sanding
couldn’t handle. I also pinched some flame dampeners from another panther kit I
had. Finally I added the side skirt mounts and it was onto the tracks.
I broke the tracks down to 7 separate sections each. As mentioned, each link
required clean up of flash on the mating surfaces which was a real pain. Once
glued together I brush painted each section Gunze Steel and set them aside to
dry.
| COLORS & MARKINGS |
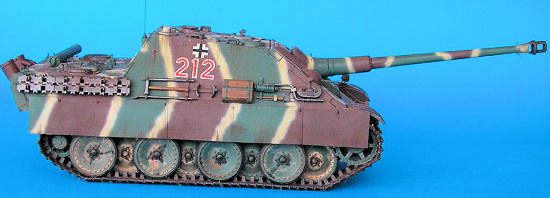
I panted the whole tank, the barrel, road wheels and skirts Humbrol 30 green. I
then airbrushed on Humbrol 160 German red brown. While letting this dry
overnight I brush painted the black rubber on the road wheels. Gunze 79 sandy
yellow was applied the next day and the whole tank was allowed to dry another
day before moving onto a gloss coat of Humbrol.
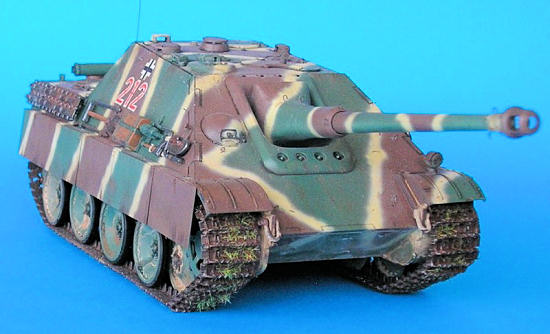
 Now the fun part, weathering. I decided to weather the lower hull first. This
was done using the Mig Pigments of dry mud, earth and black. First I simply
brushed on dry mud mixed with water and dishwashing liquid all over the wheels
and hull. At this stage things will look horrible but don’t stress, let it dry.
Once dry, I did the same in places with the earth pigment. To make clumps of
mud, I used water based matt medium mixed with Mig pigments and applied to areas
where mud would collect. I also added in some static grass to this mixture. I
brushed on dry ‘rust’ pigment to the tracks and used the matt medium to add
clumps and grass to them too before sealing the lower hull, wheels and tracks
with Humbrol Matt coat. After another night of drying, the wheels and tracks
were glued on, some final, oily stains added to the bolts on the wheels and it
was onto the superstructure.
Now the fun part, weathering. I decided to weather the lower hull first. This
was done using the Mig Pigments of dry mud, earth and black. First I simply
brushed on dry mud mixed with water and dishwashing liquid all over the wheels
and hull. At this stage things will look horrible but don’t stress, let it dry.
Once dry, I did the same in places with the earth pigment. To make clumps of
mud, I used water based matt medium mixed with Mig pigments and applied to areas
where mud would collect. I also added in some static grass to this mixture. I
brushed on dry ‘rust’ pigment to the tracks and used the matt medium to add
clumps and grass to them too before sealing the lower hull, wheels and tracks
with Humbrol Matt coat. After another night of drying, the wheels and tracks
were glued on, some final, oily stains added to the bolts on the wheels and it
was onto the superstructure.
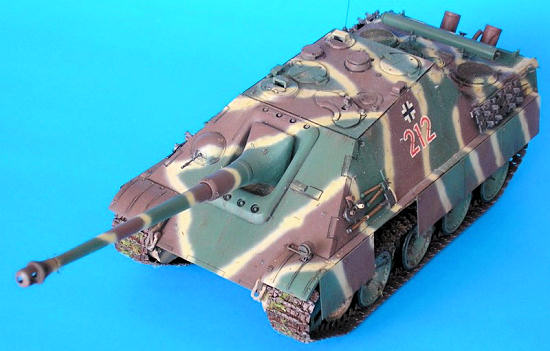
I started by gluing on the side skirts and applying the Red Brown and yellow to
them. I also painted and glued on the cleaning kit, tools, exhausts, barrel and
applied the decals. After this I
washed the superstructure with black pigment mixed with water and painting on
chips and scratches with Gunze steel. Dust, grimy and rusty streaks were then
added to the tank randomly. Finally a radio antenna was glued on from fine
copper wire and the whole kit was sealed with Humbrol Matt.
| CONCLUSIONS |
 I started this model with the intention of it being a more relaxed build, but it
quickly turned into a far more involved project than I imagined. This is still a
decent kit, but has been rendered obsolete at retail price by the newer Dragon
armour with all the bells and whistles included in the box. The Arber grills and
skirts cost me $25 bucks in total. Therefore, if you can get these older ‘red
box’ Dragon armour models for the right price, add some aftermarket photo etch
and you will end up with a pretty good looking tank for half the cost of the
more modern Dragon kits.
I started this model with the intention of it being a more relaxed build, but it
quickly turned into a far more involved project than I imagined. This is still a
decent kit, but has been rendered obsolete at retail price by the newer Dragon
armour with all the bells and whistles included in the box. The Arber grills and
skirts cost me $25 bucks in total. Therefore, if you can get these older ‘red
box’ Dragon armour models for the right price, add some aftermarket photo etch
and you will end up with a pretty good looking tank for half the cost of the
more modern Dragon kits.
| REFERENCES |
March 2011 If you would like your product reviewed fairly and quickly, please
contact
me or see other details in the
Note to
Contributors.