| KIT #: | ? |
| PRICE: | 1800 yen at www.hlj.com |
| DECALS: | Three options |
| REVIEWER: | Tom Cleaver |
| NOTES: |
| HISTORY |
Considered the best heavy anti-tank AFV produced during the Second World War,
the SdKfz 173 Jagdpanther designed to overcome the limitations of the earlier
Nashorn and Ferdinand anti-tank vehicles. Based on the chassis of the Pzkw V
Panther Ausf A, the Jagdpanther was armed with the was the awesome 88 mm PaK
43/3 L71 gun. The basic chassis, power train and lower hull of the early Panther
were used intact and new superstructure was designed without a turret, which
would simplify and speed production. The glacis plate was extended up at the
same angle, which allowed the use of the standard Panther bottom hull and nose
plate. The original Panther side armor was at too great an angle to provide for
a large fighting compartment, so a new and
 simpler hull side plate and
sponson assembly was designed, which was also adopted for the Panther Ausf G;
this provided better side protection at lower cost and production effort. The
superstructure featured 80mm armor at the front and 50mm at the sides, making
the Jagdpanther a very difficult kill for all but the most powerful Soviet
tanks, and completely outclassing the tanks used by the western Allies. Weighing
in at 46 tons and propelled by the powerful Maybach V12 cylinder engine, the
Jagdpanther featured a good balance of fire power, protection and mobility.
simpler hull side plate and
sponson assembly was designed, which was also adopted for the Panther Ausf G;
this provided better side protection at lower cost and production effort. The
superstructure featured 80mm armor at the front and 50mm at the sides, making
the Jagdpanther a very difficult kill for all but the most powerful Soviet
tanks, and completely outclassing the tanks used by the western Allies. Weighing
in at 46 tons and propelled by the powerful Maybach V12 cylinder engine, the
Jagdpanther featured a good balance of fire power, protection and mobility.
After being demonstrated to Hitler in 1943, the Jagdpanther entered production in January 1944. Fast, well armored and well armed, the Jagdpanther was an extremely effective weapon, and very popular with its crews. Only 415 had been built by April 1945 when production ceased, and there were never enough to meet demand.
The British and Americans first met Jagdpanthers during the fighting in Normandy in July 1944, when the 654th Heavy Tank Battalion ambushed British tanks at Caumont, destroying several British Shermans at no loss to themselves. However, most Jagdpanthers were used on the Eastern Front against the new T-34/85 and the JS III heavy tanks operated by the Red Army in ever-increasing numbers. Jagdpanthers returned to the Western Front in appreciable numbers for the Ardennes Offensive, known to history as the Battle of the Bulge.
| THE KIT |
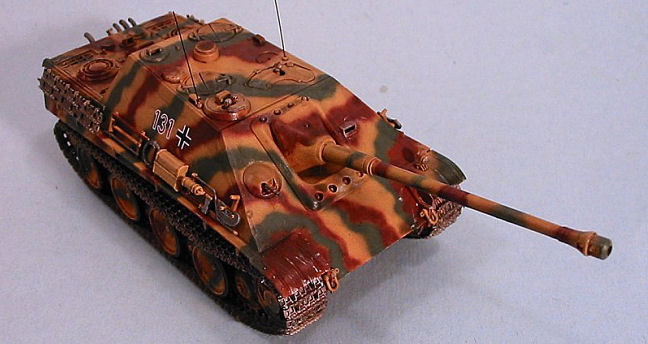
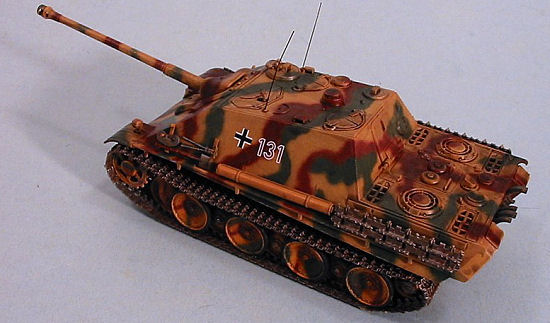
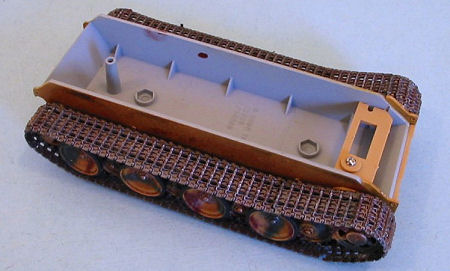
As with all the other new Tamiya 1/48 armor kits, this Jagdpanther includes a diecast chassis. Some of the more serious “treadheads” say that these diecast chassis are not very accurate; however, for this “dabbler” in armor, the fact that very few tank models get turned upside down leaves me unworried about accuracy questions that can’t easily be seen. All the parts are crisply molded in tan plastic and are flash-free. Decals are provided for two otherwise-anonymous Jagdpanthers, and a third from Kompanie 1, sPzJgAbt 560, participating in the Battle of the Bulge. All three offer the modeler different pattern variations of the three-color armor camouflage.
| CONSTRUCTION |
 For
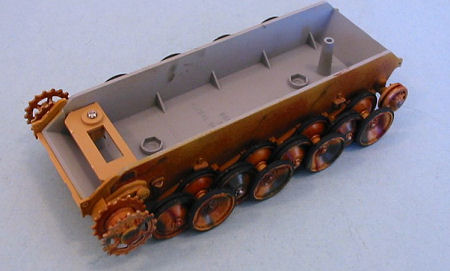
me, construction of these tank models begins with the lower hull, chassis, and
treads, and it begins with painting. I painted all the plastic parts Panzer
dark yellow, mixing this from Tamiya paints to match the color profile on the
boxtop. I then camouflaged the outer road wheels and drive sprockets with Tami
For
me, construction of these tank models begins with the lower hull, chassis, and
treads, and it begins with painting. I painted all the plastic parts Panzer
dark yellow, mixing this from Tamiya paints to match the color profile on the
boxtop. I then camouflaged the outer road wheels and drive sprockets with Tami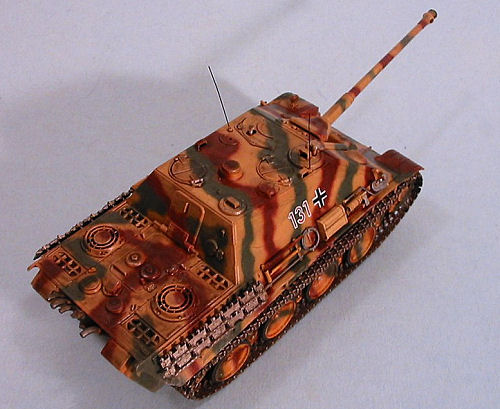 ya
Red Brown and Gunze-Sangyo Medium green. Moving on, I painted the treads with
Tamiya Flat Aluminum, mixed with Semi-gloss Black to create a “steel” color.
Next I hand painted the rubber on the road wheels, which is a tedious process at
best and the lest-enjoyable part of building one of these armored vehicles. When
these basic colors had been applied, it was time to weather things.
ya
Red Brown and Gunze-Sangyo Medium green. Moving on, I painted the treads with
Tamiya Flat Aluminum, mixed with Semi-gloss Black to create a “steel” color.
Next I hand painted the rubber on the road wheels, which is a tedious process at
best and the lest-enjoyable part of building one of these armored vehicles. When
these basic colors had been applied, it was time to weather things.
I gave everything a coat of Future mixed with Tamiya “Smoke” to “pop out” detail. Then I drybrushed the parts with Flat Aluminum. This was followed by applying a second coat of Future mixed with Tamiya Brown to make a “mud wash.” When all this was dry, I gave the lower parts a coat of Xtracrylix Flat varnish.
Construction could now begin. I attached all the wheels to the diecast lower
hull with Cyanoacrylate glue, and then attached
 the
treads with Tenax. I followed that with a drop of cyanoacrylate to each wheel to
attach it to the tread, since I had discovered while building the T-34 that
these treads can come loose from handling during construction, and there is
nothing more frustrating than looking for small tread parts in the carpet where
they inevitably end up.
the
treads with Tenax. I followed that with a drop of cyanoacrylate to each wheel to
attach it to the tread, since I had discovered while building the T-34 that
these treads can come loose from handling during construction, and there is
nothing more frustrating than looking for small tread parts in the carpet where
they inevitably end up.
With the lower hull and treads finished, it was time to move on to the upper hull. I assembled the gun as a sub assembly, and attached most of the small parts other than the items that are carried on the side. When that was complete, I camouflaged the upper hull with Tamiya Red Brown and Gunze-Sangyo Medium Green, in accordance with the pattern shown in the boxtop profile.
When this was all done, I gave the upper sub-assemblies a coat of Future with
“Smoke,” then drybrushed with Flat Aluminum, and finished off with a wash of
Future with thinned black paint to bring up final detail. The decals for the
Jagdpanther of 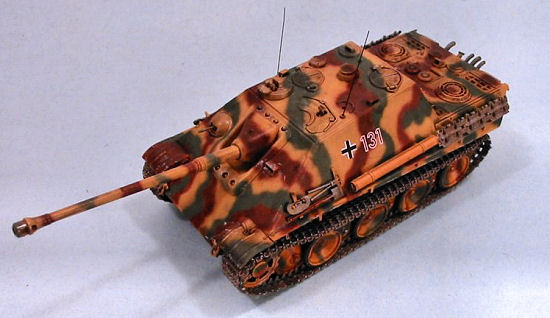 Kompanie 1,
sPzJgAbt 560, participating in the Battle of the Bulge, were applied. When that
was dry, the model was given two coats of Xtracrylix Flat varnish.
Kompanie 1,
sPzJgAbt 560, participating in the Battle of the Bulge, were applied. When that
was dry, the model was given two coats of Xtracrylix Flat varnish.
| FINAL CONSTRUCTION |
Not having yet figured out what to use to simulate steel cable, I have not as yet applied the cables. I attached all the pieces to the side of the hull, and attached two radio antennas made from wire.
| CONCLUSIONS |
For those who - like me - are “dabbling” in armor modeling either for the first time or after a long time away from the field, this Jagdpanther is an easy project that results in a good-looking final product. The Jagdpanther is easily one “mean machine.” I have to conclude that German armor appears to be as addictive as Bf-109s are, for the variety of possible paint schemes for these beasts.
January 2006
Copyright ModelingMadness.com
Review kit provided by HobbyLink Japan - get yours at “Japanese prices” at www.hlj.com
If you would like your product reviewed fairly and fairly quickly, please contact the editor or see other details in the Note to Contributors.