Dragon 1/35 M4
|
|
6511 |
|
PRICE: |
$65 MSRP |
|
DECALS: |
3 options |
|
REVIEWER: |
|
|
NOTES: |
Another great Dragon kit! |
|
HISTORY |
The M4 Sherman tank was
the most produced armored vehicle in World War II, with over 50,000 units
rolling off the lines by the end of the war (compare this with Germany’s total
tank production of some 19,900 vehicles).
Combine this number with the fact that the M4 chassis served as the
basis for many other armored vehicles, including tank destroyers, tank retrieval
vehicles, and self-propelled artillery, and one can begin to get an appreciation
for the magnitude of the production effort involved.
The US Army
Ordnance Department designed the M4 as a replacement for the M3 Lee. The Lee was
an up-gunned development of the M2 Medium Tank, a derivative of the M2 Light
Tank. The M3, which had been developed as a stopgap vehicle, suffered from a
high silhouette because of the top turret which mounted the 37mm gun, and the
inflexibility of its side sponson main gun
 mounting.
The Ordnance
Department submitted its detailed design characteristics for the M4 on 31 August
1940, but development of a prototype had to be delayed so final production
designs for the M3 could be finished, and the tank put into full-scale
production.
On 18 April,
1941 The U.S. Armored Force Board chose the simplest of five designs. Known as
the T6, the design combined a modern turret with the Lee's main gun and a
modified M3 hull and chassis. The Sherman's reliability would be
enhanced by many design features first developed in U.S. light tanks during the
1930s, including a vertical volute spring suspension, rubber-bushed tracks, and
a rear-mounted radial engine with drive sprockets in the vehicle’s front. The
stated goal was to produce a fast, dependable medium tank that was capable of
defeating any other tank currently in use by the Axis nations.
The pilot
model of the M4 was completed on 2 September 1941. Like later M3s, the hull was
welded. It had a side hatch which was eliminated from production models. The T6
became standardized as the M4, and production began in October 1941.
Early Shermans
mounted a 75mm medium-velocity general-purpose gun. Although Ordnance started
working on the Medium Tank T20 as a Sherman replacement, ultimately the Army
decided to minimize production disruption by incorporating elements of other
tank designs into Sherman production. Later M4A1, M4A2, and M4A3 models received
the larger T23 turret, with a high-velocity 76 mm gun, which reduced the number
of HE and smoke rounds carried for an increase in the number of anti-tank
rounds. The British offered the Americans their 17-pounder (76.2 mm) anti-tank
gun, with its significantly better armor penetration, but the U.S. Ordnance
Department was working on a 90 mm tank gun and declined. As a stopgap in their
tank development, the British developed their own up-gunned "Firefly" variant
using the 17-pounder.
 Later, the M4
and M4A3 were factory-produced with a 105 mm howitzer and a new distinctive
mantlet in the original turret. The first standard-production 76mm-gun Sherman
was an M4A1 in January 1944, and the first standard-production 105 mm-howitzer
Sherman was an M4 in February 1944.
Later, the M4
and M4A3 were factory-produced with a 105 mm howitzer and a new distinctive
mantlet in the original turret. The first standard-production 76mm-gun Sherman
was an M4A1 in January 1944, and the first standard-production 105 mm-howitzer
Sherman was an M4 in February 1944.
While the
M4 Sherman was very reliable, it had several problems, especially when compared
to the German tanks it fought. It was inferior to them in several key areas: It
had relatively thin armor; an inferior 75mm or 76mm gun which could not
penetrate the front armor of the German Tiger tanks even from short range, while
they could easily destroy the Sherman from long ranges; and the Sherman was very
tall, 3.43m, which is taller than the German Tigers, and one meter taller than
the Russian T-34. This limited the
|
THE |
Having built the Tamiya early
production Sherman (Kit # 35190) some years ago, I was anxious to see how this
latest
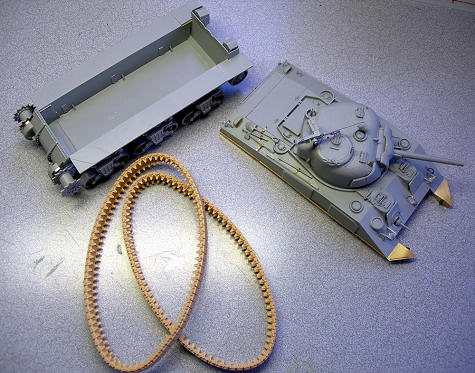
 The included photoetch
set is just about right for my particular taste: just enough pieces and not too
many very small ones (although there are still some very tiny parts in the PE
set). My biggest joy, however, was
the flexible one piece tracks as opposed to the individual link “magic tracks.”
These flex tracks save a lot of assembly time and the molding on them is
outstanding, plus they glue together as opposed to the old “heated knife”
approach. The molded in weld seams and the molded in texturing for the cast
turret also add realism to the finished product. The kit contains optional parts
for three different transmission covers, and the suspension system is highly
detailed. The mere “330” pieces is also a welcomed momentary reprieve from some
of the latest Dragon kits that have contain over 500 parts!
The included photoetch
set is just about right for my particular taste: just enough pieces and not too
many very small ones (although there are still some very tiny parts in the PE
set). My biggest joy, however, was
the flexible one piece tracks as opposed to the individual link “magic tracks.”
These flex tracks save a lot of assembly time and the molding on them is
outstanding, plus they glue together as opposed to the old “heated knife”
approach. The molded in weld seams and the molded in texturing for the cast
turret also add realism to the finished product. The kit contains optional parts
for three different transmission covers, and the suspension system is highly
detailed. The mere “330” pieces is also a welcomed momentary reprieve from some
of the latest Dragon kits that have contain over 500 parts!
Finally, I can say this
is my second consecutive DML kit in which I have found NO mislabeled parts in
the assembly instructions, so that is additional proof that Dragon is listening
to its customer base. I did,
however, discover one possible omission, and that deals with what I believe is
the turret-mounted spot light (part # B25): there is no instruction for
including a lens in the light, if that is really what is (on the other hand, if
this is not a spot light, then I guess there is no omission. Armor experts;
please enlighten me on this issue).
Suffice it to say that in numerous
|
CONSTRUCTION |
I followed the assembly
instructions to the letter, and, like all Dragon kits these days with optional
parts (and lots of them), I kept a pencil handy to mark off each completed step
to avoid later confusion and aid in returning to uncompleted stages if I chose
to
 move forward to another subassembly.
The first subassembly I completed was
the lower hull with its suspension system. Unlike most German armor, there are
only 6 road wheels on either side of the
I then moved to the upper
hull, and assembled all of the parts that comprise that subassembly, including
the hull-mounted tools (which I like to glue to the vehicle and then hand-paint
later). This included the various tools that are mounted on the rear deck lid.
Several of these had PE straps associated with them.
The next subassembly was the
turret. This involved the main gun as well as the various components for the
hull. The well-rendered .50 cal machine gun includes 8 different parts.
The final assembly process was to
mount the turret to the hull, and then to mate the upper hull with the lower
hull, after the tracks have been installed on the lower hull assembly.
|
COLORS & MARKINGS |
Once the kit was fully
assembled, I shot the entire model with Testors Model Master olive drab (I kept
the lower and upper hulls separated so I could make sure I got paint into all
the nooks and crannies). While this was drying, I painted the flex tracks with
Testors flat black and set them aside to dry.
 I then set out to brush-paint
all the tools and items such as the .50 caliber machineguns that are not OD. I
painted most of the tools with Testors steel and used tan for the wooden axe,
pick and shovel handles. I also hand-painted the rubber return rollers and the
road wheels with Testors flat black. Once everything was dry, I placed the upper
hull on the lower hull and gave the entire model several good coats of Testors
Glosscote. Once dried, I applied the excellent decals, which snuggled down
nicely with a liberal dose of Solvaset.
I then set out to brush-paint
all the tools and items such as the .50 caliber machineguns that are not OD. I
painted most of the tools with Testors steel and used tan for the wooden axe,
pick and shovel handles. I also hand-painted the rubber return rollers and the
road wheels with Testors flat black. Once everything was dry, I placed the upper
hull on the lower hull and gave the entire model several good coats of Testors
Glosscote. Once dried, I applied the excellent decals, which snuggled down
nicely with a liberal dose of Solvaset.
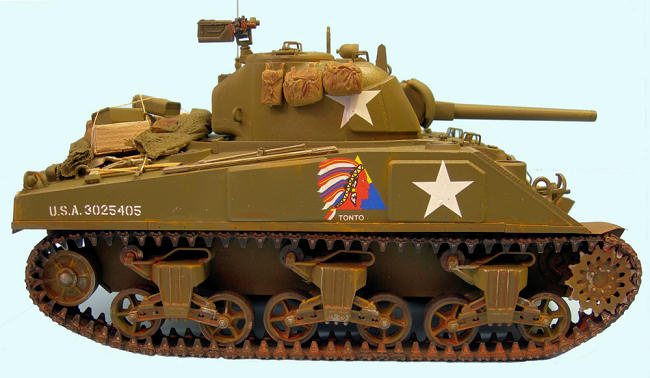
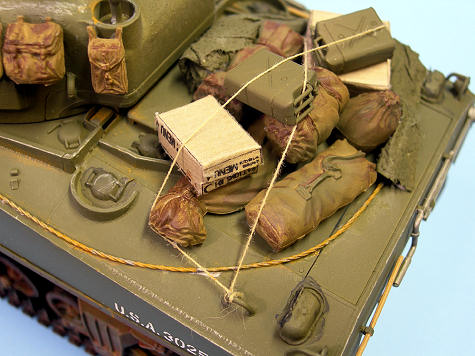
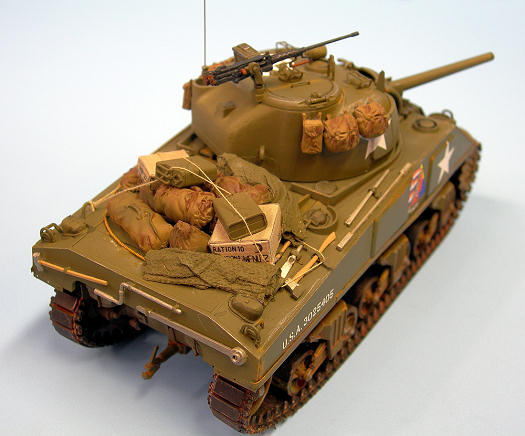
I drilled out the radio
antenna and super-glued a length of guitar wire to represent an aerial. I wanted
to represent the typical allied tank, so I needed topside equipment (ruck sacks,
sleeping bags, tarps, jerry cans, etc.) so I opted to purchase the excellent
Tamiya Allied Vehicle Accessories set (#35229). I painted various packs,
sleeping bags, etc. with Testors Khaki paint and others with OD. I also
assembled and painted two of the jerry cans out of the set. I used white glue to
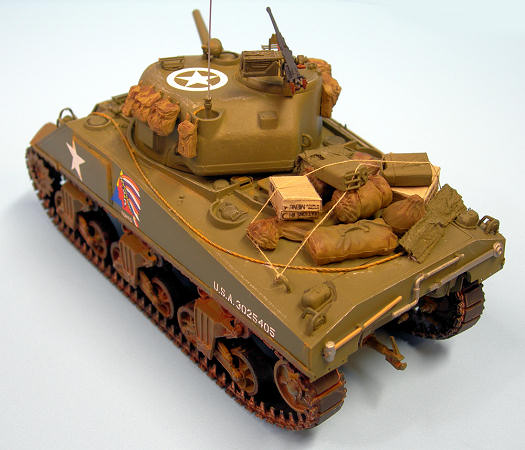
attach these items to the tank turret and hull once they were dry. I then took
some pieces of Kleenex and soaked them in diluted white glue, then rolled them
up like vehicle tarps. I placed these on the tank’s hull so they would dry in a
shape that would conform to their positioning on the tank. Once these dried, I
hand-painted them with Testors OD. I then assembled the tow cable, using the
steel wire supplied in the kit, attached it to the front towing hook, and then
draped it over the tank hull.
I used superglue to snug it down to the hull. As a final touch, I ran
some tan thread over the equipment on the rear deck to simulate the tank crew’s
attempt to secure all of this stuff.
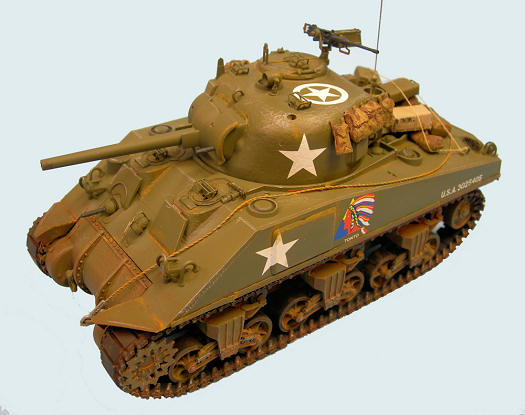
At this stage, I was ready to
do some weathering. I first applied a brown acrylic wash to the lower hull and
tracks. I used a black acrylic wash on the upper hull, and then highlighted
places on the tank with Floquil orange to simulate some rust. I then used a
paint brush to dust areas of the tank with tan artist’s chalk that I had ground
fine with a piece of sandpaper. The final step was to shoot the entire model
with Testors Dullcote.
|
CONCLUSIONS |
Another home run by
Dragon, and a real pleasure to build!
This
|
REFERENCES |
 “M4
Sherman,” Wikipedia, 2009.
“M4
Sherman,” Wikipedia, 2009.
“M4
3. Buckley, John, “British Armour in the
4. Culver, Bruce, “Sherman in Action,”
Squadron/Signal Publications, 1977.
If you would like your product reviewed fairly and quickly , please contact the editor or see other details in the Note to Contributors.
Back to the Review Index Page 2018