Accurate Miniatures 1/48 F3F-1
|
KIT # |
|
|
|
PRICE: |
$29.98 |
|
|
DECALS: |
Enough to do almost any F3F-1 |
|
|
REVIEW : |
||
|
NOTES: |
||
BUILDING ACCURATE MINIATURES' 1/48 F3F-1
To say that I was waiting with bated breath for the arrival of this kit is something of an understatement. It's been my favorite airplane ever since age 10 when I read an autobiography of a naval aviator, where he described his joy at flying the F3F, and I looked at the in-flight painting of it in the book's endpapers. I built the Monogram 1/32 kit when it first came out more than 35 years ago; I built the Rareplanes 1/72 vacuform when it came out some 23 years ago. When the F3F-1 and F3F-2 were announced by Accurate Miniatures in 1997, I was really happy. When I saw built-up kits at the IPMS National Convention in 1998, I wanted ten of each right then.
And then we waited. And then we waited some more. And we waited some more. Rumors flew right, left, straight up and straight down. Every time I talked to Bill Bosworth, he'd say, "just a few more weeks." It got to the point where - because I liked him personally as much as I do - I stopped asking.
Then they were announced. And there in my e-mail was a note from Bill that asked me to confirm my address, which I did immediately. Three days later the buzzer rang in my apartment and there was the mail man with a Priority Mail package. I opened it, looked at the kit, wiped off the drool and managed to put it aside until I finished the Claude. Often, when I get to the very end of a project, progress becomes very slow (for me). Not this time! By the next day, the Claude was finished and I could tear into the new kit like a ravening beast.
|
CONSTRUCTION |
 Anyone reading this review has likely been visiting the Accurate Miniatures website, and reading Bill's progress reports on building one of these kits. I think that is a very good idea on A-M's part; if you haven't visited there, you should before you start in on your kit. There are some other manufacturers who would profit from such a sales tactic. I have only one small detail to differ with "Modeler Bill" about, as regards the construction of the airplane.
Accurate Miniatures has gone to great lengths to make this kit into the biplane model for modelers who don't build biplanes, and they are to be commended for that. However, Parts 23 and 24 are so difficult that A-M has given a page over to describing how they got the parts into position. I managed to do it that way, and I only bent the gear legs a teensy tiny bit in accomplishing it; no problem in fixing that. Pete Chalmers, however, has presented a much better alternative, and I recommend it highly. Here it is:
Cut off the gear doors so that the hinges remain with the doors. Install the remaining pieces before you install the gear leg braces, then install the braces. Once the entire rest of the fuselage is glued together, including the engine and cowling, glue the gear doors in position. These should have been molded separately to begin with.
There, you now know my one reservation about this kit.
So far as my own construction was concerned, I painted all of the detail parts prior to assembly. The cockpit was painted aluminum lacquer; I used Model Master Aluminum (non-buffing) for this, under a coat of sealer.
I found, on applying the instrument panel decals, that the two upper instrument faces hadn't managed to make it onto the sheet, as well as two other instruments on smaller panels to either side of the cockpit. I went to my decal dungeon and took out a sheet of the ProModeler instrument panel decals, got the ones in the right size, and applied them. I probably took about two hours to do the cockpit, including paint drying time, working slowly and following the instructions.
The rest of the kit assembled exactly per instructions. It was so nice to be building a biplane model that didn't need any "fiddling with," as those of us who build in the genre regularly are so used to. I assembled the fuselage and tail, leaving the wings off at this point.
|
PAINT & DECALS |
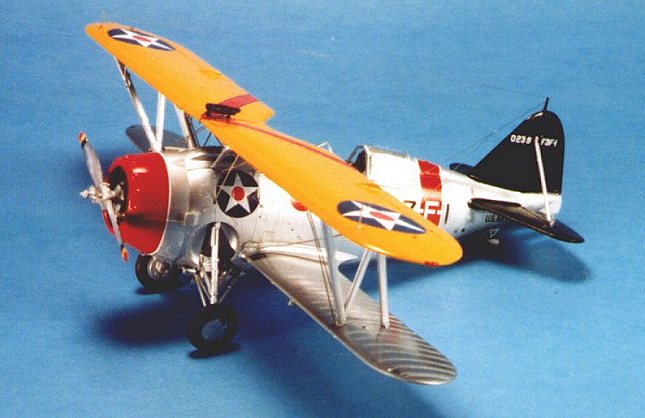
I had already decided I wanted to do the plane flown by the Commanding Officer of VF-7, aboard U.S.S. "Wasp" in 1939-40; they were the last Navy fighter squadron to equip with the F3F-1.

I started by painting the upper wing, which was done with Gunze-Sanyo H-24, "Orange Yellow;" this is a perfect match for the orange-yellow the Navy called "Chrome Yellow" during this period. I then painted the cowling and the fuselage "belly band" with Gunze-Sanyo H-86, "Red Madder." I finished by painting the vertical fin and horizontal stabilizers with Gunze-Sanyo H-2, "Gloss Black."
When all this was dry, I masked off the upper wing, and then shot the lower surface of the upper wing and both lower wings with SnJ Aluminum. I used this because it would not need to be sealed when dry, and I wanted a different "cast" to the aluminum dope used on the wings, as opposed to the aluminum lacquer used on the metal fuselage and struts.
With the wings finished and the different areas of the fuselage masked off, I shot the fuselage with Gunze-Sanyo "Mr. Color" aluminum. I let this dry, then shot a very light coat of Model Master Sealer on it to protect it during handling, and unmasked the other colors. The fuselage was then shot with a coat of Future overall, which gave the aluminum the look of polished lacquer. (Remember, these airplanes were maintained in immaculate condition.)
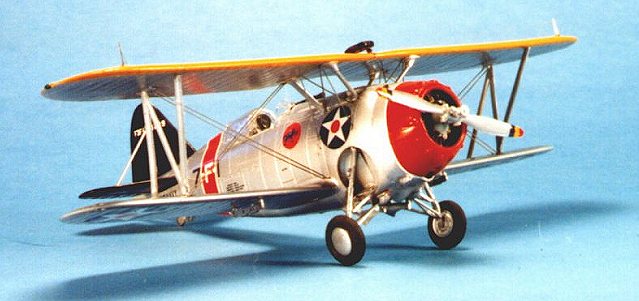
As Bill Bosworth put it, "If you have a photograph of an F3F-1, you can do that airplane with this kit using our decal sheet." He's absolutely right. The airplane I chose to do is in a photograph in "Grumman Biplane Fighters In Action." Almost all of the captions in this book provide the serial number of the airplane in the photo, in case you can't read it in the photo.
I used red decal stripes to make the upper-wing chevron. From the angle of the wing in the photograph, it is difficult to tell for sure if the chevron is edged at all, but to me it appeared dark enough on the edges that it was edged with black pinstriping, which I used from the kit. The nose band and belly band were edged with the white pinstripe. Since these airplanes were used on the "Neutrality Patrol" in 1940, they carried the additional national insignia on the forward fuselage, which the kit provides. Since none of the number or letter sets are one-piece except for the "F3F-1" designator on the rudder, take your time to be sure the decal is in proper position before you put solvent on it to seal it in place. These are excellent decals, and adhered perfectly with a bit of Micro-Sol.
|
FINAL ASSEMBLY |
 I followed the instructions for attaching the wings and had no problem accomplishing this. I attached the rudder bracing struts and the underwing bomb racks, and positioned the gunsight and windscreen. The airplane was now complete except for rigging.
Interplane wire bracing is the one big bugaboo that keeps most modelers from doing biplanes. To tell the truth, it is the one big bugaboo for modelers who do make biplanes. Fortunately, the F3F-1 is not a "birdcage," as, say, an S.E.5a or an F.E.2b would be; this is good for those who are doing their first biplane.
Accurate Miniatures were the first to provide photo-etch rigging for their model (at no extra cost, by the way). The cabane strut rigging fit perfectly into position with no problem. The interplane bracing is a bit more problematic, insofar as getting it into position. You must do the "outer" wires first, then the inners. This requires some fiddling. I think I might have actually had a harder time with this than a first-time biplane builder, since I was un-learning my own rigging technique to accomplish this. Beware that these wires are very thin and will bend easily. Treat them gently. Position the "outer" wires to the fuselage first, and let them find the proper attachment point at the outer "N" strut, to avoid bowing. With the "inner" wires, attach them to the "N" strut first, then to the cabane strut. I used C-A glue to position all these.
|
CONCLUSIONS |
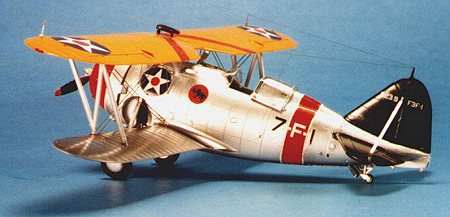 As you can see from the photographs, the model came together beautifully. As noted in the original in-box review, it has the best fabric-effect on the wings of any biplane model produced to date. The entire model is easy to do for anyone who considers themselves "intermediate" or above in skill level. I took about 10 working hours to complete mine, about one-half to one-third the time I usually spend on a biplane model. I am sure I'll do at least two more.
Copyright ModelingMadness.com. All rights reserved. No reproduction in part or in whole without express permission.
If you would like your product reviewed fairly and fairly quickly, please contact the editor or see other details in the Note to Contributors.2015