Dynavector 1/48 Supermarine Scimitar
|
KIT # |
? |
|
PRICE: |
@$55 |
|
DECALS: |
Three aircraft |
|
REVIEWER: |
|
|
NOTES: |
Vacuform multi-media kit |
|
HISTORY |
The Scimitar is the last fighter built by the famous Supermarine company, which earlier on had designed THE wonder : the Spitfire. Now I realize this is a very subjective opinion, but it is my subjective opinion, and those who disagree can go and get painted in their favourite RLM green.
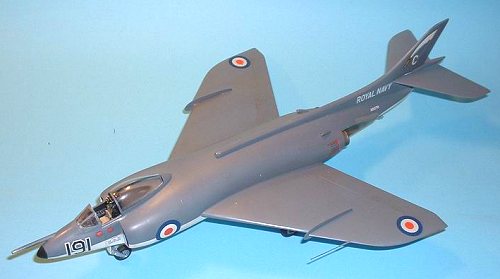
Intended as a naval interceptor, the Scimitar was a big twin jet (it is a bit longer than an English Electric Lightning), with a big thick swept back wing. The prototype had a straight wing and a butterfly tail, and looked vaguely like a Fouga which had taken too much steroids for breakfast.
 Alas, its thick wing and its non
afterburning Avon 202 turbojets forced it to remain subsonic in horizontal
flight (no mean feat, with more than 10 tons of thrust !) and made it inapt to
carry its intended role. It then became a strike aircraft, with four 30 mm
cannons and four under wing hard points, able to carry a nuclear weapon.
Alas, its thick wing and its non
afterburning Avon 202 turbojets forced it to remain subsonic in horizontal
flight (no mean feat, with more than 10 tons of thrust !) and made it inapt to
carry its intended role. It then became a strike aircraft, with four 30 mm
cannons and four under wing hard points, able to carry a nuclear weapon.
76 Scimitars were built, and 39 were lost, killing 9 pilots. It was an unbelievably noisy aircraft, fast on the deck, but short legged, with tremendous acceleration on take off, but its career, begun in 1958, lasted only 8 years. Unforgiving and difficult to operate, it was an exceptional aircraft for its time : fastest British jet when it entered service, it was the first plane using titanium in its structure, the first twin jet and the biggest single seater in the Royal Navy… And I’m forgetting a couple of things there !
Oh, I forgot… It was nicknamed « The Beast »…
|
THE KIT |
 As this is a pretty esoteric model, it
could only be found in vacform. Luckily, this is a Dynavector vacform. The
sturdy cardboard box includes two white plastic sheets for the fuselage, wings,
various doors and tailplanes, two vacformed canopies and a bag of white metal
parts for the wheels, the cockpit, auxiliary air intakes and the nozzles.
As this is a pretty esoteric model, it
could only be found in vacform. Luckily, this is a Dynavector vacform. The
sturdy cardboard box includes two white plastic sheets for the fuselage, wings,
various doors and tailplanes, two vacformed canopies and a bag of white metal
parts for the wheels, the cockpit, auxiliary air intakes and the nozzles.
The plastic parts have recessed panel lines, and the metal parts are quite nice, though they’ll need a bit of cleaning. The seat will be replaced by a resin one, as it is a bit rough.
Three decal options are on the sheet : two for operational squadrons, and the third for an experimental unit, light blue and white, rather ugly (go to Dynavector website, http://www.dynavector.co.jp and you’ll see that one. Yuck !).
|
CONSTRUCTION |
As it is usual with vacforms (er, yes, I know, this is only my second vac…), the first step is to get the parts ready. I followed Taro’s advice and didn’t use the sandpaper on the desk method, but used a sanding block (4 by 8 pine block) on which I stapled some wet and dry rough sandpaper. I cut the parts from the sheet, leaving a two or three millimetre margin, drew the contour with a greasy pencil and happily sanded the excess styrene from the parts. The upper fuselage half was given a 2mm thick card plate for strength.
 The two parts that make the tail are
home to the tailhook well. When you use your brain when modeling, you cut the
emplacement BEFORE gluing the tail parts together, install the well and close
the thing. I began by gluing the tail parts together, cut away the « door »,
made a hole inside the front end of the tail (which goes inside the front
fuselage) and slid the well inside. This is not exactly the elegant way, but it
works, so…
The two parts that make the tail are
home to the tailhook well. When you use your brain when modeling, you cut the
emplacement BEFORE gluing the tail parts together, install the well and close
the thing. I began by gluing the tail parts together, cut away the « door »,
made a hole inside the front end of the tail (which goes inside the front
fuselage) and slid the well inside. This is not exactly the elegant way, but it
works, so…
Test fitting the tail assembly to the fuselage let me foresee some puttying/sanding sessions, but that comes with the territory when you build vacs.
I made the holes for the cockpit and the front wheel well, and drilled the cannon troughs, inserting metallic tubing there.
The front wheel well is installed without any problem. The cockpit tub is painted tire black, as are the metal parts that go inside the cockpit. The instrument panel and side consoles are dry brushed with white, and some colour spots are made here and there. The instruments receive a drop of Clearfix.
The stick and the seat wait until the end of assembly.
Before gluing the windscreen, I made a small rectangle out of transparent plastic as the gunsight.
Before you close the fuselage, and if you don’t want to use the kit seat, you’ll have to put some weight inside the nose. I didn’t, and got a tail sitter, so I had to make a hole in the rear cockpit bulkhead, and slide various metal bits inside. This is not very funny on an almost completed kit !
Wings were rather interesting, in a Chinese way (as in the curse : « May you live interesting times »).
 The fuselage sides have protruding bits
around which the wings are supposed to go. Well, on my kit, they didn’t. I
removed the bits, made spars with thick plastic sheet, glued the wings on, and
spent a whole putty tube to hide the resulting gaping holes. I must have goofed
somewhere, but I can’t see where. Well, I’ll live…
The fuselage sides have protruding bits
around which the wings are supposed to go. Well, on my kit, they didn’t. I
removed the bits, made spars with thick plastic sheet, glued the wings on, and
spent a whole putty tube to hide the resulting gaping holes. I must have goofed
somewhere, but I can’t see where. Well, I’ll live…
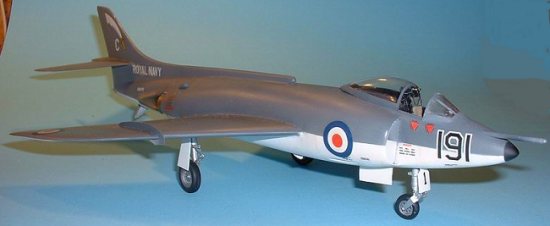
The rest of the assembly was a concerto for putty and sandpaper : the dorsal fin, the tailplanes and the air intakes don’t join that well. The intakes were painted white, with the fuselage extra dark sea grey and white. The back of the intakes was painted black, and I shaded the sides to give an illusion of depth.
I used the wing fence parts as templates and made new fences out of thin plastic sheet. I glued the fences and blended them using Mr Surfacer.
The canopy is reasonably thick and very transparent. I removed it from its backing sheet, separated the wind screen from the bubble and masked the windscreen. I glued it in place then puttied the seam lines between it and the fuselage.
|
PAINT & DECALS |
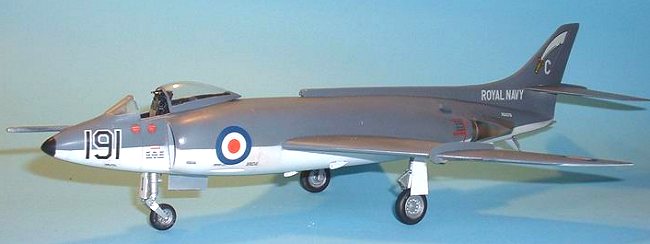
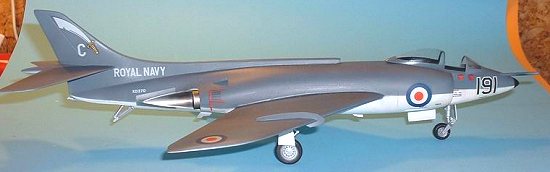
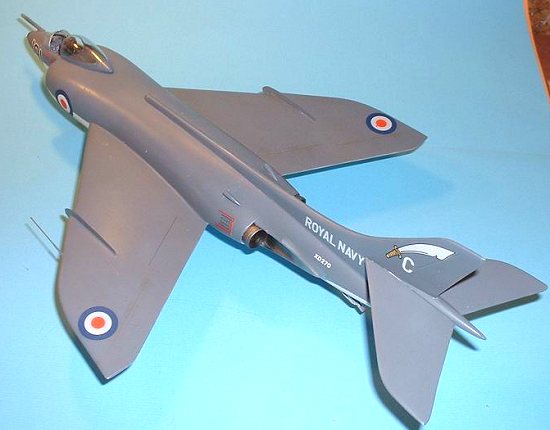
This might be the easiest part ! Top is extra dark sea grey, bottom is gloss white. Beware of the decals, though. They’re thick and transparent. I made white circles on their emplacement on the fuselage, but forgot to make these circles on the wings (me stoopid).
I chose the 803 NAS option, with the Scimitar on the fin. The decals react well to softening solutions, but quite a lot of gloss coats will be needed to blend them in.
 As FAA planes tended to be rather clean,
I chose to weather very lightly my model, with a light wash of brow artist oil
diluted with lighter fluid.
As FAA planes tended to be rather clean,
I chose to weather very lightly my model, with a light wash of brow artist oil
diluted with lighter fluid.
I detailed the landing gear legs with the help of pictures I found on Damien Burke’s excellent site http://www.thunder-and-lightnings.co.uk.
I painted the wheel wells aluminium, as well as the gear legs, the hook and the interior of the tail bumper. Tires were painted Gunze tire black.
The protection plates around the nozzles were first painted Alclad II aluminium. I made thin vertical stripes with Alclad II Pale Burnt Metal there, then alternated with Alclad II stripes. Then, I gave the area a very thin coat of Jet Exhaust. The nozzle exteriors were given the same treatment and the interiors were painted Jet Exhaust.
All doors are gloss white outside and aluminium inside, and are glued at that time.
Finally, I drilled a hole in the right leading edge and made a pitot tube with metal tubing.
|
CONCLUSIONS |
This bird is big, brutish looking, and a perfect illustration of the Fleet Air Arm in the late fifties. You seldom see such a model, either on contest tables or in magazines. As the model is good, even if a little bit more work intensive than the Wyvern from the same company, go for it !
Now, my main problem with vacs is choosing the next I’ll build. The Gannet or the Sea Vixen ? Anyway, now I’ve been bitten by the vac bug, I’ll gladly stay intoxicated !
Copyright ModelingMadness.com. All rights reserved. No reproduction in any form without express permission from the editor.
If you would like your product reviewed fairly and fairly quickly, please contact the editor or see other details in the Note to Contributors.