Hasegawa 1/72 TF-102A Conversion
| KIT #: | ? |
| PRICE: | $? |
| DECALS: | Probably two options |
| REVIEWER: | Martin Pohl |
| NOTES: | Xtraparts TF-102 conversion |
| HISTORY |
 revised
aircraft, designated YF-102A flew on
revised
aircraft, designated YF-102A flew on
To train F-102A
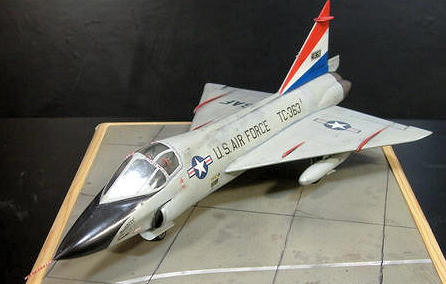
pilots, the TF-102A trainer was developed, with 111 eventually manufactured. The
aircraft was fitted with a side-by-side cockpit to facilitate ease of pilot
training. This required a redesign of the cockpit and nose incorporating a set
of vortex generators on the top of the cockpit to prevent flow separation under
certain circumstances, and repositioning of the intake ducts. Despite the many
changes, the aircraft was combat-capable, although this variant was predictably
slower, only reaching subsonic speeds in level flight.
| THE KIT |
 I used
the very old Hasegawa kit – I guess it is the first issue of the F-102 of Hase
in the very old boxing. I dont't think I have to go in detail on this one.
(For those who'd like to see what the kit looks like,
visit this
preview. Ed) As conversion kits a I had the all VAC formed by Airmodell
and the Xtra Parts conversion set. I decided to use the Xtra Parts set, cause
the Airmodell one just comes in two front halfs and the canopy, so all cockpit
interior has to be done by scratch then. The Xtra Parts set comes with two
injection molded front halfs, two white metal ejector seats, two white metal
intakes and VAC formed cockpit details and front landing gear housing plus
decals with the numbers “0-41267”.
I used
the very old Hasegawa kit – I guess it is the first issue of the F-102 of Hase
in the very old boxing. I dont't think I have to go in detail on this one.
(For those who'd like to see what the kit looks like,
visit this
preview. Ed) As conversion kits a I had the all VAC formed by Airmodell
and the Xtra Parts conversion set. I decided to use the Xtra Parts set, cause
the Airmodell one just comes in two front halfs and the canopy, so all cockpit
interior has to be done by scratch then. The Xtra Parts set comes with two
injection molded front halfs, two white metal ejector seats, two white metal
intakes and VAC formed cockpit details and front landing gear housing plus
decals with the numbers “0-41267”.
| CONSTRUCTION |
This was my first
conversion, so where to start, the complete build lasted for more than one year
with a lot of sitting aside, cause of “I can't see this anymore” of the builder.
So the here following is the story of my try and error, so most if not all of
the following are just problems above keyboard :).
 At first
step I thought it could be build like a typical plane; prepare the parts, put
together the cockpit interior and paint it, glue the complete cockpit to one
fuselage half and so on – but this
was not possible. The pit interior was too narrow to fit in the front halves of
the Xtra Parts set. So I - well you can say - glued it into one half and then
glued the second half to it to complete the front. This then meant painting the
pit inside the fuselage. The canyons on both sides between the pit and the
fuselage I then filled with dental wax, cause this easier to get in shape, when
inside.
At first
step I thought it could be build like a typical plane; prepare the parts, put
together the cockpit interior and paint it, glue the complete cockpit to one
fuselage half and so on – but this
was not possible. The pit interior was too narrow to fit in the front halves of
the Xtra Parts set. So I - well you can say - glued it into one half and then
glued the second half to it to complete the front. This then meant painting the
pit inside the fuselage. The canyons on both sides between the pit and the
fuselage I then filled with dental wax, cause this easier to get in shape, when
inside.
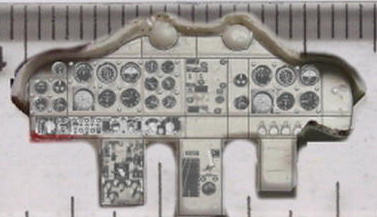
The VAC formed
instrument panel is really nice; there a lot of sinks for most of the
instruments. I've closed them all, cause to paint those instruments when the
panel is already inside the cockpit is impossible, at least for me. So I've done
a decal for the instruments. This I made from a scanned image.
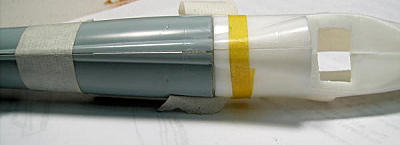 “The
first cut is the deepest” I've learned from Rod Steward or Sheryl Crow and in my
case at the wrong place. I cut the Hasegawa fuselages about 6mm too wide to the
rear. So that meant to do a second cut and then fill everything. After all that
filling and sanding the existence of things like panel lines are only
theoretical. But then came the weapon bay – oh dear – There were gaps, no ,
canyons again, everywhere. To shorten this; I've learned a lot about dental wax
and its opportunities and the guy who sold me the wax learned that he can sell
wax to scale modelers too.
“The
first cut is the deepest” I've learned from Rod Steward or Sheryl Crow and in my
case at the wrong place. I cut the Hasegawa fuselages about 6mm too wide to the
rear. So that meant to do a second cut and then fill everything. After all that
filling and sanding the existence of things like panel lines are only
theoretical. But then came the weapon bay – oh dear – There were gaps, no ,
canyons again, everywhere. To shorten this; I've learned a lot about dental wax
and its opportunities and the guy who sold me the wax learned that he can sell
wax to scale modelers too.
 The rest
of the construction went OK if one keeps in mind that I was working with a 20 or
even 30 year old Hasegawa kit – a lot of filling and sanding.
The rest
of the construction went OK if one keeps in mind that I was working with a 20 or
even 30 year old Hasegawa kit – a lot of filling and sanding.
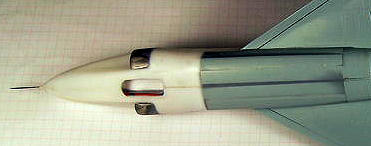
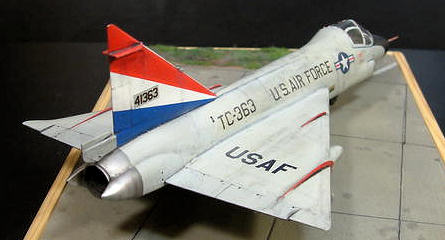
When looking at
detail pictures of a TF-102 one can see so called vortex generators attached to
the canopy, cause without those vortex generators the canopy started shaking at
higher speeds. Needles to say, those you have to do yourself. So I cut 0.8mm
wide stripes of thin aluminum, then cut about 2.8 long
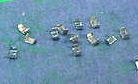 pieces of
that and bend those. The first set I glued into place after I have masked the
canopy. Because of all the handling during the painting and weathering process I
lost all but one. Guess what; yes I've also learned a lot of cutting and bending
aluminum.
pieces of
that and bend those. The first set I glued into place after I have masked the
canopy. Because of all the handling during the painting and weathering process I
lost all but one. Guess what; yes I've also learned a lot of cutting and bending
aluminum.
So, to end this
wining, the main problem here was not the Hasegawa kit or the Xtra Parts
conversion set, it was a failure in preparation and planning on my side.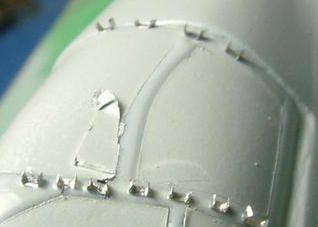
For all doing this
too I'd recommend the following:
The white metal
intakes are in one piece which give no room for deepness. It probably would be a
good idea to use those for forming new intakes in two pieces.
Cut the cockpit
interior a little wider then seen on the VAC formed part (about 2mm on each
side), then you don't have the problems to fill all the gaps.
The instruction of the Xtra Parts are a little misleading for the main cut. If you look better to the references (than me) you can see the weapon bay is carried by a TF-102 too. This saves a lot of filling and sanding.
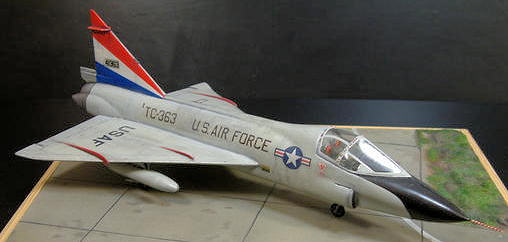
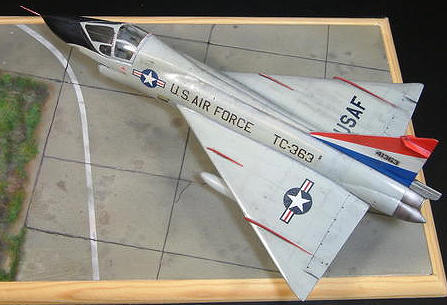
| COLORS & MARKINGS |
When I was searching
the net for information and pictures for the TF-102 I came across a picture
showing the TF-102 “Bubbles” assigned to the 32nd FIS at Soesterburg
AB, Netherlands in 1963. One of the main advantages here is, it carry the old
style wing, so there is no need to convert the wing too.
 I didn't
have the typical gray all those F-102 and TF-102 were carrying, so I mixed it
myself. Nor did I have all the decals needed, even the decals coming with the
Hasegawa kit were useless, cause the disintegrated when got wet. So all decals
are self made too.
I didn't
have the typical gray all those F-102 and TF-102 were carrying, so I mixed it
myself. Nor did I have all the decals needed, even the decals coming with the
Hasegawa kit were useless, cause the disintegrated when got wet. So all decals
are self made too.
The fin is painted
too, cause this I find easier then doing it with a decal.
Well in the end the
US insignia placed near the cockpit a slightly out of place, but at that point I
didn't want to redo that again – I can live with it.
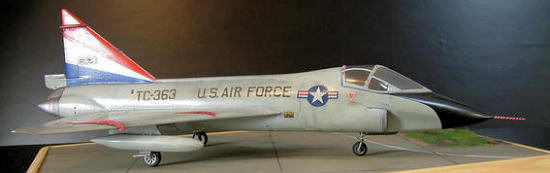
All the pictures (in
the end it were three) showed
Bubbles very weathered and flaked off color in the middle section of the
fuselage. So I decided to test the so called salt method. So after 3 base coats
to level everything a coat of silver was sprayed here. Then the salt was applied
– well this won't be my method doing this, you get you bird wet an then apply
the salt and repeat that for 30 times unit enough salt decided to stay there. OK
after this ZEN therapy of applying salt to an 1/72 airframe, the main color is
sprayed. Then the typical gloss cote for the decals and now it's time for the
truth; get rid of the salt, take the plane into water and rub the salt away –
well I got rid of the salt and the decals too – so,
 notice
to myself: before washing the salt of, get a second sealing coat on top of the
decals.
notice
to myself: before washing the salt of, get a second sealing coat on top of the
decals.
| CONCLUSIONS |
So, does anyone need
this conversion, I don't know. It's a lot of work for something sitting in the
shelf in the end, but that's what scale modeling is all about, right? If you
want to do a TF-102 and can find the Xtra Parts set, take it, cause with the
Airmodell. it is for sure more work. I haven't seen that much TF-102 in 1/72 but
those I've seen were all made with the Xtra Parts set.
| REFERENCES |
Convair F-102 Delta Dagger by Wayne Mutza, Schiffer Military History Book and the internet.
April 2010
If you would like your product reviewed fairly and quickly, please contact me or see other details in the Note to Contributors.