Trumpeter 1/48 RA-5C Vigilante
| KIT #: | 02809 |
| PRICE: | $99.95 MSRP |
| DECALS: | Two options |
| REVIEWER: | Lee Kolosna |
| NOTES: | Nautilus Models internal bracing, Aires engine exhausts, Black Box ejection seats |
| HISTORY |
The North American A3J Vigilante began its career as a long range, high speed nuclear attack bomber. In the 1950s, the Navy wanted to insure it had the capability to deliver atomic weapons from carriers, lest the Air Force be the sole owner of that mission. The AJ Savage and the A3D Skywarrior fulfilled that role, although both aircraft were subsonic. With the Vigilante, the Navy was able to deliver a Mark 28 weapon within a 685 nautical mile radius. One unique feature of the A3J was an internal bomb bay that featured ejection of the weapon rearward through a tunnel between the two GE J79 engines. Extra fuel cells were also incorporated in “stores train” surrounding the weapon to extend range without refueling.
The first Vigilantes deployed operationally in 1962.
In the renaming of all US military aircraft that same year, the A3J became
known as the A-5. By then the Navy’s primary nuclear delivery mission
had transferred to the submarine fleet and their Polaris ballistic missiles,
which meant that the Vigilante had become an airplane without a clear
purpose. Its high speed
 performance
was still impressive, faster than the F-8 Crusader and the F-4 Phantom, so a
new mission was rendered: supersonic reconnaissance. A-5As and Bs were
remanufactured by North American at their Columbus, Ohio plant as RA-5Cs,
along with a few dozen new builds. A large “canoe” was added to the
underside of the fuselage that contained several cameras and surveillance
gear. The internal weapons bay was utilized to store even more fuel
and the rear cap was permanently affixed. Photoflash pods for
nighttime illumination could be fitted on each wing, but these were rarely
used. Four under-wing pylons could be mounted to carry atomic weapons
externally, but these were never utilized operationally (thank goodness).
performance
was still impressive, faster than the F-8 Crusader and the F-4 Phantom, so a
new mission was rendered: supersonic reconnaissance. A-5As and Bs were
remanufactured by North American at their Columbus, Ohio plant as RA-5Cs,
along with a few dozen new builds. A large “canoe” was added to the
underside of the fuselage that contained several cameras and surveillance
gear. The internal weapons bay was utilized to store even more fuel
and the rear cap was permanently affixed. Photoflash pods for
nighttime illumination could be fitted on each wing, but these were rarely
used. Four under-wing pylons could be mounted to carry atomic weapons
externally, but these were never utilized operationally (thank goodness).
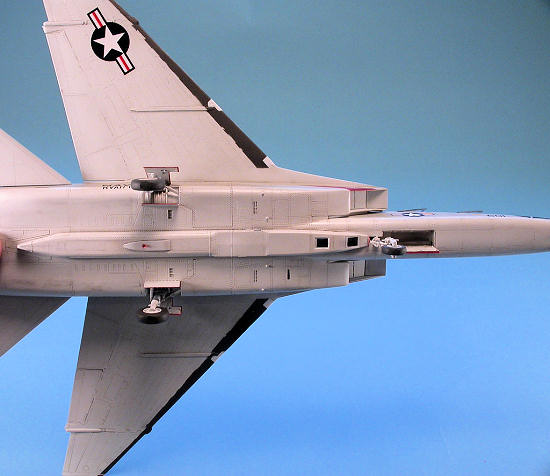
The re-missioned Vigilante became a very capable -- if not particularly reliable -- reconnaissance platform and was used extensively by the Navy during the conflict in Vietnam. It was employed in the extremely dangerous mission of post-strike damage assessment. The Vietnamese anti-aircraft gunners came to expect a flyby of a recon aircraft very shortly after a bombing mission, so they were able to train all their weapons on the lone Vigilante streaking through the sky taking pictures. 18 RA-5Cs were shot down while performing this role, which accounted of the highest loss rate, percentage-wise, of all US Navy aircraft that operated during the war. The aircraft was quite sophisticated and required intensive maintenance, with a reputation as a Hanger Queen. It was also quite a handful to fly, particularly during carrier landings. As soon as US involvement in Vietnam was over, the Navy began to retire the aircraft, with the last one leaving the fleet in 1979.
| THE KIT |
This subject topped every single “most wanted aircraft kit” surveys done for years before finally coming to fruition, courtesy of Trumpeter. Modelers were excited when the announcement was made, but wary because of Trumpeter’s spotty reputation for missing details and getting shapes wrong. When the kit was released, initial reviews were mixed. Not too long afterwards, the first set of builds revealed a number of construction and accuracy issues. The aftermarket sprang into action and numerous items became available to make a more detailed and accurate model. There are a lot of things wrong with Trumpeter’s depiction of the RA-5C, which I will try to summarize succinctly:
Overall shape -- The kit best depicts a 1516XX series Vigilante. The air intakes have the leading edge extensions of later RA-5Cs, but the engines and tail cone are more accurate for an early Vigilante. Trumpeter did not capture the correct profile for the pronounced hump of the rear fuselage as it blends into the wings and the canopy hatches do not have the correct fluted edges. The late Cutting Edge Models made a number of resin correction sets for the kit, but all of these are out of production and still didn’t address the shape issue of the forward fuselage.
 External
stores -- Trumpeter provides photoflash pods for both wings.
In the few instances where this was used (during night missions it
made the aircraft very visible to enemy AAA gunners), only one pod was
carried under the port wing. The
kit provides the four pylons and four nuclear weapons to mount on them.
Put these in the spares bin as neither the
pylons nor the weapons were ever used operationally.
External
stores -- Trumpeter provides photoflash pods for both wings.
In the few instances where this was used (during night missions it
made the aircraft very visible to enemy AAA gunners), only one pod was
carried under the port wing. The
kit provides the four pylons and four nuclear weapons to mount on them.
Put these in the spares bin as neither the
pylons nor the weapons were ever used operationally.
Wings -- Like many Trumpeter kits, all of the control surfaces are provided separately and are intended to be mounted in the down position. The problem is that a Vigilante at rest has all the flaps and slats up in a neutral configuration. Modelers also unfortunately report that like other Tumpeter kits, the flaps and slats don’t fit very well in the up position, with the individual pieces being thicker than the wing they attach to. The modeler can chose to pose the model with the wings either folded or open. The same is true for the tail.
Cockpit -- Detail isn’t too bad, actually. Trumpeter provides acetate film pieces for the instruments to be sandwiched between two plastic pieces. The effect is not very noticeable with such tiny dials. Black Box made a resin cockpit replacement that provides a little more detail, but it is by all accounts a challenge to install (Black Box even admits this in their instruction sheet). There is no detail underneath the large canopy pieces, in addition to their incorrect shape as mentioned above. A gunsight is provided in the kit, but this should be left out as it was removed on all RA-5Cs.
Engines -- Another Trumpeter trademark, you get two complete J79-GE-8 engines, which of course cannot be seen once installed inside the model. Later 155XXX and above models featured a J79-GE-10 engine.
Intakes: There is nothing beyond the front of the intakes – just hollow space. Aftermarket intake trunks were made by Cutting Edge Models, if you can find them. Again, the intakes are more accurate for a later Vigilante, with the leading edge extensions and the straight inlet edge.
 Tail
cone -- The shape of the cone is accurate for earlier series RA-5Cs, those
with bureau numbers in the 148XXX series.
Cutting Edge Models made a cone that is better for the 156XXX
series aircraft, but again these are long gone.
Tail
cone -- The shape of the cone is accurate for earlier series RA-5Cs, those
with bureau numbers in the 148XXX series.
Cutting Edge Models made a cone that is better for the 156XXX
series aircraft, but again these are long gone.
Vertical stabilizer -- The shape of the tail piece is incorrect in profile, with the trialing edge erroneously being higher than the leading edge. This is an easy fix, which can be done by cutting a wedge shaped from the top of the tail and sanding to smooth it out.
Kit engineering -- Besides not providing any intake trunking or even blanking plates, Trumpeter chose to mold the fuselage pieces in left and right halves, a serious mistake in terms of structural integrity. With the Vigilante being such a wide and flat airplane, there simply is nothing to prevent serious flexing of the top and bottom of the fuselage. Instead, they should have made a top and bottom rear fuselage section and a separate left/right front nose section to be mated to the back, designed like just about every F-14 and F-15 model kit. Nautilus Models makes a wooden internal bracing structure that can be used to beef up the kit structure. It works fairly well, but a modeler can also provide their own bracing using cut pieces of sprue and sheet styrene along the join line to provide the necessary strength.
Detail -- Unfortunately, Trumpeter’s Mad Riveter had a hand in the design of this kit. There are divots all over the model to depict the flush rivets on the real aircraft, although they are rather small in size and depth and not nearly as bad as those seen in Trumpeter’s 1/32 scale kits. Traditional panel lines are few. There are also mold flaws on the fuselage pieces, and after reading various build reviews, these seem to appear in different places on each kit. My kit had a ridge built up on the left front of the fuselage, roughly aligning with the demarcation line between the gray and the white camouflage paint. I was able to sand this down without removing much of the surrounding detail. There were also plastic flow lines on the after end of the fuselage starting at the trailing edge of the wing.
So, we have a model that is inaccurate, covered in
divots, has tons of expensive aftermarket items that still don’t fully
 correct
the profile issues, is quite pricey for a 1/48 scale jet, and is poorly
engineered. Sounds like something
everyone should take a pass on. I’m
sure that’s why we didn’t see the rush to build this “most wanted” kit that
we should have given all the pre-release hoopla.
correct
the profile issues, is quite pricey for a 1/48 scale jet, and is poorly
engineered. Sounds like something
everyone should take a pass on. I’m
sure that’s why we didn’t see the rush to build this “most wanted” kit that
we should have given all the pre-release hoopla.
But….the Vigilante is a cool-looking airplane, no doubt. It served during the height of the US Navy’s colorful high-visibility period, so there are lots of great markings options, and it still theoretically heads the list of desirable subjects in our little corner of the modeling community. I have fond memories of the ancient Monogram kit in 1/72 scale with its working bomb ejection mechanism that I used to terrorize my mother and the family cat back in the 1960s. Besides, how many collections have supersonic US Navy reconnaissance airplanes in them? Not many, I can say for sure.
A modeling buddy of mine bought one when it came out, and he dutifully got all the aftermarket items that were available. I would periodically tease him and ask how the project was going, knowing full well that it was sitting alone in his large stash of kits, slowly depreciating. When my friend finally came to the conclusion that it had to go, I arranged for a trade and the Vigilante and all its related items became my possession. Intrigued by the subject and the controversy surrounding the kit, I decided to take a stab at it and see for myself.
| CONSTRUCTION |
My first order of business was to determine what aftermarket items I would
incorporate into the project. I had read from the dire warnings of
other modelers that the kit really shouldn’t be built without the Nautilus
Models wooden bracing structure, so that was constructed with carpenter’s
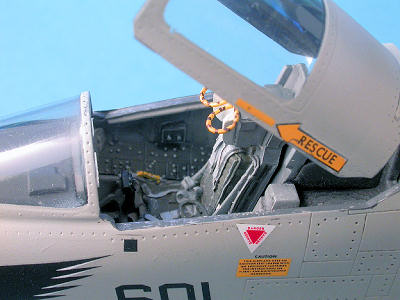
glue and set aside. A Black Box resin cockpit set was compared to the
kit pieces and I saw that it wasn’t orders of magnitude better, so I chose
to use the kit tub and instrument panels but chose the Black Box ejection
seats, which are far superior to the kit offerings. This also avoided
the aforementioned difficulty of getting the Black Box cockpit
 to fit
inside the fuselage. I got an Eduard color photo-etch cockpit set in
the deal as well. The color instrument panels look great, but as so
often the case with Eduard, the colors they used don’t come close to
matching the proper color for the surrounding cockpit. In this case,
Eduard’s choice for Dark Gull Gray is much too light. I reluctantly
discarded that set and again went with the kit pieces. A Cutting Edge
seamless resin intake was also acquired, but it was for an early RA-5C so I
decided against using it. Also, using just the seamless trunks would
require tearing up the Nautilus bracing and I frankly didn’t feel like
tackling that headache. Aires resin exhausts were included in the deal
and those looked very good so they got the approval for use. I got two
decal sheets and decided on a scheme for a late RA-5C from the 156xxx
series. That made the tail cone incorrect but there is no way to
correct that without finding the out of production Cutting Edge piece, so I
just didn’t mess with it.
to fit
inside the fuselage. I got an Eduard color photo-etch cockpit set in
the deal as well. The color instrument panels look great, but as so
often the case with Eduard, the colors they used don’t come close to
matching the proper color for the surrounding cockpit. In this case,
Eduard’s choice for Dark Gull Gray is much too light. I reluctantly
discarded that set and again went with the kit pieces. A Cutting Edge
seamless resin intake was also acquired, but it was for an early RA-5C so I
decided against using it. Also, using just the seamless trunks would
require tearing up the Nautilus bracing and I frankly didn’t feel like
tackling that headache. Aires resin exhausts were included in the deal
and those looked very good so they got the approval for use. I got two
decal sheets and decided on a scheme for a late RA-5C from the 156xxx
series. That made the tail cone incorrect but there is no way to
correct that without finding the out of production Cutting Edge piece, so I
just didn’t mess with it.
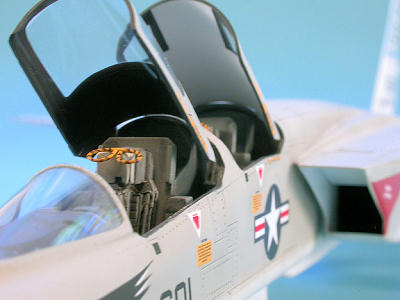
The cockpit was painted Dark Gull Gray FS36231 overall with flat black decking. The ejection seats were painted Dark Gull Gray as well with Olive Drab cushions, Medium Gray harnesses, and an off white headrest. Ejection face curtain loops were made from wire and painted yellow with striping applied with a fine point black Sharpie marker.
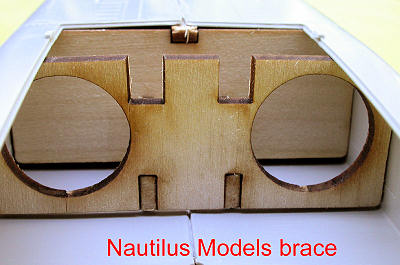 The fuselage halves were glued together, trapping the Nautilus wood brace
inside. It gives good support to the bottom seam, but the top is still
not fully supported and flexes quite a bit towards the rear where the
vertical stabilizer attaches. Still, it’s a worthwhile investment for
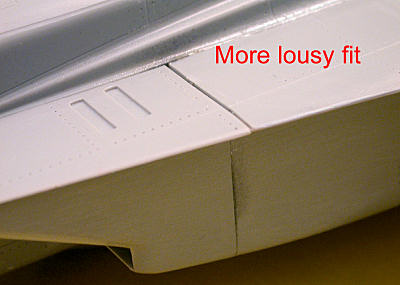
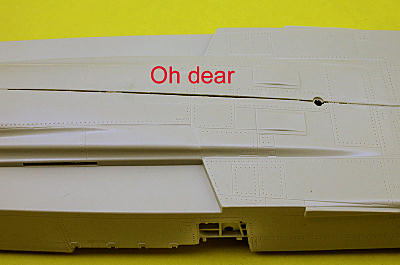
a very reasonable cost. The fit of the fuselage halves was not very
good, with large gaps present on both the top and bottom. In fact,
this whole kit doesn’t fit very well, which I find inexcusable for a modern
kit designed with CAD tools. These seams were filled with my normal
process of thick CA glue, followed up with Mr. Surfacer 1000. At least
the panel lines were fairly easily restored with rescribing. The rear
tail piece also fit poorly and required a lot of filling and sanding.
The fuselage halves were glued together, trapping the Nautilus wood brace
inside. It gives good support to the bottom seam, but the top is still
not fully supported and flexes quite a bit towards the rear where the
vertical stabilizer attaches. Still, it’s a worthwhile investment for
a very reasonable cost. The fit of the fuselage halves was not very
good, with large gaps present on both the top and bottom. In fact,
this whole kit doesn’t fit very well, which I find inexcusable for a modern
kit designed with CAD tools. These seams were filled with my normal
process of thick CA glue, followed up with Mr. Surfacer 1000. At least
the panel lines were fairly easily restored with rescribing. The rear
tail piece also fit poorly and required a lot of filling and sanding.
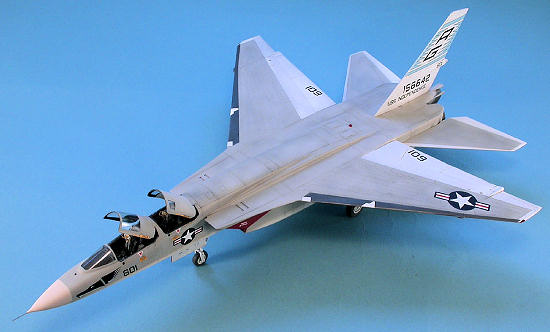
The reconnaissance canoe covers a huge seam on the bottom of the model. Unfortunately, there is no detail whatsoever behind the four camera windows, so I glued them in and sprayed them dark gray from their back side.
Having read so much about the problem fitting the control surfaces to the wings, I decided to do things a little differently. Since I wanted the slats and flaps retracted and the wings unfolded, I glued all the top pieces of the flaps and slats to the top piece of the wing, and followed up by gluing the bottom pieces to the bottom wing piece. This effectively made for a traditional wing assembly structure of one large top piece and one large bottom piece. All in all, this worked fairly well. Since there are only butt joins between the control surfaces and the wing itself, it’s a little fragile, but it avoided the issue of the wing being thinner than the pieces that attach to it and having to deal with that mismatch through extensive sanding.
 I glued the wings to the fuselage assembly and found two issues. First,
large gaps were present in the wing roots. Second, there was a very
pronounced wing droop present from the root to the wingtip, which is not the
case with the real aircraft. The gaps were taken care with old
fashioned seam filling and sanding. To bring the wings back to 0
degrees of dihedral, I dipped each wing in a large pot of almost boiling
water for a few seconds and gently bent them back into the proper position.
I glued the wings to the fuselage assembly and found two issues. First,
large gaps were present in the wing roots. Second, there was a very
pronounced wing droop present from the root to the wingtip, which is not the
case with the real aircraft. The gaps were taken care with old
fashioned seam filling and sanding. To bring the wings back to 0
degrees of dihedral, I dipped each wing in a large pot of almost boiling
water for a few seconds and gently bent them back into the proper position.
A mentioned above, the tail piece should be cut at the top to reflect a gentle slope downwards, instead of upwards. I also glued the tail pieces together on each half before gluing each side together.
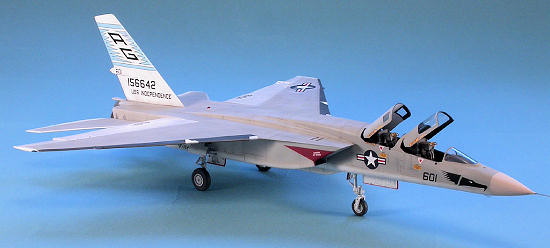
The nose cone and the refueling probe doors were glued in the closed position. The Vigilante has such elegant lines so I didn’t want to ruin them with exposed guts. Of course, this left gaps that needed to be filled and smoothed. I glued on the air intakes and encountered the largest gaps of the entire project that had to be dealt with.
Navigation lights were added to the wing tips using pieces of clear red and green resin. I used a straight pin to replace the kit pitot tube in the nose because this part always seems to get broken during later assembly.
With major construction completed, I washed the model, rechecked the seams, rescribed panel lines obliterated by the seam filling process, and prepared it for painting.
| COLORS & MARKINGS |
The undersides, wheel wells, vertical stabilizer, upper
wing control surfaces, and landing gear were painted with Polly Scale Flat
White. The topside was painted with Testors Acryl Light Gull Gray FS
36440. I diffused the gray to avoid the monotone effect by randomly
spraying lighter and darker grays, blending them back in with a thin
overcoat of the base Light Gull Gray. The radome was painted with a custom
mix of ten parts white and one part tan. The leading edge slats were
painted with Corroguard on the real aircraft, so I used Testors Metalizer
Burnt Metal as a reasonable approximation. The painting of the tail
cones on A-5s varied greatly from the aircraft to aircraft. In the
photo I have of the aircraft I modeled, the tail cone was unpainted, so I
used Alclad Dark Aluminum. The exhaust pieces were painted with Alclad
Jet Exhaust a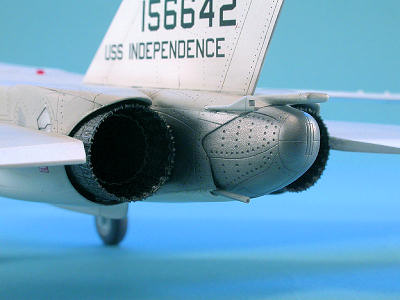 nd
heavily weathered with a black wash, dark gray pastels, and a rub of
graphite from a pencil.
nd
heavily weathered with a black wash, dark gray pastels, and a rub of
graphite from a pencil.
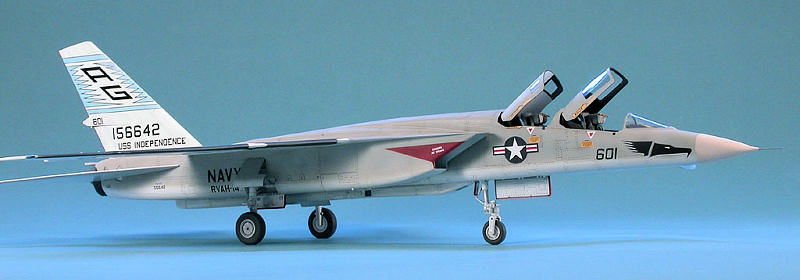
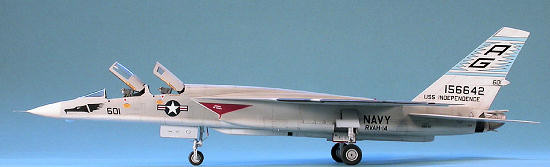
Several thin coats of Future floor polish prepared the model for decals. I chose a scheme for Bureau number 156642 from RVAH-14 as deployed aboard the USS Independence. The decals came from a special sheet issued to attendees of the 2005 IPMS/USA Nationals contest by Aerospace Modeler Magazine, another item that was provided in the deal I made for the kit. The decals went on the model fairly well, although the top wing national insignia just wouldn’t lie down flat so I stripped it off and replaced it with a decal from an AeroMaster sheet. I also had a problem with the air intake warning triangles, which developed quite a few wrinkles that wouldn’t go away with the application of Micro Sol. I gently sanded the wrinkles off and sprayed Insignia Red to cover up the damaged area. There was a bit of silvering around a number of decals that was first dealt with a slathering of Micro Sol, followed up by some deft airbrush work around the more stubborn silvered spots. Another coat of Future sealed the markings. Polly Scale Flat Clear was applied to the gray portions of the camouflage, with the white areas remaining a semi-gloss.
The decals are missing the number 1 from the start of the Bureau Number under the horizontal stabilizers. I don’t know if this was intentional or perhaps a goof by the decal printer. The artist, Jennings Heillg, is well known for his meticulous research of subjects, so I can only wonder what the real story is.
Panel lines and the wheel wells received a wash of Paynes Gray and Burnt Umber artist oils mixed with Turpenoid. A few missing panel lines and rivets were restored with a sharp #2 pencil. The landing gear doors got an Insignia Red surround, carefully applied by hand with a 00 paint brush.
| FINAL CONSTRUCTION |
 The landing gear and doors were glued on and the wheels aligned with small
flat spots made at the point of contact with the ground. I had left
out the nose strut during the construction phase to avoid breaking it, as I
invariably do, but found that you can’t just slip it in after the fuselage
halves are glued together. I had to cut off the ears on either side of
the main strut in order to get it past the gear well opening. Oh well.
I also must have messed up the positioning of the internal Nautilus brace
somehow because the Aires exhaust pieces were too short to fit inside and
stick out the back at the proper depth, so I built up some gluing points
inside the rear fuselage with scrap plastic and attached the exhausts with
CA glue. The ejection seats were plopped inside the cockpit, and the
canopies were posed in the open position using 5 minute epoxy. Note
that there is a white shroud inside the rear canopy, probably a leftover
from the nuclear weapon delivery mission. The inside of the front
canopy is flat black. Fuel dump tubes stick out the back and they went into
pre-drilled holes. I added anti-collision beacon lights that were
fashioned from colored resin pieces to the top and bottom of the fuselage
and gave a final coat of clear flat to eliminate any shiny glue spots to
conclude the project.
The landing gear and doors were glued on and the wheels aligned with small
flat spots made at the point of contact with the ground. I had left
out the nose strut during the construction phase to avoid breaking it, as I
invariably do, but found that you can’t just slip it in after the fuselage
halves are glued together. I had to cut off the ears on either side of
the main strut in order to get it past the gear well opening. Oh well.
I also must have messed up the positioning of the internal Nautilus brace
somehow because the Aires exhaust pieces were too short to fit inside and
stick out the back at the proper depth, so I built up some gluing points
inside the rear fuselage with scrap plastic and attached the exhausts with
CA glue. The ejection seats were plopped inside the cockpit, and the
canopies were posed in the open position using 5 minute epoxy. Note
that there is a white shroud inside the rear canopy, probably a leftover
from the nuclear weapon delivery mission. The inside of the front
canopy is flat black. Fuel dump tubes stick out the back and they went into
pre-drilled holes. I added anti-collision beacon lights that were
fashioned from colored resin pieces to the top and bottom of the fuselage
and gave a final coat of clear flat to eliminate any shiny glue spots to
conclude the project.
| CONCLUSIONS |
 Trumpeter’s
B Team was obviously given the assignment for this kit, which is a shame.
I was most disappointed with the poor overall fit as there was a
significant seam to deal with in practically every single major assembly.
The lack of accuracy is also a disappointment, but honestly the
issues aren’t all that noticeable to anyone but the most fanatical Vigilante
aficionado, of which I suspect there are very few in the world.
It’s also an expensive kit, and the need for some critical
aftermarket items makes it even pricier.
For such a desired subject, Trumpeter gave us a less than optimal
solution and probably explains why you don’t see very many of these built.
Trumpeter’s
B Team was obviously given the assignment for this kit, which is a shame.
I was most disappointed with the poor overall fit as there was a
significant seam to deal with in practically every single major assembly.
The lack of accuracy is also a disappointment, but honestly the
issues aren’t all that noticeable to anyone but the most fanatical Vigilante
aficionado, of which I suspect there are very few in the world.
It’s also an expensive kit, and the need for some critical
aftermarket items makes it even pricier.
For such a desired subject, Trumpeter gave us a less than optimal
solution and probably explains why you don’t see very many of these built.
The markings are colorful and the finished model looks pretty good. Would I recommend building one? I would reluctantly say yes, although modelers should know that this isn’t a box-shaker by any means and will require some effort to get to the end. Beefing up the fuselage structure is a must. I spent a little over 35 hours building mine and enjoyed it, even with all the filling and sanding. I suppose the chances of us getting another injection molded A-5 kit in this scale are fairly remote, so this is probably the only opportunity we will have to build a model of such an elegant aircraft.
| REFERENCES |
Thomason, Tommy: “US Naval Air Superiority, Development of Shipborne Jet Fighters, Phantom – Phantom II, 1943 – 1962”
Lee KolosnaIf you would like your product reviewed fairly and quickly, please contact me or see other details in the Note to Contributors.