Eduard 1/48 Spad XIII
| KIT #: | 1142 and 8196 |
| PRICE: | $74.95 and 34.95 |
| DECALS: | Four options per kit |
| REVIEWER: | Dan Lee |
| NOTES: | American Eagles SPAD XIII Dual Combo Kit 1142 & SPAD XIII Late Version Kit 8196 |
| HISTORY |
The SPAD XIII is one of the most famous WW1 fighters as it was the main mount for many of France s top aces including Rene Fonck and Charles Nungesser as it was for many of the US aces including Eddie Rickenbacker and Frank Luke.
It was a development of the obsolete SPAD VII with a considerably more
powerful engine which made it faster than all of its contemporaries including
the Sopwith Camel, double the firepower of the VII (two machine guns instead of
one) and a redesigned
 wing that improved maneuverability. However, it did not
have the best low speed maneuvering combined with a steep glide angle and sharp
stall that made life difficult for novice pilots when landing one.
wing that improved maneuverability. However, it did not
have the best low speed maneuvering combined with a steep glide angle and sharp
stall that made life difficult for novice pilots when landing one.
Eddie Rickenbacker
America s Ace of Aces in WW1 and the standard by which US WW2 aces were judged by. Born of Germanic ancestry, he was actually Edward Rickenbacker till he changed the CH to a K to Americanize it due to anti-German backlash in WW1.
Despite having a 7th Grade education, Eddie proved to be an adept learner and avid reader of things mechanical. This led him to a job as a car salesman and race car driver.
When the United States entered WW1, he pushed to become a pilot but was hampered by the fact that pilots were selected from elite colleges. Eventually through the force of his will and a friend on Pershing s staff, he managed to get himself assigned to the 94th Aero Squadron aka Hat In The Ring as a fighter pilot. By the end of May 1918, he became an ace. By the end of Sept, he became the CO of the 94th Aero Squadron. Over the course of the war, Eddie ended up with 26 kills at the end of the war, of which all but four were fighters (including 14 Fokker DVIIs) and observation balloons (the most dangerous target of all.) It is more than likely he would have gotten more if it were not for an ear infection which grounded him from July to the middle of Sept.
Eddie survived the war to live a very interesting life including founding
Eastern Air Lines, be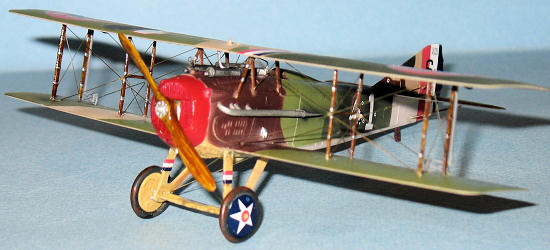 coming one of Roosevelt s harshest critics and surviving a
B-17 crash in the South Pacific during 1942 among other things.
coming one of Roosevelt s harshest critics and surviving a
B-17 crash in the South Pacific during 1942 among other things.
Eddie Rickenbaker died in Switzerland in 1973 while looking for treatments for his wife.
Frank Luke
Tom Cleaver writes a well done article on the brief life of Frank Luke and I will only refer to his article on the 1/32 Hobbycraft SPAD
http://modelingmadness.com/reviews/w1/tc/tmc13.htm
Charles Nungesser
Born on March 15, 1892, he started WW1 in the cavalry before going to flight school and then joining VB106 in 1915 where he began to shoot down German planes.
Unlike the cold meticulous Rene Fonck, the very handsome Charles hated the
strict military discipline and enjoyed the Paris
 nightlife as much as a he could
thus becoming THE prototype (the OM if you will... Original Maverick!) for the
devil may care, handsome, charming and roguish ace pilot. The French newspapers
were captivated by his exploits of shooting down Germans and experiencing the
Paris Nightlife.
nightlife as much as a he could
thus becoming THE prototype (the OM if you will... Original Maverick!) for the
devil may care, handsome, charming and roguish ace pilot. The French newspapers
were captivated by his exploits of shooting down Germans and experiencing the
Paris Nightlife.
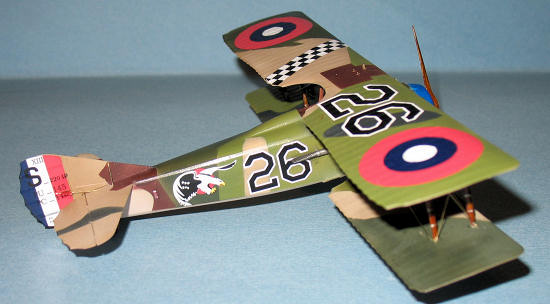
Despite the disciplinary actions he faced from disobeying his superiors to the wounds he suffered from German bullets and crashes, Charles shot down a total of 43 German planes with 11 assists. His planes became famous for the unique markings of a black heart with candles, coffin and skull & crossbones.
After the war, Charles went to Hollywood as a pilot in the movie Dawn Patrol in 1920 (flying as himself.)
In 1927, he and his navigator Francois Coli disappeared over the Atlantic flying from France to the US in an attempt to win the Orteig Prize some two weeks before Charles Lindbergh's successful 1st non-stop transatlantic flight. No one is sure where they crashed (some accounts say Maine and others claim it was over the Atlantic.)
Information courtesy of Wikipedia and the Eduard Instructions
| THE KIT |
See Tom Cleaver's preview of the 8196 kit
http://modelingmadness.com/reviews/w1/previews/8196.htmSee Bill Michael's preview of the 1142 kit http://modelingmadness.com/reviews/w1/previews/eduard/1142.htm
| CONSTRUCTION |
I started off with the cockpit following the instructions. It is recommend
that one follows the instructions or it will make the build more complicated. I
have no problems with PE parts, but they do take a while to do right. Watch out
for the PE seatbelt/harness as i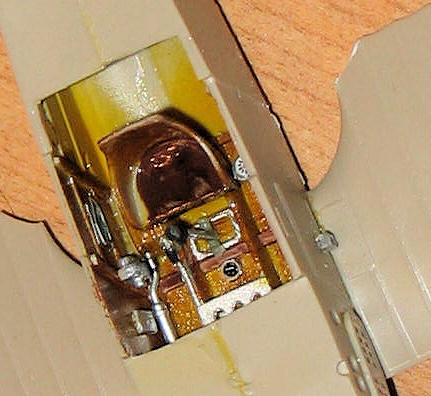 t is a delicate if not difficult assembly to
deal with.
t is a delicate if not difficult assembly to
deal with.
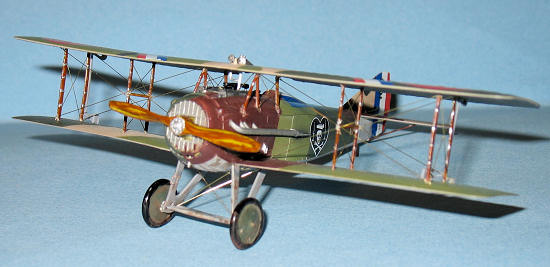
All aluminum interior parts were painted with a base coat of Tamiya Aluminum and Talon Aluminum.
The wooden interior was painted dry brushing MM Acryl burnt sienna all over the wood parts. Once it dried then I brush painted Clear Yellow to simulate the laminate. I don t use a tan base coat as the olive brown color looks tan under a clear yellow coat. At the same time, I painted the props in the same fashion (hubs hand painted with Mithril Silver.)
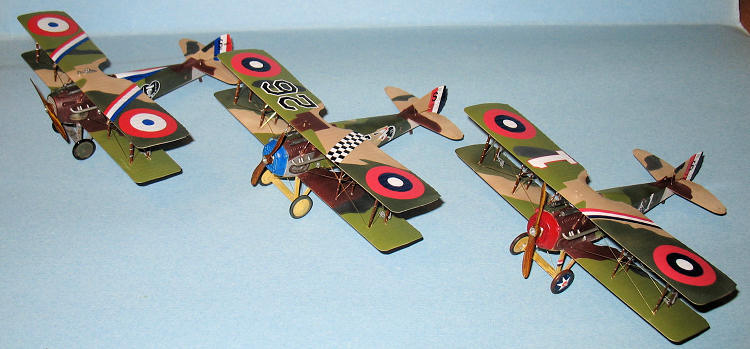
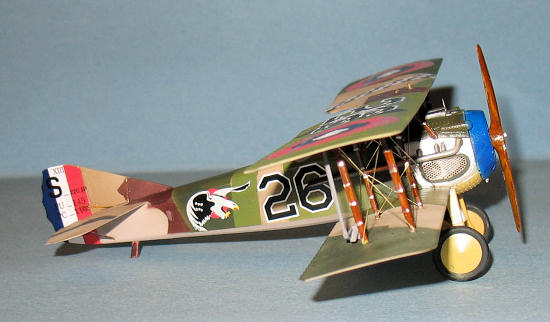
Be very patient with the cockpit tubing as it is rather fiddly, but a little bit of extra glue does the trick. Despite the complexity of the cockpit with all the PE, all three cockpits were done within a couple of days. Two of the three SPADs have the open engine grills so one needs to take your time with the exposed engine area as the parts require some attention so that it does not look out of place. I glued the closed engine grills in place for Rickenbacker s plane (they fit well so no issues.)
The fuselage halves go together fine. Thanks to the excellent parts engineering, there is only a single seam on the rear underside to deal with (filled with CA glue and sanded carefully so as not to ruin the fabric detail.) I then added the top and bottom portions. On the underside, I found there were some gaps that some Vallejo plastic putty to fill them in. The topside fuselage went on fine, but I noticed that it was a little large to the left and needed to be sanded down. I masked the detail with some tape and sanded the left so that it was the same size as the left.
I painted the engine grills with a base coat of Tamiya Aluminum and a top coat of Hawkeye Talon Aluminum. The cowls were a little more difficult to assemble as one has to make sure that the cooling chines are aligned in the vertical and horizontal. When the glue dried, I painted the cowlings in their respective colors (Red for Rickenbacker, Blue for Luke and the camo colors/Aluminum for Nungesser.) Once dry I test fitted the engine faces and cowls on the front. This is where I noticed that there was a slight gap between the cowling and the nose of the SPAD. I cut some 10 thou plastic card shims to seal up the gaps.
Once everything was dry, I carefully stuffed the cockpits and exposed engine areas with wet tissue paper to prevent overspray.
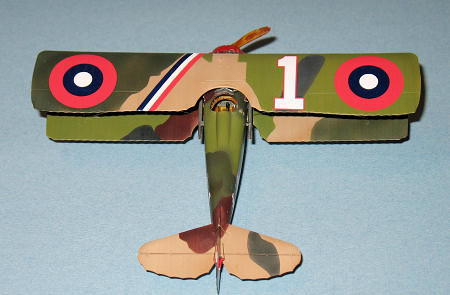
| COLORS & MARKINGS |
Painting
The SPAD camo patterns are what make the kit interesting for me; aside from
the tedium of making masks and applying them. I went for what I had available
among my paints to emulate the not very common French WW1 paints. I chose to use
Tamiya Hull 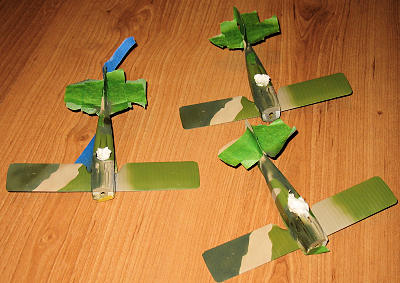 Red (as it is close to the shades of what they call French Chestnut
Brown I ve seen at the LHS), IJA Dark Green, US Interior Green (some folks use
RLM 83, but I find it to be too, er, green and prefer a less intense green with
more yellow in it) Tamiya Bluff and Tamiya NATO Black. The fabric underside was
done in Gunze Sail Color and the metal/wood portions of the underside done based
on Tom Cleaver s suggestion using Clear Yellow and Radome Tan for the
Rickenbacker and Luke planes while I used Tamiya Sky Grey for the underside of
Nunngesser s plane.
Red (as it is close to the shades of what they call French Chestnut
Brown I ve seen at the LHS), IJA Dark Green, US Interior Green (some folks use
RLM 83, but I find it to be too, er, green and prefer a less intense green with
more yellow in it) Tamiya Bluff and Tamiya NATO Black. The fabric underside was
done in Gunze Sail Color and the metal/wood portions of the underside done based
on Tom Cleaver s suggestion using Clear Yellow and Radome Tan for the
Rickenbacker and Luke planes while I used Tamiya Sky Grey for the underside of
Nunngesser s plane.
Each plane was preshaded in flat black and then each color had to be masked off and painted to prevent overspray. As you can imagine, this took quite some time as the patterns for each plane are different.
Fortunately, I did a decent job of masking so that I didn't need to do much work except deal with seams that I didn't do as good a job with of sanding down.
The wheels were done around the same time. The wheels for Rickenbacker and Luke were painted with the same cream color while Nungesser s wheels were painted IJA Green. Once dry, they were masked using the kit masks and painted with NATO Black.
Once the paint was dry, I sprayed on two thin layers of Tamiya Clear Gloss as a base for the decals.
Decals
The Eduard decals by Cartograph were well done and settled down using
MicroSet. An oddity I noticed was that the blue used on the US SPADs was
actually US Insignia blue and not the lighter French blue as seen in the color
diagrams in the instructions. One issue that sho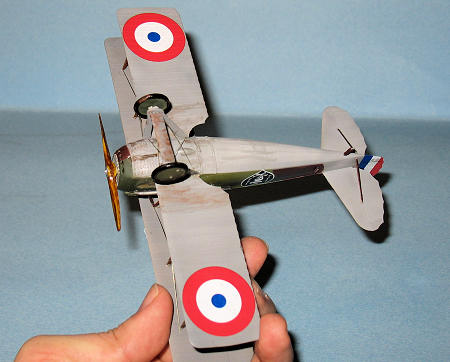 uld be noted is that I had to
cut the rudder decals where the control wires attach so as to get the decal to
sit properly then when it was dry, I put some Solvaset around the area of the
cut to get them to settle down properly. Another issue is that the white isn't
entirely opaque.
uld be noted is that I had to
cut the rudder decals where the control wires attach so as to get the decal to
sit properly then when it was dry, I put some Solvaset around the area of the
cut to get them to settle down properly. Another issue is that the white isn't
entirely opaque.
When things were dry, I used RLM23 red and lightened French blue for Nungesser s plane/Insignia Blue for Frank Luke and Rickenbacker s to touch up the areas of the rudder that were not covered by the decal. I did additional touch up along the edge of the rudder matching the various colors of each rudder flash.
The tricolor triangle marking on Nungesser s proved to be a bit more difficult than I first thought, but I managed to get it to stick using an application of MicroSet and then with some Solvaset when the MicroSet dried. Same applies to the star markings on Rickenbacker s wheels.
Weathering
I limited the weathering on Frank Luke s plane to some dirt on the wheels, a little bit of exhaust stains and mud on the struts because of his limited (and intense) combat service.
Rickenbacker s and Nungesser s were weathered a bit more due to the fact that they flew more often, but I did not attempt to overdo them because they were both well known aces whose planes received more attention maintenance wise. I muddied up the wheels, wings and struts a bit. Both planes had more noticeable exhaust stains, but I avoided going WW2 South Pacific extreme.
| FINAL CONSTRUCTION |
I glued the guns and gun sights on first before doing the upper wing as it would be difficult otherwise.
The most tricky part of any WW1 plane assembly is dealing with the struts and landing gear as alignment can be rather elusive.
I began with the interplane struts on Rickenbacker s plane before adding the top wing. I glued all the unpainted (but sanded down and mold marks removed) struts into the holes then I had a hell of a time trying to align everything into the holes. It seemed each time I had a pair of struts in, another pair would pop out. It was literally the WW1 version of whack a mole which nearly turned into Smack A SPAD, but I wasn't going to act like a spaz and refrained from doing so. After an hour of grinding my teeth, I finally got everything in place. A couple of C clamps were gently placed on the wings to keep the alignment and it was set aside to dry.
 I had some big problems with the tubing (parts D10 and D23) that comes down
the middle of the wing to the fuselage. This was more problematic than the
struts. I cheated a bit by gluing the plastic parts in and then trimming the
bottom. I did not care about being exact as most of the detail is hidden by the
wing (and as I do not build for contests, I could live with it.)
I had some big problems with the tubing (parts D10 and D23) that comes down
the middle of the wing to the fuselage. This was more problematic than the
struts. I cheated a bit by gluing the plastic parts in and then trimming the
bottom. I did not care about being exact as most of the detail is hidden by the
wing (and as I do not build for contests, I could live with it.)
There is actually a better way which I did with Luke s and Nungesser s planes. I found that if you glue the interplane struts that attach the fuselage to the upper wing first and then you let the glue dry. When it is dry, you attach the wing to the fuselage and glue it in place. Once the glue is dry, you work outwards by attaching the H shaped middle strut in next and then finally the outer struts. This way you only worry about four pegs in each step not twelve. It takes longer to do, but it is less problematic and messy and easier on the sanity.
Once the struts were in, I very very very carefully hand painted them. There is a reason why I don t paint them before attaching them and that is because I d rather not worry about ruining the paint when I m gluing them (I know this from painful experience.) I painted them with burnt sienna first, clear yellow next and then painted the silver bands on each. There is no easy way to rush it and this is probably the most difficult part of painting the plane. I think this can be better solved using decals for the silver bands.
I found the struts that attach the fuselage to the horizontal stabilizers to be the fiddly. Don t trim the sprue gate tabs when one removes them because they re just a touch short. Also don t insert the alignment pin in too deep or the other end of the strut will not touch. This will take some patience to it right.
 Next came the landing gear. I m not sure about the SPAD landing gear
alignment, but I don t think I did a very good job of aligning it. I had to
fidget with the landing gear till I got the plane to sit level. Even then it
didn't look 100% to me. If you never built a WW1 model before, I should let you
know that I ve always found the landing gear alignment on every model I ve built
to be fiddly. The Eduard SPAD is typical of my experience. Assembling the
landing gear of any WW1 model plane takes a great deal of patience.
Next came the landing gear. I m not sure about the SPAD landing gear
alignment, but I don t think I did a very good job of aligning it. I had to
fidget with the landing gear till I got the plane to sit level. Even then it
didn't look 100% to me. If you never built a WW1 model before, I should let you
know that I ve always found the landing gear alignment on every model I ve built
to be fiddly. The Eduard SPAD is typical of my experience. Assembling the
landing gear of any WW1 model plane takes a great deal of patience.
Next up were the interplane wires. It is VERY tedious work, but essential if
you want to do a WW1 model as it will look odd without it (like a ship model
without any PE railing.) My method is to take a set of dividers to measure the
gap and then cut a section of brass 0.008 diameter wire to that length and glue
it with white glue. I have tried to drill holes, add fishing line and glue it in
place with CA glue but I ve never got to to work well for me which is why I do
it this way. I don t use CA glue (and will use it only for stubborn sections)
because white glue is flexible enough to endure the contraction/expansion of
metal with temperature. Based on the wire diagram in the instructions, I found
that there was a total of
 38 or 42 different wires (depending on how you cut the
ones that intersect the middle spar.)
38 or 42 different wires (depending on how you cut the
ones that intersect the middle spar.)
I worked from the fuselage out with all the interior wires and interplane wires that are in between struts done first. Then the outer wires, the landing gear wires and finally the tail assembly.
Once done, I carefully sprayed on some Xtracylic Semi-Gloss for the final coat and then attached the small canopies on.
Figures
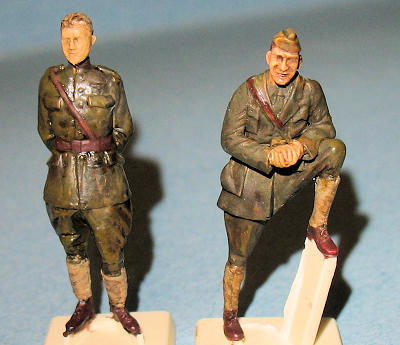
The American Eagles kit comes with a resin figure of both Eddie Rickenbacker and Frank Luke. Eddie s figure is in three pieces which were glued together using CA glue and lightly sanded to deal with the seams while there was a small pin hole on Frank Luke s face that was filled in with Vallejo Plastic Putty. I hand painted them using various Tamiya and Vallejo paints. The details were highlighted using watercolor pin washes and thinned Vallejo paints. I m happy that they turned out okay.
| CONCLUSIONS |
I m satisfied (only exception is the landing gear alignment) with the results of my first attempt at assembly line modeling. I m not crazy about doing it again, but I did not make any SNAFUs that haunted me during the build.
 The Eduard SPAD is a very well engineered kit as Eduard split the fuselage
into three sections and eliminated the upper fuselage seam that plagued the DML
and Glencoe kits. It does require a lot of patience on the part of the modeler
to do them right due to the complexity of the struts and interplane wires. I
wouldn't recommend this kit for the first time WW1 modeler to build (Eduard s
Albatross and Nieuport series of kits are excellent starter kits) but I heartily
recommend these kits if you have at least one WW1 kit under your belt.
The Eduard SPAD is a very well engineered kit as Eduard split the fuselage
into three sections and eliminated the upper fuselage seam that plagued the DML
and Glencoe kits. It does require a lot of patience on the part of the modeler
to do them right due to the complexity of the struts and interplane wires. I
wouldn't recommend this kit for the first time WW1 modeler to build (Eduard s
Albatross and Nieuport series of kits are excellent starter kits) but I heartily
recommend these kits if you have at least one WW1 kit under your belt.
I have to say that the Eduard SPAD is a welcome addition to 1/48 scale WW1 planes.
February 2010
Thanks to Eduard for the review kits
If you would like your product reviewed fairly and quickly, please contact me or see other details in the Note to Contributors.