Smer 1/50 Avro 504
|
KIT # |
0107 |
|
PRICE: |
$6.98 |
|
DECALS: |
Two versions: Generic German and Russian |
|
REVIEW : |
|
|
NOTES: |
|
FINDING THE GEM WITHIN
I've only been involved in the modeling hobby for about 3 years now. I chose WW1 aircraft because I always thought that biplanes looked cool, so I decided to build one of each of the 1/48 WWI scale kits out there. That shouldn't be too hard, since I had also noticed that there weren't a lot of WW1 kits in 1/48 on the market. So I started to buy any kit in 1/48 on the subject I could buy. One of the kits I picked up was the Smer Avro 504K for about five dollars. This kit sat in my box of "someday I will build this kit" for about a year while I tinkered with other kits.
After building fighters and bombers, I wanted something different; I ran across the 504 while rummaging to find out exactly what I had bought during my buying splurge. A 504K...hmmm, never built a SMER kit. WellYwhy not...I never saw an Avro 504 before, and with all that rigging I thought it would look pretty cool. Now that I have finished this project, I see I was right. It does look pretty cool, probably one of the most eye catching models I ever built. The downside was I spent about 100+ hours on this kit. But as always I look back on the project and realize I had a blast.
Enough about that. Here's the saga of my two month effort to build the Smer 504K, the only 1/48 model of this very versatile aircraft available on the market today.
|
HISTORY |
The Avro 504 was first introduced in 1913, a year before the start of the First World War. As with most pre-war designs, the performance was not very exciting. But if you look at the clean lines, the modern eye can see some potential in the design. Although not impressed with the performance of the 504, the Royal Flying Corps was very impressed its stability. This was an easy airplane to fly, even for the novice pilot; they started to use it as a trainer.
 As the war progressed,
there was an acute shortage of pilots and also a noticeable shortage of training
aircraft. Due to its impressive stability, the Avro 504 was ordered in large
quantities. By the end of September 1917, there were over 1,400 Avro 504s in
service with the RFC. It was quickly becoming the de facto "Standard
Trainer" for the RFC.
As the war progressed,
there was an acute shortage of pilots and also a noticeable shortage of training
aircraft. Due to its impressive stability, the Avro 504 was ordered in large
quantities. By the end of September 1917, there were over 1,400 Avro 504s in
service with the RFC. It was quickly becoming the de facto "Standard
Trainer" for the RFC.
The bulk of the 504s were equipped with the 100 hp Gnome Monosoupape engine. However, in July 1917 the state of aircraft engine development made this engine obsolete and no additional orders for the engine were made. Now the RFC faced a dilemma. There was a desperate need for pilots at the front and the engine for the primary training aircraft was soon going to be in very short supply. The solution was incredibly simple: install an adapter kit so that any of the currently available rotary engines could be installed. The aircraft produced or modified for this modification was designated the Avro 504K. With the engine problem solved, the airplane was soon chosen as the official training aircraft for the RFC in February 1918, thus replacing over 13 other types of training aircraft in the active inventory; it would remain the standard RAF trainer into the early 1930s.
In addition to its role in training new pilots the Avro 504K was also used in a home defense role as a night fighter. When the war ended there were a very large number of excess Avro 504 aircraft available. These were given to the air services of the various commonwealth countries. The type was also used during the fighting in Russia in 1919- 1920 as a reconnaissance and bomber aircraft. In time, many of these aircraft fell into civilian use as passenger aircraft and barnstorming aircraft; anything an airplane can be used as, the 504 was given a try at!
Counting all variants of the Avro 504 since its introduction in 1913, a total of almost 11,000 aircraft were produced. This airplane was to Great Britain in the 1920s and 1930s what the Curtiss "Jenny" was to the Americans during the "golden age" of flight.
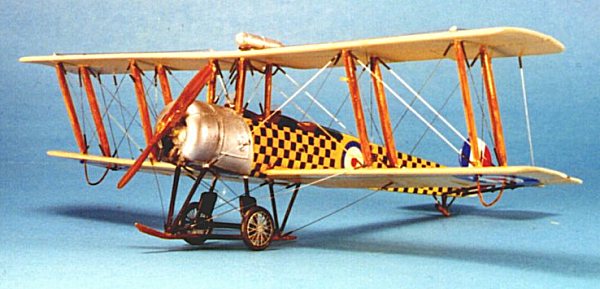
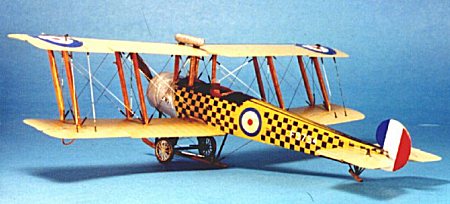
I wanted a colorful model this time around. I was really getting tired of using dull colors such as doped linen and PC-10 on my RFC models. I had an aircraft to really play with. I was going through my aircraft books and I came across photos of the replica Avro 504K flying at the Old Rheinbeck Airdrome in New York State. It was painted in a post-war style: big, bold, and colorful.
|
THE KIT |
The SMER kit is pretty basic and definitely ancient by todays' standards. It was covered with etched decal areas in the plastic; roundrels and aircraft numbers were molded into all the wings, in the fuselage, and on the tail. There was a lot of ugly plastic that needed to come off. The wing ribs were also very pronounced and had to be sanded down. The problem was not only confined to removing this detail, but also to figure out how to add better looking detail back onto the aircraft. Nothing would look worse than a flat, bland, piece of smooth plastic that is supposed to represent an airplane!
|
CONSTRUCTION |
First, I sanded off all the molded detail on the aircraft.
Fuselage, wings and tail surfaces were sanded flat. I also sanded off everything on the fuselage, since it was proving difficult to just sand off the annoying insignia etching without touching the stitching detail on both sides. When I was finished all I had left was clean smooth plastic. I almost forgot to mention the dents in the plastic parts - I had lots of them to fill in with putty! Now I have just a really smooth fuselage and really smooth flying surfaces - now what?
The cockpit:
 First, the cockpit posed a
problem. There isn't any cockpit detail to speak of supplied with the kit. I
scratch built mine using scrap parts from other kits, longerons from styrene
rod, and instrument panel and flooring from basswood. By the end, the cockpit
had been entirely scratchbuilt. This was pretty easy to do. The entire cockpit
process probably took me 2 hours at most.
First, the cockpit posed a
problem. There isn't any cockpit detail to speak of supplied with the kit. I
scratch built mine using scrap parts from other kits, longerons from styrene
rod, and instrument panel and flooring from basswood. By the end, the cockpit
had been entirely scratchbuilt. This was pretty easy to do. The entire cockpit
process probably took me 2 hours at most.
The Fuselage:
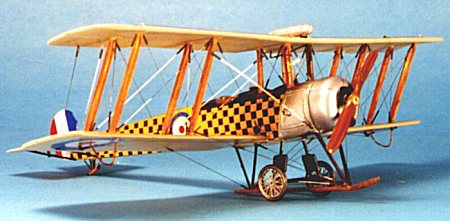
The fuselage itself poised a different problem. I didn't have any detail left at all. I wanted to recover the longeron effect under the fabric skin so I had to experiment a bit. What I ended up doing was scribing out two deep lines the length of the fuselage on each side along with three scribed lines on the top of the fuselage from the cockpit aft to the horizontal stabilizer. I then put .006" stiff wire into the lines and glued them in with white glue. The upper 8th of the wire is now exposed out of the fuselage. After painting the fuselage, these wires would result in my desired longeron effect.
To put the fabric stitching back I used Archer Dry Transfer WW1 aircraft stitching.
The Wings:
To replace the ribbing in the flying surfaces, I resorted to a technique told to me by Robert Karr and Tom Cleaver. At each point where a rib is to be positioned on the wing, I used 1/64" wide tape to mark the location. I then placed masking tape along the sides of the wing rib tape. Once the masking place is in place, I removed the 1/64" tape, which leaves a small rib sized strip of exposed plastic. I painted this strip with one coat of Mr. Surfacer 1000; this yielded a covering a little thicker than brushed paint. The idea is that this will yield a subtle 3 dimensional aspect to the wing ribs - simulating the rib tape - once the wing is painted. This technique also gets rid of that overly pronounced wing ribbing "hills and valleys" effect some manufacturers are fond of. I did similar work to the tail surface, then painted the wings and tail with Tamiya "Buff" to simulate clear doped linen.
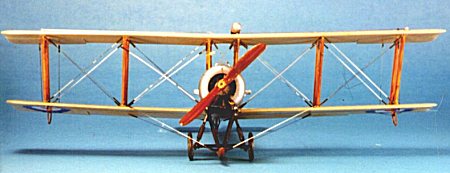
The kit interplane and cabane struts are just about useless. I made their replacements out of basswood, stained them with a blond stain, and finally coated each with Tamiya "Clear Yellow" to yield a varnished grain effect. This also works great for a laminated propeller. The engine was horrible so I replaced it with an Aeroclub 110hp LeRhone engine. The tail skid and main landing gear are also scratchbuilt. The only original part of the landing gear I kept was the landing skid.
One new thing I tried was wire wheels. I used some from an Eduard kit, attaching them to rubber O-rings I found at my local hardware store. I had trouble getting the photoetched spokes to bind to the O-rings. After I ran through all my usual adhesives and thoroughly ruined a set of wire wheels, I hit upon the idea of using contact cement. This bound the photoetch to the rubber O-ring just fine. One note of caution though: once the cement on each parts comes into contact with the other, you don't have much wiggle room before you start tearing the photoetch spokes out of whack. If you try this technique please be careful!.
 One other technique I tried
for the first time involves putting the detail back on the portions of the
engine that were made of aluminum. From the photos of the Old Rheinbeck Avro
504, this detail looked like places where aluminum overlapped into either a
weld, rivet joint, or some other form of overlap. To reproduce this effect, I
used 1/64" plastic tape from an artist supply store. I laid strips of tape
down and painted them aluminum. I found that I couldn't get either enamel or
acrylic paint to bond to the tape due to its slick plastic surface. I had given
up on this technique until I found something in that same artist store 3 days
later. Pilot makes a line of metallic marker pens; their silver marker uses a
paint that adhered to the tape very well. Once this paint had dried on the tape,
I cut it to the lengths I required and placed them to represent metal work
detail where I needed it. I sprayed the portions of the aircraft that were to be
aluminum with SnJ Aluminum metalizer right over the tape. The tape just seemed
to meld into the metallic surface. It pays to wander around an artist's supply
shop.
One other technique I tried
for the first time involves putting the detail back on the portions of the
engine that were made of aluminum. From the photos of the Old Rheinbeck Avro
504, this detail looked like places where aluminum overlapped into either a
weld, rivet joint, or some other form of overlap. To reproduce this effect, I
used 1/64" plastic tape from an artist supply store. I laid strips of tape
down and painted them aluminum. I found that I couldn't get either enamel or
acrylic paint to bond to the tape due to its slick plastic surface. I had given
up on this technique until I found something in that same artist store 3 days
later. Pilot makes a line of metallic marker pens; their silver marker uses a
paint that adhered to the tape very well. Once this paint had dried on the tape,
I cut it to the lengths I required and placed them to represent metal work
detail where I needed it. I sprayed the portions of the aircraft that were to be
aluminum with SnJ Aluminum metalizer right over the tape. The tape just seemed
to meld into the metallic surface. It pays to wander around an artist's supply
shop.
The rest of the project was pretty standard. I used Tamiya acrylic paint throughout. The fabric portions of the fuselage are painted Tamiya "Lemon Yellow" and covered with Superscale checkerboard decal. The racing strip effect on the top of the fuselage where some of my longeron wires were placed is done with 1/32" black plastic tape, which was then seamed with 1/64" black plastic tape for a raised longeron effect. The rest of my decals were taken from the kit or my scrap box as needed.
Rigging:
Since I was doing so many experiments with technique on this project, I decided to try one more. I always wanted to reproduce turnbuckles on my aircraft rigging, but never really could pull off something that looked right. Some WW1 modelers use a combination of acrylic paint and white glue to "sculpt" turnbuckles on the installed rigging wire. I never could get that to look right amid all the little distorted dabs of glue I was left with.
Since I do all my rigging using stiff steel wire in .0065 or .007" diameter, I figured that all I needed was a sleeve of a little greater diameter to wrap around this wire to produce a turnbuckle effect. My answer came in the catalog from Small Parts, Inc. They carry a line of clear Teflon "spaghetti" tubing with an inside diameter sufficient to take my rigging wire and an outside diameter just a little larger. Once painted, these yield nice round turnbuckles of uniform length and roundness.
This idea worked, but it was difficult. Have you ever tried to thread .007" wire into a .0075" diameter Teflon tube? I had to buy an illuminated magnifier to do it. It took me about 2 to 3 hours to thread my wire over the length of the rigging portion of the project. I think it was worthwhile. Be sure you put the tubing on the wire before you paint it. The clear Teflon tubing makes it possible to see the wire inside so you can cut it to the proper length. My turnbuckles on this model are 2/10" long. In hindsight, this is probably too big. On my current project I have cut it down to 1/8" long and this looks better, especially when painted aluminum instead of flat black.
 An unexpected bonus came
out of this technique. One of the difficulties of model aircraft rigging is
measuring the wire and cutting it the proper length. I am always hate this,
because thin stiff rigging wire is hard to come by and I hate wasting it. There
is nothing worse than cutting a length of rigging wire just a bit too short.
That problem is a thing of the past: the Teflon sleeves act as spacers on the
wire. Cut the wire just a little too short, and make up the length slide the
Teflon sleeves at each side of the wire beyond the end of the wire to get a
little more length. Just a bit less than 2/8" of adjustment is a nice
luxury to have. And I didn't waste any wire by cutting my lengths too short.
Another bonus: I had a wire come off on my way to a model show. The wire came
out, but the Teflon sleeves stayed firmly in place with the white glue I use an
an adhesive. I just recovered the wire and worked it back into its sleeves.
Easy!!
An unexpected bonus came
out of this technique. One of the difficulties of model aircraft rigging is
measuring the wire and cutting it the proper length. I am always hate this,
because thin stiff rigging wire is hard to come by and I hate wasting it. There
is nothing worse than cutting a length of rigging wire just a bit too short.
That problem is a thing of the past: the Teflon sleeves act as spacers on the
wire. Cut the wire just a little too short, and make up the length slide the
Teflon sleeves at each side of the wire beyond the end of the wire to get a
little more length. Just a bit less than 2/8" of adjustment is a nice
luxury to have. And I didn't waste any wire by cutting my lengths too short.
Another bonus: I had a wire come off on my way to a model show. The wire came
out, but the Teflon sleeves stayed firmly in place with the white glue I use an
an adhesive. I just recovered the wire and worked it back into its sleeves.
Easy!!
All this work took me about 2 months, which probably translates to about 100 hours of work. A lot of this time was taken up in experimenting with new techniques, so I learned a lot. The only thing I would do different is to paint my turnbuckles silver instead of flat back. I think mine stand out a bit too much. All in all though, I think this kit came out pretty nice. I never saw another at a model show and my Avro 504K did get a lot of attention at a recent contest0. One has to admit that it is colorful and eye catching, definitely more attractive than PC10! All in all, I think it was worth the effort but it was still hard. Perhaps that is why my current project is being build right from the box - I need a break! But that OOB project, just finished, looks really cool with those 1/8" aluminum turnbuckles.
If you would like your product reviewed fairly and fairly quickly, please contact the editor or see other details in the Note to Contributors.