 Kit Number: F-241
 Frog 1/72 Martin Maryland
Kit Number: F-241
Price: $6.99 (1981)
Decals: Two versions: RAF and Free French
Reviewer: Scott Van Aken
Date of Review: 6 August 1997
First a bit of history. The Martin Maryland was designed to meet a 1937 USAAC specification for a twin engined light bomber with a 1200 mile range, carrying 1200 pounds of bombs at 200+ miles an hour. Designated the XA-22, Model 167 was not chosen (the winner being the A-20), and so Martin started a campaign to sell the aircraft overseas. The French placed the first order for 115 aircraft in March 1939 for the 167F (for French). The aircraft had a top speed of 280 mph, six .30 calibre guns (two in each wing and two in a turret). External bomb carriers brought the total bomb load from 1200 to 1760 lbs, although that much was rarely carried. All aircraft were completed within six months of the contract being signed, a feat impossible today. Unfortunately, the US gov't embargoed the aircraft and they were not delivered until October 1939. All deliveries were made within a month and an additional contract for 100 planes was placed, of which 25 were delivered by the armistice of June 1940. The rest of the contract was taken up by the British. The Maryland saw service with the French, Vichy French, British, South Africans and Free French forces. All non-French use was in the Mediterranean theatre.
On to the kit. This kit is typical Frog with raised panel lines, a very basic interior , thick transparencies, and no wheel well detail. This makes the kit rather easy to build for beginning modellers and leaves lots of room for the advanced builder to make improvements. It is molded in Frog's normal light grey plastic. First thing is to clean up the parts, this kit being remarkably free from flash and obvious mold ejector marks. There were also no sink marks to worry about. After clean-up, the parts were painted various colors prior to assembly. The interior was painted chromate green (pretty standard for me unless I know what the color is supposed to be), as were the wheel well areas and insides of the gear doors (which had to have part numbers and ejector marks removed). Next the cockpit parts consisting of generic seat, control column and instrument panel were attached to the floor and inserted in the fuselage along with the gun turret and side windows, after which the halves were glued.
While the fuselage dried, the wings were assembled. No major problems were encountered as the fit is actually rather good. The horizontal stabilizers were likewise assembled. Once dry these assemblies were cleaned up and puttyed were necessary. The fuselage needed more than I would have liked, but no problems. After this was done, the wings and stabilizers were attached to the fuselage. The stabilizers needed putty to mold properly with the aft fuselage as did the wings, mostly to fill gaps.
The engines were typically generic, but better portrayed than on other kits. At least these had pushrod assemblies molded on! They were then inserted into the cowlings and attached to the wings. The wings also had the machine gun holes drilled out after consulting references as the kit makes no mention of them. The exhaust ports on the nacelles were then drilled out. Next the cockpit, underfuselage, and nose transparencies were added. I had little problem with them although the nose transparency is a three part affair and, unfortunately, one window is split between two parts. There is nothing to be done about this other than to grin and bear it. Thanks to the large framework, the transparencies are easy to mask for painting. Purists will want to file these down considerably.
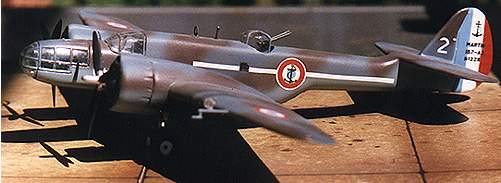
Next the cowlings were masked with tissue, the ADF and other antennas attached and the aircraft ready to paint. I used Gunze paints for this, mixing them until I got colors close to those in Squadron's 'Armee de'lAir 1939-1945' book. This consisted of a camouflaged mix of dark brown and blue-grey uppers with light blue (similar to RLM 65) lower surfaces. These were sprayed with an airbrush. The rudder colors were painted on using Testor's Model Master paints. Next the gloss coat and when dry, the decals. I wanted to portray a 'Glenn' of the Aeronavale in Vichy service prior to the application of the yellow and red ID marks. The only kit parts used were the tail serial numbers. Others were from the spares box or hand made to represent an aircraft from Escadrille 3B of Flotille 3F in 1942.
Once that was done, the final pieces (undercarriage and propellers) were added after the masking was removed. Although it has been over ten years since I built this kit, it is still a favourite of mine and shows how far my talents have improved since then.
Copyright ModelingMadness.com. All rights reserved. No reproduction in part or in whole without express permission from the editor.
Back to Reviews Page 2016