Supermodel 1/72 Macchi C.205 'Veltro'
|
KIT # |
72-013 |
|
PRICE: |
@$6.00 |
|
DECALS: |
Four aircraft - dry transfer type |
|
REVIEWER: |
|
|
NOTES: |
It has rubber do-nuts for tires!! |
|
BACKGROUND |
For a look at what's in the box and a brief history of the 205, please visit the preview.
|
CONSTRUCTION |
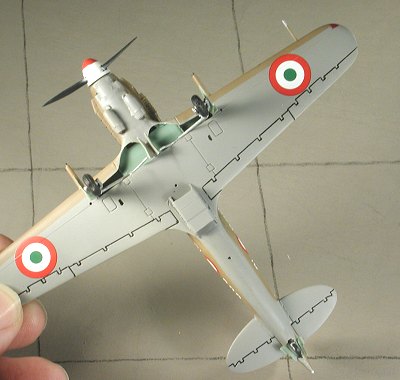
With this kit, I started by assembling the upper and lower wing
halves. During this time, I also glued in the clear wing tip lights. These were
a touch oversize so were sanded flush with the wings. I should mention at the
start that this is not a new kit and so I used filler to some extent on the
entire airframe. The kit also suffered from some minor flash that needed to be
trimmed prior to gluing.
When that was dry, the fuselage halves were glued together and
the control column glued in place. Yes, this thing just glues to the centerline
of the fuselage floor. I said there wasn't much of an interior. I then glued the
wings in place. These will need to have the little alignment stubs sanded back a
touch to ensure that the wing will have the proper dihedral. There is a rather
large trench at the wing/fuselage join that will need filled. You'll also
destroy some raised detail in this area when sanding, but it can't be helped.
This plane has wing cannon so the cannon barrels will need to be glued over the
machine gun holes on the wing. This isn't an easy task at all as it seems the
cannon barrels are not really designed to fit well.
At the back of the
plane, the horizontal stabilizers were attached with no real problems, thank
goodness. The tail wheel was glued in place at this time. The attachment point
is a bit vague, but it does look proper when done. The windscreen and canopy
were next. I had to trim back the canopy to get it to fit as it was a bit too
long to fit the opening once the windscreen was glued in. Once in place and dry,
they were masked and the radio mast installed. I then got ready for some paint. CAMOUFLAGE & MARKINGS
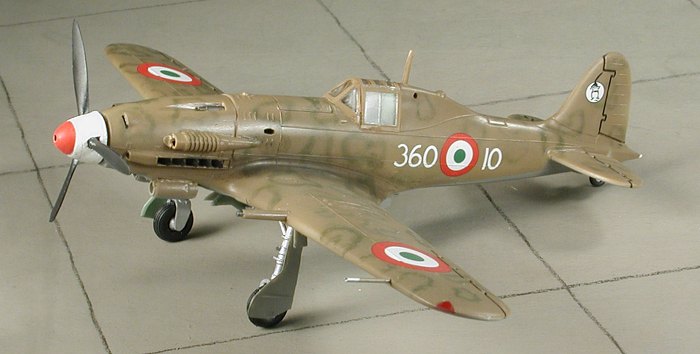
The scheme I chose was in the standard colors for this plane of Sand 4 (FS
30219) over Light
The kit was then glossed up and the decals applied. Sky Decals are truly superb.
They are produced by Cartograf and are very well done indeed. Registration is
spot on and the whites are nice and opaque. One thing I did notice is that the
fin unit badges are shown mirror imaged on the instruction sheet from what are
given on the decals. Don't think this makes a lot of difference, but thought
you'd like to know. I used Solvaset on the decals with no problem.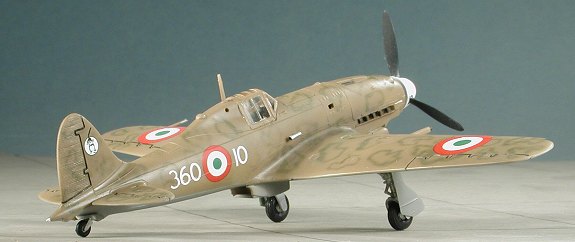 I next went to the cockpit. This is
rather barren by modern standards and relies on a pilot figure to cover up the
lack of amenities. There are transfers for the instruments and as these are dry
transfers, they require a slightly different application procedure. Basically,
one cuts out the decal, then places it where desired. Then, with a rounded
instrument (I used the end of a paint brush handle), the transfer is rubbed over
its entire area. This transfers the decal to the plastic. The nice thing about
them is that silvering is usually not a problem and they are quite thin so
conform to all surface undulations. Anyway, the rest of the cockpit is basically
a seat and control stick. The seat and instrument panel were glued into a
fuselage half and all the interior bits were painted Italian anti-corrosion
green.
I next went to the cockpit. This is
rather barren by modern standards and relies on a pilot figure to cover up the
lack of amenities. There are transfers for the instruments and as these are dry
transfers, they require a slightly different application procedure. Basically,
one cuts out the decal, then places it where desired. Then, with a rounded
instrument (I used the end of a paint brush handle), the transfer is rubbed over
its entire area. This transfers the decal to the plastic. The nice thing about
them is that silvering is usually not a problem and they are quite thin so
conform to all surface undulations. Anyway, the rest of the cockpit is basically
a seat and control stick. The seat and instrument panel were glued into a
fuselage half and all the interior bits were painted Italian anti-corrosion
green.
 With the wing in place, the upper and lower cowling parts were
glued in. The upper one fit fairly well, but the lower one did not. It is too
wide and so needs a lot of sanding to bring it in line. The forward
wing/fuselage join is not good either. In fact, one will end up removing quite a
bit of 'detail' in this area before being done with it. The oil coolers are not
a lot of fun to install. Removing them from the sprue will result in damaging
the circular 'lip' that runs around it from the attachment points. Since they
are opposite each other, there is no way to hide them both when gluing the
coolers in place. At this time, I also glued on the two part supercharger sand
filter/intake and the under wing radiator.
With the wing in place, the upper and lower cowling parts were
glued in. The upper one fit fairly well, but the lower one did not. It is too
wide and so needs a lot of sanding to bring it in line. The forward
wing/fuselage join is not good either. In fact, one will end up removing quite a
bit of 'detail' in this area before being done with it. The oil coolers are not
a lot of fun to install. Removing them from the sprue will result in damaging
the circular 'lip' that runs around it from the attachment points. Since they
are opposite each other, there is no way to hide them both when gluing the
coolers in place. At this time, I also glued on the two part supercharger sand
filter/intake and the under wing radiator.
 I was in a real quandary about how to paint this. You see, I planned to use the
Sky Decals sheet on the 205.
Well, there are markings for 45 aircraft on it!! I had originally decided to do
one of the ANR planes in Luftwaffe colors, but in the end, went for the Italian
Co-Belligerent Air Force version with the nice, large roundels. I've not seen
too many Italian WWII subjects in these markings so thought it would be a nice
change. I could have used the kit transfers for this as the Supermodel dry
transfers are excellent. But so are the Sky Decals.
I was in a real quandary about how to paint this. You see, I planned to use the
Sky Decals sheet on the 205.
Well, there are markings for 45 aircraft on it!! I had originally decided to do
one of the ANR planes in Luftwaffe colors, but in the end, went for the Italian
Co-Belligerent Air Force version with the nice, large roundels. I've not seen
too many Italian WWII subjects in these markings so thought it would be a nice
change. I could have used the kit transfers for this as the Supermodel dry
transfers are excellent. But so are the Sky Decals.
 Grey I (FS 36307) with Dark Green 2 (FS 34052) 'smoke
rings' on the upper surface. I used Aeromaster acrylics for the Sand and Light
grey, but didn't have the Dark Green 2. Instead I used Xtracolor NATO Green as
it seemed to be a pretty close match. I can tell you that airbrushing all those
small smoke rings on the upper surface was a touch time consuming, but the end
results are not too bad, especially in 1/72. Oh yeah, I also didn't like the way
the wing tip lights turned out so painted over them.
Grey I (FS 36307) with Dark Green 2 (FS 34052) 'smoke
rings' on the upper surface. I used Aeromaster acrylics for the Sand and Light
grey, but didn't have the Dark Green 2. Instead I used Xtracolor NATO Green as
it seemed to be a pretty close match. I can tell you that airbrushing all those
small smoke rings on the upper surface was a touch time consuming, but the end
results are not too bad, especially in 1/72. Oh yeah, I also didn't like the way
the wing tip lights turned out so painted over them.
|
FINAL CONSTRUCTION |
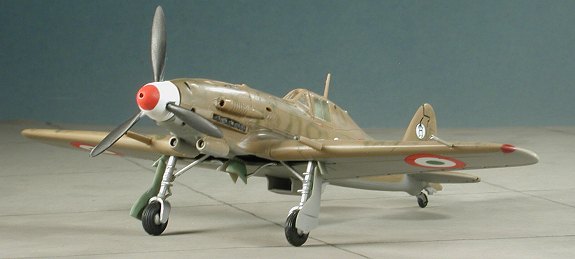
Meanwhile, I got the main landing gear together. This is a rather Mickey Mouse
set up in my opinion. I don't like the rather poorly molded rubber tires and the
wheel hubs are a joke. Molding the two sides of the gear forks probably makes
sense, but it also makes it a bit more difficult to install the wheels. After
fussing with it, I got them on just fine and glued the struts
The prop was assembled and then painted. Spinner was painted white with a red
tip. Then it was glued into the front of the fuselage. For some reason, it
doesn't want to go all the way in so the assembly sits a bit proud of the front
of the fuselage. The venturi tube was glued to the fuselage side and the pitot
glued in. Thanks to this kit being basically a 202 with 205 bits, there are two
small holes in the lower fuselage/wing that should have been filled, but the
instructions say nothing about them at all. I figured all through construction
that something would go there, but nothing did!
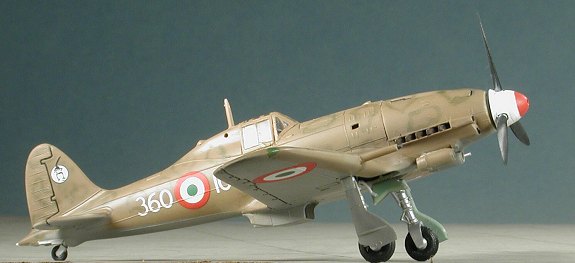
I then sprayed the plane with clear matte, removed the canopy masking, painted
the wing tip lights and other small touchups, applied some pastel exhaust
staining and was done.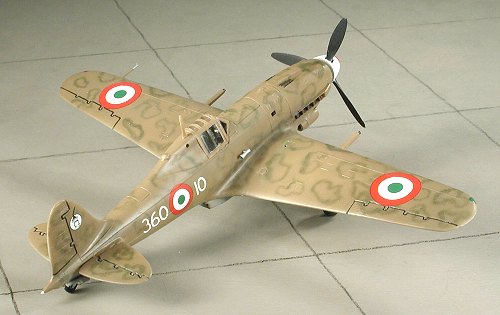 into the slots in
the upper wing. I then flooded the area with glue to make sure they stayed
there. The wells were then brush painted in Italian anti-corrosion green. Once
the gear had dried, I attached the gear doors. Or I should say tried to. You
see, I got the gear on the wrong side and the gear door attachment points were
now on the inside of the landing gear bay! DOH! Well, I muddled through best I
could and got all the doors and struts installed. The tail wheel also has doors
and they were attached and painted at this time as well.
into the slots in
the upper wing. I then flooded the area with glue to make sure they stayed
there. The wells were then brush painted in Italian anti-corrosion green. Once
the gear had dried, I attached the gear doors. Or I should say tried to. You
see, I got the gear on the wrong side and the gear door attachment points were
now on the inside of the landing gear bay! DOH! Well, I muddled through best I
could and got all the doors and struts installed. The tail wheel also has doors
and they were attached and painted at this time as well.
|
CONCLUSIONS |
I found out after I bought this kit that Italeri does a more modern kit of the 205. While the Supermodel one isn't bad, it is a child of the 70s and shows it in the low detail level and the dodgy fit of some parts. I also found the plastic to be a bit on the brittle side so great care is needed to remove the smaller bits. Interestingly, it is the first model of an Italian aircraft I've built in over two years. The last one was a Supermodel kit as well.....
March 2003
#1261 in a series
Copyright ModelingMadness.com. All rights reserved. No reproduction in part or in whole without express permission from the editor.
If you would like your product reviewed fairly and fairly quickly, please contact the editor or see other details in the Note to Contributors.