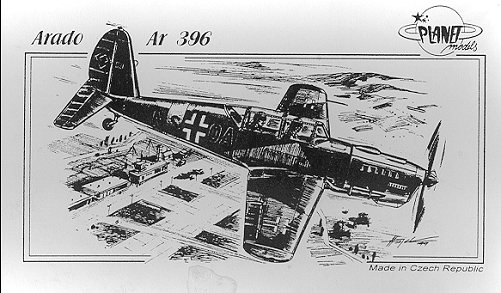
Planet Models 1/48 Ar-396
|
KIT # |
057 |
|
PRICE: |
|
|
DECALS: |
See Review |
|
REVIEW & |
|
|
NOTES: |
Resin Kit |
|
HISTORY |
The Ar-396 was designed to be a replacement trainer for the Ar-96. The major stipulation for designing it was to reduce the amount of metal in the aircraft. Production was to take place in French factories, but the progress of the war made that impossible. Construction was therefore moved to Czech factories. While the prototype and several examples were constructed there, the war ended before they were able to be brought into service.
Postwar, 200 examples were built in France by SIPA. These were used for training and as COIN aircraft in North Africa. The major difference between the SIPA aircraft and the standard Ar-396 were the addition of wing racks for light bombs and rockets as well as a different canopy with a flat top and three center sections vice the two used by the Ar-396.
|
THE KIT |
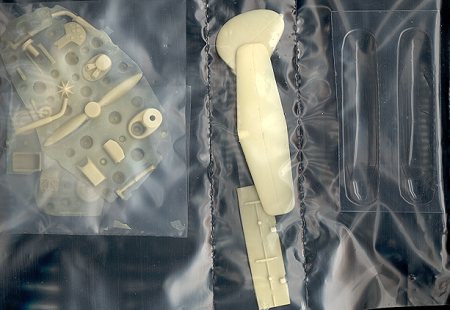
 Planet Models
resin kits have always come very well packaged and this one is no exception. The
clear plastic bag is divided into several sections. This allows the large, heavy
parts to rattle around without damaging the smaller, more fragile bits. In this
case, there are separate compartments for the large, one-piece wing, the
fuselage halves, the rudder/tailplane/cockpit floor, the two vac canopies, and
the several wafers, themselves individually packaged.
Planet Models
resin kits have always come very well packaged and this one is no exception. The
clear plastic bag is divided into several sections. This allows the large, heavy
parts to rattle around without damaging the smaller, more fragile bits. In this
case, there are separate compartments for the large, one-piece wing, the
fuselage halves, the rudder/tailplane/cockpit floor, the two vac canopies, and
the several wafers, themselves individually packaged.
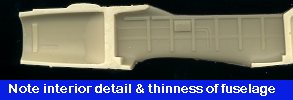
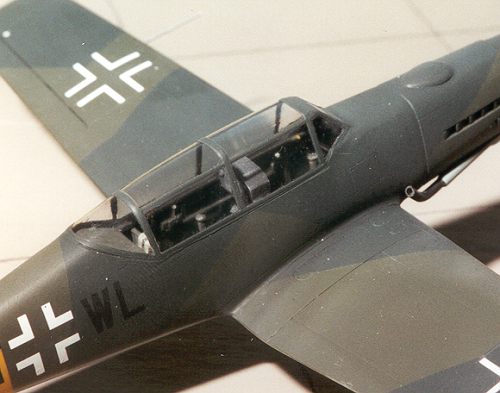
Detailing on the parts is quite good. There is even detail on the fuselage sidewalls. It is good to see that Planet Models is finally putting two vacuform canopies in their kits and I do hope that this is a major policy change.
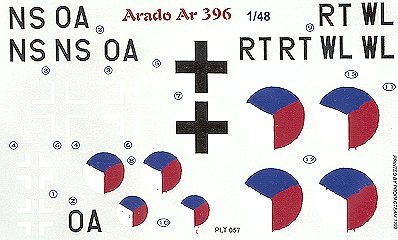
There is also a decal sheet for two aircraft, one German and one
Czech. According the the instructions, this Czech one represents an aircraft
used during the Prague uprising of 5 May, 1945. That explains why they appear to
be
so poorly printed. They are
supposed to represent markings that were hastily brush painted on the aircraft.
The instruction sheet is just as brief as before, though this
time there isn't even a parts breakdown diagram. One gets a brief
 history and
part of the painting directions on one sheet, the other part of the painting
diagram and the interior construction on another, the third section is an
exploded view of the rest of the construction and the fourth section is a
'catalogue' of other Planet kits.
history and
part of the painting directions on one sheet, the other part of the painting
diagram and the interior construction on another, the third section is an
exploded view of the rest of the construction and the fourth section is a
'catalogue' of other Planet kits.
The kit itself is packaged in the now common white paperboard box.
|
CONSTRUCTION |
With all resin kits, the first thing to do is to remove all the big parts from the resin blocks. This requires the use of a saw of some sort, followed by a good sanding of the places where the block meets the part. I found the kit parts to be very well designed as to minimize any excessive sanding. Probably the trickiest part was removing the 'sprue' from the wing. It goes a bit into the root and needs careful attention. There was a small amount of flash on the large parts, but really not as much as one would expect.
In fact, the detailing as a whole is really very good. There is plenty of detail on the parts themselves and the interior sidewalls have very nice rib detail. Removing the bits from the resin wafers was next. This took a bit more effort, as the edges had to be cleaned up once removed from the wafers. A few passes with an Xacto and sandpaper took care of it. I left all the really small bits on the wafer until needed.
 It was while
doing this cleanup that I was struck by how really nicely this kit was molded.
Test fitting some of the major components showed that fit was quite good indeed.
The wing/fuselage join was particularly good, with almost no gaps. Same with the
fitting of the cockpit floor into the fuselage. Were it not for the material
from which the kit was made, as well as the odd air bubble or two in some of the
parts, I would have thought this to be a good quality injected styrene kit!
It was while
doing this cleanup that I was struck by how really nicely this kit was molded.
Test fitting some of the major components showed that fit was quite good indeed.
The wing/fuselage join was particularly good, with almost no gaps. Same with the
fitting of the cockpit floor into the fuselage. Were it not for the material
from which the kit was made, as well as the odd air bubble or two in some of the
parts, I would have thought this to be a good quality injected styrene kit!
 Once all the big pieces were cleaned up, it was time to start on
assembly. Since there weren't any subassemblies to do, this meant the cockpit.
There are ten pieces shown in the instructions that fit on the cockpit floor:
two seats, two control sticks, four rudder pedals and a two-piece front
instrument panel. This panel has a small tray that fits 2/3rds of the way down
the face of it. I started with the foot pedals and worked to the taller bits.
There are depressions for the pedals and seats. The control sticks are simply
sanded flat on the bottom and glued to the small mounts on the floor. The
instrument panel has a small cutout on the floor to fit over a pipe that runs
fore and aft down the centerline of the floor. To make sure this fit properly,
the floor was placed into a fuselage half and then the instrument panel was test
fit. There is a small notch in the fuselage side to accept the side of the
panel. I had to sand a small bit off the bottom of the panel where it meets the
floor to keep it from being too tall.
Once all the big pieces were cleaned up, it was time to start on
assembly. Since there weren't any subassemblies to do, this meant the cockpit.
There are ten pieces shown in the instructions that fit on the cockpit floor:
two seats, two control sticks, four rudder pedals and a two-piece front
instrument panel. This panel has a small tray that fits 2/3rds of the way down
the face of it. I started with the foot pedals and worked to the taller bits.
There are depressions for the pedals and seats. The control sticks are simply
sanded flat on the bottom and glued to the small mounts on the floor. The
instrument panel has a small cutout on the floor to fit over a pipe that runs
fore and aft down the centerline of the floor. To make sure this fit properly,
the floor was placed into a fuselage half and then the instrument panel was test
fit. There is a small notch in the fuselage side to accept the side of the
panel. I had to sand a small bit off the bottom of the panel where it meets the
floor to keep it from being too tall.
|
MYSTERIOUS PARTS |
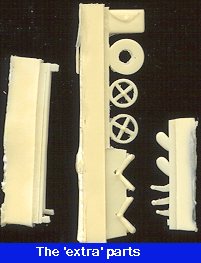 Closing the other
fuselage half with the cockpit floor in place showed that the fit is excellent.
Certainly better than most limited run injected styrene kits!! I was about to
paint everything in there RLM 66 dark grey, when I realized that there was a bag
of small parts that I hadn't used. Looking at the parts showed that they were
definitely bits that belonged in the cockpit, however there was no mention of
them at all in the instructions!! A little sleuthing determined what the bits
are for.
Closing the other
fuselage half with the cockpit floor in place showed that the fit is excellent.
Certainly better than most limited run injected styrene kits!! I was about to
paint everything in there RLM 66 dark grey, when I realized that there was a bag
of small parts that I hadn't used. Looking at the parts showed that they were
definitely bits that belonged in the cockpit, however there was no mention of
them at all in the instructions!! A little sleuthing determined what the bits
are for.
From the left, there is a block on which are the control rods that go to the engine throttles. The center block has (from the top) a forms pouch, the retainer for the prop, two trim wheels, and two oleo scissors. The last little block has (from the top), the trim wheel mounts, and three control levers.
Now locales for all but the control levers and forms pouch can pretty well be figured out as there are spots on the cockpit floor for the trim wheel mounts and the wheels and control arms fit on that. The oleos go on the landing gear. For the other items, guesswork and logical placement will have to do as drawings and diagrams for the Ar-396 interior were impossible for me to find.
|
CONSTRUCTION CONTINUES |
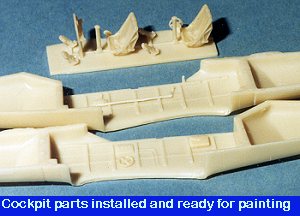 Once placement was determined, the bits were glued
into place. Naturally, I broke one of the throttle rods while removing it from
the resin block! Then the interior parts were all painted RLM 66 using
Aeromaster paint. Detail painting was next. The seat belts were painted a light
grey with aluminum hardware.
Once placement was determined, the bits were glued
into place. Naturally, I broke one of the throttle rods while removing it from
the resin block! Then the interior parts were all painted RLM 66 using
Aeromaster paint. Detail painting was next. The seat belts were painted a light
grey with aluminum hardware. 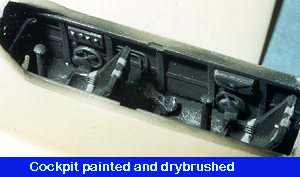 The throttle handles were painted white and the
canopy latch yellow. The rest of the interior was drybrushed with medium grey
and aluminum to bring out highlights. Then the interior was tack glued to the
right fuselage half. Once happy with the alignment, the left side was glued in
place in the back as I was concerned with proper alignment. The front half was
then glued and then the interior was glued in place. Superglue and accelerator
was used for all gluing. The very front has an engine face that was glued in
place and then painted black. When dry the engine details were painted aluminum.
The throttle handles were painted white and the
canopy latch yellow. The rest of the interior was drybrushed with medium grey
and aluminum to bring out highlights. Then the interior was tack glued to the
right fuselage half. Once happy with the alignment, the left side was glued in
place in the back as I was concerned with proper alignment. The front half was
then glued and then the interior was glued in place. Superglue and accelerator
was used for all gluing. The very front has an engine face that was glued in
place and then painted black. When dry the engine details were painted aluminum.
 The seams were all sanded down and any gaps filled with putty.
So far, everything was going very normally, unusual for me and a resin kit. The
horizontal stabilizer was next. I had thought about inserting a pin or two for
strength, but in the end chose not to. Getting this bit properly aligned is
paramount as it has a very small mating surface and if it is misaligned, the
entire aircraft won't look right. Some careful sanding enabled a good fit and
once in position, it was hit with accelerator. The wings were next and they fit
just beautifully. A bit of trimming was needed on the right front but it slid in
place. So tight is the fit that no filler was needed on the upper wing section,
though the underside had a few gaps.
The seams were all sanded down and any gaps filled with putty.
So far, everything was going very normally, unusual for me and a resin kit. The
horizontal stabilizer was next. I had thought about inserting a pin or two for
strength, but in the end chose not to. Getting this bit properly aligned is
paramount as it has a very small mating surface and if it is misaligned, the
entire aircraft won't look right. Some careful sanding enabled a good fit and
once in position, it was hit with accelerator. The wings were next and they fit
just beautifully. A bit of trimming was needed on the right front but it slid in
place. So tight is the fit that no filler was needed on the upper wing section,
though the underside had a few gaps.
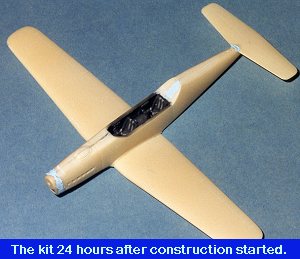 Now it was starting to look like an aeroplane. The nose piece
was, so far, the worst fitting part. It appears possible to have a spinning prop
as there is a retainer and short shaft that fit just fine. However the engine
face doesn't allow enough room behind the nose piece so I fear that the prop
will be of the non-spinning variety. Had I known beforehand that it was so
tight, I would have sanded away the trouble spot on the engine insert before
installing it.
Now it was starting to look like an aeroplane. The nose piece
was, so far, the worst fitting part. It appears possible to have a spinning prop
as there is a retainer and short shaft that fit just fine. However the engine
face doesn't allow enough room behind the nose piece so I fear that the prop
will be of the non-spinning variety. Had I known beforehand that it was so
tight, I would have sanded away the trouble spot on the engine insert before
installing it.
There are a number of gaps between the nose piece and the fuselage that my attempts at eliminating by sanding the fuselage nose only made worse. I finally just applied a bunch of superglue, got the nose bit in position and then hit with accelerator. A liberal amount of filler was then used on the ensuing bad areas. The area was then sanded smooth. Unfortunately, there is (was) some rather fine detailing that disappeared under the filler and sanding.
While all that was drying, the exhaust were cleaned up and drilled out. The wheels were then test fit to the axles. One wheel had the hole in it filled with resin so that had to be drilled out. The prop was also cleaned up. When I cut of a large blob from behind one of the blades, I opened up quite a cavern. That took several sessions of filler to fill.
Once the prop was done, the spinner was cleaned up and glued in place on the prop. There was an air bubble on one of the vanes of the spinner. This was filled with superglue and cleaned up. A hazard of resin kits! The prop and spinner were then painted matte black.The fin was then attached. There are small resin pips on the bottom of the fin that are to mate with holes in the upper fuselage. Well there was no way I would be able to properly clean up the area around the pips, so the whole bottom of the fin was sanded smooth and two holes drilled where the pips were. Those holes then has sections of paper clip glued into them. These sections fit into the holes in the fuselage just perfectly. The fin was then superglued into place.
 Moving to the front of the
plane, there is what appears to be some sort of box-shaped exhaust. It looks
like an oil cooler, but there isn't any opening in the front. This assembly was
fit in place as best as I could manage (there is no drawing of the underside of
the nose) and faired in with superglue. Next the exhaust pipes were glued in
place. These are rather curious affairs as the exhaust exits ABOVE the wing
roots. I doubt if they were worried about heat seeking missiles!!
Moving to the front of the
plane, there is what appears to be some sort of box-shaped exhaust. It looks
like an oil cooler, but there isn't any opening in the front. This assembly was
fit in place as best as I could manage (there is no drawing of the underside of
the nose) and faired in with superglue. Next the exhaust pipes were glued in
place. These are rather curious affairs as the exhaust exits ABOVE the wing
roots. I doubt if they were worried about heat seeking missiles!!
One of the more trying parts for me was next; the canopy. First I installed the aft instrument panel, painted it RLM 66 and dry brushed it. The fit is so-so. Actually either it is a bit too narrow or the fuselage is a bit too wide, so come constructive gluing had to be done! The canopy was successfully trimmed and after MUCH dryfitting, was deemed ready to glue. Before that happened, the canopy was masked. I used non-fogging superglue to attach the canopy. Once the canopy was firmly in place, the superglue was used to fill any gaps. These were then sanded smooth and it was on to painting!
|
PAINT & DECALS |
 There was much personal turmoil as to which aircraft to do.
Originally, I wanted to do the French version, the SIPA 111. However, after
finding out that I would have to make a new canopy, and after several attempts
at that failed miserably, I was left with the German versions. The kit's decals
offer two (actually three) options. You can do two Luftwaffe aircraft using the
codes supplied in the kit. The third option is for a Czech version with crudely
painted roundels covering the Luftwaffe insignia. Regardless, all three aircraft
are in RLM 70/71 uppers and RLM 65 lowers. I find it odd that these early war
colors would still be around in 1944/45, however I imagine that they were there
for repainting of Ju-52s and Stukas and other early war aircraft that were being
overhauled.
There was much personal turmoil as to which aircraft to do.
Originally, I wanted to do the French version, the SIPA 111. However, after
finding out that I would have to make a new canopy, and after several attempts
at that failed miserably, I was left with the German versions. The kit's decals
offer two (actually three) options. You can do two Luftwaffe aircraft using the
codes supplied in the kit. The third option is for a Czech version with crudely
painted roundels covering the Luftwaffe insignia. Regardless, all three aircraft
are in RLM 70/71 uppers and RLM 65 lowers. I find it odd that these early war
colors would still be around in 1944/45, however I imagine that they were there
for repainting of Ju-52s and Stukas and other early war aircraft that were being
overhauled.
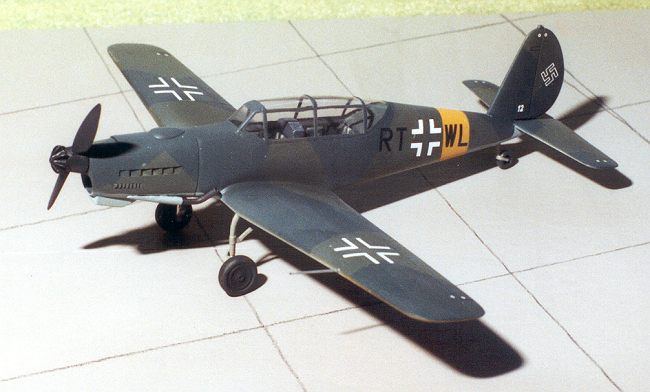
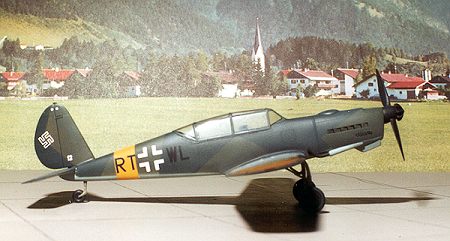
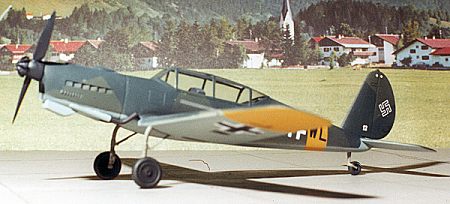
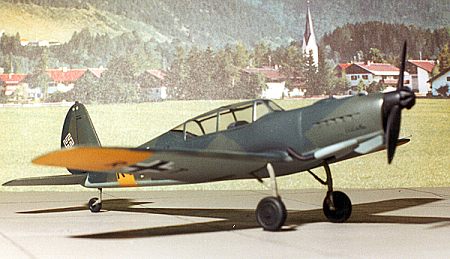
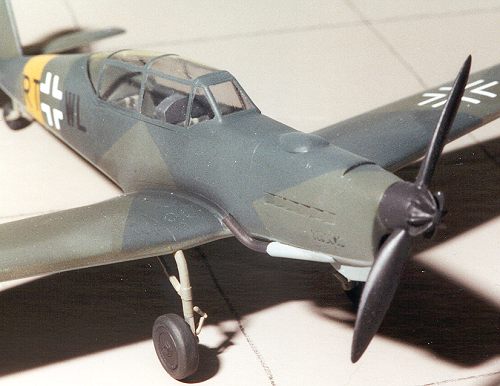
First to be painted were the wingtips and fuselage band. These are in RLM 04 yellow and I used Xtracolor enamel paint for this purpose. Once that yellow was dry, it was masked off and the underside painted RLM 65 blue using Aeromaster Enamels. Those areas needing masked were done and the upper surface was painted RLM 71 green, after the canopy had been painted RLM 66 dark grey. Finally, the RLM 71 parts were masked off and the RLM 70 black green was painted. The aircraft was given a coat of Future clear gloss acrylic in preparation for the decals.
|
MORE CONSTRUCTION |
 Now that I had the main colors on the plane, It
was time to glue in the tail wheel and the main landing gear. These items were
painted RLM02 grey as were the main wheel wells. Not sure if they should have
been that color, but it seemed like a logical choice of colors. The wheels were
painted black and 'tire' color. The main gear and tail wheel were then glued
into place. The main gear takes a bit of alignment work to get things properly
positioned so be careful on this step. The oleos were wrapped with Bare Metal
Foil. Not mentioned in the instructions are the scissor links for the oleos.
These should face inward towards each other according to the drawing in the
instructions.
Now that I had the main colors on the plane, It
was time to glue in the tail wheel and the main landing gear. These items were
painted RLM02 grey as were the main wheel wells. Not sure if they should have
been that color, but it seemed like a logical choice of colors. The wheels were
painted black and 'tire' color. The main gear and tail wheel were then glued
into place. The main gear takes a bit of alignment work to get things properly
positioned so be careful on this step. The oleos were wrapped with Bare Metal
Foil. Not mentioned in the instructions are the scissor links for the oleos.
These should face inward towards each other according to the drawing in the
instructions.
It was at this time that the decals were applied. They are by Propagteam so are very thin and must be handled with care. In all cases, they were slid off the backing sheet into a small pool of saliva. This is the best thing to use to prevent them from sticking on contact. You have the ability to slide them around somewhat if the underside is properly lubricated. As always, they are quite opaque and beautifully done. I decided to do the Czech version prior to it being captured and repainted.
Once the decals were in place, they were given a bit of setting solution to make sure they stuck. Then when dry, the excess residue was wiped off with a damp towel and the kit given an overall coat of semi-matt clear to seal the decals.
Final steps included attaching the pitot tube, painting the exhaust pipe Burnt Iron, and adding some pastel exhaust staining. These areas were then resprayed with matte clear. The masking was removed from the canopy and the kit was finished.
|
CONCLUSIONS |
This was without a doubt, the finest building resin kit I have ever done. No real problems, fit was excellent, and the kit was done in near record time for me. I started building it on a Thursday evening, and it was completed by the following Tuesday. I can recommend this kit to anyone who wants a great resin kit. I would even suggest this to be a good first full resin kit for those wanting to tackle the medium.
As a side note, this kit took a third place against a very full field at a recent model contest. This despite the fact that the kit is straight from the box and against kits that had a lot of detail sets and extra work put into them.
February 2000