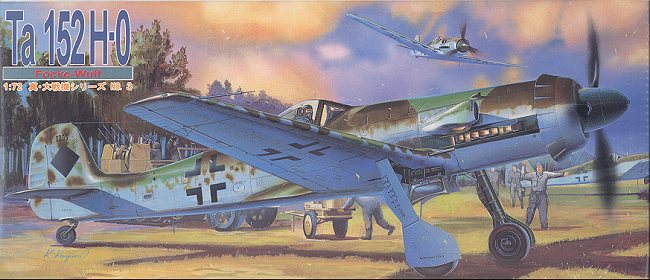
Aoshima 1/72 Ta-152H-0
|
KIT # |
16503 |
|
PRICE: |
$24.00 |
|
DECALS: |
See preview |
|
REVIEW : |
|
|
NOTES: |
|
HISTORY |
Please see the preview of this kit for historical information and a look at the kit as it comes from the box.
|
CONSTRUCTION |
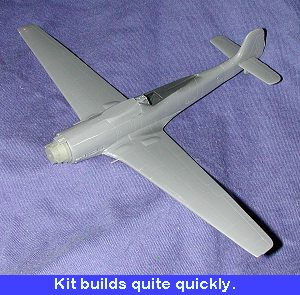
 The kit is quite straightforward, as modern models go.
There are not a lot of small fiddly bits. The downside is that detail is a bit
on the light side and not as finely done as on the Dragon kit of the Ta-152H.
Those who have built the Frog/Revell 1/72 version of this kit will find many
things in common, most notably that this is a kit which will be a pretty fast
build.
The kit is quite straightforward, as modern models go.
There are not a lot of small fiddly bits. The downside is that detail is a bit
on the light side and not as finely done as on the Dragon kit of the Ta-152H.
Those who have built the Frog/Revell 1/72 version of this kit will find many
things in common, most notably that this is a kit which will be a pretty fast
build.
The first things I did were to install the seat and control stick into the cockpit. Then all the cockpit components as well as the inside of the fuselage were painted in RLM 66 dark grey. When dry, the decals for the side consoles and instrument panel were affixed. These were then given a taste of Solvaset to increase the stick. The decals are a bit thick, but that is fine as it means they can take the handling.
 While the decals were drying, the wings were
glued together as was the fuselage. Since the interior inserts from the bottom,
this is possible. One of the first things I noticed is that the panel lines on
the aft part of the fuselage do not match from side to side. I also needed a bit
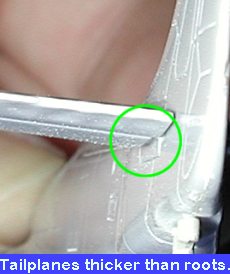
of filler in that area to take care of a gap or two. At this time, I fitted the
tailplanes. Much to my dismay, it
While the decals were drying, the wings were
glued together as was the fuselage. Since the interior inserts from the bottom,
this is possible. One of the first things I noticed is that the panel lines on
the aft part of the fuselage do not match from side to side. I also needed a bit
of filler in that area to take care of a gap or two. At this time, I fitted the
tailplanes. Much to my dismay, it
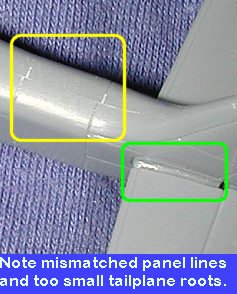 seems as if the tailplanes are actually
thicker than the roots to which they attach on the fuselage. Not sure how to fix
it or if it is actually worth all the work that will be required. For the time
being, I left them as is. The upper fuselage decking was also glued on at this
time. The fit of this was a bit loose, but the real aircraft also had some
pretty sloppy construction in this area so it was not a major concern.
seems as if the tailplanes are actually
thicker than the roots to which they attach on the fuselage. Not sure how to fix
it or if it is actually worth all the work that will be required. For the time
being, I left them as is. The upper fuselage decking was also glued on at this
time. The fit of this was a bit loose, but the real aircraft also had some
pretty sloppy construction in this area so it was not a major concern.
Once the fuselage had been cleaned up, the interior was installed. Fit is quite good, though there isn't much to see through the small cockpit opening. The wings were glued on after the cockpit had dried. Fit was quite good, though there were some gaps at the front that needed filler. Also needed filler on the underside of the forward wing/fuselage join.
 At this
juncture, the forward duct section was glued in place. The instructions would
have you do this near the end as it is what holds in the prop, however, since
rarely do I have moveable props on my kits, it was not a problem. In the matter
of just a couple of days, I had a rather complete airframe.
At this
juncture, the forward duct section was glued in place. The instructions would
have you do this near the end as it is what holds in the prop, however, since
rarely do I have moveable props on my kits, it was not a problem. In the matter
of just a couple of days, I had a rather complete airframe.
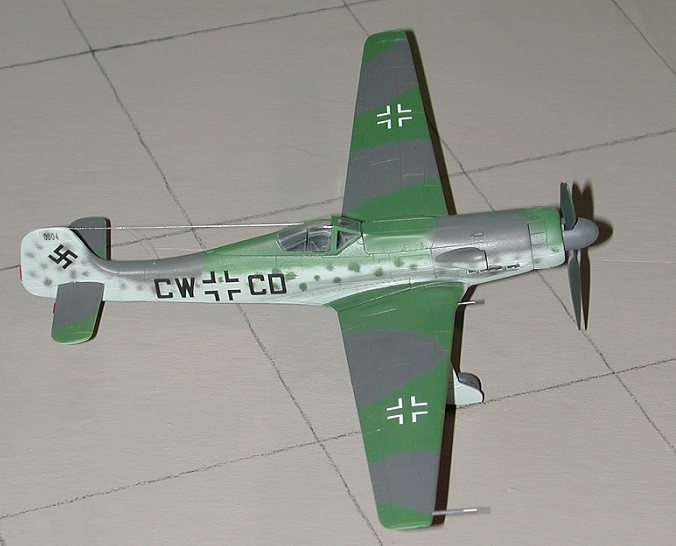
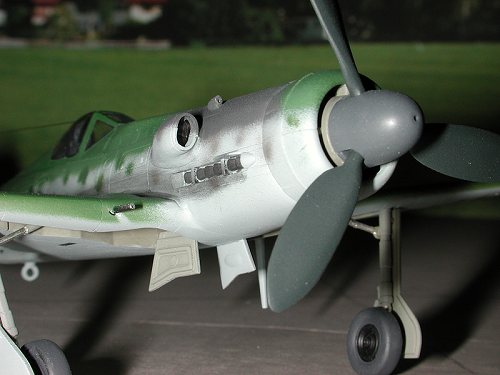
The next steps involved assembling the supercharger intake and gluing that on as well as cementing the nose of my choice. Aoshima offers two noses; one with the cowl flaps open and another with them closed. Most of my Fw-190D models have them open so I decided to be a bit different and do them closed. Besides, there is no detail to be seen when looking into the open flaps. The small scoop was glued into the top of the nose decking at this time and then drilled out along with the gun barrels.
I had decided to build this kit with the canopy closed, though Aoshima does offer the option of an open canopy if you desire such. The canopy fits fairly well, though not perfect with a bit of a step/gap at the front. Interestingly, there is no gunsight offered with the kit so you don't have to worry about installing that item. Once the canopy was glued on and dry, it was masked with Tamiya tape and then it was on to the paint shop.
|
PAINT & DECALS |
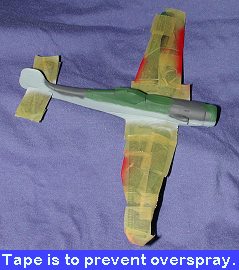 First thing that was painted was the canopy. This was painted
with RLM 66 to match the interior. When dry, the entire underside and all of the
fuselage side was painted RLM 76 using Aeromaster enamels. When dry, the
underside of the tailplanes were masked off and then the upperside was painted
with RLM 83 bright green. Then the RLM 75 for the was airbrushed onto the wings
and tailplanes in a freehand pattern using the kit painting instructions as a
guide. I took care not to get any of the RLM 75 grey onto the upper fuselage.
When the wing and tailplanes had dried enough, they were masked off and the
fuselage RLM 75 pattern was painted. There was a lot of overspray onto the RLM
76 light blue, as I expected. But thanks to the masking, there was no overspray
on the wings or tailplane. Using masking of some sort is the only way to really
prevent any problems with overspray.
First thing that was painted was the canopy. This was painted
with RLM 66 to match the interior. When dry, the entire underside and all of the
fuselage side was painted RLM 76 using Aeromaster enamels. When dry, the
underside of the tailplanes were masked off and then the upperside was painted
with RLM 83 bright green. Then the RLM 75 for the was airbrushed onto the wings
and tailplanes in a freehand pattern using the kit painting instructions as a
guide. I took care not to get any of the RLM 75 grey onto the upper fuselage.
When the wing and tailplanes had dried enough, they were masked off and the
fuselage RLM 75 pattern was painted. There was a lot of overspray onto the RLM
76 light blue, as I expected. But thanks to the masking, there was no overspray
on the wings or tailplane. Using masking of some sort is the only way to really
prevent any problems with overspray.
 Once the
fuselage was done, the RLM 76 light blue was touched up as was any overspray
caused by using the 76. Most of these late war aircraft had a pretty loose
camouflage pattern. These folks used the RLM instructions as a general guideline
and did not stick slavishly to them as was done in the early years of the war.
There were also a lot of touchups that were done, especially to prototypes as
airframe modifications were made to them, or as a result of crashes. These
aircraft did not have the mottling that was so common to front line aircraft so
none was done to this one.
Once the
fuselage was done, the RLM 76 light blue was touched up as was any overspray
caused by using the 76. Most of these late war aircraft had a pretty loose
camouflage pattern. These folks used the RLM instructions as a general guideline
and did not stick slavishly to them as was done in the early years of the war.
There were also a lot of touchups that were done, especially to prototypes as
airframe modifications were made to them, or as a result of crashes. These
aircraft did not have the mottling that was so common to front line aircraft so
none was done to this one.
Once the paint had dried, it was time to do a bit more construction. Mostly to get it on its landing gear. The tail wheel and strut are molded into the fuselage half and that had the tail wheel painted. The landing gear, which had been painted RLM 02, had the oleos covered with Bare Metal Foil. The gear wells were touched up and the gear, actuating struts and doors were installed. No need to remove the ejector pin marks from the inside of the doors on on the landing gear as they cover each other up. Nice move Aoshima! Now that it was on its gear, the kit was sprayed with a clear gloss acrylic in preparation for the decals.
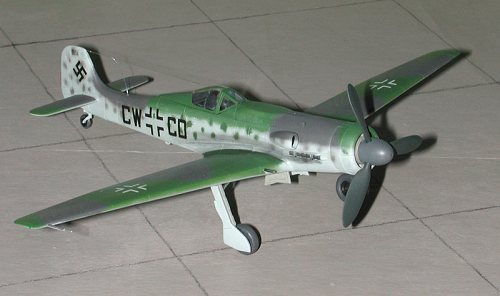 Looking at the decals, I could see cracks in them.
Putting the black crosses into water confirmed my fears as they split into many
small pieces. Grabbing the Microscale Superfilm, the entire decal sheet was
coated. Microscale aftermarket black crosses were then used to replace the ones
that fell apart. It was then that I decided that the airframe was too clean.
Looking at the references again, I decided that I really needed to add just a
touch of mottling to the fuselage side before I went any further with the
decals. Returning to the paint booth, a light mottling was applied. Then it was
reglossed and it was back to adding decals.
Looking at the decals, I could see cracks in them.
Putting the black crosses into water confirmed my fears as they split into many
small pieces. Grabbing the Microscale Superfilm, the entire decal sheet was
coated. Microscale aftermarket black crosses were then used to replace the ones
that fell apart. It was then that I decided that the airframe was too clean.
Looking at the references again, I decided that I really needed to add just a
touch of mottling to the fuselage side before I went any further with the
decals. Returning to the paint booth, a light mottling was applied. Then it was
reglossed and it was back to adding decals.
Adding the Superfilm
to the decals made them a bit thicker than normal. They also made the decals a
bit more difficult to get to conform to the surface details. In some cases,
parts of the decal curled up when it dried. This meant multiple applications of
Solvaset to get the decals to stick properly. The instructions were also less
than comprehensive about all the decals and I had a lot of them left over when
done.
|
CONSTRUCTION CONTINUES |
 Once the decals were all on and dry, it was time to finish up
the construction of the kit. This consisted of installing the inner gear doors,
wheels, adf loop antenna, underwing VHF antenna and the pitot tube. It also
meant attaching the prop to the spinner and placing that onto the front of the
aircraft. Not sure if the prototypes and preproduction aircraft had the spiral
on the spinner, but one isn't included on the decal sheet. Then the kit was
sprayed with a clear matte to seal in the decals. Final steps included removing
the masking, small bits of touchup paint, application of pastels for exhaust
stains and the installation of the antenna wire using clear stretched sprue.
Once the decals were all on and dry, it was time to finish up
the construction of the kit. This consisted of installing the inner gear doors,
wheels, adf loop antenna, underwing VHF antenna and the pitot tube. It also
meant attaching the prop to the spinner and placing that onto the front of the
aircraft. Not sure if the prototypes and preproduction aircraft had the spiral
on the spinner, but one isn't included on the decal sheet. Then the kit was
sprayed with a clear matte to seal in the decals. Final steps included removing
the masking, small bits of touchup paint, application of pastels for exhaust
stains and the installation of the antenna wire using clear stretched sprue.
|
CONCLUSIONS |
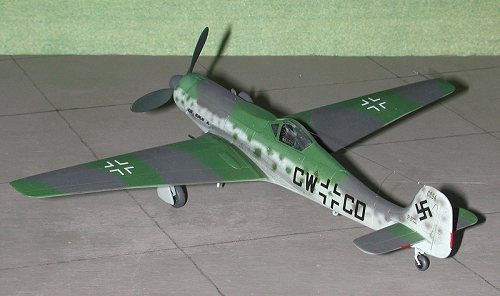
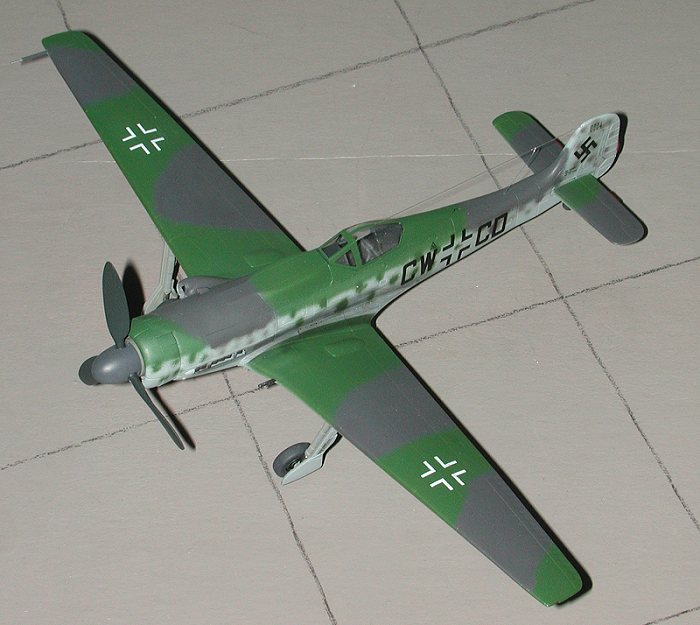
Really a very nice model, despite the problems mentioned above. I have no idea if it is accurate in size or shape as I rarely concern myself with those things. I'll let others concern themselves with what is often minutiae. All I care about is if it looks like what it is supposed to look like and this one does. It is a kit that can be recommended to all skill levels. If you can find it and can justify the rather high price, then go for it. As a late note, this kit has recently (2013) been reissued.
|
REFERENCES |
Mongram Closeup #24: Ta-152 by Jeff Ethell, 1990
Focke-Wulf Ta-152 by Dietmar Harmann, 1999
Copyright ModelingMadness.com. All rights reserved.
Review kit courtesy of me and my wallet!
If you would like your product reviewed fairly and fairly quickly, please contact the editor or see other details in the Note to Contributors.
Back to Reviews Page 2017