| KIT #: | 97 |
| PRICE: | $13.50 back in 1985 |
| DECALS: | Two options |
| REVIEWER: | Scott Van Aken |
| NOTES: | Metal kit with rubber tires and vac windscreen |
| HISTORY |
During the early 1960s, Ferrari was a major player in
Formula One, just as it has been since the renewal of open wheel racing after
World War II. Back in those days, aerodynamics was a very minor part of how a
car was built, with much of how well a car went dependent on the skills of the
driver. These cars had a lot of horsepower to be put to the road through some
pretty skinny tires and relatively unsophisticated suspensions. Drivers wore
simple overalls with a crash helmet and a pair of goggles. No fire suppression
systems, no carbon fibre tubs, no pneumatic suspensions or valve trains. No 6 or
7 speed transmissions or fat, sticky tires. With all due regard to today's
drivers, the men who drove these earlier cars were not the prima donnas
commanding 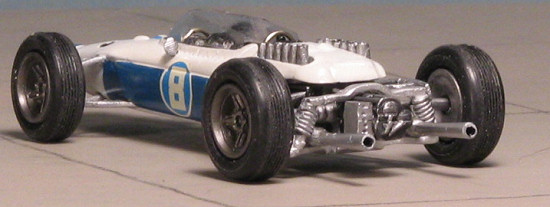 millions of dollars and were often paid out of the purse they won and
little else.
millions of dollars and were often paid out of the purse they won and
little else.
This was back when car racing was a sport and not a business.
The cars wore the colors of the country they represented; Red for Italy, Blue for France, Green for the UK, White and Blue for the US, White for Japan. Privateers often drove cars from last year or the year before and used house colors for this purpose. This was before the multi-hued, sponsor cluttered cars we see today.
The engine size of the time was 1.5 liters. Often the cars were V-8 or V-12 powered, with some of the earlier cars using 4 cylinder engines. The horsepower wasn't as much as today, but that didn't matter as getting the power to the road was a difficult task. These were squirrelly cars that were difficult to drive so driver skill was paramount. Power slides through corners was as much the norm as anything. They were designed to go the full race distance on the fuel and tires they carried at the start. For many of us, the 1950s and 60s were the best years of the sport.
 1964
was well into the 1.5 liter formula. Cars were using engines and suspensions
that had been proven over several years of racing, though they were not what
we'd consider bullet proof, for trying to eke out that extra few horsepower was
often enough to cause catastrophic failure. The last events of the year were in
the United States and Mexico City, a locale that for years presided over the
final race of the season. Going into the last race, it was a close race between
Graham Hill, driving for BRM, Jim Clark, driving for Lotus, and John
Surtees, driving for Ferrari. Due to the way the points system worked, if Hill
won any points at all, he'd have to drop 3 points, so he had to finish in the
top three to be champion. If Clark won the race and the other two finished out
of the points (as in 7th or worse), he'd be the champion. Surtees, a motorcycle
world champion, was determined to become the first to win world championships on
both two and four wheels. Three Ferraris were entered and all were painted in
the blue and white of NART, the North American Racing Team, who paid to bring
over the cars and drivers for the last two races. Besides Surtees, there was
Lorenzo Bandini, a superb Italian driver who would die in a fiery crash at Mon
1964
was well into the 1.5 liter formula. Cars were using engines and suspensions
that had been proven over several years of racing, though they were not what
we'd consider bullet proof, for trying to eke out that extra few horsepower was
often enough to cause catastrophic failure. The last events of the year were in
the United States and Mexico City, a locale that for years presided over the
final race of the season. Going into the last race, it was a close race between
Graham Hill, driving for BRM, Jim Clark, driving for Lotus, and John
Surtees, driving for Ferrari. Due to the way the points system worked, if Hill
won any points at all, he'd have to drop 3 points, so he had to finish in the
top three to be champion. If Clark won the race and the other two finished out
of the points (as in 7th or worse), he'd be the champion. Surtees, a motorcycle
world champion, was determined to become the first to win world championships on
both two and four wheels. Three Ferraris were entered and all were painted in
the blue and white of NART, the North American Racing Team, who paid to bring
over the cars and drivers for the last two races. Besides Surtees, there was
Lorenzo Bandini, a superb Italian driver who would die in a fiery crash at Mon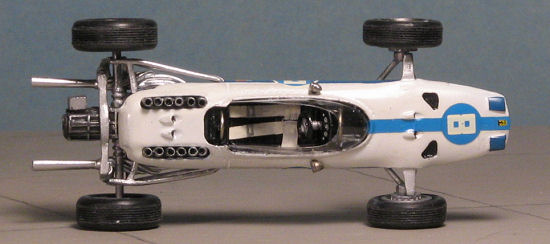 aco's
chicane during the 1967 race, and Mexican driver Pedro Rodriguez driving the
other two Ferraris.
aco's
chicane during the 1967 race, and Mexican driver Pedro Rodriguez driving the
other two Ferraris.
Surtees was driving a new V-8 powered type 158 car with Rodriguez driving an older version. Bandini had the Ferrari 1512 (undoubtedly the type number is 15 for 1.5 liter and the 12 stood for the number of cylinders; hence 1512), powered by a flat 12 (called a 'boxer' engine) that was very fast, but often not that reliable (see photo). As the race started, Hill had problems that kept him from starting and he eventually finished 11th outside the points after an early spin from contact with Bandini. Clark, however, had won the pole and set off at a blinding pace. Surtees' car started misfiring early, but cleared up and he worked his way through the field. With but 8 laps to go, Clark was in the lead with Dan Gurney, driving for Brabham in second, Bandini third, and Surtees fourth. Things did not look good for Surtees as Clark had to finish several positions behind and Surtees had to beat Bandini to keep Clark from being champion. As luck would have it, Clark's Lotus started leaking oil and the engine seized on the next to last lap, relegating him to fifth in the overall standings. Gurney took advantage of Clark's misfortune and grabbed the lead to go on to win the race. Bandini could still have given the championship to Clark, but he slowed down enough to allow Surtees to pass and pick up the valuable points needed, thus ensuring a championship for himself and, more importantly, for Ferrari.
| THE KIT |
 Back
when I first got interested in 1/43, it was quite common to find cast metal kits
and I have to confess that I've built quite a few of these kits. The plus side
is that they can take a beating while the downside is that they are difficult to
clean up and just don't have the fidelity of detail that is offered by resin.
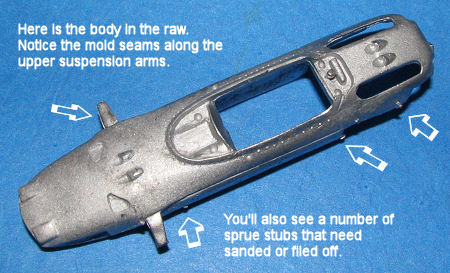
All of the FDS kits I've done have been pretty simple to build and fairly well
molded, though the smaller bits seem to suffer from mold shift to varying
degrees. This is
most apparent in the steering wheels and other parts with thin bits. There are
also the mold attachment parts that will have to be cleaned off as well as the
usual mold seams; just like a standard plastic or resin kit.
Back
when I first got interested in 1/43, it was quite common to find cast metal kits
and I have to confess that I've built quite a few of these kits. The plus side
is that they can take a beating while the downside is that they are difficult to
clean up and just don't have the fidelity of detail that is offered by resin.
All of the FDS kits I've done have been pretty simple to build and fairly well
molded, though the smaller bits seem to suffer from mold shift to varying
degrees. This is
most apparent in the steering wheels and other parts with thin bits. There are
also the mold attachment parts that will have to be cleaned off as well as the
usual mold seams; just like a standard plastic or resin kit.
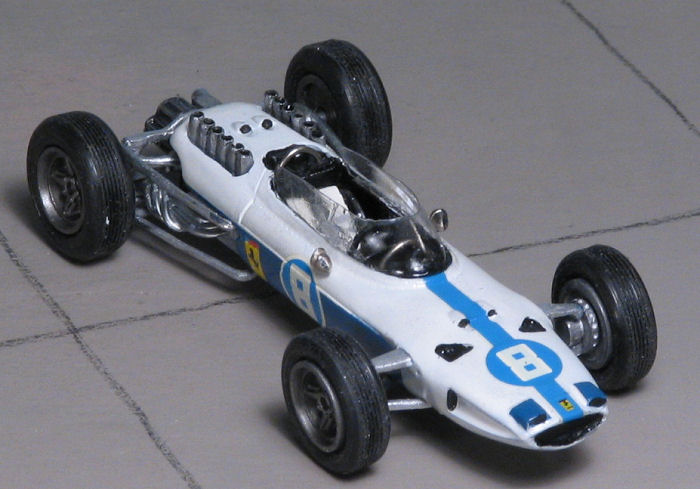
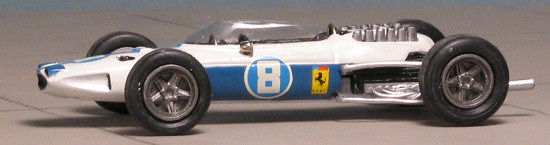
This kit is Bandini's 1512.
 I found it odd that though
the tires are different widths fore and aft, the wheels are the same size, and
seem more appropriate for the wider rear wheels. It is not unusual for these
kits to be rather battered, and over the years, many of the thinner parts have
become bent. Fortunately, with care it is easy to reshape these bits. One does
have to be careful not to overdo it as the material used can be broken if flexed
too often. The vacuformed windscreen is very thin and has little in the way of
delineation to tell where one should trim it. Only one is provided. A side note
is that the rivets along the sid
I found it odd that though
the tires are different widths fore and aft, the wheels are the same size, and
seem more appropriate for the wider rear wheels. It is not unusual for these
kits to be rather battered, and over the years, many of the thinner parts have
become bent. Fortunately, with care it is easy to reshape these bits. One does
have to be careful not to overdo it as the material used can be broken if flexed
too often. The vacuformed windscreen is very thin and has little in the way of
delineation to tell where one should trim it. Only one is provided. A side note
is that the rivets along the sid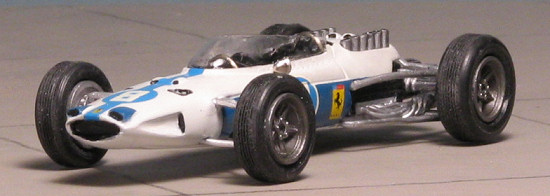 e of the body are recessed, where on the real car, they are not. Photos of the actual car also show that the fit of the body
components was, to be polite, rather loose. Often one could see rather
substantial gaps and overlaps.
e of the body are recessed, where on the real car, they are not. Photos of the actual car also show that the fit of the body
components was, to be polite, rather loose. Often one could see rather
substantial gaps and overlaps.
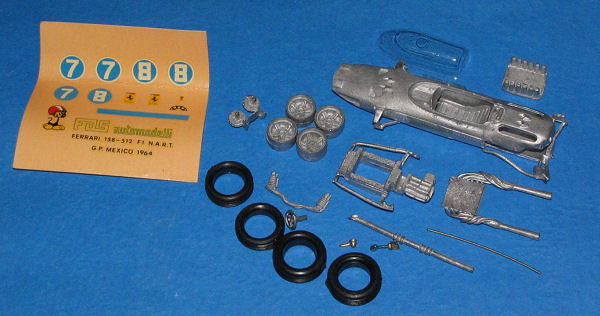
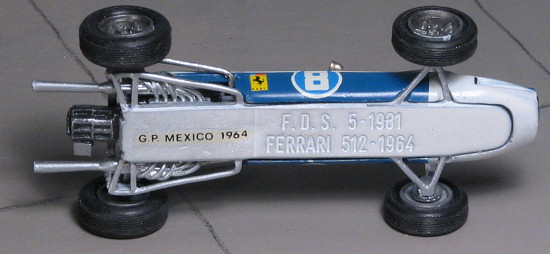
Instructions are limited to a single small sheet with a
photo of the built up model on one side, and an exploded view with minimal color
info on the other. The now rather old sheet has markings for car 7 and car 8,
though in reality, the only ones appropriate for this kit are the #8 markings;
Lorenzo Bandini's car. Surtees #7 car was the V-8 powered Ferrari 158 and so his
number isn't applicable to this kit. Having used FDS sheets in the past, I can
tell you that the whites are somewhat transparent and like this
![]() sheet, they tend to
have registration problems. However, they do work and finding replacements is
unlikely. I'd also hoped that all the lumps and bumps on the kit were mistakes,
but is seems that when the car was run at Mexico City, the need for more air
caused those horrible forward nose bumps to be created. Does nothing for the
look of the car. Unable to find a photo, the best I could come up with was a
drawing.
sheet, they tend to
have registration problems. However, they do work and finding replacements is
unlikely. I'd also hoped that all the lumps and bumps on the kit were mistakes,
but is seems that when the car was run at Mexico City, the need for more air
caused those horrible forward nose bumps to be created. Does nothing for the
look of the car. Unable to find a photo, the best I could come up with was a
drawing.
| CONSTRUCTION |
 As with any kit of this type, the initial stages of
construction will involve cleaning up the parts and getting them ready to go. In
this case, I first had to remove all the glue from the old tape that had held
the chassis and body together. I used 'Goo-Gone' for this and it worked like a
champ. It also polished things up a bit as well. I then got down to the
task of cleaning up the few parts that are provided. For much of this I used
files as it is the best way to get into the little nooks and crannies of the
various bits. I discovered that in the many years since I built one of these,
the quality of the molds has gotten worse! What wasn't bad in 1990 is now not
that great. I had a real problem with mold mismatch on the suspension bits. To
the extent that in some cases, the parts would have been better off being
replaced by bits from the spares box. However, this was supposed to be a pretty
quick and easy build, so doing major scratchbuilding would have deviated from
that. Since this will never see a contest and only grace my shelves along with
others of its ilk, I cleaned things up as best as I could and left it at that.
As with any kit of this type, the initial stages of
construction will involve cleaning up the parts and getting them ready to go. In
this case, I first had to remove all the glue from the old tape that had held
the chassis and body together. I used 'Goo-Gone' for this and it worked like a
champ. It also polished things up a bit as well. I then got down to the
task of cleaning up the few parts that are provided. For much of this I used
files as it is the best way to get into the little nooks and crannies of the
various bits. I discovered that in the many years since I built one of these,
the quality of the molds has gotten worse! What wasn't bad in 1990 is now not
that great. I had a real problem with mold mismatch on the suspension bits. To
the extent that in some cases, the parts would have been better off being
replaced by bits from the spares box. However, this was supposed to be a pretty
quick and easy build, so doing major scratchbuilding would have deviated from
that. Since this will never see a contest and only grace my shelves along with
others of its ilk, I cleaned things up as best as I could and left it at that.
The body required a bit of filler in a few spots so I
used Mr. Surfacer to see how it would handle metal in a few places. In others, I
tried a new filler that was provided for experimentation.
 While that was drying,
I drilled out both the intakes and the exhaust. The intake stack is really not
well molded, being more like a group of somewhat square chimneys than velocity
stacks. I had to first file down the top of all of them as they were not of
equal height. More concerned modelers will replace these with tubing. All of
this clean-up took about an hour and a half.
While that was drying,
I drilled out both the intakes and the exhaust. The intake stack is really not
well molded, being more like a group of somewhat square chimneys than velocity
stacks. I had to first file down the top of all of them as they were not of
equal height. More concerned modelers will replace these with tubing. All of
this clean-up took about an hour and a half.
The next thing I did was to paint the inside of the body and the seat with matte black, and for this I used Floquil Engine Black. Eventually, this was a waste of time as overspray was able to pretty well make repainting needed again. I then painted the body using Floquil's reefer white after sanding it down to a smooth surface. Actually 'smooth' is a bit of a misnomer as there were some casting glitches that were just too much trouble to fix for what would be a shelf model. I also found that I had to do more filing to have the various engine components fit within each other. Much test fitting went on to be sure that I could have things join up fairly well when it came time to apply cement. With things about as well done as they could be, I took the bits to get painted.
| COLORS |
You already know about the body being painted Reefer
White. The other color was a blue shade. It looks l![]() ike French Blue, but since I
didn't have that particular shade, I mixed up something that I thought was
closely matched to the decal. And it was, until it dried, at which time it was a
bit darker. This shade was applied to the lower body panels and the nose cooling
scoops. I painted the transmission area as well a
ike French Blue, but since I
didn't have that particular shade, I mixed up something that I thought was
closely matched to the decal. And it was, until it dried, at which time it was a
bit darker. This shade was applied to the lower body panels and the nose cooling
scoops. I painted the transmission area as well a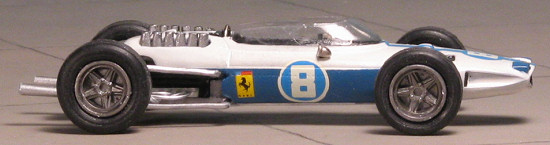 s the exhaust piece and intake
section with aluminum. The wheels were given a coat of magnesium. These metallics were all Alclad II. I then painted the exhaust with chrome to make it
shinier. I had thought about using white, but it wasn't for a few more years
that this color became popular on exhaust. I then gave the body a couple
of coats of clear acrylic gloss (Future).
s the exhaust piece and intake
section with aluminum. The wheels were given a coat of magnesium. These metallics were all Alclad II. I then painted the exhaust with chrome to make it
shinier. I had thought about using white, but it wasn't for a few more years
that this color became popular on exhaust. I then gave the body a couple
of coats of clear acrylic gloss (Future).
Back on the bench, I broke out the paint brush and did some more work with the Floquil engine black. This included the intakes, inside of the body and the area behind the cockpit. I painted the transmission with weathered black as it looked more of a grey in the photo. I also painted what I can only assume to be the engine block with the black as well.
| MORE CONSTRUCTION |
I then started with some gluing, using superglue, though I'm sure that epoxy would work as well in this regard. I put the rear axle into its housing and glued the lower section with the exhaust to it. I had to be careful with alignment on this so that things would be somewhat level. I then glued this to the back of the body pan. This required much rebending of the rear suspension pieces as the upper and lower suspension was not totally even. By this I mean that where they met the axle, one side was narrower than the other. I also found that the exhaust wouldn't fit quite as advertised. They should swoop up from their attachment to the engine, but in order to have them clear the rear axle, the entire header on each side had to be bent down.
| DECALS |
 While that was drying, I took a careful look at my 25
year old decals (assuming the kit was produced in 1981 as stated in the
instructions). One of the problems with decals in most of these kits is that
they've been folded and that usually spells disaster. I carefully cut off one of
the numbers I wouldn't be using and dipped it in water. After a minute or so, I
pushed it off the backing onto an unused part from one of my previous plastic
models. Though the decal had yellowed a bit and was from a section of the sheet
that had been heavily creased, it came off in one piece. I
While that was drying, I took a careful look at my 25
year old decals (assuming the kit was produced in 1981 as stated in the
instructions). One of the problems with decals in most of these kits is that
they've been folded and that usually spells disaster. I carefully cut off one of
the numbers I wouldn't be using and dipped it in water. After a minute or so, I
pushed it off the backing onto an unused part from one of my previous plastic
models. Though the decal had yellowed a bit and was from a section of the sheet
that had been heavily creased, it came off in one piece. I
 then applied some Solvaset
to it and it behaved beautifully. That was quite a relief and so I applied the
nose stripe, liberally applying setting solution to it so it would conform
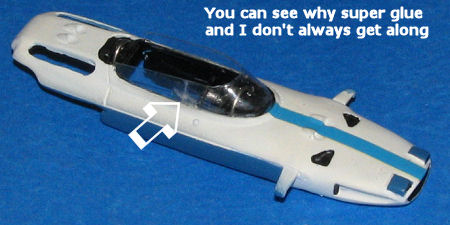
properly. Much to my delight, it worked superbly. Next was to install the
vacuformed windscreen. This is poorly defined, but after some trimming, I was
able to get it in place. I made the usual mess of things with superglue on the
side panels, but a bit of Future on it helped to reduce the obviousness of this
screw-up.
then applied some Solvaset
to it and it behaved beautifully. That was quite a relief and so I applied the
nose stripe, liberally applying setting solution to it so it would conform
properly. Much to my delight, it worked superbly. Next was to install the
vacuformed windscreen. This is poorly defined, but after some trimming, I was
able to get it in place. I made the usual mess of things with superglue on the
side panels, but a bit of Future on it helped to reduce the obviousness of this
screw-up.
I then applied the other markings and this included an instrument panel decal. I trimmed each decal very closely to remove any of the yellowed carrier film. I also had to fudge around the off-register side numbers. The white isn't very opaque and the underlying color does bleed through. After they were all on and dry, I noticed that one of the NART markings had slipped and dried way off position. A dab of Microsol, about a minute's wait, and then I flooded the decal with water, pushing at it from the edges with an old paint brush. Eventually it worked its way free after about 10 minutes of work and I was able to put it back on in the right position. One has to be gentle in this process, but unless it has been clear coated, it works every time to remove and reposition decals.
| LAST STEPS |
 One
wouldn't think that a kit with this few a number of parts would be a lot of
work, but really, it is. The next thing I had to do was to add a couple of roll
bars; one above the instrument panel and one behind the driver. When dry, the
steering wheel was painted and glued in place just under it. A piece of stiff
wire is provided and after some bending and trimming, these were added in. No
painting on these bits is needed. I drilled out the holes for the poorly cast
side mirrors, clipped the metal posts shorter and installed them. I applied
cement from the inside to keep from messing up the body. A bit of paint on the
forward suspension bits (not cast very prototypically) and that was basically
it.
One
wouldn't think that a kit with this few a number of parts would be a lot of
work, but really, it is. The next thing I had to do was to add a couple of roll
bars; one above the instrument panel and one behind the driver. When dry, the
steering wheel was painted and glued in place just under it. A piece of stiff
wire is provided and after some bending and trimming, these were added in. No
painting on these bits is needed. I drilled out the holes for the poorly cast
side mirrors, clipped the metal posts shorter and installed them. I applied
cement from the inside to keep from messing up the body. A bit of paint on the
forward suspension bits (not cast very prototypically) and that was basically
it.
Back on the chassis, I installed the rear shocks,
though I have to say that this is probably the worst cast portion of the kit,
the mold misalignment is so bad. I then cleaned up the front brakes and glued
those to the lower front suspension pieces. At this time, I brush painted the
suspension
 arms
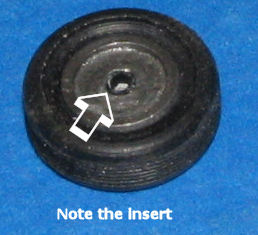
with Humbrol Aluminum and let that dry. When it came time to install the wheels,
it was obvious that the holes on the back of the wheels were about twice the
size as the axle bits. A cure was found with some plastic tubing. I found a
section that would fit into the back of the wheels, yet also fit snugly onto the
axles. I cut four thin slivers and put each one into the back of a wheel.
arms
with Humbrol Aluminum and let that dry. When it came time to install the wheels,
it was obvious that the holes on the back of the wheels were about twice the
size as the axle bits. A cure was found with some plastic tubing. I found a
section that would fit into the back of the wheels, yet also fit snugly onto the
axles. I cut four thin slivers and put each one into the back of a wheel.
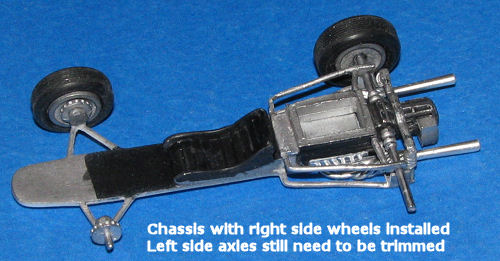 Then
it was time to trim the axles and stick the wheels in place. It seemed all was
right with the world on this regard and when I put the chassis on a flat metal
plate, there was no wobble. Of course, with this soft metal, it would be easy to
simply bend something until all four wheels were aligned.
Then
it was time to trim the axles and stick the wheels in place. It seemed all was
right with the world on this regard and when I put the chassis on a flat metal
plate, there was no wobble. Of course, with this soft metal, it would be easy to
simply bend something until all four wheels were aligned.
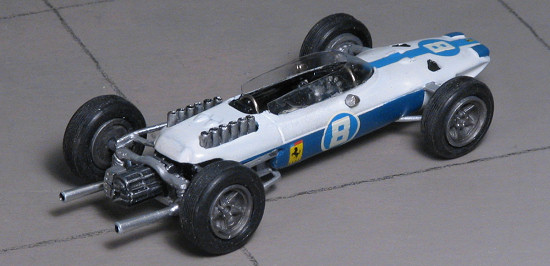
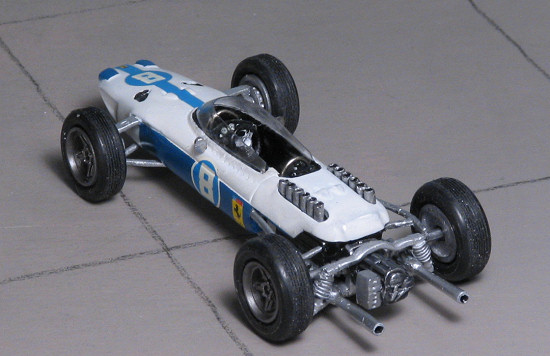
With the body fully painted, I test fit it to be sure all was well. Something was missing. A seat harness. I didn't have any belts in 1/43, but I do in 1/48 and 1/32 for aircraft. A set of wide lap belts came from a US Navy harness set and the shoulder belts were cut from the excess brass on an old fret. Last thing to do was to cement the upper body and the chassis together. I then added some matte to the various intakes and that was it.
| CONCLUSIONS |
To me, this is an old friend. At least the FDS kits are. Most of my 1/43 racing car collection (small though it is) consists of these kits so I know what to expect. Today's modeler expects a greater amount of detail and fewer molding glitches so they probably wouldn't be quite as acceptable. When you compare the grossness of the detail of the kit to the finesse of the real car, there is a rather large disparity. One does need to take into consideration that the whole model is only 3½ inches long, and this includes the exhaust. However, I like them for two reasons. One is that they were not expensive. Secondly they build quickly and when one needs a finished model in a week and is limited on time, these are great!
| REFERENCES |
Various internet sites. A healthy Google will bring up a lot of information on not only the car but the race and the drivers involved.
January 2006
#1399 in a series
Copyright ModelingMadness.com. All rights reserved.
If you would like your product reviewed fairly and fairly quickly, please contact the editor or see other details in the Note to Contributors.