Kit: DC-3
Scale: 1/48
Kit Number: 5610
Manufacturer: Monogram
Price: $21.25
Media: Injected Plastic
Decals : One version: Eastern Airlines - the aircraft on display at the Smithsonian.
Date of Review: 29 April, 1996
Comments: When airplane people are asked what is their favorite aircraft, a large number will pick the DC-3/C-47/Dakota. And why not. The Gooney Bird is an aircraft that many of the older generation has flown in and many of the youngsters out there have seen at air shows. I find it amazing that an aircraft that is well over fifty years old is still giving sterling service with airlines and air forces throughout the world. It only goes to prove that when you build something right, it will last a lifetime. I only hope to be around when it celebrates its 100th birthday in 2033!!
I would be willing to bet that anyone who has done more than five years of modeling has built a C-47 or one of its derivatives. I know that I have built four variants: a 1/100 Nitto kit in TWA marks, a 1/72 C-47A from Italeri, a 1/72 EC-47N using the ESCI kit as a basis, and the 1/48 Monogram DC-3. In addition, I have 14 kits of various versions squirreled away.
One thing that always impresses DC-3 modelers is that size of the aircraft. I had always thought of it as being a rather small aircraft, but the size of the wings alone puts it into the large category. When Monogram released the United Airlines version, I knew that it was time to build it. The first surprise is the size of the box. When you open it, you will see why as the fuselage and one-piece lower wing do a credible job of filling the box. You will thank Monogram for the one-piece lower wing as it really assists construction. Next surprise is the size of the decal sheet. It appears to fill the bottom of the box.
The first step in construction is the interior. Typical of Monogram, it is very detailed although there is room for additional super detailing should you wish. The floor comes complete with the passenger seats already molded in so you won't have to spend the time building all those seats. Since this is a passenger version, you also get overhead racks and window curtains molded as a single piece to be placed over the windows. Be sure to paint the interior prior to installing the windows and also be sure to paint the curtains as they are easily seen from the outside. The kit gives you the option of having the 'airstairs' up or down. Since the portal is rather small, very little of your detailing work in the interior will be seen past the back rows, so if you opt for down stairs, don't spend a lot of time on interior work. If the stars are up, you can spend even less as the small thick windows do not allow a lot of interior view to be seen from the exterior. The same goes for the cockpit, although you can see a bit more if you opt to open the escape door on the pilot's side. This is equally true for the radio room. It is a shame that these areas cannot be seen as so much research has gone into providing decent details for you.
Anyway, once the interior has been built and the proper holes opened for your radio suite, you can then cement the fuselage together. It is actually quite sturdy as the various bulkheads stiffen the fuselage quite well. A nice touch is that the tail wheel assembly is a snap fit and can be put in after the kit is painted and decaled. I did have a bit of a fit problem around the cockpit canopy, but it is nothing that cannot be cured. Once the fuselage is complete, it is on to the wings.
Due to the design of the wings, it is possible to cut and drop the flaps, but I believe you will lose rigidity and you'll also have to do some fabrication on the undersides of the upper part. Naturally, I took the lazy way out and did not drop the flaps. The wings are really long and large and my copy suffered a little warp. Careful gluing or hot water treatment will take care of this problem. The engines are just half engines, but look great with proper painting and drybrushing. The exhausts provided in the kit were too long for the version I was building, so I cut them short, slightly reshaped them and hollowed them out with a motor tool. While with the wings, I also built up the undercarriage, which is a rather complicated affair, but once together is very sturdy. You can leave off the main wheels until after the aircraft is painted, but it is a tight fit and you must be very careful. Since I built this before the days of True Details, I did not use their resin wheels, but the next one will have them!
The final step is gluing the huge wings to the fuselage. Mine fit quite well, only requiring a bit of putty on the underside where they attached to the fuselage. I found that gluing one side first and then the other prevented any major screw-ups and steps in the wing/fuselage join. Once this is accomplished and you realize how huge a kit it is, the next step is painting.
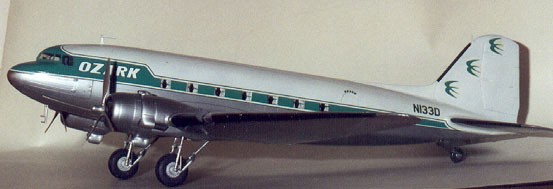
I had already determined that I was going to build an Ozark Airlines version. I had flown in one on a trip from St. Louis to Chicago in the early 1960's. I can remember that it made three stops on the way on a 270 mile trip! I used a sheet of decals provided by IPMS as their 1985 convention special. Actually I used two, but more on that later. The first thing I noticed was that the Monogram Kit has the passenger door on the left side, whereas according to the instructions, Ozark DC-3s had the door on the right. Monogram's kit is correct for United Airlines, so I was left in a quandary. Do I go through the modification required or do I take the lazy way out and leave it. You guessed it: the lazy way, so hold your cards and letters. I also did not have a beacon for the top of the tail so left that off as well.
Back to the paint. It is a relatively simple scheme of Aluminum and White. After masking the windows, the top of the fuselage and the tail was painted white and masked. Then the rest of the aircraft was painted Aluminum including the undercarriage and wheel wells. I mixed a slightly different shade for the fabric control surfaces just to add some change. I then coated the entire aircraft with Future floor wax. This realistically dulled the Metallizer aluminum, gave me a smooth surface for the decals, and allowed me to handle the kit without getting 'stuff' all over my hands. The final paint step was to mask the de-icer boots and paint them black. After all this had dried for about a week, I added all the decals. When I first lined up the decals, I noticed that they were too long to fit the windows. This required me to cut the decals into small sections and put in each section individually to ensure proper alignment. The biggest problem was around the nose section. The anti-glare panel is part of the green fuselage stripe. Not only was it insufficient to cover the nose section, it was just a real chore to get it to fit all those tight compound curves. Thankfully, I had bought two sheets so, with the use of Solvaset, was able to add extra bits of green from the second sheet and to get the decals to finally fit, but it took the better part of two weeks to get it all right.
Finally, add the props, antennas, put Bare Metal foil over the landing lights, and put on the light covers. Done. It looks superb and takes up a huge amount of shelf space, but it is a 1/48 Ozark Airlines DC-3. I have actually been offered several hundred dollars for the kit, but would rather give away a kit to someone would would cherish the gift than to sell models. Sales means a business and modeling then stops being a hobby.
If you have the space for it, buy Monogram's DC-3 while it is still available.