Anigrand 1/72 AJ-2 Savage
| KIT #: | AA-2089 |
| PRICE: | $106.00 |
| DECALS: | One Option |
| REVIEWER: | Scott Van Aken |
| NOTES: | Full resin kit with metal landing gear and a CD with photos and modeler's notes. |
The AJ Savage was a large composite-powered carrier-borne Attack Bomber designed to deliver nuclear ordnance. It also performed photo reconnaissance duties and later on was used as an aerial refuelling platform. The North American AJ-1/2 and AJ-1/2P Savage aircraft were in a number of USN Heavy Attack Composite squadrons from 1948–1956, as well as in several Photographic Reconnaissance squadrons. The Heavy Attack versions were the first nuclear bomb carrying bombers able to be launched from and recovered on aircraft carriers. The date of its inception was a time where the US Navy was faced with procuring the nascent jet engine, while still having to rely upon the simple yet well proven reciprocating engine. Jets at this time were unreliable and used large quantities of fuel; however, once they were developed, they produced performance that no piston engine could ever provide. A compromise was made to include in the Savage two Pratt & Whitney R-2800 piston engines, with a large turbocharger fitted inside each engine nacelle. This combination made it possible for the R-2800 engines to produce rated powe r (2,500 hp/1,864 kW) up to 42,000 ft (12,802 m) altitude. An Allison J33 turbojet was fitted in the rear fuselage. Interestingly, both engine types used the same fuel. The piston-turbojet arrangement was intended to give added power on take-off and extra dash speed while in combat. At high altitude, this 'boxy' looking (but aerodynamically very clean) airplane was remarkably fast - more than 460 mph (740 km/h), when the jets of that era were not very much faster.
The first production Savage flew in May 1949, with the first carrier landing of the type taking place on the USS Coral Sea on 31 August 1950.
Early model Savages (AJ-1) were converted to the air tanker role, with the bomb bay filled with all the necessary equipment, including hoses, fuel pumps, electric power drive, and the drogue. Additional fuel was provided in drop tanks. AJ-1 tankers were used to refuel John Glenn's F8U Crusader during the Project Bullet transcontinental speed record flight.
The AJ-2 first flew on19 February 1953 and had uprated engines and a taller vertical stabilizer and non-dihedral tailplane.
The AJ-2P was the photographic reconnaissance version of the Savage. It carried photo-flash bombs for night missions, with most of the plane's 18 cameras being operated automatically. It was capable of night and low-level reconnaissance. The -2P also had additional fuel capacity
This latest kit from Anigrand incorporates a new feature from this company; cockpit interior detailing. A first for Anigrand and one that I hope we will continue to see. Having this as part of the kit means greater attention to quality control to prevent any resin blobs or unwanted air pockets in this are. It seems to have worked as the last few kits have also been glitch free in the wheel 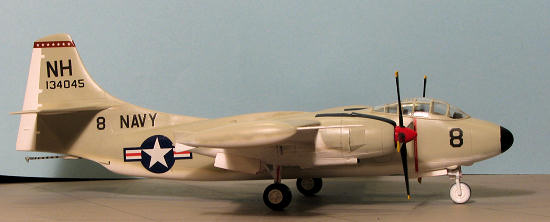 wells, where these things often form. It is not all roses as you'll still find some small voids on the wing tips, lower engine intake lips and on the side of one of the wing nacelle sections, to name a few. I also found a few pits, but these all are relatively easy to fix and to be expected.
One of the nice surprises is that there is detail in the cockpit. Not only on the sidewalls, but on the instrument panel as well. The seats are well done and while not as spindly as the originals, give a good impression. One does need to do well in the interior as the resin canopy section is very clear and you'll be able to see what's inside. This has engraved frame lines making masking a snap.
Test fitting the parts shows that considerable work has gone into engineering. The engine nacelles fit well onto the wings, the fuselage halves match up well and the fit of the canopy is very good. I even was able to get very good joins on the wings as well. This one looks to be a pleasure to build. I do notice from the modeler's notes that the tail hook attachment area is pure fiction, but the correct shape is given in the notes for those who wish to make the correction.
 The kit comes with metal gear as well, a real plus as it will take considerable weight to prevent tail sitting. These are nicely cast as well and should look even better with a touch of file work to clean off the seams. I am impressed with the level of detailing on the engine nacelles. These are not simple items to mold, yet Anigrand has done a bang up job getting all the various intakes and vents in the proper location. I understand that much research went into doing this one right the first time with noted author and historian Tommy Thomason being very much involved.
Typical of Anigrand, you get several smaller decal sheets to make into one set. The strip sheet is doubled up and a generic set of insignia is included. Instructions are the usual exploded views with detail information. The unit chosen for the markings is not listed. I'm also not 100% on the red nose. Only on the plane at the USN Aviation Museum have I seen this. Other color images I've found of the plane show it black or a tan fiberglass color.
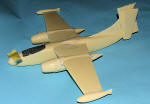
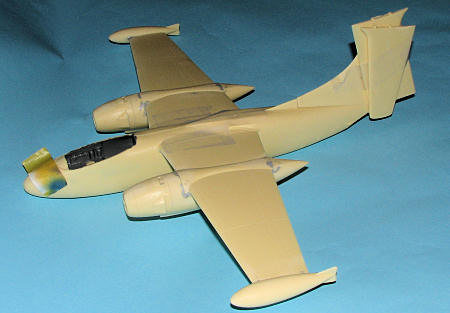
As always with short run molded kits, I did parts clean-up. This meant filling in the small voids one often finds and sanding smooth all the mating surfaces. This was on the larger parts as I generally don't clean up the smaller ones until near time to be attached.
 On this kit, the first actual assembly was on the wings. There are two engine nacelle halves per side and a wing tip tank. It is very handy to have a low speed motor tool with several different shaped grinding bits to get the parts cleaned up. Everything took multiple test fits to be sure there were no problems. On the engine nacelles, I simply dropped in the engine facings before gluing the halves together. They fit quite snugly in there with no need for cement. There is the need for filler on the nacelles and when attaching them, but the overall fit of these parts is quite good. This was one area where I had to do some extra sanding to get a good fit. The tip tanks were also a very good fit. Having them installed made it easier to fill the couple of air voids that I found on the wing tips.
 The next stage was to be sure I had enough weight in the nose. I did this by first putting in what I thought was enough lead in the cavernous nose area and then taping all the major assemblies together with Scotch tape. Then I balanced the model with my fingers where the main gear struts attached. It seemed as if I had enough so when I removed the tape, I added another weight just to make sure. I generally use conical fishing weights for this purpose as they come in a variety of sizes and can be smushed down if needed. Using round shot requires the building of extra bulkheads to keep it in place, which is why I use the larger conical weights.
 I then assembled the cockpit bits after painting them, with the exception of a small rear panel that had to fit across the fuselage seam. I painted the cockpit dark gull grey after initially painting it in weathered black (which was far too dark). I started gluing the fuselage in stages, starting at the nose. This would allow me to tweak the fuselage as I went along to be sure that all the panel line lined up. Resin in notorious for being a bit off kilter when it comes to fuselage halves and this seems to work out well.
Once all the fuselage seams were filled with super glue and sanded down, I attached the fin/rudder part. Fit here was also very good after clean-up with the only largish gap at the front. Several applications of super glue filled that with no real problem. Attaching the tail planes was equally simple. Again a small gap at the front. Anigrand molds the very tip of tailplanes in with the fin. They also have each side keyed differently. While on the subject of keys, this is one of the first Anigrand kits I've built that had all the keys fully molded on the various parts. Usually many of them are short shot to the point where they are not there.
The next step was attaching the wing assemblies. The fit here is so good that I used no additional filler when attaching them. With the interior in place and drybrushed, I then glued on the canopy. This is very nicely molded with only a couple of tiny air bubbles. I particularly like that Anigrand has the frame lines engraved. Though not prototypical, it makes masking them SO easy. In fact, I didn't mask it until after I  had attached it to the airframe. For this, I used Vallejo clear gloss paint. This has several benefits. One is that it won't fog the resin as does superglue and it flows almost as well into the seams. Secondly, it is something that you can form to some extent with your finger to prevent blobs. Finally, it sticks quite well, especially if the attachment area is large. You do have to tape the assembly in place while it dries, but once that it done, you can touch up any gaps you see with more paint.
Since the underside, landing gear and wheel wells were to be painted the same color, I cleaned up the metal landing gear with a small file and glued these into place. The main gear was a positive fit while the nose gear fits into a bit of a shallow depression and required some fiddling to get it into position just right. Drilling the depression more would have made the nose gear too short. I also took this time to attach the two small bumps that go near the nose gear door.
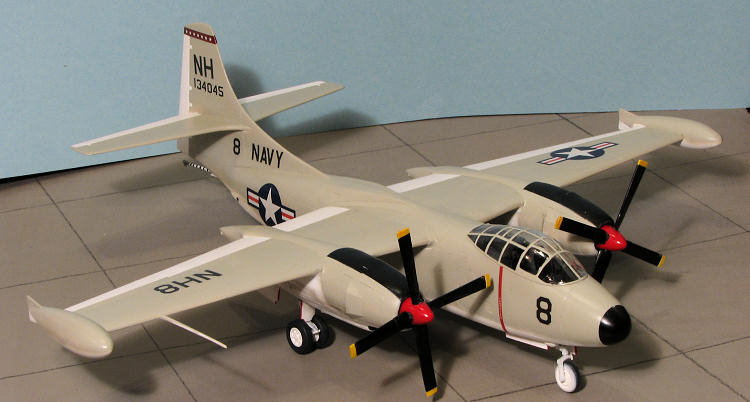
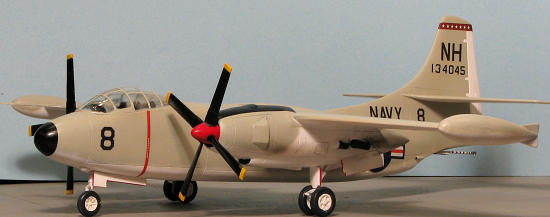
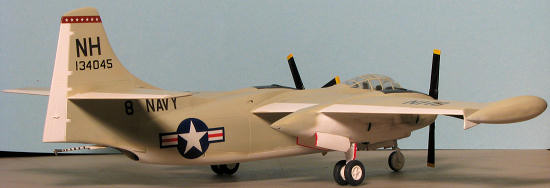
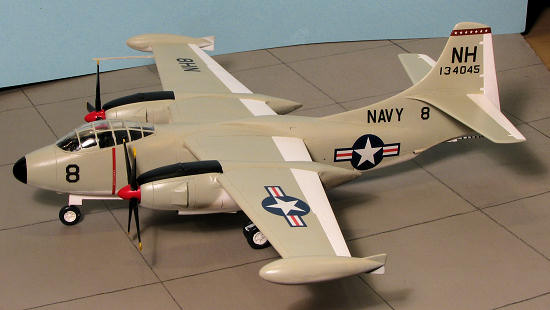
With the airframe together, I headed for the paint shop. This isn't a tiny airplane and so painting it wasn't a short operation. It took several days just to apply the gloss white, and add a few more when I found a seam I missed and had to repair it and repaint. Since I had to repaint things anyway, I sprayed black on the upper engine nacelles and the nose. These areas were masked off when dry. I know that the paint scheme in the box calls for a red nose, but I just couldn't do it as it just looks wrong. I also had to do a lot of masking of the white uppe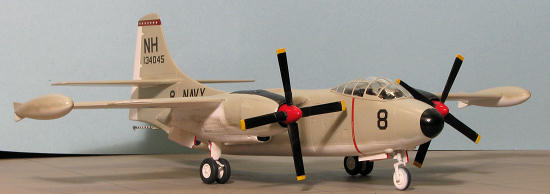 r control surfaces and rudder. A note about this. I have found photos of this plane where this wasn't done, so the choice in this regard is yours. Most of the time, the rudder was not white
Once all that masking was done, I sprayed on the matte light gull grey, using what was left of my Aeromaster enamel to do so. The demarcation lines are not razor sharp as many times the original paint job was oversprayed by a bored sailor with a rattle can, dreaming of the next port of call while assigned to corrosion control. Been there, done that so I know of what I speak. After all of that had dried, the masking was removed and I found that some of the black on the nacelles had peeled up with the tape. Happens on EVERY resin kit I build. After the touchup, the upper surface was given a couple of coats of Future in preparation for the decals. Anigrand's decals are quite good, though relatively impervious to setting solutions. Even using Solvaset, I was unable to get them to properly snuggle down. It was here that I deviated again from the instructions. For whatever reason, no serial number is provided. Again, every photo I've seen of this plane in this scheme has it prominently placed on the fin. Fortunately, I have an older Superscale sheet that has numbers in the right size and font so I chose one from the serial sequence for the AJ-2 and applied it. I also applied black stripe decal sections around the tail hook. Just for the record, though not noted in the instructions, it appears that this plane was assigned to VAH-7. I found several photos showing the same tail band, though in different colors and all were from this unit.
There actually is quite a bit to do for the last bits. First off, the props have to be built up. In the Modeler's Notes it suggests pretty much removing the cuffs from the prop blades. I didn't do this. I did paint the spinners white then red and the blades black. The tips were painted white then yellow. To my surprise and delight, no paint seeped under the masking. After sanding off the resin 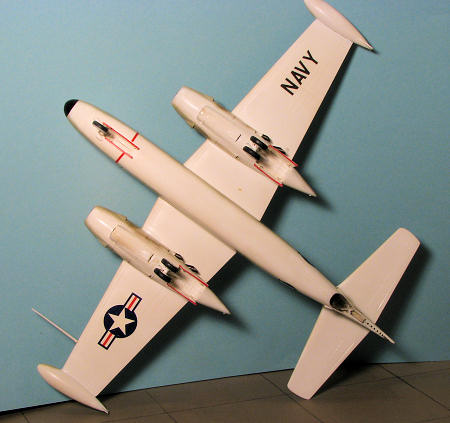 pour nubs, these were easily slotted into the hub. The wheels were painted then glued onto the struts. A note on the nose wheel. Apparently there was a problem of catapulting the aircraft with the nose wheel swiveled around (which tells me the plane didn't have nose wheel steering). When this happened, the wheel would jam during retraction as it rotated 90 degrees into the well. As a result, crews painted the right side of the tire in white to be sure all was properly aligned on the cats. This was duplicated on the nose wheel, so it is NOT sloppy painting on my part.
I then painted all the vents and intakes. Next, the gear doors were cut and using a red Sharpie, I added the red door warning markings that were part of the change-over to the grey/white scheme. The doors were glued in place without any trauma. This is the first Anigrand kit I've built where all the little hinges on the doors were intact. Often one or more are broken away or short shot. As yet another note, the large main gear doors were normally closed. I was just too lazy to do the extra work of getting them to fit in that way. The pitot tube was trimmed and glued in place. Once dry, this was painted. The tail hook was then glued in place. The way Anigrand portrays the hook door is pure fiction. It is more 'vee' shaped and the CD that is included shows the correct way to reform this part of the aircraft.
I then gave the upper surface a coat of semi-matte clear to seal in the decals. The masking was removed from the canopy, the props pushed onto the engines, and the model was done. I then hurried to take photos of it for the article before I broke something.
This is without a doubt the finest Anigrand kit to date. The thorough research that went into its molding shows in the detail level of the cockpit. The molding is the best so far and aside from the usual work needed on some small air voids, the fit is superb. Now I understand that Nostalgic Plastic has some aftermarket sheets made for this so you are not limited to the kit option. If you ever wanted to give a resin kit a go, you could do no better than with this one.
PS, there have been some comments about the lack of an upper fuselage jet air intake. Well, from what I have seen in photos, this intake was behind a spring loaded door and unless the engine was operating, you wouldn't see it. Similar to the intake doors on the pods seen on P2V-7s and some other aircraft using these avgas powered engines in pods.
http://en.wikipedia.org
The CD that comes with the kit
Strike from the Sea, by Tommy Thomason.
August 2009
Copyright ModelingMadness.com. All
rights reserved.If you would like your product reviewed fairly and fairly quickly, please contact the editor or see other details in the Note to Contributors.
Back to the Main Page
Back to the Previews Index Page
2019
 The next stage was to be sure I had enough weight in the nose. I did this by first putting in what I thought was enough lead in the cavernous nose area and then taping all the major assemblies together with Scotch tape. Then I balanced the model with my fingers where the main gear struts attached. It seemed as if I had enough so when I removed the tape, I added another weight just to make sure. I generally use conical fishing weights for this purpose as they come in a variety of sizes and can be smushed down if needed. Using round shot requires the building of extra bulkheads to keep it in place, which is why I use the larger conical weights.
 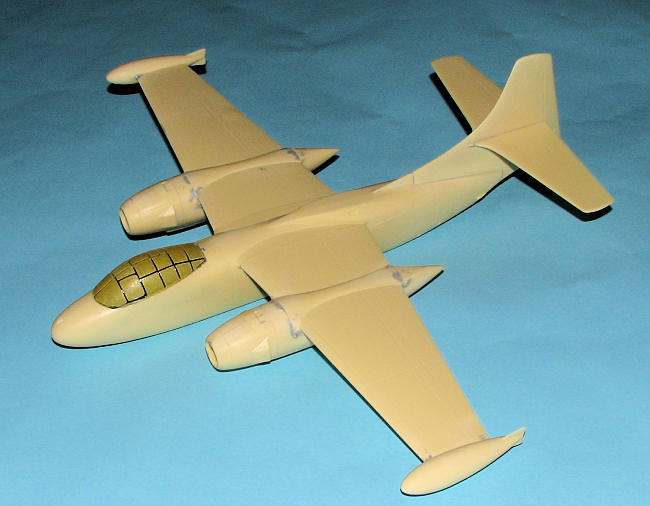 had attached it to the airframe. For this, I used Vallejo clear gloss paint. This has several benefits. One is that it won't fog the resin as does superglue and it flows almost as well into the seams. Secondly, it is something that you can form to some extent with your finger to prevent blobs. Finally, it sticks quite well, especially if the attachment area is large. You do have to tape the assembly in place while it dries, but once that it done, you can touch up any gaps you see with more paint.