| KIT #: | 6 |
| PRICE: | €29.00 from www.tracks-n-troops.com/shop |
| DECALS: | Two options |
| REVIEWER: | Scott Van Aken |
| NOTES: | Resin kit |
| HISTORY |
 Paraphrased from the instructions:
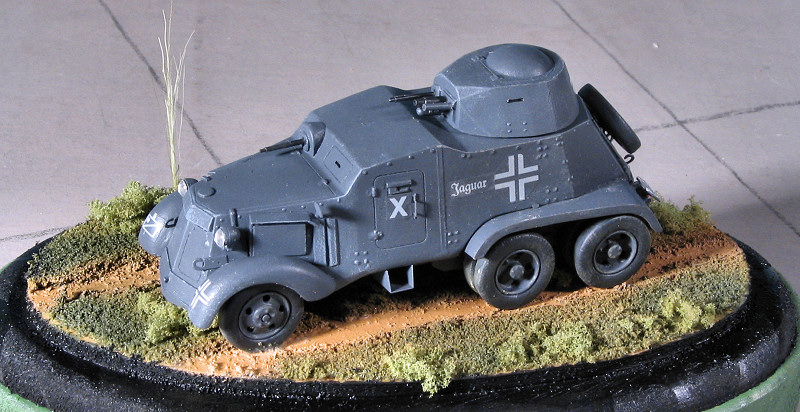
"The Spanish armored car Chevrolet 1937 was created on the chassis of the Chevrolet SD 6X4 Model 1937. The pattern example was the Soviet BA-6 armored car (which is why it is rather familiar). Production started at La Hispano Suiza Barcelona in May 1937. At the beginning, only machine guns were planned. With the 37mm Puteaux gun from old Renaut FT 17s available, these were used. Production was casual with only 4 vehicles a month produced. This rate decreased as more and more Republican territory was lost during the Civil War. Overall, about 70 vehicles were produced and their use in combat is pretty much unknown.
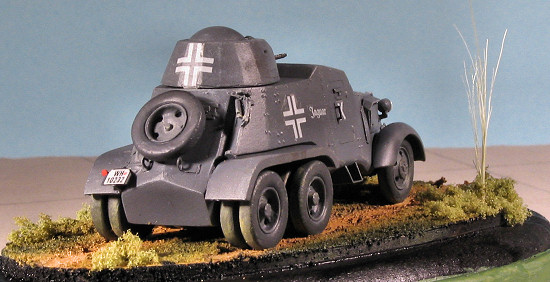
After the end of the Spanish Civil War in early 1939, some of these vehicles escaped to France. At least two of them were captured by the Germans in 1940. These were used in action during 1941 against partisans in occupied areas of the Soviet Union."
| THE KIT |
Superbly molded in tan resin, the kit has very good detailing and I was quite pleased not to find any molding glitches during inspection. The kit comes in four bags; one for the heavy chassis and body and turret, another for the very fine guns and decal sheet and two others for the rest of the parts. The box was full of plastic peanuts and survived shipping with no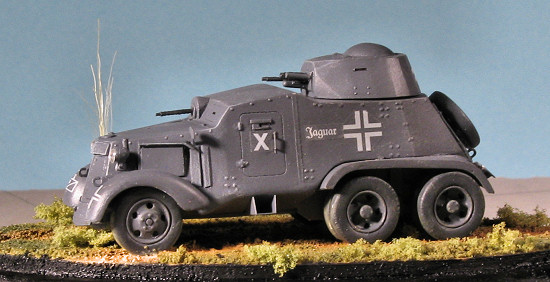 problems.
The body, chassis and turret only have very minimal clean-up required prior to use; little more than a light sanding. Fenders seem to be able to be removed from their pour stub backings with little more than a hobby knife. The rear suspension bits are designed to be installed on the rectangular backings. The most difficult part of parts removal will be the head lights and a few other small bits. The rest of the pieces should be a breeze. A small etched fret with tow hooks, steps, and rear lights/plate housings is included. The brass is quite hefty so no worries about bending flimsy bits on this one.
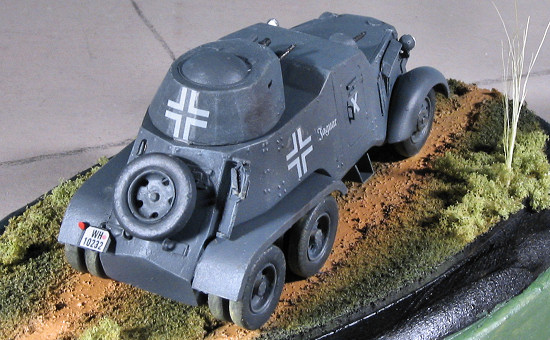
The instructions are a single piece of paper with the history and a photo on one side, with a parts listing/drawing, exploded view, and color/decal marking sheet. It seems that there are two nearly identical vehicles on the decal sheet, differing by name only. Both options are overall Panzer Grey.
| CONSTRUCTION |
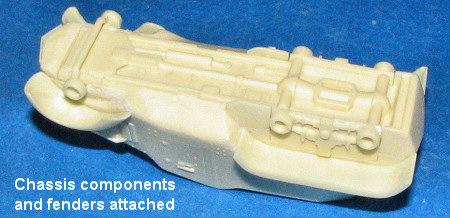
As with all resin kits, the first step is to remove whatever resin pour stubs/blocks there are. None of these are particularly difficult to take off, though the ones for the body and chassis are the most time consuming. Try as I might, I could not get them to be so f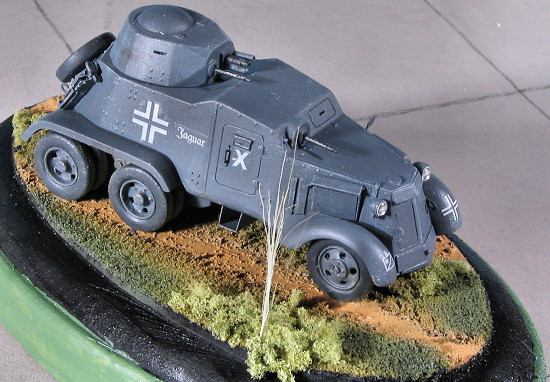 lush that there were not any gaps. After getting them as good as they were going to get, I superglued them together then filled the openings with epoxy filler. This material is great for large gaps and can be smoothed down with little more than water.
While that was drying (and it does take a minimum of 12 hours), I removed the blocks from the rest of the parts, leaving only the very small items (headlights, gun barrels and such). It is better to wait on these tiny parts until you are ready to use them to keep them from disappearing. Though there is some light tread detail on the tires, that quickly disappeared under sanding. I left them smooth as I'm not really sure of a quick way of restoring tread on resin, and I wasn't into spending a lot of time scribing tread in 11 very small tires!
The fenders are marked as left and right on the mold stub and so I carefully scribed an 'L' into the left side ones so I wouldn't get them crossed. Test fitting them showed this wasn't necessary as they only properly fit one way. Removing them was simple and I used a sharp scalpel to remove them with a few strokes of a sanding stick to smooth the mating surfaces. After cleaning the tiny stub from the bottom of the turret, I test fit it on the upper body. It is a very tight fit, which is good. I then removed the main gun barrel from the resin block and glued it in place. The barrel is molded with a nice opening in it. I also removed the steering arm piece from its resin block and cleaned it up. Again, only a sharp scalpel was needed to remove it.
With the filler sanded down, I started gluing on pieces. First, the rear suspension bits. These have to have their thickness sanded down and then slit into place and glued. This is really a great way of doing this and it looks quite convincing. I next glued on the 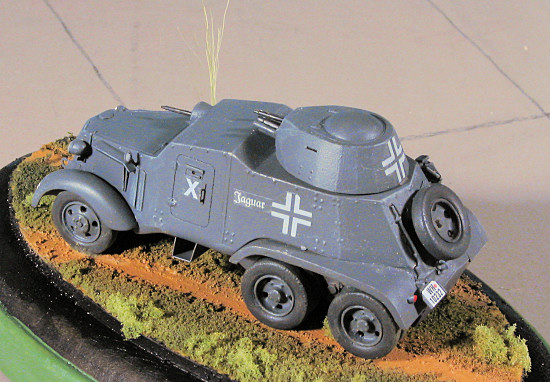 steering arm section on the front suspension, then attached the fenders. No real trauma here, but one does have to be careful to get them one straight as once the super glue dries, that is it! There is a very fine 'vee' sectioned piece for the front that I had trouble getting on straight. I'd be surprised if quite a few parts are not off a bit!
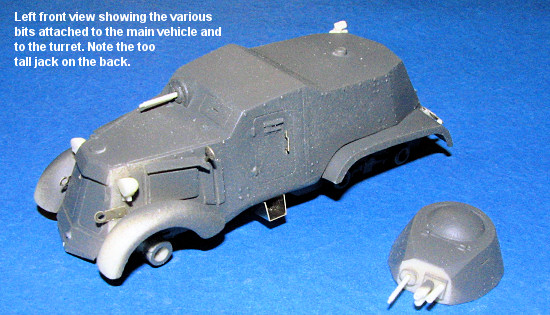
 At this time, I sprayed on some Panzer Grey to see how the bits looked. I also shot the wheels at this time. I then attached the side plate bits for the engine. I'm really not sure just what these bits are, but I'm assuming it is a piece of armor plate to protect the engine that can be moved open for cooling. I then continued to add on bits, this time working on the photo etch. There are two large 'troughs' under each of the doors that was bent and installed. There is a small cut-out on the frame rail so no guessing as to just where it goes. Very thoughtful. The tow hooks were glued on; one on the rear needs to be shortened to fit and the instructions mention this. On the back there is an 'x'd area for the large one.
 I continued by attaching the headlight mounts and then the separate headlights. This was not at all easy and were I to do another of these kits, I'd make sure that the the mounts were so that the wider piece was the attachment point. This may not be prototypical, but it sure would help. I drilled a small hole for the rear view mirror and had to slightly trim the small door handles, but they fit superbly in the slots provided. Most thoughtful again.
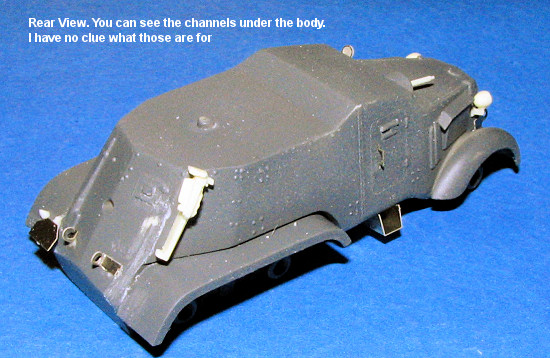 On the back, the tail light was glued on as was the license plate mount and then the plate itself. I trimmed the mount a bit on the top as it seemed too long. The jack was then mounted to the right rear as shown by an etched section. Be sure it is low as the turret has to clear over the top of it. Mine was originally too high so I had to remove it and put it down lower. I cut off the gun barrels and glued them in as well. I should mention that cutting the very small resin bits from the backing wasn't difficult as I used a new scalpel blade and worked the blade back and forth slightly to cut through.
With that done, I got ready to finish painting.
| COLORS & MARKINGS |
Overall Panzer Grey is an easy color to do. I painted the underside of the main part and the turret first as well as all the wheels. The wheels had the tires painted with Weathered Black, a Floquil color. As I was painting the upper surface, I had one of those moments when a model seems like an eel. I did a juggling act that would have done a circus proud, yet was unable to catch it before it went crashing to the concrete floor. After several comments that would have been more appropriate at sea, I was amazed to find that no parts had gone flying off and only the little 'vee' shaped piece on the lower nose (obviously the main impact point) had suffered any damage. A few paint scuffs and that was it. Must have been my lucky day.
I cleaned up all the fuzz once the paint had dried and then repainted the areas scuffed. I'm still amazed at how well all the resin and photo etched parts held on. I then continued the painting. When that was dry, I started putting on the decals. These are not your standard water-slide markings. They are ALPS printed so scratch easily. The carrier is a bit thicker than I'd like to see and the white proved to be a bit translucent, though on a monochrome background, it isn't that bad. All four of the insignia are the same size so too large for the front fender. That and the decal's difficulty in conforming to compound surfaces convinced me to leave it off. I would recommend aftermarket for the basic markings if you can. Missing from the sheet was a license. I don't have any 1/72 aftermarket sheets for German military vehicles but did manage to scrounge something useful from the sheet of an Italeri kit.
| FINAL BITS |
Then it was time to do some final painting. For this I used a light grey to do some minor dry brushing and painted a few bits with various metallics, including the gun barrels and exhaust. The only things not attached were the turret and wheels. The turret was easy with just a dab of superglue. There are four different styles of wheels so it is important to separate them before gluing. There are the two fronts, four inner rears, four outer rears (these have large hubs) and the spare (with no hub). Getting them all on and aligned was impossible. At least impossible for me. I did get them on fairly well and had the usual problem of not having them all touch at the same time. This was easily cured with a sanding stick as I carefully flat-spotted the bottom of the tires until they all touched the ground.
The model was given an overall mate coat and some dusting with pastels. I also drilled out the headlights with a mini-drill and installed some #29 MV lenses. This size is perfect for 1/72 headlights and 1/48 aircraft landing lights so I have quite a stash of them. I doubt if these things carried radios so I didn't install a radio antenna.
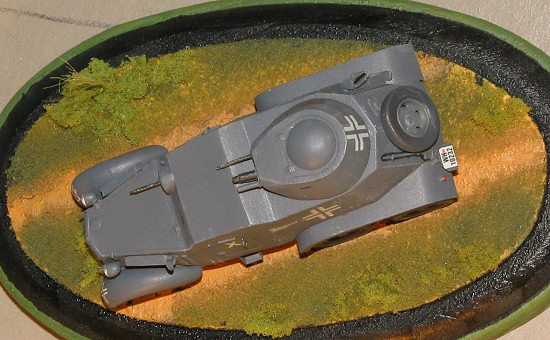
The last thing I did was to fix up a base for it. For some reason, these quite small kits just look nicer on a base of some sort. The local Hobby Lobby always has small bases of rough pine for about 50cents each, a most reasonable price, and they are just the right size for 1/72 military vehicles.
I chose an oval one and wanted something really simple. First, I doused the upper surface with Future and then dumped a batch of Woodland Scenics grass on it. I knocked off all the extra, and while the Future was still wet, took the car and drug it diagonally across the upper surface. This left two nice ruts. Those were painted a light brown and thanks to there still being some of the grass on it, were not smooth. I then added some rougher material for some additional texture. The 'grass' section was sprayed a few shades of green, for some color interest. I also added a tuft of tall weeds. I basically wanted an interesting base that would not put the model in the diorama class when going to contests. The car was then super-glued to the base and the rest of the base was painted.
| CONCLUSIONS |
 This really is a neat little kit. The engineering is quite good and the subject is interesting. I'd personally wish that they'd do a standard 37 Chevy truck and perhaps they will. The end result is an unusual model of a little known vehicle. If you are ready to tackle the challenges of a multi-media kit like this, you could pick no better one with which to start.
Thanks to Steelwork for the opportunity to build this neat little kit. Get yours from www.tracks-n-troops.com/shop
June 2006
#1420 in a series
Copyright ModelingMadness.com. All rights reserved.
If you would like your product reviewed fairly and fairly quickly, please contact the editor or see other details in the