Nautilus Models 1/350 USS Nautilus SS 168
KIT # | S-50 |
PRICE: | $55 |
DECALS: | none |
REVIEW BY: | |
NOTES: | Resin with photoetched parts |
HISTORY |

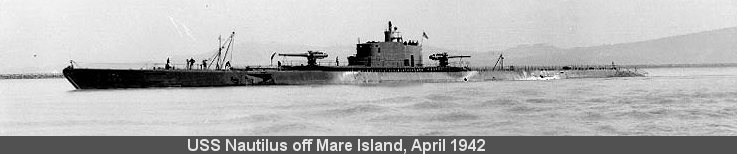
USS Nautilus, a 2730-ton Narwhal class cruiser submarine, was built at the Mare Island Navy Yard, California. Commissioned in July 1930 as USS V-6 (SC-2), she was renamed Nautilus in February 1931 and redesignated SS-168 in July 1931. Prior to World War II, she was mainly operated in the Pacific, based at Pearl Harbor and at San Diego. Modernized between July 1941 and April 1942, her first war patrol included intense involvement in the Battle of Midway, during which she attacked a Japanese aircraft carrier that was at that time identified as
Soryu but was more probably Kaga. Later during that patrol, while off Japan, she sank the destroyer Yamakaze.Nautilus then began an active career as a transport submarine, a role for which her large size made her especially useful. She landed Marines to raid Makin Island, in the Gilbert Islands in August 1942; put scouts ashore at Attu, in the Aleutians, in May 1943; again landed Marines in the Gilberts in November 1943 and carried out several missions into the Philippines area in May 1944 - January 1945. During this time Nautilus also conducted anti-shipping and reconnaissance patrols off Japan, in the Central Pacific and in the Solomons area, sinking and damaging several Japanese ships. Ordered home after her 14th war patrol, she arrived at Philadephia, Pennsylvania, in May 1945 and was decommissioned the following month. Nautilus was sold for scrapping in November 1945.
THE KIT |
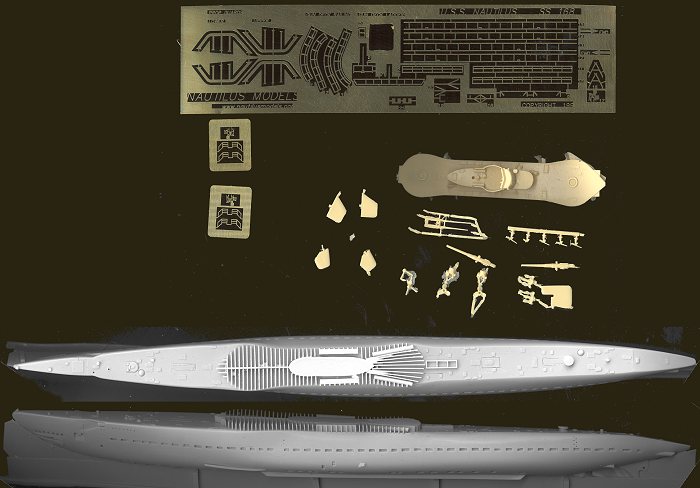
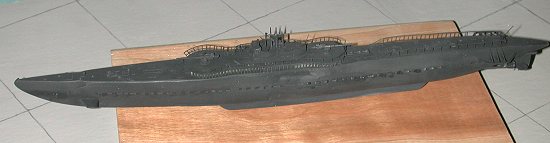
As you can see from the image above, this is one very detailed kit. The main part of the boat is a solid piece of greyish resin over 13 inches long. There is superb detailing on all the parts, but specifically the hull were every vent, hatch and deck plate is meticulously reproduced. There are a few small air bubbles on the bottom near the resin attachment, but nothing that cannot be easily taken care of. There are a number of other resin parts including the bridge, dive planes, propellers and rudders as well as guns, anchors and aerials. There is one huge and two smaller brass etched frets that includes prop guards, ladders, railings and other miscellaneous bits and pieces.
The instruction sheet is very good, comprising a two-sided sheet that breaks down construction into five steps. Each step is accompanied by photographs of the kit to ensure that you are able to get all the bits and pieces in the correct place without having to wonder what goes where.
One area in which Iron Shipwrights really shines is customer service. To quote from the instructions ".... a free damaged or lost part replacement plan; no matter if it was miscast, broken or eaten by Catzilla, we will replace it free of charge." It really doesn't get much better than that.
CONSTRUCTION |
 It took me a long time to getstarted on this kit and once underway, it was punctuated by long layoffs. I canonly guess that ships are not my main interest at this time. That combined withsome problems I had made this into a long build.
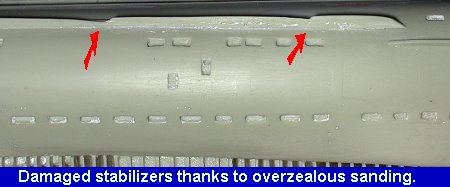
The first thing I did was toremove the hull from the resin casting block. This was a rather painless task,though I did leave some excess material in a few locations. Simply scribing thehull with an Xacto knife was all that it took. I started sanding off the ensuingridge that was left and here is where I ran into real trouble. That trouble wasin the form of air bubbles. As I removed the ridge, I opened up a lot of thesebubbles. Once relatively smooth, I started filling them and sanding them smoothonly to open even more bubbles. Well, you get the point by now. After two weekswork, not only did I still have air bubbles, but I had damaged the stabilizersthat run along each side near the bottom of the boat. So badly, in fact, thatI'll have to replace them with strip plastic when the time comes. It is at thistime that I put the kit up and went to work on other stuff.
Three months later..... Workon the kit was resumed. A bit more filling and careful sanding got things to anacceptable point. There are still pinholes but hopefully they will be filledwith paint. I started to cut the sail deck off the resin block. This is a thinpart so I cut very carefully. Unfortunately, not carefully enough as when I gotit about half way, I broke the deck in two! AAARRRRGGGGHHHH! I finishedoff the job of removing the piece from the block, sanded everything flat andthen put things back in the box and went off to work on something else.
 Two more months pass. Now onemonth away from a contest that has a category for torpedo carrying stuff. Thedeck is glued back into one piece. Not too bad. It is then superglued to thehull. Looks ok. Wait a minute, it isn't perfectly straight. No way can I getthis piece off again! Now onto the big deck guns as per the instructions.The small pieces have lots of flash on them and are difficult to clean up (atleast for my ham fists). I do eventually get two 6" guns and mounts to looklike something and glue those to the pedestal mounts on the gun deck.
Next are the AA guns. Thereare five of them in the kit and these have the best molding of all the smallbits. No flash either. The kit needs three of them, one with a brass shield. Noproblem here and they are glued on as per the instructions. Next the nest ofperiscopes. This assembly is really full of flash and mismatched mold halves.Much scraping eventually gets something that looks OK and this is glued onto thedeck as well.
 Next, the instructions tellyou to do the diving planes; either up or down. Well, I'd like to do them up,but there is no description of how they look. The pieces are obviously molded inthe down position so that is how they will be mounted just prior to painting.I'm waiting until then because otherwise I'll just break them off.
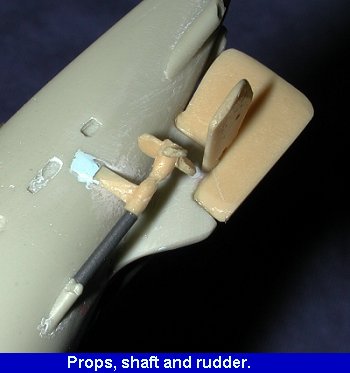
Towards the rear the props,prop shaft, shaft mounts, rudder and rear planes have to be glued on. The rudderand rear planes are in good shape and clean up well. The shaft mounts and propsare not and take a lot of work. The prop shafts themselves need to be made fromplastic rod that is enclosed in the kit.
First thing I do is to drilla small hole to mount the rudder. Once that is done and alignment is checked,the prop shaft mounts are superglued in place. There is no locator for theseparts, so they are glued where it looks nice. The outside parts of the mount arein desperate need of some sort of smoothing out, so a dab of filler and somesanding fairs those mounts in with the hull so they don't look just tacked on.The end result is acceptable.
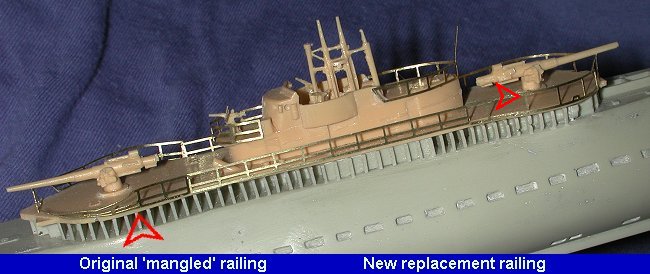
Now on to the etchedbrass. Most of the parts fit fairly well, however, the railings around theguns were a disaster. Despite numerous attempts, I only managed to destroy twoof the four pieces and the two remaining were rather badly mangled by the timethey were fixed. I was so frustrated that the kit sat in its box for the nextfour months.
 It had now beennearly 11 months since starting on the kit. I was determined to finish the darn thing!This meant finishing up the railing problem and fixing the stabilizers as wellas putting on the last few bits of etched brass, painting the kit and building amount for it. Piece of cake! First thing was the forward railing. I used some'spare' railing and simply glued it in place. This is the way the originalpieces should have fit. No hassles.
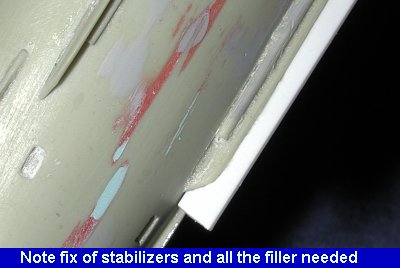 Now that the railing problem had been taken careof, it was time to fix the stabilizers. What was done, was that a piece ofstyrene strip was glued on the outside of the damaged stabilizer. Then it wassimply sanded to shape, though a touch larger than the damaged one. With the kitpermanently mounted on a base, the fix should not be too obvious.
There were a numberof other etched parts that needed to be installed, specifically the prop guardsand a few other smaller bits. Then the kit was ready for the paint shop
PAINT & DECALS |
This part was ridiculouslyeasy. The entire model was painted flat black. During this process, a number ofthe very tiny etched bits decided to depart the model and go off into the landof disappearing model bits. The blobs of superglue that 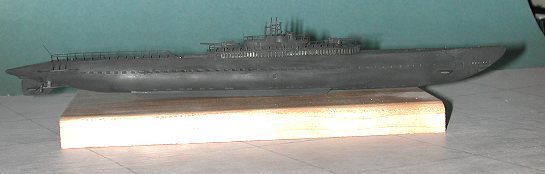 were supposed to hold them in place were then sandeddown and the areas repainted. Then it was drybrushed with a dark grey tobring out some of the highlights.
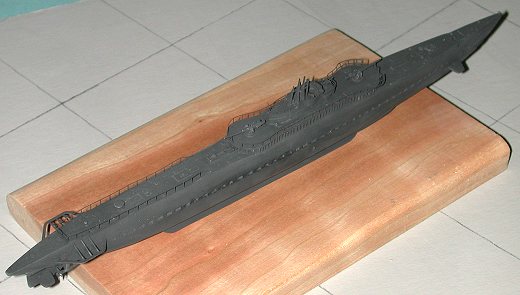
The final step was to drill a large hole in the bottom of thekit and in the base for the insertion of a thick piece of brass tubing. This iswhat holds the kit in place. It is also enables the model to be removed from thebase for any moving or other work that may be needed.
CONCLUSIONS |
Though a simpler kit than thetug, this one took me a lot longer to build. I'll have to blame the etched bitsas I'm not really that fond of them. Others have had good luck with them so Imust conclude that I need to be more patient when installing them. Other thanthat, the kit was a relatively fast build and the end result is quite pleasing.Other than the railings around the gun, I would not hesitate to recommend thiskit to those with an interest in the type.

REFERENCES |
U.S. Subs in Action, Robert Stern, Squadron SignalPublications, 1983
Fleet Submarines of World War Two, The Floating Drydock,1988
For more information on this and other offerings from Iron Shipwrights, they can be contacted at the following e-mails:dparis@eznet.net or ironship@usit.net .As a late note (2010), I'd be willing to bet that this kit is no longer available and the e-mails may no longer be valid.
Many thanks to them for providing the review kit.