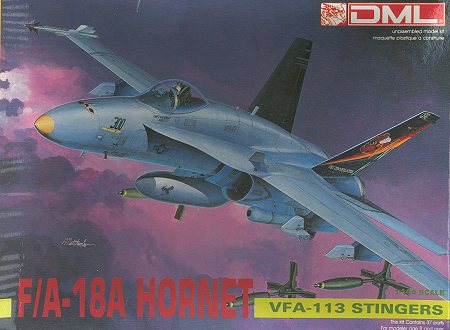
Dragon/DML 1/144 F-18A Hornet
| KIT: | DML 1/144 F-18A Hornet |
| KIT # | 4513 |
| PRICE: | $3.50 |
| DECALS: | VFA-113 CAG commander's aircraft |
| REVIEW BY: | |
| NOTES: |
|
| HISTORY |
Initially designed as the YF-17A lightweight fighter, following its loss tothe F-16, it was greatly modified to become the F/A-18 Hornet. The initialsquadrons were on carriers by the 1980s. Initial concerns with lack of range andcarrying capability were never fully solved with either the F-18A or theimproved F-18C versions. Even the newer F-18E series still has those concerns.
However, the F-18 has performed admirably well for the US Navy and MarineCorps. So popular is the design that a number of foreign countries now have theHornet in service including Kuwait, Finland, Spain, Switzerland and Canada. TheCanadians were one of the first overseas sales for the Hornet and the survivorsof the138 examples initially purchased have been sterling performers for the CAF.
In the US inventory, the F-18A (subject of this kit) has been mostly replacedby the more capable F-18C, though there are a number of them in use by the Navyand Marine Reserves. The future of the A model is unsure, but it is quite likelythat it will be converted into an aerial target or drone when the available F-4Phantom Airframes have been expended.
| THE KIT |
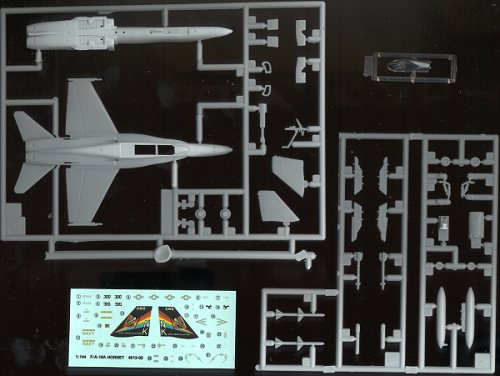 Asyou can see from the illustration to the right, the DML F-18 is remarkablycomplete for a 1/144 kit. Unlike a number of 1/144 fighters that I can think of,this one actually looks pretty much like what it is supposed to be! In additionto the usual bits and pieces to make the kit, there is a decent weapons load,though it would be nice to have has some bombs to stick on those wing racks.Besides the air to air missiles, there is a centerline fuel tanks as well as thesensors that fit on the edges of the intakes.
The decal sheet is quite complete with all the needed warnings and insignia.The colorful tail markings are in one piece to make placement easier. The tailsthemselves will have to be painted black anyway as both sides were so colored.The instruction sheet is on the back of the box as is the painting guide. Thiswill eliminate the problem with losing the sheet!
| CONSTRUCTION |
As with other kits, first step is the cockpit. Well, therereally isn't much cockpit with this kit. Just a floor with built in seat andpilot shape. Guess they figured that with something this tiny, a cockpitwouldn't be seen. Probably, they are right as the market to which this kit isaimed wouldn't be too concerned with that. However, I know that kind of detailcan be done as I have several 1/200 ships that have well done crew memberfigures.
Anyway, the cockpit area was painted dark gull grey and thecockpit glued into the bottom fuselage section. You may have to fiddle with it abit as the position that 'feels' best has the pilots face up against theanti-glare shield. I put glued mine a bit 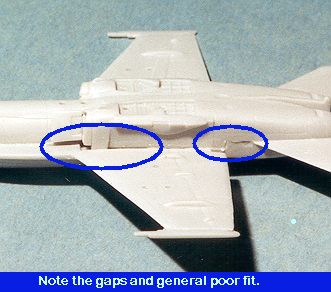 further back. Then the fuselage halveswere glued together. I didn't use any nose weight as I don't think it is needed.The fit is.... well..... not that great. There are great gapsunder the wings and quite a bit of overlap in the nose area. Thanks to thesoftness of the plastic, correcting the nose isn't a big deal. You will needfiller for the wing gaps though and some sanding sticks to take care of the fitproblems just behind the wings.
Next, the intakes were glued in place. Fit is OK, but it seemsthat the intakes are too short to fit right up against the bottom of the LEREX. Same with the splitter plates. Either they are too short, or the fuselage bottomis too tall. Regardless, the end result is that the intake bits either fit atthe top or the bottom, but not both. I chose the bottom as the best compromise.
During this operation, I filled the wing pylon mounting holeswith superglue and sanded it smooth. I'm doing a display aircraft that is devoidof these things. It also makes building the kit quite a bit easier. At thistime, the centerline tank was glued together and smoothed out. Next the verticalstabilizers were glued in place. Again, the fit was so-so, but better than thefuselage halves.
| PAINT & DECALS |
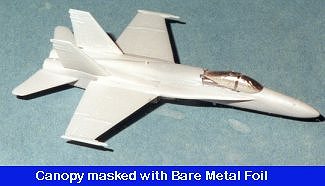 Because of the decal scheme I was using, now was when the kitwas painted and decaled. First, the underside was painted FS 36375 light greyusing Aeromaster enamel paint. When dry, the canopy was masked with Bare MetalFoil and the upper surface was painted FS 36270 using Gunze acrylic paint. Whenall that was dry, the entire airframe was given a couple of coats of Future inpreparation for the decals.
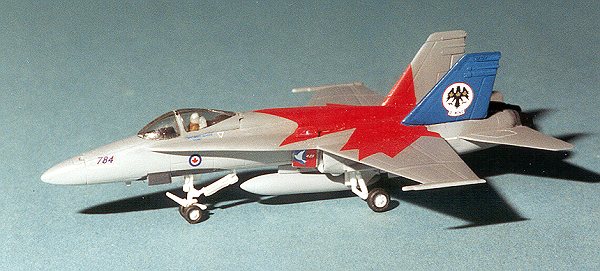
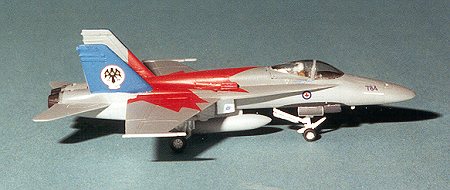
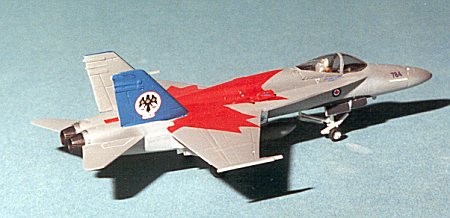
This was to be one of the CAF special paint scheme aircraft. Iused Cutting Edge sheet 144-3 for the 1996-98 3 wing display aircraft. It is areally colorful scheme mainly consisting of a huge maple leaf on the uppersurface. With much anticipation, I started with the big, red, maple leaf. Itwent on without too much fuss, though it appears to be just a bit too large, afact I came to notice with several other parts of the sheet. I also ended upwith it a bit crooked, so had to do some touchup a bit later. The rest of thedecals went on without too much fuss, though the 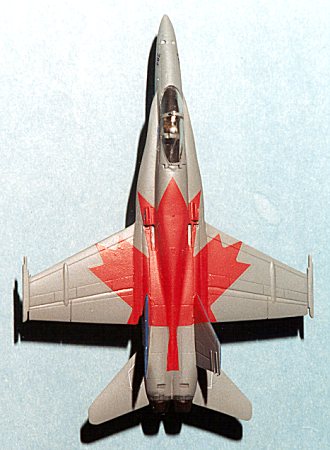 blue outer tail decals and thefalse canopy decals are decidedly too large for the kit. Not sure where theglitch lies. Either the DML F-18 is off scale (the recommended kit according tothe decal instructions), or the decals were not shrunk down enough.Interestingly, the splitter plate decals were too small!! Having gone throughall this, I would recommend spray painting the outside tails and the splitterplates. You are given separate decals to put on the painted surfaces if youchoose to go that route. I wanted to finish it rather quickly so took what Ithought would be the quick way and paid for it.
Trimming the too-big parts of the blue tail decal left the edgesragged. Having to fix that and the maple leaf, I bought the recommended paints,both by Testors; Guards Red and True Blue. When I touched up the various raggededges, rips and tears, I was not surprised to find the paint to be slightly adifferent shade than the decal. Matching paint to decals is difficult enough,and when one uses a brush vice air brush, you get yet another color differenceas brush painting generally produces a darker shade than air brushing.
Once all the decals were on and the various touchup painting wasdone, the wheel wells were painted white and once dry, the gear glued in place.Next, the wheels were glued in place. The gear doors were then cut andinstalled. Then the decals for the doors were applied. They were too big andwhen dry, the insides had to be touched up with white. The next bits to be addedare the small plates on top of the wing. These had been painted red and thedecals put on them prior to gluing them down. Actually, tacking them down is amore apt description as they are glued right on the big maple leaf decal.Finally the centerline fuel tank was squeezed in between the gear doors and thetoo-small afterburner cones were glued onto the tail section and touchedup.
The kit was then oversprayed with semi-matte clear acrylic andthen the masking taken off the canopy. Voila! A 1/144CF-118A!
| CONCLUSIONS |
 What to say about this kit. The end result certainly cannot bemistaken for anything other than an F-18 Hornet, but there are a number ofsubtle shape differences that DML just didn't get quite right. Maybe it isn'tfair to compare this kit with those in larger scales. Maybe there are aspects ofdesign for these little tykes that don't easily translate over from the largerkits. Maybe the designers just didn't know enough about the real plane to make theirkits more true to the prototypes. I don't know the answer.
I do know that this kit had fit problems that are almostimpossible to correct. However, the target market, younger kids spending pocketmoney, really doesn't give a care about fidelity of scale or shape, they justwant an F-18 to play with. In that respect the kit works well. For those of uswho are used to having kits look almost exactly like the prototypes (call usJaded if you will), then this kit falls short.
 Equally disappointing was the decal sheet. While I have nocomplaints as to its completeness, fidelity of color or registration, I'm notsure why it ended up being too large for the kit for which it was allegedlydesigned. There are two possibilities here. First is that Leading Edge justmissed when they scaled down the sheet. Secondly, that the DML F-18 isn't really1/144 but some scale close to it. I'm not one of those folks who drags out aruler to make sure that all parts are perfectly in scale. I'll leave that toothers who revel in such things.
Overall, it looks neat when done and I'm glad I built it.However, it wasn't the piece of cake I was thinking it would be and seeing theproblems I had with it, it will be a while before I build another.
March, 2000
Review copy courtesy of me and my wallet!!
If you would like your product reviewed fairly and fairly quickly, please contact the editor or see other details in the Note to Contributors.