Creating An Aviation Painting by Tom Berto
I started painting in the late 70's. It was a natural offshoot of modeling - I already had the paints, thinner, X-acto knives, brushes, airbrush, and compressor. In addition, I had developed airbrush and masking skills that are fundamental to making paintings. Paintings are obviously different from plastic models, but they have some technical processes in common. With "Mustang", which I finished this year, the subjects matched, too. Here's the what, why, and how of "Mustang".
The
performance, looks, and positive historic roles of the Mustang and Spitfire have
made them my favorite airplanes for as long as I can remember. The range and
performance of the P-51 gave the pilots of the 8th Air Force the bomber escort
they needed to break the back of the Luftwaffe in early 1944. This hastened the
end of the most horrible war in human history. My painting is based very
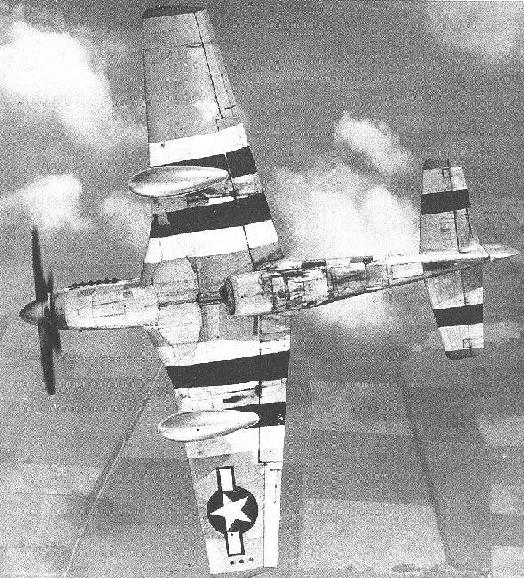
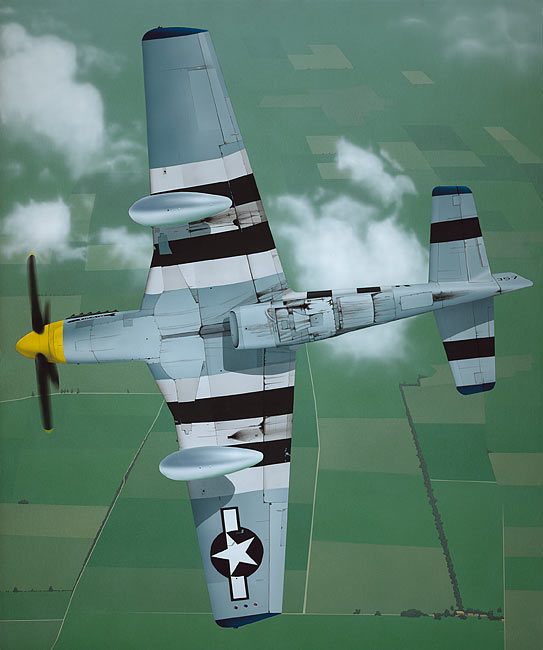
closely on a WWII USAF black & white photograph of a P-51. The subject is "Tika
IV", flown by Vernon R Richards, an ace pilot of the 374th Fighter Squadron,
361st Fighter Group, 8th Air Force. The photo shows off the wing planform and
radiator scoop of the P-51, as well as the elegant drop tanks and four-blade
propeller churning out power. The black/white invasion stripes have historic and
moral significance as a symbol of the liberation of Europe from Hitler and his
Nazis – as well as being a striking graphic element. The clouds and receding
fields of the background help convey the height and space of the scene. There
is also some “abstraction” to the image, in that the canopy is not visible –
very unusual for aircraft photos! It's a unique, spectacular, and beautiful
photo – a great starting point for a painting.
Materials and tools: I use a Paasche VL-3 airbrush, bought at my local model shop. The VL is the workhorse of professional airbrush artists (car and shirt painters) because of its reasonable price and good performance. I started painting with a Paasche H single action, but the double action is crucial for working with acrylics.
I paint on Crescent #100 cold-press illustration board, a thick, rugged board with a medium rough white surface that holds onto paint well and can take direct cutting. I started with model aircraft paints, but most subjects don't come in FS or RLM colors, so I switched to acrylic paints. A water-based paint is a near necessity, given the constant color changes and cleaning associated with making an airbrushed painting. I settled on medium body acrylics from Liquitex. There might be better brands, but Liquitex paints work well and aren't too expensive – that makes a difference when accumulating a working set of about thirty different colors. I premix a bottle of 50/50 Liquitex gloss medium and water, then use this to thin the paints to the consistency of heavy cream. There are premixed “airbrush paints” but they are also more expensive.
Paintings have more area than models, so one generates more airborne paint particles. When I'm “hosing on” a base color or a gloss seal coat, I wear a dust mask. More often, I spray without the mask – when working close in, overspray is minimal, and my work area is large and well ventilated. It’s also separate from our house. I also reduce risk by trying to avoid the most dangerous pigments: those with cadmium, copper, chrome, or lead. There are others, but those four elements are "the usual suspects" – and their colors tend to cost more, anyway!
Note that there are replacements, generally called “Hues”, for some of these colors – for example, “Cadmium Yellow Medium Hue” is a mix of less-toxic ingredients that approximates “Cadmium Yellow Medium”. It helps that the pigments I use the most of, titanium dioxide white and Mars black, have no known hazards. The acrylic base is also relatively benign. I clean the airbrush promptly with water and dump that in jars that I evaporate and dispose of safely. Lacquer thinner, a blend of solvents that can seemingly dissolve anything short of tool steel, is used by the drop to clean dried acrylic inside the airbrush. For more information about pigment and solvent hazards, consult the book "Artist Beware" by Michael McCann, PhD.
The process: I began the painting by mixing and spraying a base coat of a green that represented an average of the background field colors. I matched the color of the mix to a fresh blade of grass. When this base coat had thoroughly dried, I covered the entire painting with Createx Frisket Film (formerly Frisk Film). This is a translucent plastic film with a low-tack repositionable adhesive on one side and a matte finish on the other. I had a slide photograph of my source photo - I projected this onto the "frisketed" background and drew in all the shapes. Using the projector saves a lot of time - I like to draw, but I like to paint more. It's also accurate - getting the shape wrong at the beginning of a painting is like breaking a shoelace at the beginning of a marathon.
Here's how frisket and airbrush work together: individual frisket areas are cut out, peeled off, and set aside. The exposed areas are sprayed and dried, then the peeled pieces of frisket are re-applied and the process repeated elsewhere. It's technical and time consuming, but it breaks a painting up into manageable pieces. Frisket conforms well to minor bumps in the painting, and sticks just the right amount. The only knock on frisket is that it's expensive, about $65 for a ten-yard, two ft wide roll – more per square foot than the illustration board.
Using this technique, individual fields were cut out with a new #11 blade and painted, using just enough of a lighter or darker color to give variation. With the fields complete, I removed all but the frisket covering the Mustang, then masked off the roads with paper and “14-day” blue tape from the hardware store. After painting the roads, the trees, hedges, and farm were brush painted. The fields "above" the Mustang in the source photo were indistinct, so I added in a few more, following the converging perspective and curvature of the fields in the foreground.
I mixed a thin bluish white and used this to add the haze to the background. Heaviest at the top, but continued all the way to the bottom. This gave the background instant realism and was VERY easy to do with my airbrush. I added the clouds free-hand with pure white, working close in at low pressure – that way if I made a mistake, it would be a small one. Free-hand airbrushing is like doing a trapeze act with a bungee cord around your ankle – it's usually possible to recover from mistakes, but it's never pleasant.
With the
clouds complete, the background was done to my satisfaction. The source photo
had some definite shadows from the clouds, but adding these would have made the
clouds look as though they were much closer to the ground, affecting the feeling
of the painting – so I left them off. 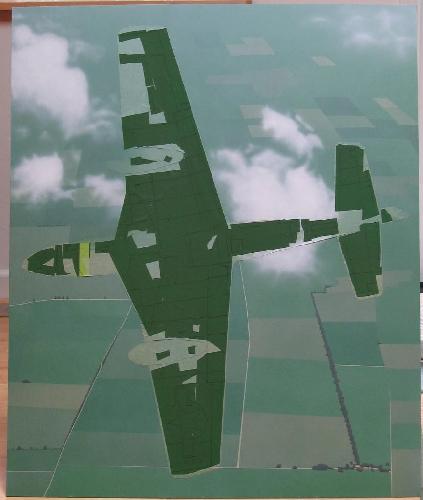
Painting an un-weathered plastic model might call for only three or four colors, generally applied in uniform layers over broad, masked areas. The third dimension comes with the model. In a painting, the third dimension has to be represented by shadows and variations in color that are consistent with the illumination and texture of the subject. This is particularly true of natural metal subjects, like this P-51. The aluminum skin of the Mustang was the biggest challenge in this painting - a flying collection of curved mirrors.
To do a good job, I had to understand what the "mirrors" were reflecting. From the shadows, I was able to deduce that the Mustang was north of the camera plane, flying west, but the real Rosetta stones were the drop tanks. Study of the reflections off of them revealed a lot - a broad cloud layer below and to the west and south of the photo aircraft. Clear blue sky above, with sun to the southeast. Because of these surroundings, the lower wing, which reflects the cloud layer, is brighter than the upper wing, which reflects the blue sky and also some sun toward the trailing edge. These variations aren't immediately obvious from the original black & white photo – until one looks for them. Other color and tone differences are caused by variations in the surface finish of the individual panels.
With the background masked off, but the entire aircraft exposed, I painted a base light blue-grey color – an average of the sky and the clouds. I then re-applied the aircraft frisket and cut it along the panel lines. I started the natural metal work by doing the drop tanks, free-hand within their teardrop-shaped openings. They came out well, giving me a jolt of energy and good cheer. Then, using the same frisket process used for the background landscape, I adjusted the shade and hue of each panel. The wings were straightforward, but the belly area had lots of individual panels with variations in shade.
With the natural metal complete for the moment, I cut and removed all of the frisket for the yellow nose, wing insignia, blue wing and tail tips, "Tika IV" arrow, serial number, "R" (of B7-R), tail stripes and D-Day stripes. Inside these areas of "single color", I varied the tones and shades as needed to give shape, sometimes by cutting the single frisket piece into smaller pieces. As an example, the invasion stripes started with an off-white base coat. I then re-applied the frisket pieces, cut the black/white lines, peeled the frisket off the black areas, then sprayed them with dark grey (off-black). I then removed the white masking, and went over the top of both black and white with light coats of thinned black or white, to give panel variations. By the way, note the irregularity of the stripes: the missing spot on the upper gear door, the non-parallelism, variable widths, angles, etc. This comes right from the source photo – those stripes were painted in a hurry by crews on their backs, maybe with the flaps down, maybe with drop tanks installed, probably at night.
I then removed and discarded all of the aircraft frisket, and saw how all the panels and shades worked together. I adjusted some of the natural metal panels that were too dark or light, masking them with small pieces of frisket or hand-held masks made from plastic or thin cardboard. I hand-painted small details like the three ID lights on the starboard wing, pitot tube, and various holes, bumps, and bolt heads seen on the tanks, fuselage, and wings.
The Mustang was in direct sun, and so the tanks, scoop, rear fuselage, and pitot tube cast shadows. These shadow areas cut across panels and colors, so I applied new pieces of frisket, then drew and cut out the contours of the shadow areas. A delicate, transparent misted-on layer of blue-black gave the shadow effect.
At that point,
I had an aircraft that looked like something out of computer flight simulator
program - brand new, no grit, no grime...not exactly right.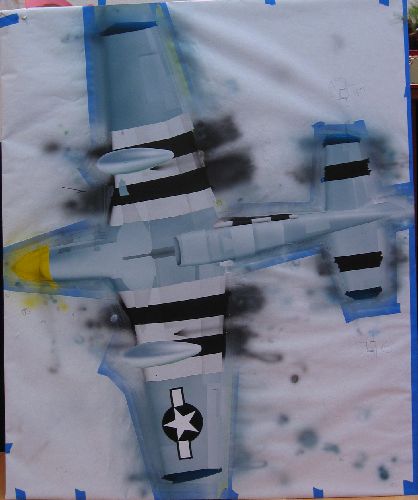 I shot a heavy coat of clear gloss medium over the entire
aircraft, then started adding panel lines, rivet heads, fastener heads, oil,
dirt, and gunpowder stains. I used a heavily thinned black, applying layer
after layer with a hand brush to build up depth to the grime. This is a
technique straight out of weathering models and painting figures. It was
crucial to the realism of the painting – and a lot of fun! When I decided I had
an area just right, I'd overcoat it with clear gloss to seal it in. The
underside of this aircraft, in particular aft of the radiator scoop and shell
ejector chutes, was downright filthy. My guess is that in summer 1944 the
priorities for the crew chief of "Tika IV" were: engine, guns, controls,
cockpit, etc, etc, with cleanliness at the bottom of the list. I think he had
it right.
I shot a heavy coat of clear gloss medium over the entire
aircraft, then started adding panel lines, rivet heads, fastener heads, oil,
dirt, and gunpowder stains. I used a heavily thinned black, applying layer
after layer with a hand brush to build up depth to the grime. This is a
technique straight out of weathering models and painting figures. It was
crucial to the realism of the painting – and a lot of fun! When I decided I had
an area just right, I'd overcoat it with clear gloss to seal it in. The
underside of this aircraft, in particular aft of the radiator scoop and shell
ejector chutes, was downright filthy. My guess is that in summer 1944 the
priorities for the crew chief of "Tika IV" were: engine, guns, controls,
cockpit, etc, etc, with cleanliness at the bottom of the list. I think he had
it right.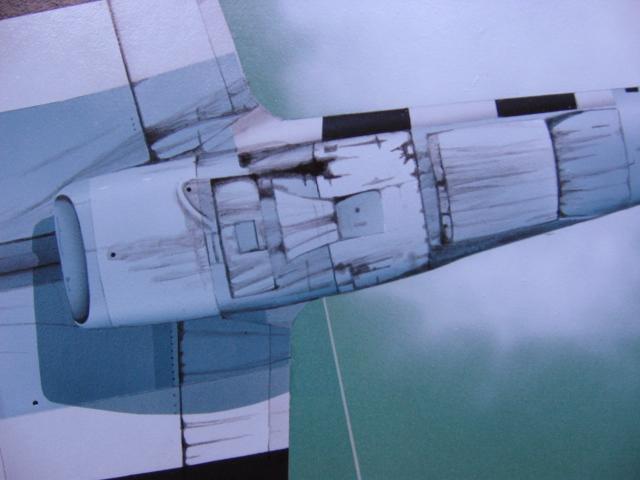
I added in "Tika IV" in white on the arrow, then masked and painted the exhaust stacks – the full bank on top, only the front stack on the bottom. That left only the propeller.
The photographer probably used a "Speed Graphic" press camera to take the original photo. This camera had a focal plane shutter, in which exposure time is controlled by the width of a slit that moves across the camera's focal plane. This particular type of shutter causes interesting distortions when photographing moving objects - most famously the pictures of old race cars in which the wheels are tilted forward. Propellers photographed with focal plane shutters are also distorted. The blades are bent, and are wider on one side, thinner on the other. In the source photo for "Mustang", the two front blades are elongated so much that the tips are vertical, while the rear blades almost disappear behind the spinner. I like the way it looks – it conveys movement and power.
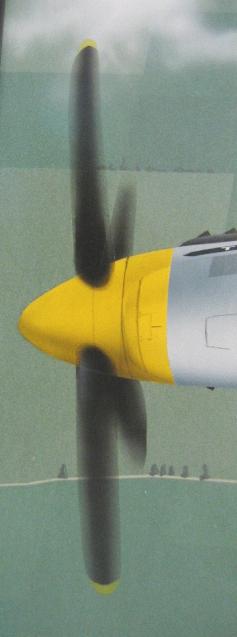 The thing
about the propeller was that I was going to be painting over the spinner and
background, and I knew that repainting the background if I messed up the
propeller would be difficult. I reduced the risk by adding a heavy gloss coat
over that part of the painting, to protect the background if I had to wipe and
scrub the propeller paint off for a redo. I also made (and learned a lot from)
a study in which I painted the propeller by itself. I covered the area with frisket,
cut openings larger than the blades, then sprayed black down the middle of the
openings, deliberately stopping short of the edges. This gave the
propeller blades substance, but left the edges blurred. Crescent-shaped yellow
tips and a white highlight on the rising front blade completed the propeller,
and the painting. I sealed the entire painting with gloss medium and
signed it.
The thing
about the propeller was that I was going to be painting over the spinner and
background, and I knew that repainting the background if I messed up the
propeller would be difficult. I reduced the risk by adding a heavy gloss coat
over that part of the painting, to protect the background if I had to wipe and
scrub the propeller paint off for a redo. I also made (and learned a lot from)
a study in which I painted the propeller by itself. I covered the area with frisket,
cut openings larger than the blades, then sprayed black down the middle of the
openings, deliberately stopping short of the edges. This gave the
propeller blades substance, but left the edges blurred. Crescent-shaped yellow
tips and a white highlight on the rising front blade completed the propeller,
and the painting. I sealed the entire painting with gloss medium and
signed it.
If you like to paint models more than you like assembling them... or like photography but want something more than the usual color print... or want to create a scene that never existed... and you don't mind cleaning your airbrush – try doing a painting.
I mostly paint landscapes and flowers. "Mustang" was a change-of-pace for me, a rewarding and ultimately very satisfying labor of love. More examples of my work can be seen at: