Aloha from the last
inhabited island of the remotest archipelago in the world.
A
quick and simple “how to” regarding a great product called “Propblur”.
By
Mike Wilson
In my almost 60 years of
plastic modeling, I’ve never found a better way to depict a model aircraft with
a spinning prop. I’ve seen and used clear disks which can be effective but they
don’t have the eye appeal of the Propblur. Propblurs can be used out of the box
but I prefer to slightly modify mine. My most recent use of them was on a 1/72nd
six plane, in flight collection of Blue Angel support aircraft including the
R4D, R5C, R4D-8, R5D, C-121 and C-130. This collection now lives with the Team
on the Fat Albert side of the house at NAS Pensacola.
If you like,
you can find a picture of the R5D on the Propblur website. I actually had one
retired Naval Aviator, CDR. Dick Dietz, (his eyes may have been bad) do a double
take when he saw the Propblurs, he thought for a second they were
actually
spinning.
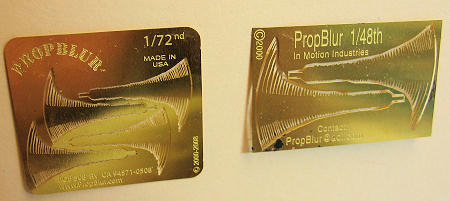 The
first image shows the blurs as they come from the manufacturer. If you order the
1/ 48th scale blur, you get two
blades per fret, in 72nd you get 4,
I haven’t seen the 1/144th scale
blurs yet so I don’t know how many are on a fret. Current pricing is best
obtained from the guys at Propblur. All the Propblurs I’ve worked with have been
1/48th scale cut down to the size
required for 1/72nd transport
aircraft, (1/72nd and smaller blurs
weren’t available at the time). The following techniques should work in any
scale.
The
first image shows the blurs as they come from the manufacturer. If you order the
1/ 48th scale blur, you get two
blades per fret, in 72nd you get 4,
I haven’t seen the 1/144th scale
blurs yet so I don’t know how many are on a fret. Current pricing is best
obtained from the guys at Propblur. All the Propblurs I’ve worked with have been
1/48th scale cut down to the size
required for 1/72nd transport
aircraft, (1/72nd and smaller blurs
weren’t available at the time). The following techniques should work in any
scale.
Modifications:
1. Leave the mounting
end alone and focus the mods on the outer portion of the blade. First, with
sharp scissors, (Fiskars are great) shorten the blade to the same length of the
blade you want to recreate, slightly shorter is better than too long.
2. Find an in flight
photo, (not a painting or drawing) of the prop you want to duplicate. Trim the
leading edge of the blur to the desired width. Secondly, trim the trailing edge
of the blur to a width slightly longer than the leading edge. I know this sounds
confusing but if you look at a picture of a turning prop, the leading edge blur
is usually shorter than the trailing edge. When satisfied with the shape and
length of your blurs, you’re ready to install them on the prop hub.
 Mounting:
-
Drill the mounting holes in the hub as required and hot stuff the
blades in place.
NOTE: Use
a piece of Manila folder paper as a jig with a hole punched in it for the prop
hub shaft and blade alignment reference lines drawn in at whatever degrees the
blades are apart
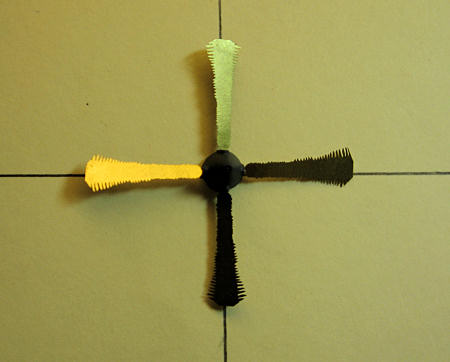
-
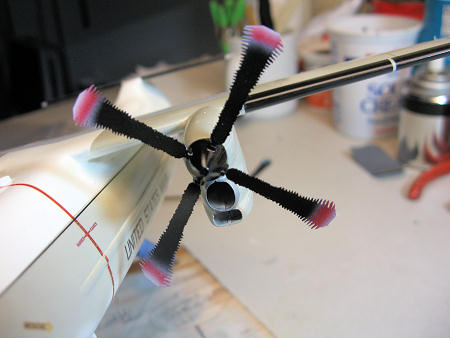
In my last project, I attached the blades without any pitch on them.
As you see in picture # 2, (my current project) the blades are attached with
an angle of attack that’s more representative of the prototype, (I need to
thank my good friend, Jack Kerr for resin casting the prop spinners for me.
Jack’s a far better modeler than me and I’m lucky to have him on my side
during these projects).
A note of caution: Make sure you get the blade pitch
correct for the direction of prop rotation. A word about prop pitch: on take
off the prop has a flatter pitch angle to allow higher prop rpm and greater
engine manifold pressure, (MAP) to de
 velop the required power for take off.
After take off, power is reduced to Maximum Except Take Off, (METO) and then
set to climb power as required after the airplane’s cleaned up.
During
cruise, the blades have more pitch that allows less MAP at lower prop rpm
and less strain on the engine. As you climb, MAP drops off requiring more
throttle to maintain MAP and rate of climb, (ROC).
In a
normally aspirated engine, (non turbo/super charged) you must make sure to
always set your prop control first and MAP second to avoid blowing a jug
and/ or destroying the engine. Either one is considered bad form. So, if
you’re depicting an aircraft on take-off, landing or going into a fight, the
pitch should be flatter, in cruise, it should show more bite. Turbo-props
operate in much the same way and develop power and thrust over a wide rpm
range.
Turbojets are a different story; they develop 90% of their power in
about the last 10% of their rpm. The first time I flew a pure jet, I was
amazed at how quiet, smooth and responsive the engine was as long as you
stay ahead of the power curve, get behind it and watch out! Perhaps I’ll
tell that story another
time
velop the required power for take off.
After take off, power is reduced to Maximum Except Take Off, (METO) and then
set to climb power as required after the airplane’s cleaned up.
During
cruise, the blades have more pitch that allows less MAP at lower prop rpm
and less strain on the engine. As you climb, MAP drops off requiring more
throttle to maintain MAP and rate of climb, (ROC).
In a
normally aspirated engine, (non turbo/super charged) you must make sure to
always set your prop control first and MAP second to avoid blowing a jug
and/ or destroying the engine. Either one is considered bad form. So, if
you’re depicting an aircraft on take-off, landing or going into a fight, the
pitch should be flatter, in cruise, it should show more bite. Turbo-props
operate in much the same way and develop power and thrust over a wide rpm
range.
Turbojets are a different story; they develop 90% of their power in
about the last 10% of their rpm. The first time I flew a pure jet, I was
amazed at how quiet, smooth and responsive the engine was as long as you
stay ahead of the power curve, get behind it and watch out! Perhaps I’ll
tell that story another
time
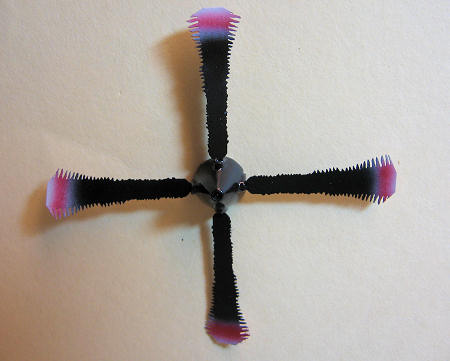
Painting:
1.
The best finish to use is semi-gloss. If you look at pictures of a spinning
prop, the blade doesn’t seem to be flat in color but tends towards the gloss or
semi-gloss due to reflection and maintenance.
Constant speed prop blades usually have a bit of sheen
to them because of the oil in the hub; this can be heightened when glycol
de-icing fluid is used.
Fixed pitch props usually have no oil in the hub but
still show reflection.
 2.
When painting the tip, give it a feathered edge to
enhance the
blurring. Use the same technique when painting a multi-colored tip. Here’s a
tip: Multi engine aircraft usually have the multi colored tips painted on the
blade front and back. Single engine airplanes usually have only the front of the
blades painted in multi colors. The rear of the blade usually has a small
portion of the blade tip painted yellow. This helps reduce the chance of the
pilot getting flicker vertigo by having his brain sense the multi colors
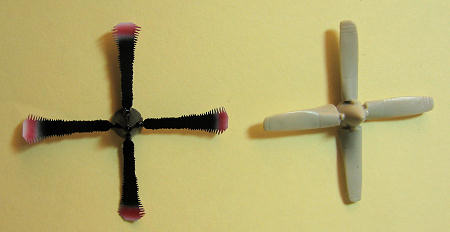
whirling around in front of him in IFR conditions or at night. Photo # 3 shows
the blade in its final configuration compared to the original Fujimi E-2 prop.
Photo #4 shows the blade installed. Gee, I only have 11
more of these fun little gems to make! I did show the prop to my wife and she
thought it was “cute”.
2.
When painting the tip, give it a feathered edge to
enhance the
blurring. Use the same technique when painting a multi-colored tip. Here’s a
tip: Multi engine aircraft usually have the multi colored tips painted on the
blade front and back. Single engine airplanes usually have only the front of the
blades painted in multi colors. The rear of the blade usually has a small
portion of the blade tip painted yellow. This helps reduce the chance of the
pilot getting flicker vertigo by having his brain sense the multi colors
whirling around in front of him in IFR conditions or at night. Photo # 3 shows
the blade in its final configuration compared to the original Fujimi E-2 prop.
Photo #4 shows the blade installed. Gee, I only have 11
more of these fun little gems to make! I did show the prop to my wife and she
thought it was “cute”.
 Conclusions: Propblurs
are a unique, well thought out product, (thank you Bill Faulkner, who was the
original designer along with the Propblur Team at Insight Designs for keeping a
great product alive and well) they’ve opened many avenues for those of us that
like to build our models doing what the real ones were designed to do, FLY! I’m
using them for my 6 aircraft VRC-30 C-2A COD collection, (thank you Fotios Rouch)
and my 1/72nd
42 model
“History of US Navy and Marine Corps fighters
1919 to Present”, ( the Sopwith Camel through the FA/18E) project that will
require
simulating many spinning props. I really enjoy using this product and if you’ve
ever wondered how to recreate that snapshot of a moment in time in the history
of flight, wonder no more, Prop blurs will allow you to do just that. Please
give them a try; I think you’ll like them.
Conclusions: Propblurs
are a unique, well thought out product, (thank you Bill Faulkner, who was the
original designer along with the Propblur Team at Insight Designs for keeping a
great product alive and well) they’ve opened many avenues for those of us that
like to build our models doing what the real ones were designed to do, FLY! I’m
using them for my 6 aircraft VRC-30 C-2A COD collection, (thank you Fotios Rouch)
and my 1/72nd
42 model
“History of US Navy and Marine Corps fighters
1919 to Present”, ( the Sopwith Camel through the FA/18E) project that will
require
simulating many spinning props. I really enjoy using this product and if you’ve
ever wondered how to recreate that snapshot of a moment in time in the history
of flight, wonder no more, Prop blurs will allow you to do just that. Please
give them a try; I think you’ll like them.
I wonder if we could get
Insight Designs to produce the 8 bladed scimitar shaped blades for the E-2C
2000?, hey, that gives me an idea!!!!!!!!??????????????
If you have any
constructive comments or questions, please contact me at the above email
address, and Scott, quit trying to call me collect by telling the operator
you’re Publishers Clearing House and that I’ve won the big jackpot…….. Please,
I’m starting to get embarrassed, Kaua’i is a small island.
Mike Wilson